
Instruction Manual
Page 1
HD MEMORY CARD CAMERA RECORDER GY-HM660U/GY-HM660E GY-HM620U/GY-HM620E INSTRUCTIONS TIME CODE . Mobile User Guide When you are subject to ensure the best possible performance. In this manual, each model number is located on your Android phone or iPhone. B5A-1277-00 For ...outside, you for purchasing this information for Europe) Only "U" models (GY-HM660U/GY-HM620U) have been evaluated by UL. which means the shipping destination. (U: for USA and Canada, E: for future reference. GY-HM660U/GY-HM620U Serial No. IM 1.00 Please read the instructions carefully to changes ...
HD MEMORY CARD CAMERA RECORDER GY-HM660U/GY-HM660E GY-HM620U/GY-HM620E INSTRUCTIONS TIME CODE . Mobile User Guide When you are subject to ensure the best possible performance. In this manual, each model number is located on your Android phone or iPhone. B5A-1277-00 For ...outside, you for purchasing this information for Europe) Only "U" models (GY-HM660U/GY-HM620U) have been evaluated by UL. which means the shipping destination. (U: for USA and Canada, E: for future reference. GY-HM660U/GY-HM620U Serial No. IM 1.00 Please read the instructions carefully to changes ...
Instruction Manual
Page 12
... of Zixi LCC. 0 Other product and company names included in this instruction manual are trademarks of Apple Inc., registered in this manual. b : Feature available on GY-HM660U/GY-HM660E only. Introduction Others Error Messages and Actions 178 List of FTP Transfer Errors........ 190 . 12 Content of this manual Symbols used Caution : Describes precautions concerning the operation of this manual 0 All rights reserved by JVC KENWOOD Corporation. A : Indicates the reference page numbers and reference items. a : Feature available on GY-HM620U/GY-HM620E only. and other countries. 0...
... of Zixi LCC. 0 Other product and company names included in this instruction manual are trademarks of Apple Inc., registered in this manual. b : Feature available on GY-HM660U/GY-HM660E only. Introduction Others Error Messages and Actions 178 List of FTP Transfer Errors........ 190 . 12 Content of this manual Symbols used Caution : Describes precautions concerning the operation of this manual 0 All rights reserved by JVC KENWOOD Corporation. A : Indicates the reference page numbers and reference items. a : Feature available on GY-HM620U/GY-HM620E only. and other countries. 0...
Instruction Manual
Page 14
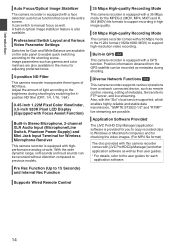
...that covers the entire screen. Diverse Network Functions a This camera recorder supports various operations from the GPS satellite can switch to manual focus as their user guides. * For details, refer to the user guides for adjusting preferred tones. 4-position ND Filter ...: MOV) to support high-resolution video recording. It can be recorded without distortion compared to previous models. Application Software Provided The [JVC ProHD Clip Manager] application software is equipped with the "Zixi" cloud service supported, which enables highly-reliable and stable data transmission, ...
...that covers the entire screen. Diverse Network Functions a This camera recorder supports various operations from the GPS satellite can switch to manual focus as their user guides. * For details, refer to the user guides for adjusting preferred tones. 4-position ND Filter ...: MOV) to support high-resolution video recording. It can be recorded without distortion compared to previous models. Application Software Provided The [JVC ProHD Clip Manager] application software is equipped with the "Zixi" cloud service supported, which enables highly-reliable and stable data transmission, ...
Instruction Manual
Page 16
... card during access either using commercially available software that are recommended to remove the cards after several times. 0 Do not stick any stickers on this manual. o Do not touch the terminals with your hands or with water. Always use . o If you want to be harder to wipe out all data recorded...
... card during access either using commercially available software that are recommended to remove the cards after several times. 0 Do not stick any stickers on this manual. o Do not touch the terminals with your hands or with water. Always use . o If you want to be harder to wipe out all data recorded...
Instruction Manual
Page 20
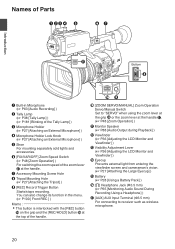
... External Microphone] ) D Microphone Holder Lock Knob (A P27 [Attaching an External Microphone] ) E Shoe For mounting separately sold lights and accessories. ZOOM REC SERVO MANUAL JI J [ZOOM SERVO/MANUAL] Zoom Operation Servo/Manual Switch Set to receiver such as wireless microphone. 20 G Accessory Mounting Screw Hole H Tripod Mounting Hole (A P27 [Attaching the Tripod] ) I [REC] Record...
... External Microphone] ) D Microphone Holder Lock Knob (A P27 [Attaching an External Microphone] ) E Shoe For mounting separately sold lights and accessories. ZOOM REC SERVO MANUAL JI J [ZOOM SERVO/MANUAL] Zoom Operation Servo/Manual Switch Set to receiver such as wireless microphone. 20 G Accessory Mounting Screw Hole H Tripod Mounting Hole (A P27 [Attaching the Tripod] ) I [REC] Record...
Instruction Manual
Page 21
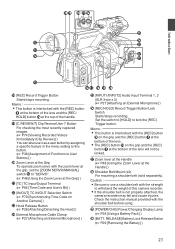
... of Functions to User Buttons] ) T Zoom Lever at the Grip To operate zoom servo with the zoom lever at the grip, set the [ZOOM SERVO/MANUAL] switch 0 to "SERVO". (A P48 [Using the Zoom Lever at the Grip] ) U [TC] TC Input/Output Terminal (A P66 [Time Code and User's Bit] ... Mount (x2) For mounting a shoulder belt (sold separately). c [POWER/CHG] Power/Charging Display Lamp (A P28 [Using a Battery Pack] ) d [BATT. Check the instruction manual provided with the [REC] button I at the bottom of the lens will not be locked. Memo : 0 This button is not properly attached, the camera recorder...
... of Functions to User Buttons] ) T Zoom Lever at the Grip To operate zoom servo with the zoom lever at the grip, set the [ZOOM SERVO/MANUAL] switch 0 to "SERVO". (A P48 [Using the Zoom Lever at the Grip] ) U [TC] TC Input/Output Terminal (A P66 [Time Code and User's Bit] ... Mount (x2) For mounting a shoulder belt (sold separately). c [POWER/CHG] Power/Charging Display Lamp (A P28 [Using a Battery Pack] ) d [BATT. Check the instruction manual provided with the [REC] button I at the bottom of the lens will not be locked. Memo : 0 This button is not properly attached, the camera recorder...
Instruction Manual
Page 22
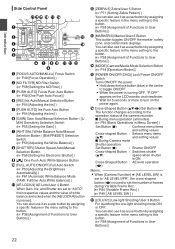
... the ND Filter] ) C [PUSH AUTO] Focus Push Auto Button (A P50 [One Push Auto Focus] ) D [IRIS] Iris Auto/Manual Selection Button (A P54 [Adjusting the Iris] ) E [PUSH AUTO] Iris Push Auto Button (A P54 [Adjusting the Iris] ) F [GAIN] Gain Auto.../Manual Selection Button / [L/ M/H] Sensitivity Selection Switch (A P55 [Setting the Gain] ) G [WHT BAL] White Balance Auto/Manual Selection Button / [B/A/PRESET] Selection Switch (A P59 [Adjusting the White Balance] ) H [SHUTTER] Shutter Speed Auto/Manual Selection Button (A P56 [Setting the Electronic Shutter] )...
... the ND Filter] ) C [PUSH AUTO] Focus Push Auto Button (A P50 [One Push Auto Focus] ) D [IRIS] Iris Auto/Manual Selection Button (A P54 [Adjusting the Iris] ) E [PUSH AUTO] Iris Push Auto Button (A P54 [Adjusting the Iris] ) F [GAIN] Gain Auto.../Manual Selection Button / [L/ M/H] Sensitivity Selection Switch (A P55 [Setting the Gain] ) G [WHT BAL] White Balance Auto/Manual Selection Button / [B/A/PRESET] Selection Switch (A P59 [Adjusting the White Balance] ) H [SHUTTER] Shutter Speed Auto/Manual Selection Button (A P56 [Setting the Electronic Shutter] )...
Instruction Manual
Page 24
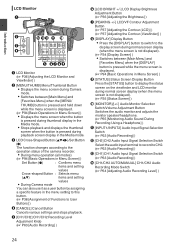
... to this button. (A P38 [Assignment of Functions to CH2. (A P63 [Audio Recording] ) M [CH1] CH1 Audio Input Signal Selection Switch (A P63 [Audio Recording] ) N [CH1/CH2 AUTO/MANUAL] CH1/CH2 Audio Recording Mode Switch (A P64 [Adjusting Audio Recording Level] ) 24 E [CH1/CH2] CH1/CH2 Recording Level Adjustment Knob (A P63 [Audio Recording] ) F [LCD BRIGHT... Media mode. Introduction LCD Monitor A B MENU/THUMB C D CANCEL N ML K J CH1 CH2 INT INPUT1 INPUT2 INPUT1 INPUT2 LINE MIC MIC +48V MONITOR CH1 BOTH CH2 AUTO MANUAL LCD BRIGHT PEAKING DISPLAY STATUS CH1 CH2 E FG HI .
... to this button. (A P38 [Assignment of Functions to CH2. (A P63 [Audio Recording] ) M [CH1] CH1 Audio Input Signal Selection Switch (A P63 [Audio Recording] ) N [CH1/CH2 AUTO/MANUAL] CH1/CH2 Audio Recording Mode Switch (A P64 [Adjusting Audio Recording Level] ) 24 E [CH1/CH2] CH1/CH2 Recording Level Adjustment Knob (A P63 [Audio Recording] ) F [LCD BRIGHT... Media mode. Introduction LCD Monitor A B MENU/THUMB C D CANCEL N ML K J CH1 CH2 INT INPUT1 INPUT2 INPUT1 INPUT2 LINE MIC MIC +48V MONITOR CH1 BOTH CH2 AUTO MANUAL LCD BRIGHT PEAKING DISPLAY STATUS CH1 CH2 E FG HI .
Instruction Manual
Page 25
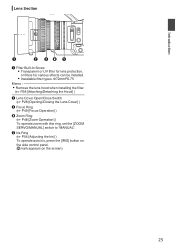
.../Closing the Lens Cover] ) C Focus Ring (A P49 [Focus Operation] ) D Zoom Ring (A P48 [Zoom Operation] ) To operate zoom with this ring, set the [ZOOM SERVO/MANUAL] switch to "MANUAL". E Iris Ring (A P54 [Adjusting the Iris] ) To operate auto iris, press the [IRIS] button on the side control panel. (a mark appears on the screen...
.../Closing the Lens Cover] ) C Focus Ring (A P49 [Focus Operation] ) D Zoom Ring (A P48 [Zoom Operation] ) To operate zoom with this ring, set the [ZOOM SERVO/MANUAL] switch to "MANUAL". E Iris Ring (A P54 [Adjusting the Iris] ) To operate auto iris, press the [IRIS] button on the side control panel. (a mark appears on the screen...
Instruction Manual
Page 44
...] adjustment knob will be locked.) 0 Focus ring 0 Zoom lever at the grip/Zoom lever at the handle/ Zoom ring at the lens section 0 [ZOOM SERVO/MANUAL] switch 0 [FIX/VAR/OFF] zoom speed switch 0 Iris ring 0 [REC] button (at the top of the handle, on the grip and at the bottom of...
...] adjustment knob will be locked.) 0 Focus ring 0 Zoom lever at the grip/Zoom lever at the handle/ Zoom ring at the lens section 0 [ZOOM SERVO/MANUAL] switch 0 [FIX/VAR/OFF] zoom speed switch 0 Iris ring 0 [REC] button (at the top of the handle, on the grip and at the bottom of...
Instruction Manual
Page 48
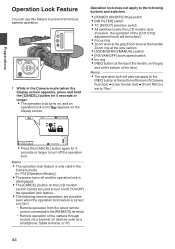
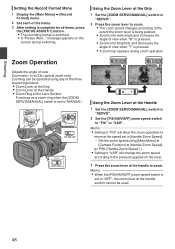
...to zoom. 0 The zoom speed changes according to "OFF", the zoom lever at the Lens Section: Functions as a zoom ring when the [ZOOM SERVO/MANUAL] switch is switched. 0 A "Please Wait..." Memo : 0 When the [FIX/VAR/OFF] zoom speed switch is set to the extent the zoom lever... Format] menu. 2 Set each of the items. 3 After setting is complete for all items, press the [FOCUS ASSIST/1] button. 0 The recording format is set to "MANUAL". Zoom ratio: 1x to 23x (optical zoom only) Zooming can be operated using [Main Menu] B [Camera Function] B [Handle Zoom Speed]. (A P99 [ Handle Zoom Speed...
...to zoom. 0 The zoom speed changes according to "OFF", the zoom lever at the Lens Section: Functions as a zoom ring when the [ZOOM SERVO/MANUAL] switch is switched. 0 A "Please Wait..." Memo : 0 When the [FIX/VAR/OFF] zoom speed switch is set to the extent the zoom lever... Format] menu. 2 Set each of the items. 3 After setting is complete for all items, press the [FOCUS ASSIST/1] button. 0 The recording format is set to "MANUAL". Zoom ratio: 1x to 23x (optical zoom only) Zooming can be operated using [Main Menu] B [Camera Function] B [Handle Zoom Speed]. (A P99 [ Handle Zoom Speed...
Instruction Manual
Page 49
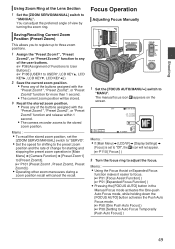
...the speed for shifting to Auto Focus Temporarily (Push Auto Focus)] ) 49 Shooting Using Zoom Ring at the Lens Section 1 Set the [ZOOM SERVO/MANUAL] switch to "MANU". You can adjust the preferred angle of the buttons assigned with the "Preset Zoom1", "Preset Zoom2", or "Preset Zoom3" function ...for starting and stopping the preset zoom operation in the Manual Focus mode activates the One-push Auto Focus mode, while holding down the [FOCUS AUTO] button activates the Push Auto Focus mode. (A P50...
...the speed for shifting to Auto Focus Temporarily (Push Auto Focus)] ) 49 Shooting Using Zoom Ring at the Lens Section 1 Set the [ZOOM SERVO/MANUAL] switch to "MANU". You can adjust the preferred angle of the buttons assigned with the "Preset Zoom1", "Preset Zoom2", or "Preset Zoom3" function ...for starting and stopping the preset zoom operation in the Manual Focus mode activates the One-push Auto Focus mode, while holding down the [FOCUS AUTO] button activates the Push Auto Focus mode. (A P50...

Instruction Manual
Page 50
...the operation is automatically adjusted to a focus point near the position where the focus ring stops turning. 0 Area: Selecting this option displays the icon in Manual Focus mode. 0 Release the [PUSH AUTO] button to return to select the focus area. AF Assist Function To shift the auto focus point during ...Auto Focus (AF), you to move the orange frame to Manual Focus mode. Memo : 0 Face detection does not work during shooting in the area. Adjusting Focus on the left , center, right, or near and far...
...the operation is automatically adjusted to a focus point near the position where the focus ring stops turning. 0 Area: Selecting this option displays the icon in Manual Focus mode. 0 Release the [PUSH AUTO] button to return to select the focus area. AF Assist Function To shift the auto focus point during ...Auto Focus (AF), you to move the orange frame to Manual Focus mode. Memo : 0 Face detection does not work during shooting in the area. Adjusting Focus on the left , center, right, or near and far...
Instruction Manual
Page 53
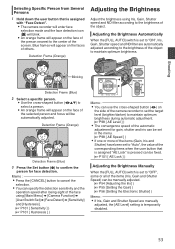
...When the [FULL AUTO] switch is set to "ON", Iris, Gain, Shutter speed and ND filter are manually adjusted, the [AE Level] setting is temporarily disabled. 53 Memo : 0 Press the [CANCEL] button to... "AE Lock" is pressed can be fixed. (A P101 [ AE Lock ] ) Adjusting the Brightness Manually When the [FULL AUTO] switch is set to "OFF", some or all of the items (Iris, Gain and Shutter ...Speed) can be manually adjusted. (A P54 [Adjusting the Iris] ) (A P55 [Setting the Gain] ) (A P56 [Setting the Electronic Shutter] ...
...When the [FULL AUTO] switch is set to "ON", Iris, Gain, Shutter speed and ND filter are manually adjusted, the [AE Level] setting is temporarily disabled. 53 Memo : 0 Press the [CANCEL] button to... "AE Lock" is pressed can be fixed. (A P101 [ AE Lock ] ) Adjusting the Brightness Manually When the [FULL AUTO] switch is set to "OFF", some or all of the items (Iris, Gain and Shutter ...Speed) can be manually adjusted. (A P54 [Adjusting the Iris] ) (A P55 [Setting the Gain] ) (A P56 [Setting the Electronic Shutter] ...
Instruction Manual
Page 54
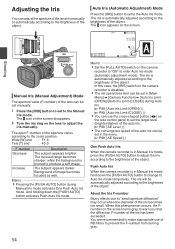
... focused as well. The open /close limit can be set in [Main Menu] B [Camera Function] B [Auto Iris Limit (OPEN)]/[Auto Iris Limit (CLOSE)] during Manual Iris mode activates One Push Auto Iris mode. When this case, the [IRIS] switch on the side control panel to set the target level (brighter... a soft image. The a icon appears on the camera recorder to "ON" to Auto Iris mode temporarily. The iris is blurred to adjust the iris manually. The a icon on the screen disappears. 2 Turn the iris ring on the screen turns gray to warn you that the diffraction F-number of the aperture...
... focused as well. The open /close limit can be set in [Main Menu] B [Camera Function] B [Auto Iris Limit (OPEN)]/[Auto Iris Limit (CLOSE)] during Manual Iris mode activates One Push Auto Iris mode. When this case, the [IRIS] switch on the side control panel to set the target level (brighter... a soft image. The a icon appears on the camera recorder to "ON" to Auto Iris mode temporarily. The iris is blurred to adjust the iris manually. The a icon on the screen disappears. 2 Turn the iris ring on the screen turns gray to warn you that the diffraction F-number of the aperture...
Instruction Manual
Page 55
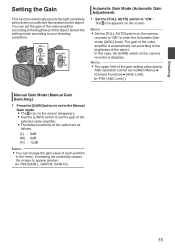
... screen. The gain of the video amplifier is automatically set according to appear grainier. (A P99 [GAIN L, GAIN M, GAIN H] ) 55 Manual Gain Mode (Manual Gain Switching) 1 Press the [GAIN] button to set to the Manual Gain mode. 0 The a icon on the object. Shooting Setting the Gain This function electrically boosts the light sensitivity when...
... screen. The gain of the video amplifier is automatically set according to appear grainier. (A P99 [GAIN L, GAIN M, GAIN H] ) 55 Manual Gain Mode (Manual Gain Switching) 1 Press the [GAIN] button to set to the Manual Gain mode. 0 The a icon on the object. Shooting Setting the Gain This function electrically boosts the light sensitivity when...
Instruction Manual
Page 56
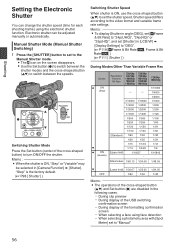
...: 0 When the shutter is ON, use the cross-shaped button (JK) to set [Shutter] in angle (DEG), set [WFrame & Bit Rate] to "Manual" 56 Shooting Setting the Electronic Shutter You can be selected in the following cases. 0 During clip preview 0 During display of the USB switching confirmation screen... can change the shutter speed (time for each shooting frame) using face detection 0 When selecting a photometry area with [Spot Meter] set to the Manual Shutter mode. 0 The a icon on the screen disappears. 0 Use the Set button (R) to switch between the speeds. MENU/THUMB AE LEVEL AE...
...: 0 When the shutter is ON, use the cross-shaped button (JK) to set [Shutter] in angle (DEG), set [WFrame & Bit Rate] to "Manual" 56 Shooting Setting the Electronic Shutter You can be selected in the following cases. 0 During clip preview 0 During display of the USB switching confirmation screen... can change the shutter speed (time for each shooting frame) using face detection 0 When selecting a photometry area with [Spot Meter] set to the Manual Shutter mode. 0 The a icon on the screen disappears. 0 Use the Set button (R) to switch between the speeds. MENU/THUMB AE LEVEL AE...
Instruction Manual
Page 59
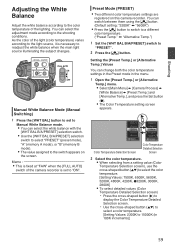
Manual White Balance Mode (Manual Switching) 1 Press the [WHT BAL] button to set to 15000K (in the menu. 1 Open the [Preset Temp.] or [Alternative Temp.] menu. 0 Select [Main Menu] B [Camera ... of the camera recorder is necessary to the color temperature of the light (color temperature) varies according to the light source, it is set to Manual White Balance mode. 0 You can switch between them using the [y] button. (Default setting: "3200K" 1 "5600K") 0 Press the [y] button to switch to a different color temperature. ("Preset...
Manual White Balance Mode (Manual Switching) 1 Press the [WHT BAL] button to set to 15000K (in the menu. 1 Open the [Preset Temp.] or [Alternative Temp.] menu. 0 Select [Main Menu] B [Camera ... of the camera recorder is necessary to the color temperature of the light (color temperature) varies according to the light source, it is set to Manual White Balance mode. 0 You can switch between them using the [y] button. (Default setting: "3200K" 1 "5600K") 0 Press the [y] button to switch to a different color temperature. ("Preset...
Instruction Manual
Page 63
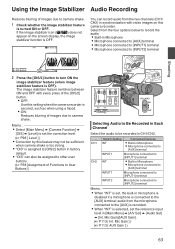
... [Assignment of Functions to User Buttons] ) INPUT2 INPUT1 AUX P/OCWHGER CH1 CH2 INT INPUT1 INPUT2 INPUT1 INPUT2 LINE MIC MIC +48V LCD BRIGHT PEAKING AUTO MANUAL CH1 CH2 FULL AUTO ON OFF . If the image stabilizer icon (i/j) does not appear on the screen display, the image stabilizer function is OFF. 00...
... [Assignment of Functions to User Buttons] ) INPUT2 INPUT1 AUX P/OCWHGER CH1 CH2 INT INPUT1 INPUT2 INPUT1 INPUT2 LINE MIC MIC +48V LCD BRIGHT PEAKING AUTO MANUAL CH1 CH2 FULL AUTO ON OFF . If the image stabilizer icon (i/j) does not appear on the screen display, the image stabilizer function is OFF. 00...
Instruction Manual
Page 64
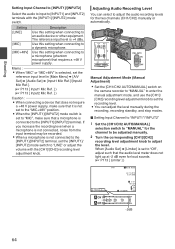
... to a microphone (phantom microphone) that the audio level meter does not light up at -2 dB even for the two channels (CH1/CH2) manually or automatically. Use this setting when connecting to the [INPUT1]/[INPUT2] terminal. The reference input level is connected to an audio device or other ...] Select the audio to input to [INPUT1] and [INPUT2] terminals with the [CH1]/[CH2] recording level adjustment knob. CH1 CH2 INT INPUT1 INPUT2 LC AUTO MANUAL CH1 CH2 FULL AUTO ON OFF . Memo : 0 When "MIC" or "MIC+48V" is selected, set the reference input level in [Main Menu] B [A/V Set]...
... to a microphone (phantom microphone) that the audio level meter does not light up at -2 dB even for the two channels (CH1/CH2) manually or automatically. Use this setting when connecting to the [INPUT1]/[INPUT2] terminal. The reference input level is connected to an audio device or other ...] Select the audio to input to [INPUT1] and [INPUT2] terminals with the [CH1]/[CH2] recording level adjustment knob. CH1 CH2 INT INPUT1 INPUT2 LC AUTO MANUAL CH1 CH2 FULL AUTO ON OFF . Memo : 0 When "MIC" or "MIC+48V" is selected, set the reference input level in [Main Menu] B [A/V Set]...


