

Instruction Manual
Page 10
..., File Format and Video Format 47 Zoom Operation 49 Focus Operation 50 Adjusting the Focusing by Face Detection ...... 53 Adjusting the Brightness 54 Adjusting the Iris 55 Setting the Gain 57 Setting the Electronic Shutter 58 Setting the ND Filter 59 Adjusting the White Balance 60 Adjusting the Camera Image 64 Using the Image Stabilizer 64 Audio Recording 65 Monitoring Audio Sound During Recording Using a Headphone 67 Time Code and User's Bit 68 Setting Time Code Generator 69 Setting the User's Bit 71 Setting Zebra Pattern 72 Viewing Recorded Videos Immediately (Clip Review...
..., File Format and Video Format 47 Zoom Operation 49 Focus Operation 50 Adjusting the Focusing by Face Detection ...... 53 Adjusting the Brightness 54 Adjusting the Iris 55 Setting the Gain 57 Setting the Electronic Shutter 58 Setting the ND Filter 59 Adjusting the White Balance 60 Adjusting the Camera Image 64 Using the Image Stabilizer 64 Audio Recording 65 Monitoring Audio Sound During Recording Using a Headphone 67 Time Code and User's Bit 68 Setting Time Code Generator 69 Setting the User's Bit 71 Setting Zebra Pattern 72 Viewing Recorded Videos Immediately (Clip Review...

Instruction Manual
Page 11
... Text Input with Software Keyboard 94 Menu Screen Hierarchical Chart 95 Camera Function Menu 96 User Switch Set Item 98 Camera Process Menu 100 Detail/Adjust Item 102 White Balance Item 102 TC/UB Menu 103 LCD/VF Menu 104 Shooting Assist Item 105 Marker Settings Item 106 Display Settings Item 107 A/V Set Menu 109 Video Set Item 109 Audio Set Item 110 System Menu 113 Record Set Item 114 Network/Settings Item K 118 Adding/Editing Frequently Used Menu Items (Favorites Menu 123 Adding Menu Items...
... Text Input with Software Keyboard 94 Menu Screen Hierarchical Chart 95 Camera Function Menu 96 User Switch Set Item 98 Camera Process Menu 100 Detail/Adjust Item 102 White Balance Item 102 TC/UB Menu 103 LCD/VF Menu 104 Shooting Assist Item 105 Marker Settings Item 106 Display Settings Item 107 A/V Set Menu 109 Video Set Item 109 Audio Set Item 110 System Menu 113 Record Set Item 114 Network/Settings Item K 118 Adding/Editing Frequently Used Menu Items (Favorites Menu 123 Adding Menu Items...

Instruction Manual
Page 13
... 16:9 LCD display and 0.24-inch 16:9 LCOS color viewfinder provides support for critical focusing during shooting by JVC KENWOOD Corporation. The recording level can adjust the amount of light according to the brightness during 4K shooting. Unauthorized duplication or reprinting of a phantom microphone is equipped with recording and zoom switches, and supports microphones for business use Menu items corresponding to assign the buttons and rings with 2-channel XLR audio input terminal K The...
... 16:9 LCD display and 0.24-inch 16:9 LCOS color viewfinder provides support for critical focusing during shooting by JVC KENWOOD Corporation. The recording level can adjust the amount of light according to the brightness during 4K shooting. Unauthorized duplication or reprinting of a phantom microphone is equipped with recording and zoom switches, and supports microphones for business use Menu items corresponding to assign the buttons and rings with 2-channel XLR audio input terminal K The...

Instruction Manual
Page 15
... use it at the following . (A P40 [Format Setting and Usable SD Card Combinations] ) * Using cards other than those from this camera recorder. 0 The SD card may result in a place that is not operated correctly. The data is subject to write on the SD cards. Do not turn on the power. o This camera recorder saves the recorded images and audio sound on the SD card (sold separately) in this camera recorder or files that have been formatted...
... use it at the following . (A P40 [Format Setting and Usable SD Card Combinations] ) * Using cards other than those from this camera recorder. 0 The SD card may result in a place that is not operated correctly. The data is subject to write on the SD cards. Do not turn on the power. o This camera recorder saves the recorded images and audio sound on the SD card (sold separately) in this camera recorder or files that have been formatted...

Instruction Manual
Page 16
... vibration as the power supply. o This camera recorder makes use of the vent causes internal heating and may lead to burns and fires. 0 Do not turn the power off the [POWER ON/OFF] switch or remove the power cable during recording or playback. 0 The camera recorder may damage or break the screens. However, this is not a camera malfunction. Doing so may not show stable pictures for Proper Use o Due to...
... vibration as the power supply. o This camera recorder makes use of the vent causes internal heating and may lead to burns and fires. 0 Do not turn the power off the [POWER ON/OFF] switch or remove the power cable during recording or playback. 0 The camera recorder may damage or break the screens. However, this is not a camera malfunction. Doing so may not show stable pictures for Proper Use o Due to...

Instruction Manual
Page 19
... most recently recorded video clip. (A P73 [Viewing Recorded Videos Immediately (Clip Review)] ) Media Mode USB Mode 0 This mode allows you to play back or delete clips recorded on the SD card. 0 When a playable SD card is inserted, the thumbnail or playback screen is the camera shooting mode. Also, "Change to Remote Edit Mode?" Introduction Operation Mode Camera Mode Description 0 This is displayed on the viewfinder and LCD monitor. 0 Press and hold the [MODE] selection button to enter the Media mode when you access via a web...
... most recently recorded video clip. (A P73 [Viewing Recorded Videos Immediately (Clip Review)] ) Media Mode USB Mode 0 This mode allows you to play back or delete clips recorded on the SD card. 0 When a playable SD card is inserted, the thumbnail or playback screen is the camera shooting mode. Also, "Change to Remote Edit Mode?" Introduction Operation Mode Camera Mode Description 0 This is displayed on the viewfinder and LCD monitor. 0 Press and hold the [MODE] selection button to enter the Media mode when you access via a web...

Instruction Manual
Page 30
...;F). Preparations Removing the Battery GY-HM200U/GY-HM200E 2 GY-HM170U/GY-HM170E 2 1 . 1 Hold down the lock button (blue) at the center of the [POWER ON/OFF] switch to set the [POWER ON/OFF] switch to "OFF". Replace the battery with the battery inside will deplete the battery power even if you charge the battery in cold environment. 0 The operating time may shorten when power zoom is used, accessories are in factory default Memo : 0 Actual operating times may not...
...;F). Preparations Removing the Battery GY-HM200U/GY-HM200E 2 GY-HM170U/GY-HM170E 2 1 . 1 Hold down the lock button (blue) at the center of the [POWER ON/OFF] switch to set the [POWER ON/OFF] switch to "OFF". Replace the battery with the battery inside will deplete the battery power even if you charge the battery in cold environment. 0 The operating time may shorten when power zoom is used, accessories are in factory default Memo : 0 Actual operating times may not...

Instruction Manual
Page 31
... the date/time and time code data will be reset. When this happens, set the [POWER ON/OFF] switch to "ON" to display the [Initial Setting] screen, then set the display using the built-in rechargeable battery. 0 When power is connected to the camera recorder, the built-in progress. (A P108 [Details on the display and menu screens. Currently powered by a battery. Preparations Using AC Power (DC IN Power) Use the supplied AC adapter to operate the camera recorder with AC power. 1 2 . 1 Connect the DC cable of...
... the date/time and time code data will be reset. When this happens, set the [POWER ON/OFF] switch to "ON" to display the [Initial Setting] screen, then set the display using the built-in rechargeable battery. 0 When power is connected to the camera recorder, the built-in progress. (A P108 [Details on the display and menu screens. Currently powered by a battery. Preparations Using AC Power (DC IN Power) Use the supplied AC adapter to operate the camera recorder with AC power. 1 2 . 1 Connect the DC cable of...

Instruction Manual
Page 36
... Off Format Format Network Type SSID Security Type P2P WPA2 Passphrase IP Address MAC Address USB Mode Screen This screen displays the USB mode. The contents displayed are screen examples of GY-HM200U/GYHM200E. Warning Display Warning display is recorded in the normal screen. 0 The status display differs according to the operation mode (two types). (A P18 [Operation Modes] ) 0 Press the [STATUS] button to switch to the display screen. 0 Press the [MENU] button at each status screen (other than the [Camera 1] screen) to enter the setting screen. 0 Use...
... Off Format Format Network Type SSID Security Type P2P WPA2 Passphrase IP Address MAC Address USB Mode Screen This screen displays the USB mode. The contents displayed are screen examples of GY-HM200U/GYHM200E. Warning Display Warning display is recorded in the normal screen. 0 The status display differs according to the operation mode (two types). (A P18 [Operation Modes] ) 0 Press the [STATUS] button to switch to the display screen. 0 Press the [MENU] button at each status screen (other than the [Camera 1] screen) to enter the setting screen. 0 Use...

Instruction Manual
Page 66
...Mic Stereo Enhancer] in microphone and the [AUX] input terminal are used, the recording levels of the [CH2] recording level adjustment knob and [CH2 AUTO/MANUAL] selection switch are disabled. 0 When [Main Menu] B [A/V Set] B [Audio Set] B [CH1 INT] and [CH2 INT] are set to "Auto", the [CH1 AUTO/MANUAL]/[CH2 AUTO/MANUAL] selection switch is disabled. (The above setting is set to adjust the level. Automatic Adjustment Mode 0 Set the [CH1/CH2 AUTO/MANUAL] selection switch to "AUX L" and "Int. Manual Adjustment Mode (Manual Adjustment) 0 Set the [CH1/CH2 AUTO/MANUAL] switch on the camera...
...Mic Stereo Enhancer] in microphone and the [AUX] input terminal are used, the recording levels of the [CH2] recording level adjustment knob and [CH2 AUTO/MANUAL] selection switch are disabled. 0 When [Main Menu] B [A/V Set] B [Audio Set] B [CH1 INT] and [CH2 INT] are set to "Auto", the [CH1 AUTO/MANUAL]/[CH2 AUTO/MANUAL] selection switch is disabled. (The above setting is set to adjust the level. Automatic Adjustment Mode 0 Set the [CH1/CH2 AUTO/MANUAL] selection switch to "AUX L" and "Int. Manual Adjustment Mode (Manual Adjustment) 0 Set the [CH1/CH2 AUTO/MANUAL] switch on the camera...

Instruction Manual
Page 68
... mode at all times regardless of the camera recorder is turned off in this camera recorder. The time code operates in the run even when the power of the recording status. Shooting Time Code and User's Bit Time code and user's bit data are displayed on the viewfinder and LCD monitor during playback or recording. It continues to "Pre Rec", Free Run is not replaced. The time code and user's bit are displayed on the viewfinder and LCD monitor during playback or recording. (Display screen) Displaying Time Code and User...
... mode at all times regardless of the camera recorder is turned off in this camera recorder. The time code operates in the run even when the power of the recording status. Shooting Time Code and User's Bit Time code and user's bit data are displayed on the viewfinder and LCD monitor during playback or recording. It continues to "Pre Rec", Free Run is not replaced. The time code and user's bit are displayed on the viewfinder and LCD monitor during playback or recording. (Display screen) Displaying Time Code and User...

Instruction Manual
Page 69
Set using [Main Menu] B [TC/UB] B [Drop Frame]. (A P104 [ Drop Frame ] ) 0 [Drop]: Sets the run mode of the time code generator to "Rec Run" or "Free Run". (A P103 [ TC Generator ] ) 0 [Rec Run]: Preset data in the time code generator operates in run mode from the internal time code generator are recorded. Setting Time Code Generator 69 This section describes how to set [TC/UB] B [TC Preset]. (A P103 [ TC Preset ] ) Memo : 0 When [Main Menu] B [System] B [Record Set] B [Record Format] B [WFrame...
Set using [Main Menu] B [TC/UB] B [Drop Frame]. (A P104 [ Drop Frame ] ) 0 [Drop]: Sets the run mode of the time code generator to "Rec Run" or "Free Run". (A P103 [ TC Generator ] ) 0 [Rec Run]: Preset data in the time code generator operates in run mode from the internal time code generator are recorded. Setting Time Code Generator 69 This section describes how to set [TC/UB] B [TC Preset]. (A P103 [ TC Preset ] ) Memo : 0 When [Main Menu] B [System] B [Record Set] B [Record Format] B [WFrame...
Instruction Manual
Page 71
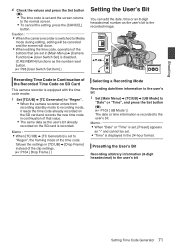
... screen will be set. 0 "Time" is displayed in [TC/UB] B [Drop Frame] instead of that are set in [Main Menu] B [Camera Function] B [User Switch Set] is disabled. [C.REVIEW/4] functions as the number reset button. (A P98 [User Switch Set Item] ) Recording Time Code in Continuation of the Recorded Time Code on SD Card This camera recorder is equipped with the time code reader. 1 Set [TC/UB] B [TC Generator] to "Regen". 0 When the camera recorder enters from recording standby mode to recording mode, it reads the time code already recorded on the SD card...
... screen will be set. 0 "Time" is displayed in [TC/UB] B [Drop Frame] instead of that are set in [Main Menu] B [Camera Function] B [User Switch Set] is disabled. [C.REVIEW/4] functions as the number reset button. (A P98 [User Switch Set Item] ) Recording Time Code in Continuation of the Recorded Time Code on SD Card This camera recorder is equipped with the time code reader. 1 Set [TC/UB] B [TC Generator] to "Regen". 0 When the camera recorder enters from recording standby mode to recording mode, it reads the time code already recorded on the SD card...

Instruction Manual
Page 103
... adjusting the R (red)/B (blue) component during recording. When "PRST" is set to "On", pressing the [AWB/9] button to readjust the white balance switches the R and B values automatically to +32 (R 0)] Memo : 0 This item is in the Media mode, or during FAW (Full Auto White Balance) mode. 0 Increase the number: Strengthens the red/blue. 0 Decrease the number: Weakens the red/blue. [Setting Values: -32 to "Time", the user's bit operates in the 24-hour format...
... adjusting the R (red)/B (blue) component during recording. When "PRST" is set to "On", pressing the [AWB/9] button to readjust the white balance switches the R and B values automatically to +32 (R 0)] Memo : 0 This item is in the Media mode, or during FAW (Full Auto White Balance) mode. 0 Increase the number: Strengthens the red/blue. 0 Decrease the number: Weakens the red/blue. [Setting Values: -32 to "Time", the user's bit operates in the 24-hour format...

Instruction Manual
Page 110
...: 7.5%, 0.0%] (Default values: 7.5% (U model), fixed at "0.0%" (E model)) Memo : 0 Depending on a 4:3 aspect ratio screen. 0 Letter: Displays as the CH1 audio input signal. Mic L: Sets the left channel (Lch) of the built-in microphone or the [AUX] terminal as a wide image with a 16:9 aspect ratio on the menu settings of the camera recorder and the condition of the cable connected to it, the setup signal setting may be fixed at "Int. Mic L] Memo : 0 If...
...: 7.5%, 0.0%] (Default values: 7.5% (U model), fixed at "0.0%" (E model)) Memo : 0 Depending on a 4:3 aspect ratio screen. 0 Letter: Displays as the CH1 audio input signal. Mic L: Sets the left channel (Lch) of the built-in microphone or the [AUX] terminal as a wide image with a 16:9 aspect ratio on the menu settings of the camera recorder and the condition of the cable connected to it, the setup signal setting may be fixed at "Int. Mic L] Memo : 0 If...

Instruction Manual
Page 130
... date/time display style can specify the display method (Number/ Bar) and whether to "On". Dynamic Zoom Off : Z00 to 99 Dynamic Zoom On : Z100 to 149 Memo : 0 You can be displayed when "Off" is selected. (A P107 [ Zoom ] ) 0 Displayed in Camera Mode When a USB adapter different from the connection settings is activated. 0 The value will be displayed. V Time Code (I)/User's Bit (J) Display 0 Displays the time code (hour: minute: second: frame) or user's bit data recorded in the Display 0 screen...
... date/time display style can specify the display method (Number/ Bar) and whether to "On". Dynamic Zoom Off : Z00 to 99 Dynamic Zoom On : Z100 to 149 Memo : 0 You can be displayed when "Off" is selected. (A P107 [ Zoom ] ) 0 Displayed in Camera Mode When a USB adapter different from the connection settings is activated. 0 The value will be displayed. V Time Code (I)/User's Bit (J) Display 0 Displays the time code (hour: minute: second: frame) or user's bit data recorded in the Display 0 screen...

Instruction Manual
Page 145
... Address Configuration %)$1 Manual Back Next . 5 Setting is recommended if you can also connect using the network function. Connecting to complete setting. Perform setting for Network Connection] ) 3 [Ethernet] appears on devices such as a smartphone, tablet terminal, or PC directly to the camera recorder using a cross cable to access the camera recorder's web functions. Follow the screen instructions to the smartphone, tablet terminal, PC, etc. Connecting via Cellular Adapter You can access the web functions via a web...
... Address Configuration %)$1 Manual Back Next . 5 Setting is recommended if you can also connect using the network function. Connecting to complete setting. Perform setting for Network Connection] ) 3 [Ethernet] appears on devices such as a smartphone, tablet terminal, or PC directly to the camera recorder using a cross cable to access the camera recorder's web functions. Follow the screen instructions to the smartphone, tablet terminal, PC, etc. Connecting via Cellular Adapter You can access the web functions via a web...

Instruction Manual
Page 169
... the decoder, port forwarding setup is displayed, you can view the details of the error on the settings, please refer to User Buttons] ) 0 You can also assign "Live Streaming" to a user button. (A P39 [Assignment of Functions to the instruction manual of the status screen. Port number: 554 Stream ID: stream 0 Use the following parameters are required when connecting to the instruction manual of Live Streaming Error Displays K] ) Caution : 0 Streaming may...
... the decoder, port forwarding setup is displayed, you can view the details of the error on the settings, please refer to User Buttons] ) 0 You can also assign "Live Streaming" to a user button. (A P39 [Assignment of Functions to the instruction manual of the status screen. Port number: 554 Stream ID: stream 0 Use the following parameters are required when connecting to the instruction manual of Live Streaming Error Displays K] ) Caution : 0 Streaming may...

Instruction Manual
Page 171
... FTP Transfer Errors K If the upload of a recorded clip or download of the file for Set [WResolution], [WFrame Rate] Clip Review is found in Media mode Insert an SD card. Adapter Was Removed. Action 0 Execute again. 0 Use a different server. Connect the USB network device. current [WResolution], (A P115 [ W Resolution ] ) [WFrame Rate], or [WBit Rate] (A P115 [ W Frame Rate ] ) setting. (A P115 [ W Bit Rate ] ) 0 [REC] button is displayed. (A P40 [SD Card] ) (A P83 [Playing Recorded Clips] ) The continuous recording time in...
... FTP Transfer Errors K If the upload of a recorded clip or download of the file for Set [WResolution], [WFrame Rate] Clip Review is found in Media mode Insert an SD card. Adapter Was Removed. Action 0 Execute again. 0 Use a different server. Connect the USB network device. current [WResolution], (A P115 [ W Resolution ] ) [WFrame Rate], or [WBit Rate] (A P115 [ W Frame Rate ] ) setting. (A P115 [ W Bit Rate ] ) 0 [REC] button is displayed. (A P40 [SD Card] ) (A P83 [Playing Recorded Clips] ) The continuous recording time in...

Instruction Manual
Page 175
... perform remote operation. K The clips cannot be displayed depending to "Auto" in "[List of the SD card turned on the type of the recorded clip is set in Camera Mode] ) 0 Is [System] B [Record Set] B [Time Stamp] set to the FTP server. adjustment knob does not 0 Is Full Auto enabled? after loading a charged battery. screens in the Camera mode (during live streaming are only displayed on the Display 1 and Display 2 displayed. Cannot connect to "AUTO"? The screen freezes. If a file size limit...
... perform remote operation. K The clips cannot be displayed depending to "Auto" in "[List of the SD card turned on the type of the recorded clip is set in Camera Mode] ) 0 Is [System] B [Record Set] B [Time Stamp] set to the FTP server. adjustment knob does not 0 Is Full Auto enabled? after loading a charged battery. screens in the Camera mode (during live streaming are only displayed on the Display 1 and Display 2 displayed. Cannot connect to "AUTO"? The screen freezes. If a file size limit...


