
Instructions
Page 3
...specified by the manufacturer. 11. Unplug this apparatus near any interference received, including interference that to qualified service personnel. Protect the power cord from tip-over. 12. Increase the separation between the equipment and receiver. Servicing is damaged, liquid has been spilled or... found to comply with Part 15 of Conformity Model Number : GY-HM100U Trade Name : JVC Responsible party : JVC AMERICAS CORP. If this symbol is shown, it is connected. AC adapter When using the AC adapter in areas other than American National Standard C73 series type use ...
...specified by the manufacturer. 11. Unplug this apparatus near any interference received, including interference that to qualified service personnel. Protect the power cord from tip-over. 12. Increase the separation between the equipment and receiver. Servicing is damaged, liquid has been spilled or... found to comply with Part 15 of Conformity Model Number : GY-HM100U Trade Name : JVC Responsible party : JVC AMERICAS CORP. If this symbol is shown, it is connected. AC adapter When using the AC adapter in areas other than American National Standard C73 series type use ...
Instructions
Page 7
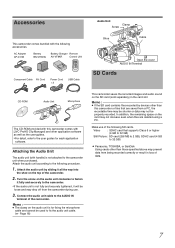
...fasten it fully and securely to fix the audio unit cable. (A Page 18) This camcorder saves the recorded images and audio sound on the top of data. 7 Accessories This camcorder comes bundled with [JVC ProHD Clip Manager] and other application software as well as the user guides. TIf ...shorter or data may not increase even when files are saved from the camcorder during use of the camcorder. AC Adapter AP-V21M Battery BN-VF823U Battery Charger Remote AA-VF8KR Control Unit Component Cable AV Cord Power Cord ן2 USB Cable Audio Unit Clamp Screw Shoe ...
...fasten it fully and securely to fix the audio unit cable. (A Page 18) This camcorder saves the recorded images and audio sound on the top of data. 7 Accessories This camcorder comes bundled with [JVC ProHD Clip Manager] and other application software as well as the user guides. TIf ...shorter or data may not increase even when files are saved from the camcorder during use of the camcorder. AC Adapter AP-V21M Battery BN-VF823U Battery Charger Remote AA-VF8KR Control Unit Component Cable AV Cord Power Cord ן2 USB Cable Audio Unit Clamp Screw Shoe ...
Instructions
Page 8
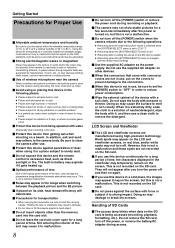
... Places subject to malfunction. 8 Ⅵ Do not turn off and then on again. Ⅵ If you turn off the power, or remove the battery/AC adapter during access. Doing so may cause the surface to remove the detergent. LCD Screen and Viewfinder Ⅵ The LCD and viewfinder screens...; Rebooting when the [SYSTEM SELECT] menu is set the [POWER] switch to AOFFB in order to reduce power consumption. Ⅵ Wipe the external cabinet of the device with it is used near a heater for transportation ● When carrying the camcorder, be sure to set ● Rebooting after a setting file...
... Places subject to malfunction. 8 Ⅵ Do not turn off and then on again. Ⅵ If you turn off the power, or remove the battery/AC adapter during access. Doing so may cause the surface to remove the detergent. LCD Screen and Viewfinder Ⅵ The LCD and viewfinder screens...; Rebooting when the [SYSTEM SELECT] menu is set the [POWER] switch to AOFFB in order to reduce power consumption. Ⅵ Wipe the external cabinet of the device with it is used near a heater for transportation ● When carrying the camcorder, be sure to set ● Rebooting after a setting file...
Instructions
Page 19
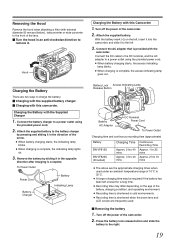
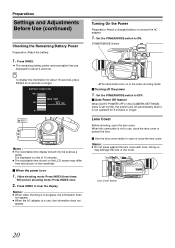
...the left unused for a long time. ● Recording time may differ depending on the left, insert it into the camcorder, and slide it . Connect the AC adapter that is shortened when the zoom lens and LCD screen are the approximate charging times when used . Ⅵ Removing the... by pressing and sliding it in cold environments. ● Recording time is provided with this camcorder. Attach the supplied battery. Turn off the power of the camcorder. 2 . Turn off the power of the camcorder. 2 . Connect the battery charger to the battery charger by sliding it in the direction ...
...the left unused for a long time. ● Recording time may differ depending on the left, insert it into the camcorder, and slide it . Connect the AC adapter that is shortened when the zoom lens and LCD screen are the approximate charging times when used . Ⅵ Removing the... by pressing and sliding it in cold environments. ● Recording time is provided with this camcorder. Attach the supplied battery. Turn off the power of the camcorder. 2 . Turn off the power of the camcorder. 2 . Connect the battery charger to the battery charger by sliding it in the direction ...
Instructions
Page 20
INDEX To display the information for about 15 seconds, press INDEX for about 3 seconds. POWER/MODE Switch MIC ●The camcorder turns on 1 . When this camcorder is in use , the information does not appear. B- PRST- A- Video shooting mode: Press INDEX three ...; Do not press against the lens cover with force. M- Turning On the Power Preparation: Attach a charged battery or connect the AC adapter. 1 . Still picture shooting mode: Press INDEX once. 2 . Set the POWER/MODE switch to clear the display. Lens Cover Before shooting, open or close the...
INDEX To display the information for about 15 seconds, press INDEX for about 3 seconds. POWER/MODE Switch MIC ●The camcorder turns on 1 . When this camcorder is in use , the information does not appear. B- PRST- A- Video shooting mode: Press INDEX three ...; Do not press against the lens cover with force. M- Turning On the Power Preparation: Attach a charged battery or connect the AC adapter. 1 . Still picture shooting mode: Press INDEX once. 2 . Set the POWER/MODE switch to clear the display. Lens Cover Before shooting, open or close the...
Instructions
Page 27
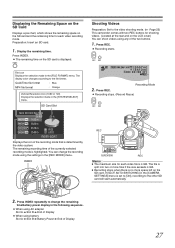
... by the video system. REC REC [0h57m] B [5h12m] 00:00:00:01 Recording Mode 2 . You can shoot videos using battery Slot A B Slot B B Battery Power B End of the two buttons. 1 . Press REC. ● Recording stops. (Record Pause) REC REC E OGRAM A REC INDEX T PR W REC CAM / MEDIA USERS...to the video shooting mode. (A Page 25) This camcorder comes with two REC buttons for shooting videos. (Located at the rear and on the LCD cover) You can change the remaining time/battery power display in the following sequence. ● When using AC adapter Slot A B Slot B B End of Display &#...
... by the video system. REC REC [0h57m] B [5h12m] 00:00:00:01 Recording Mode 2 . You can shoot videos using battery Slot A B Slot B B Battery Power B End of the two buttons. 1 . Press REC. ● Recording stops. (Record Pause) REC REC E OGRAM A REC INDEX T PR W REC CAM / MEDIA USERS...to the video shooting mode. (A Page 25) This camcorder comes with two REC buttons for shooting videos. (Located at the rear and on the LCD cover) You can change the remaining time/battery power display in the following sequence. ● When using AC adapter Slot A B Slot B B End of Display &#...
Instructions
Page 28
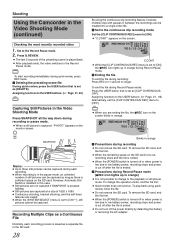
...SELECT] menu is set to low battery power, recording stops and power is cut off the power directly by detaching the battery or removing the AC adapter. To remove the SD card, end the file first. ● When the [POWER] switch is turned off or when power is low due to [720-**], still pictures... cannot be captured as long as [CLIP CONTINUOUS OFF]. Shooting Using the Camcorder in orange Ⅵ Precautions during...
...SELECT] menu is set to low battery power, recording stops and power is cut off the power directly by detaching the battery or removing the AC adapter. To remove the SD card, end the file first. ● When the [POWER] switch is turned off or when power is low due to [720-**], still pictures... cannot be captured as long as [CLIP CONTINUOUS OFF]. Shooting Using the Camcorder in orange Ⅵ Precautions during...
Instructions
Page 70
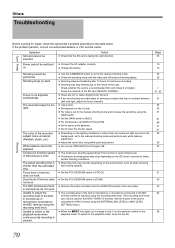
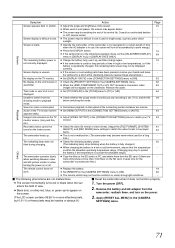
...; Do not use [TWILIGHT] from the AUDIO IN terminal of the camcorder. ● The recording level of the builtin microphone or microphone connected .... ● Shooting may shorten depending on . ● Connect the AC adapter correctly. ● Charge the battery. Focus is slow. Continuous shooting speed of...work. If the problem persists, consult our authorized dealers or JVC service center. Page 23 19 19 25 25 - 7 ... 35 36 32 - 31 30 40 64 28 70 Others Troubleshooting Card Power Before sending for the INPUT1/INPUT2 terminal. Shooting Shooting cannot be switched on...
...; Do not use [TWILIGHT] from the AUDIO IN terminal of the camcorder. ● The recording level of the builtin microphone or microphone connected .... ● Shooting may shorten depending on . ● Connect the AC adapter correctly. ● Charge the battery. Focus is slow. Continuous shooting speed of...work. If the problem persists, consult our authorized dealers or JVC service center. Page 23 19 19 25 25 - 7 ... 35 36 32 - 31 30 40 64 28 70 Others Troubleshooting Card Power Before sending for the INPUT1/INPUT2 terminal. Shooting Shooting cannot be switched on...
Instructions
Page 71
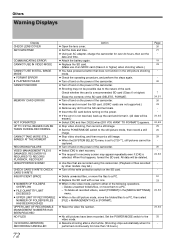
... time.) The indicating lamp does not blink during charging. ● Check the remaining battery power. 20 (The indicating lamp stops blinking when the battery is interrupted at the connecting section ...screen. (long and thin, monitor. Remove the battery and AC adapter from the camcorder, reattach them from the shooting mode to save energy.) ● Press the DISPLAY button. 15... terminal is not a malfunction. (The camcorder may be reaching the end of its service life. or JVC service center. Screen is blank. ● Operate the camcorder. (If the camcorder is not operated for a certain length ...
... time.) The indicating lamp does not blink during charging. ● Check the remaining battery power. 20 (The indicating lamp stops blinking when the battery is interrupted at the connecting section ...screen. (long and thin, monitor. Remove the battery and AC adapter from the camcorder, reattach them from the shooting mode to save energy.) ● Press the DISPLAY button. 15... terminal is not a malfunction. (The camcorder may be reaching the end of its service life. or JVC service center. Screen is blank. ● Operate the camcorder. (If the camcorder is not operated for a certain length ...
Instructions
Page 72
Action ● Using an AC adapter, charge the camcorder for over 24 hours, then set to [720-**], still pictures cannot be...short while. (Shooting stops automatically when it . (All data will be captured. ● Turn off and on the power of the camcorder. ● Shooting may appear repeatedly even if [OK] is performed continuously for recovery screen may not be erased.) ...and time. Check whether the card is a recommended SD card (Class 6 or higher) Erase the contents of the camcorder. ● Turn off and on the SD card. ● Delete unwanted files, or move the files to start...
Action ● Using an AC adapter, charge the camcorder for over 24 hours, then set to [720-**], still pictures cannot be...short while. (Shooting stops automatically when it . (All data will be captured. ● Turn off and on the power of the camcorder. ● Shooting may appear repeatedly even if [OK] is performed continuously for recovery screen may not be erased.) ...and time. Check whether the card is a recommended SD card (Class 6 or higher) Erase the contents of the camcorder. ● Turn off and on the SD card. ● Delete unwanted files, or move the files to start...
Instructions
Page 74
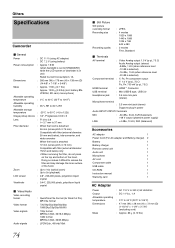
Others Specifications Camcorder Ⅵ General Power : DC 11 V (using AC adapter) DC 7.2 V (using battery) Power consumption : Approx 7.8 W (when backlight is set to [STANDARD] while the LCD screen or viewfinder is selected) Component terminal : Y, PB, PR component ...Battery charger 1 Remote control unit 1 Audio unit 1 Microphone 1 AV cord 1 Component cable 1 USB cable 1 CD-ROM 1 Instruction manual 1 Warranty card 1 AC Adapter Power Output Allowable operating temperature Dimensions Mass : AC 110 V to 240 V, 50 Hz/60 Hz : DC 11 Vd, 1 A : 0°C to 40°C (...
Others Specifications Camcorder Ⅵ General Power : DC 11 V (using AC adapter) DC 7.2 V (using battery) Power consumption : Approx 7.8 W (when backlight is set to [STANDARD] while the LCD screen or viewfinder is selected) Component terminal : Y, PB, PR component ...Battery charger 1 Remote control unit 1 Audio unit 1 Microphone 1 AV cord 1 Component cable 1 USB cable 1 CD-ROM 1 Instruction manual 1 Warranty card 1 AC Adapter Power Output Allowable operating temperature Dimensions Mass : AC 110 V to 240 V, 50 Hz/60 Hz : DC 11 Vd, 1 A : 0°C to 40°C (...


