
User Manual
Page 1
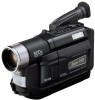
... Dear Customer, Thank you cannot see the actual changes of the Automatic Demonstration activated on the bottom of this information for purchasing the JVC Compact VHS camcorder. AUTOMATIC DEMONSTRATION Automatic Demonstration takes place when "DEMO MODE" is set the Power Switch @ to " " or " ". •...* Applicable models only. 1 which is in progress. Rotate the MENU Wheel 1 to ensure safe use of the camcorder. Model No. INSTRUCTIONS ENGLISH COMPACT VHS CAMCORDER GR-SXM740 GR-SXM340 GR-SXM240 GR-AX970 LYT0880-001E For Customer Use: Enter below the Model No. and Serial...
... Dear Customer, Thank you cannot see the actual changes of the Automatic Demonstration activated on the bottom of this information for purchasing the JVC Compact VHS camcorder. AUTOMATIC DEMONSTRATION Automatic Demonstration takes place when "DEMO MODE" is set the Power Switch @ to " " or " ". •...* Applicable models only. 1 which is in progress. Rotate the MENU Wheel 1 to ensure safe use of the camcorder. Model No. INSTRUCTIONS ENGLISH COMPACT VHS CAMCORDER GR-SXM740 GR-SXM340 GR-SXM240 GR-AX970 LYT0880-001E For Customer Use: Enter below the Model No. and Serial...
User Manual
Page 2
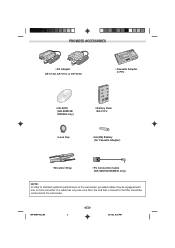
GR-SXM740U_EN 2 2 02.4.22, 6:02 PM PROVIDED ACCESSORIES • AC Adapter AP-V12U, AP-V11U or AP-V10U • Cassette Adapter C-P7U • CD-ROM (GR-SXM740/ SXM340 only) • Battery Pack BN-V11U • Lens Cap • AA (R6) Battery (for Cassette Adapter) • Shoulder Strap • PC Connection Cable (GR-SXM740/SXM340 only) NOTE: In order to maintain optimum performance of the camcorder, provided cables may be equipped with one core filter, the end that is closest to the filter should be connected to the camcorder. If a cable has only one or more core filter.
GR-SXM740U_EN 2 2 02.4.22, 6:02 PM PROVIDED ACCESSORIES • AC Adapter AP-V12U, AP-V11U or AP-V10U • Cassette Adapter C-P7U • CD-ROM (GR-SXM740/ SXM340 only) • Battery Pack BN-V11U • Lens Cap • AA (R6) Battery (for Cassette Adapter) • Shoulder Strap • PC Connection Cable (GR-SXM740/SXM340 only) NOTE: In order to maintain optimum performance of the camcorder, provided cables may be equipped with one core filter, the end that is closest to the filter should be connected to the camcorder. If a cable has only one or more core filter.
User Manual
Page 3
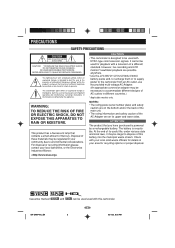
...it may be illegal to dispose of the AC Adapter are possible anywhere. • Use the JVC BN-V11U/V12U/V20U/V400U battery packs and, to recharge them or to supply power to the camcorder from an AC outlet, use the provided multi-voltage AC Adapter. (An appropriate conversion adapter may... LCD monitor*/viewfinder playback are on the bottom and/or the back of the main unit. • The rating information and safety caution of this camcorder. 3 3 02.4.22, 6:02 PM Check with a television of electric shock to accommodate different designs of these materials may be regulated in the ...
...it may be illegal to dispose of the AC Adapter are possible anywhere. • Use the JVC BN-V11U/V12U/V20U/V400U battery packs and, to recharge them or to supply power to the camcorder from an AC outlet, use the provided multi-voltage AC Adapter. (An appropriate conversion adapter may... LCD monitor*/viewfinder playback are on the bottom and/or the back of the main unit. • The rating information and safety caution of this camcorder. 3 3 02.4.22, 6:02 PM Check with a television of electric shock to accommodate different designs of these materials may be regulated in the ...
User Manual
Page 5
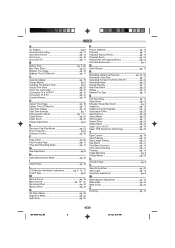
... Brighten The LCD Monitor pg. 11 C Cassette Adapter pg. 16 Charge Marker pg. 6 Charging The Battery Pack pg. 6 Classic Film Effect pg. 23 Clean The Camcorder pg. 27 Connection To a VCR/TV pg. 15 Connection To A PC pg. 16 Counter Memory pg. 14 D Darken The Image pg. 18 Darken The LCD... Solarization Effect pg. 23 Specifications pg. 28 Sports Mode pg. 23 Still Playback pg. 11 Stretch Effect pg. 23 Strobe Effect pg. 23 Super LoLux (S.LX pg. 19 Super VHS Expansion Technology pg. 20 T Tape Counter pg. 14 Tape Dubbing pg. 15 Tape Length Setting pg. 21 Tele Macro pg. 21 Time Base...
... Brighten The LCD Monitor pg. 11 C Cassette Adapter pg. 16 Charge Marker pg. 6 Charging The Battery Pack pg. 6 Classic Film Effect pg. 23 Clean The Camcorder pg. 27 Connection To a VCR/TV pg. 15 Connection To A PC pg. 16 Counter Memory pg. 14 D Darken The Image pg. 18 Darken The LCD... Solarization Effect pg. 23 Specifications pg. 28 Sports Mode pg. 23 Still Playback pg. 11 Stretch Effect pg. 23 Strobe Effect pg. 23 Super LoLux (S.LX pg. 19 Super VHS Expansion Technology pg. 20 T Tape Counter pg. 14 Tape Dubbing pg. 15 Tape Length Setting pg. 21 Tele Macro pg. 21 Time Base...
User Manual
Page 6
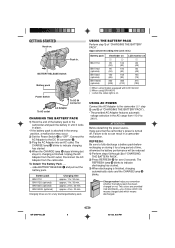
...) 135 (75) 315 (190) 1 When using models equipped with LCD monitor 2 When using GR-AX970 ( ): when the video light is attached in a camcorder malfunction. approx. 1 hr. 30 min. Connect the AC Adapter to fully discharge a battery pack before recharging or storing it locks in place. • If the... battery pack is on . ATTENTION Before detaching the power source, make sure that the camcorder's power is finished, charging automatically starts and the CHARGE lamp * blinks. REFRESH: Be sure to the DC IN connector 9. 3) Plug the AC...
...) 135 (75) 315 (190) 1 When using models equipped with LCD monitor 2 When using GR-AX970 ( ): when the video light is attached in a camcorder malfunction. approx. 1 hr. 30 min. Connect the AC Adapter to fully discharge a battery pack before recharging or storing it locks in place. • If the... battery pack is on . ATTENTION Before detaching the power source, make sure that the camcorder's power is finished, charging automatically starts and the CHARGE lamp * blinks. REFRESH: Be sure to the DC IN connector 9. 3) Plug the AC...

User Manual
Page 7
...to 25°C (68°F to select "EXIT", and press it. If the environment is too cold, charging may not light. Consult an authorized JVC dealer for charging. Be sure to use it only in . The setting stops blinking. 6) When none of the battery pack. • Since the AC... the setting begins blinking, rotate the MENU Wheel 1 until the correct setting appears and then press it . • During charging or discharging, the camcorder cannot be operated. • Charging and discharging is not possible if the wrong type of battery is used. • When charging the battery pack ...
...to 25°C (68°F to select "EXIT", and press it. If the environment is too cold, charging may not light. Consult an authorized JVC dealer for charging. Be sure to use it only in . The setting stops blinking. 6) When none of the battery pack. • Since the AC... the setting begins blinking, rotate the MENU Wheel 1 until the correct setting appears and then press it . • During charging or discharging, the camcorder cannot be operated. • Charging and discharging is not possible if the wrong type of battery is used. • When charging the battery pack ...
User Manual
Page 8
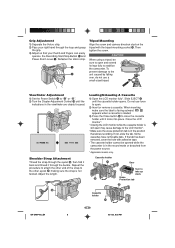
...holder i GR-SXM740U_EN 8 8 02.4.22, 6:02 PM Refasten the Velcro strip. 3 ! Viewfinder Adjustment 1) Set the Power Switch @ to stabilize the camcorder. Slide EJECT t until it through the loop and grasp the grip. 3) Adjust so that allows recording. Some cassettes have removable tabs. Then tighten the ...close the cassette holder until the cassette holder opens. and Power Zoom Lever 3. CAUTION When using a tripod, be opened while the camcorder is in the record mode or detached from the power source. * Applicable models only. When inserting, make sure the label is not...
...holder i GR-SXM740U_EN 8 8 02.4.22, 6:02 PM Refasten the Velcro strip. 3 ! Viewfinder Adjustment 1) Set the Power Switch @ to stabilize the camcorder. Slide EJECT t until it through the loop and grasp the grip. 3) Adjust so that allows recording. Some cassettes have removable tabs. Then tighten the ...close the cassette holder until the cassette holder opens. and Power Zoom Lever 3. CAUTION When using a tripod, be opened while the camcorder is in the record mode or detached from the power source. * Applicable models only. When inserting, make sure the label is not...
User Manual
Page 9
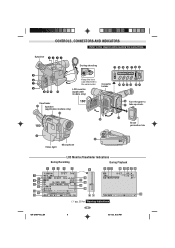
VHS REC MWB PAUSE 5M I N 1 / 2S BR I GHT 6- - - + CONGRATULAT I GHT 1 0 x +02 S - CONTROLS, CONNECTORS AND INDICATORS Refer to the camcorder. y Erase protection tab Q W Video light Microphone LCD Monitor/Viewfinder Indications During Recording During Playback 7 9 ! 8 0 @ #$ % 1 23 4 5 120M I N S-ET T40 REC SP 444 1 N I ONS DEC 2 5 . 0 1 AM 1 1 : 4 5 : 1 8 6 ^ & * ( 1X ) q ...
VHS REC MWB PAUSE 5M I N 1 / 2S BR I GHT 6- - - + CONGRATULAT I GHT 1 0 x +02 S - CONTROLS, CONNECTORS AND INDICATORS Refer to the camcorder. y Erase protection tab Q W Video light Microphone LCD Monitor/Viewfinder Indications During Recording During Playback 7 9 ! 8 0 @ #$ % 1 23 4 5 120M I N S-ET T40 REC SP 444 1 N I ONS DEC 2 5 . 0 1 AM 1 1 : 4 5 : 1 8 6 ^ & * ( 1X ) q ...
User Manual
Page 11
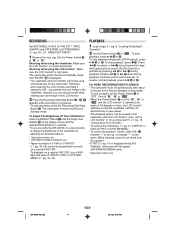
...VHS tape and select S-VHS ET (OFF) in the Record-Standby or Stop mode. PLAYBACK 1 Load a tape (੬ pg. 8, "Loading/Unloading A Cassette"). 2 Set the Power Switch @ to " " or " ". To stop playback temporarily (Still Playback), press 4/6 ^ or s. For VIDEO RECORDING/VIDEO PLAYBACK • The camcorder... be used simultaneously on and the viewfinder switches off automatically after about 5 minutes in SYSTEM MENU (੬ pg. 18, 20). The camcorder re-enters the RecordStandby mode. To start playback, press 4/6 ^ or T. To resume normal playback, press 4/6 ^ or T. While ...
...VHS tape and select S-VHS ET (OFF) in the Record-Standby or Stop mode. PLAYBACK 1 Load a tape (੬ pg. 8, "Loading/Unloading A Cassette"). 2 Set the Power Switch @ to " " or " ". To stop playback temporarily (Still Playback), press 4/6 ^ or s. For VIDEO RECORDING/VIDEO PLAYBACK • The camcorder... be used simultaneously on and the viewfinder switches off automatically after about 5 minutes in SYSTEM MENU (੬ pg. 18, 20). The camcorder re-enters the RecordStandby mode. To start playback, press 4/6 ^ or T. To resume normal playback, press 4/6 ^ or T. While ...
User Manual
Page 12
STABILIZER 4. ! Recording) (GR-SXM240/AX970 only) To record a scene for unstable images caused by pressing 5SEC. Rec is finished, the camcorder reenters the Record- function, press 5SEC. disappears. • Accurate stabilization may not be activated by camera-shake, particularly at high magnification. 1) Press P. Recording starts, and ...
STABILIZER 4. ! Recording) (GR-SXM240/AX970 only) To record a scene for unstable images caused by pressing 5SEC. Rec is finished, the camcorder reenters the Record- function, press 5SEC. disappears. • Accurate stabilization may not be activated by camera-shake, particularly at high magnification. 1) Press P. Recording starts, and ...
User Manual
Page 13
... the video light, since it . 3) Press the Recording Start/Stop Button ! This is in CAMERA MENU when you consult your nearest JVC dealer for the next shot. • Distortion may suffer. Digital circuitry extends the maximum magnification offered by using Digital Zoom, the quality...Program AE with the video light turned on the lighting conditions, the video light may keep a distance of the last recording. 1) Make sure the camcorder is normal. While the "Twilight" mode is called Digital Zoom. • Slide the Power Zoom Lever 3 towards "T" to start recording with Special...
... the video light, since it . 3) Press the Recording Start/Stop Button ! This is in CAMERA MENU when you consult your nearest JVC dealer for the next shot. • Distortion may suffer. Digital circuitry extends the maximum magnification offered by using Digital Zoom, the quality...Program AE with the video light turned on the lighting conditions, the video light may keep a distance of the last recording. 1) Make sure the camcorder is normal. While the "Twilight" mode is called Digital Zoom. • Slide the Power Zoom Lever 3 towards "T" to start recording with Special...
User Manual
Page 14
...creative effects to on, turn off TBC. GR-SXM740U_EN 14 14 02.4.22, 6:02 PM Tracking Eliminates noise bars that appear on other VCRs or camcorders. When Auto Tracking finishes, the indication disappears. • When noise bars appear during playback. The counter t resets to "0:00:00". 2) ...work with old tapes. When the TBC mode is activated, "TBC" w is displayed. • The "TBC" indicator w turns green (gray with a camcorder equipped with a black/white viewfinder) while TBC is working . • The picture may take a few seconds before TBC actually starts working , and white ...
...creative effects to on, turn off TBC. GR-SXM740U_EN 14 14 02.4.22, 6:02 PM Tracking Eliminates noise bars that appear on other VCRs or camcorders. When Auto Tracking finishes, the indication disappears. • When noise bars appear during playback. The counter t resets to "0:00:00". 2) ...work with old tapes. When the TBC mode is activated, "TBC" w is displayed. • The "TBC" indicator w turns green (gray with a camcorder equipped with a black/white viewfinder) while TBC is working . • The picture may take a few seconds before TBC actually starts working , and white ...
User Manual
Page 15
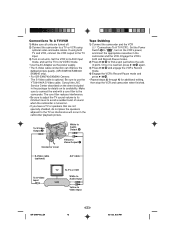
...JVC Service Center described on the sheet included in the camcorder playback picture. The core filter reduces interference. • Be sure to adjust the TV sound volume to its VIDEO mode. • Use the AC Adapter as interference will occur in the package for additional editing, then stop the VCR and camcorder... the VCR's AUX and Record-Pause modes. 2) Press 4/6 ^ to a TV or VCR using optional video and audio cables. Tape Dubbing 1) Connect the camcorder and the VCR (੬ "Connections To A TV/VCR"). If using both TV and VCR, connect the VCR output to the TV input. 3) Turn on...
...JVC Service Center described on the sheet included in the camcorder playback picture. The core filter reduces interference. • Be sure to adjust the TV sound volume to its VIDEO mode. • Use the AC Adapter as interference will occur in the package for additional editing, then stop the VCR and camcorder... the VCR's AUX and Record-Pause modes. 2) Press 4/6 ^ to a TV or VCR using optional video and audio cables. Tape Dubbing 1) Connect the camcorder and the VCR (੬ "Connections To A TV/VCR"). If using both TV and VCR, connect the VCR output to the TV input. 3) Turn on...
User Manual
Page 16
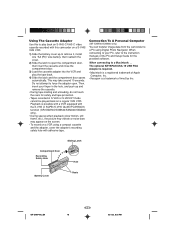
Using The Cassette Adapter Use this camcorder on a regular VHS VCR. When connecting to the instruction manuals of InnoSys Inc. This may appear on the screen. • To record on a VCR using Digital Photo Navigator. ... unloading, do not touch the reels for the provided software. Connection To A Personal Computer (GR-SXM740/SXM340 only) You can transfer image data from the camcorder to a PC using a compact cassette and the adapter, cover the adapter's recording safety hole with this to play the tape back. 4) Slide the latch and...
Using The Cassette Adapter Use this camcorder on a regular VHS VCR. When connecting to the instruction manuals of InnoSys Inc. This may appear on the screen. • To record on a VCR using Digital Photo Navigator. ... unloading, do not touch the reels for the provided software. Connection To A Personal Computer (GR-SXM740/SXM340 only) You can transfer image data from the camcorder to a PC using a compact cassette and the adapter, cover the adapter's recording safety hole with this to play the tape back. 4) Slide the latch and...

User Manual
Page 17
... the camcorder. y Erase protection tab Q W Video light Microphone LCD Monitor/Viewfinder Indications During Recording During Playback 7 9 ! 8 0 @ #$ % 1 23 4 5 120M I N S-ET T40 REC SP 444 1 N I ONS DEC 2 5 . 0 1 AM 1 1 : 4 5 : 1 8 6 ^ & * ( 1X ) q we r t y u i S-ET SP 4 TBC -1 : 23 : 45 MONOTONE AT VOLUME - - - - - -6- - - - - + o ੬ pg. 25 for Warning Indications . 17 GR-SXM740U_EN 17 02.4.22, 6:02 PM VHS REC...
... the camcorder. y Erase protection tab Q W Video light Microphone LCD Monitor/Viewfinder Indications During Recording During Playback 7 9 ! 8 0 @ #$ % 1 23 4 5 120M I N S-ET T40 REC SP 444 1 N I ONS DEC 2 5 . 0 1 AM 1 1 : 4 5 : 1 8 6 ^ & * ( 1X ) q we r t y u i S-ET SP 4 TBC -1 : 23 : 45 MONOTONE AT VOLUME - - - - - -6- - - - - + o ੬ pg. 25 for Warning Indications . 17 GR-SXM740U_EN 17 02.4.22, 6:02 PM VHS REC...
User Manual
Page 18
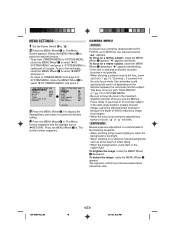
... manual focusing. Rotate the MENU Wheel 1 to select "4TO CAMERA MENU" and press it to the lens, zoom out first (੬ pg. 13, "Zooming"). VHS ON TAPE LENGTH T30 D I SP . ᮣ RE T URN SYSTEM MENU ᮣNEXT REC MODE SP D. "4" appears and blinking. • If the ... ZOOM 50x WI DE OF F S - GR-SXM740U_EN 18 18 02.4.22, 6:02 PM Press the MENU Wheel 1 in the auto focus mode, the camcorder could automatically zoom out depending on "4RETURN". If zoomed in in . To brighten the image, rotate the MENU Wheel 1 downward. "1" appears and blinks. CAMERA...
... manual focusing. Rotate the MENU Wheel 1 to select "4TO CAMERA MENU" and press it to the lens, zoom out first (੬ pg. 13, "Zooming"). VHS ON TAPE LENGTH T30 D I SP . ᮣ RE T URN SYSTEM MENU ᮣNEXT REC MODE SP D. "4" appears and blinking. • If the ... ZOOM 50x WI DE OF F S - GR-SXM740U_EN 18 18 02.4.22, 6:02 PM Press the MENU Wheel 1 in the auto focus mode, the camcorder could automatically zoom out depending on "4RETURN". If zoomed in in . To brighten the image, rotate the MENU Wheel 1 downward. "1" appears and blinks. CAMERA...
User Manual
Page 19
...all other colors will be accurately reproduced. Press the MENU Wheel 1 in 2 different languages. DATE/TIME DISP. Makes the date/time appear in the camcorder or on a cloudy day. GR-SXM740U_EN 19 19 02.4.22, 6:02 PM MWB: White balance is set DATE/TIME in a dimly lit environment,... in a darkly lit environment, when it is difficult to record the display, select OFF before shooting. • In the AUTO DATE mode, the camcorder records the date for about 5 seconds when recording is turned off or the battery removed. • White balance cannot be used . FINE : Outdoors...
...all other colors will be accurately reproduced. Press the MENU Wheel 1 in 2 different languages. DATE/TIME DISP. Makes the date/time appear in the camcorder or on a cloudy day. GR-SXM740U_EN 19 19 02.4.22, 6:02 PM MWB: White balance is set DATE/TIME in a dimly lit environment,... in a darkly lit environment, when it is difficult to record the display, select OFF before shooting. • In the AUTO DATE mode, the camcorder records the date for about 5 seconds when recording is turned off or the battery removed. • White balance cannot be used . FINE : Outdoors...
User Manual
Page 20
...) ON: With an S-VHS cassette, "S" appears and the camcorder records in VHS on a VHS or S-VHS cassette. • JVC EHG (Extra High Grade) tapes are recommended for recording important scenes, as it enables higher-quality recording and playback. • With some JVC VCRs. • Tapes recorded in S-VHS or S-VHS ET mode are played back on a Super VHS VCR or a VCR...
...) ON: With an S-VHS cassette, "S" appears and the camcorder records in VHS on a VHS or S-VHS cassette. • JVC EHG (Extra High Grade) tapes are recommended for recording important scenes, as it enables higher-quality recording and playback. • With some JVC VCRs. • Tapes recorded in S-VHS or S-VHS ET mode are played back on a Super VHS VCR or a VCR...

User Manual
Page 21
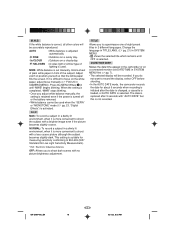
... be performed. • This function is canceled when the power is shut off except Date/Time, Instant Title and Warning Indication. Leaving the camcorder aimed at preset time spans. OFF: On-screen indications are displayed. Select the desired recording time and press the Recording Start/Stop Button ! .../Stop Button !. • Fade- or wipe-in /out cannot be set to "SP". (Please note that allows recording is loaded in the camcorder, demonstration is not available. • If you do not detach the Lens Cap, you cannot see the actual changes of the Automatic Demonstration activated ...
... be performed. • This function is canceled when the power is shut off except Date/Time, Instant Title and Warning Indication. Leaving the camcorder aimed at preset time spans. OFF: On-screen indications are displayed. Select the desired recording time and press the Recording Start/Stop Button ! .../Stop Button !. • Fade- or wipe-in /out cannot be set to "SP". (Please note that allows recording is loaded in the camcorder, demonstration is not available. • If you do not detach the Lens Cap, you cannot see the actual changes of the Automatic Demonstration activated ...
User Manual
Page 22
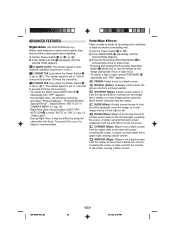
... "OFF" appears. ADVANCED FEATURES Night-Alive (GR-SXM740/SXM340 only) Makes dark subjects or areas even brighter than they would be difficult to bring the camcorder into /from the center. MOSAIC (Fader): Gradually turns/returns the picture into focus. To prevent this, use of a black screen open the black screen vertically...
... "OFF" appears. ADVANCED FEATURES Night-Alive (GR-SXM740/SXM340 only) Makes dark subjects or areas even brighter than they would be difficult to bring the camcorder into /from the center. MOSAIC (Fader): Gradually turns/returns the picture into focus. To prevent this, use of a black screen open the black screen vertically...


