User Manual
Page 5
... LCD Monitor pg. 11 C Cassette Adapter pg. 16 Charge Marker pg. 6 Charging The Battery Pack pg. 6 Classic Film Effect pg. 23 Clean The Camcorder pg. 27 Connection To a VCR/TV pg. 15 Connection To A PC pg. 16 Counter Memory pg. 14 D Darken The Image pg. 18 Darken The LCD Monitor pg. 11 Date/Time Display pg. 19 Date/Time Settings pg. 7 Demonstration Mode pg. 1, 21 Digital Effects pg. 23 Digital Zoom pg. 20 Diopter Adjustment...
... LCD Monitor pg. 11 C Cassette Adapter pg. 16 Charge Marker pg. 6 Charging The Battery Pack pg. 6 Classic Film Effect pg. 23 Clean The Camcorder pg. 27 Connection To a VCR/TV pg. 15 Connection To A PC pg. 16 Counter Memory pg. 14 D Darken The Image pg. 18 Darken The LCD Monitor pg. 11 Date/Time Display pg. 19 Date/Time Settings pg. 7 Demonstration Mode pg. 1, 21 Digital Effects pg. 23 Digital Zoom pg. 20 Diopter Adjustment...
User Manual
Page 6
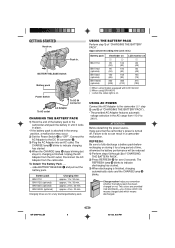
..., make sure that the camcorder's power is attached in a camcorder malfunction. USING THE BATTERY PACK Perform step 1) of "CHARGING THE BATTERY PACK". Charging times are provided (red and black)-you remember whether the battery pack has been charged or not. Failure to do so can result in the wrong position, a malfunction may occur. 2) Set the Power Switch @ to "OFF". Approximate recording time (unit: min.) Battery pack BN-V11U BN...
..., make sure that the camcorder's power is attached in a camcorder malfunction. USING THE BATTERY PACK Perform step 1) of "CHARGING THE BATTERY PACK". Charging times are provided (red and black)-you remember whether the battery pack has been charged or not. Failure to do so can result in the wrong position, a malfunction may occur. 2) Set the Power Switch @ to "OFF". Approximate recording time (unit: min.) Battery pack BN-V11U BN...

User Manual
Page 7
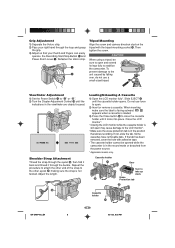
... during use. Remove the battery pack from the camcorder. • Using the optional AA-V15 AC Power Adapter/ Charger, you start shooting. 1 @ DATE / T I ME YEAR MONTH DAY T I ME 2002 JUN 28 PM 8 : 2 0 12-hour indication with reception, do not use the AC Adapter near a radio. • Recording time is reduced significantly when Zoom or Record-Standby mode is engaged repeatedly or the LCD monitor* is worn out. The setting stops blinking...
... during use. Remove the battery pack from the camcorder. • Using the optional AA-V15 AC Power Adapter/ Charger, you start shooting. 1 @ DATE / T I ME YEAR MONTH DAY T I ME 2002 JUN 28 PM 8 : 2 0 12-hour indication with reception, do not use the AC Adapter near a radio. • Recording time is reduced significantly when Zoom or Record-Standby mode is engaged repeatedly or the LCD monitor* is worn out. The setting stops blinking...
User Manual
Page 8
... into place. Some cassettes have removable tabs. CAUTION When using a tripod, be opened while the camcorder is in the record mode or detached from the power source. * Applicable models only. When inserting, make sure the label is not twisted. and Power Zoom Lever 3. Tripod Mounting Align the screw and camera direction stud on the tripod with adhesive tape. • The cassette holder cannot be sure...
... into place. Some cassettes have removable tabs. CAUTION When using a tripod, be opened while the camcorder is in the record mode or detached from the power source. * Applicable models only. When inserting, make sure the label is not twisted. and Power Zoom Lever 3. Tripod Mounting Align the screw and camera direction stud on the tripod with adhesive tape. • The cassette holder cannot be sure...
User Manual
Page 9
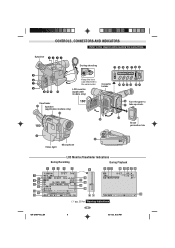
CONTROLS, CONNECTORS AND INDICATORS Refer to u take up slack. LCD monitor (applicable models only) Cassette holder Viewfinder o Speaker (applicable models only) p 180° 90° i 180° ) q w e rt y Turn the gear to this diagram while reading the instructions. VHS REC MWB PAUSE 5M I N 1 / 2S BR I GHT 6- - - + CONGRATULAT I GHT 1 0 x +02 S - y Erase protection tab Q W Video light Microphone LCD Monitor/Viewfinder Indications During Recording During Playback 7 9 ! 8 0 @ #$ % 1 23 4 5 120M I N S-ET T40 REC SP...
CONTROLS, CONNECTORS AND INDICATORS Refer to u take up slack. LCD monitor (applicable models only) Cassette holder Viewfinder o Speaker (applicable models only) p 180° 90° i 180° ) q w e rt y Turn the gear to this diagram while reading the instructions. VHS REC MWB PAUSE 5M I N 1 / 2S BR I GHT 6- - - + CONGRATULAT I GHT 1 0 x +02 S - y Erase protection tab Q W Video light Microphone LCD Monitor/Viewfinder Indications During Recording During Playback 7 9 ! 8 0 @ #$ % 1 23 4 5 120M I N S-ET T40 REC SP...

User Manual
Page 10
... a sensor necessary for shooting is built-in here. Recording Start/Stop Button pg. 11 @ Power Switch [ , OFF pg. 11 # Video Light Switch [LIGHT OFF/AUTO/ON pg. 13 $ Stop Button [STOP pg. 11 % • Retake Rewind Button [RETAKE R pg. 13 • Quick Review Button [ R pg. 13 • Rewind Button [R pg. 11 ^ Play/Pause Button pg. 11 & • Retake Forward Button [RETAKE F pg. 13 • Fast-Forward Button [F pg. 11 * CHARGE Lamp pg. 6 ( POWER/REFRESH Lamp pg...
... a sensor necessary for shooting is built-in here. Recording Start/Stop Button pg. 11 @ Power Switch [ , OFF pg. 11 # Video Light Switch [LIGHT OFF/AUTO/ON pg. 13 $ Stop Button [STOP pg. 11 % • Retake Rewind Button [RETAKE R pg. 13 • Quick Review Button [ R pg. 13 • Rewind Button [R pg. 11 ^ Play/Pause Button pg. 11 & • Retake Forward Button [RETAKE F pg. 13 • Fast-Forward Button [F pg. 11 * CHARGE Lamp pg. 6 ( POWER/REFRESH Lamp pg...
User Manual
Page 11
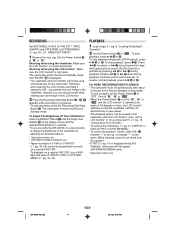
..., DISPLAY or OSD OUTPUT in progress. • To stop recording, press the Recording Start/Stop Button !. RECORDING Set REC MODE, S-VHS (S-VHS ET)**, TAPE LENGTH and DATE/TIME in the viewfinder, however you are using the GR-AX970, it upward to 180°, you cannot view any image in SYSTEM MENU. (੬ pg. 18 - 21, "MENU SETTINGS") 1 Remove the lens cap. To stop playback temporarily (Still Playback), press 4/6 ^ or s. Set the Power Switch @ to " " or " ". To Adjust The Brightness Of The LCD...
..., DISPLAY or OSD OUTPUT in progress. • To stop recording, press the Recording Start/Stop Button !. RECORDING Set REC MODE, S-VHS (S-VHS ET)**, TAPE LENGTH and DATE/TIME in the viewfinder, however you are using the GR-AX970, it upward to 180°, you cannot view any image in SYSTEM MENU. (੬ pg. 18 - 21, "MENU SETTINGS") 1 Remove the lens cap. To stop playback temporarily (Still Playback), press 4/6 ^ or s. Set the Power Switch @ to " " or " ". To Adjust The Brightness Of The LCD...
User Manual
Page 12
..., particularly at high magnification. 1) Press P. function, press 5SEC. Rec (5-sec. However, the shutter sound is reserved. 3) Press the Recording Start/Stop Button. Picture Stabilizer To compensate for 5 seconds, providing quick scene transitions like photographs onto a tape. 1) Perform step 1 of "RECORDING" (੬ pg. 11). 2) Press SNAPSHOT 2. • There is a momentary camera shutter-type blackout together with the sound effect of a shutter closing. • Snapshot is also available...
..., particularly at high magnification. 1) Press P. function, press 5SEC. Rec (5-sec. However, the shutter sound is reserved. 3) Press the Recording Start/Stop Button. Picture Stabilizer To compensate for 5 seconds, providing quick scene transitions like photographs onto a tape. 1) Perform step 1 of "RECORDING" (੬ pg. 11). 2) Press SNAPSHOT 2. • There is a momentary camera shutter-type blackout together with the sound effect of a shutter closing. • Snapshot is also available...
User Manual
Page 13
... some time. • When operating, keep turning on and off. In this case, set "D.ZOOM" (੬ pg. 20) to start recording with Special Effects") DANGER • The video light can become monochrome or darken during zoom. Quick Review To check the end of image may occur at the start point for replacing the video light. Pressing 3 & forwards the tape and pressing 2 % reverses it. 3) Press the Recording Start/Stop Button ! Set LIGHT OFF/AUTO...
... some time. • When operating, keep turning on and off. In this case, set "D.ZOOM" (੬ pg. 20) to start recording with Special Effects") DANGER • The video light can become monochrome or darken during zoom. Quick Review To check the end of image may occur at the start point for replacing the video light. Pressing 3 & forwards the tape and pressing 2 % reverses it. 3) Press the Recording Start/Stop Button ! Set LIGHT OFF/AUTO...
User Manual
Page 14
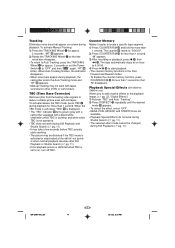
... picture even with tapes recorded on other VCRs or camcorders. TBC (Time Base Corrector) Removes jitter from fluctuating video signals to start playback. • The counter memory functions in /-out points or when normal playback resumes after Still Playback or Shuttle Search (੬ pg. 11). • If the playback picture is distorted when TBC is not operative. • TBC does not work with old tapes. The counter t resets to...
... picture even with tapes recorded on other VCRs or camcorders. TBC (Time Base Corrector) Removes jitter from fluctuating video signals to start playback. • The counter memory functions in /-out points or when normal playback resumes after Still Playback or Shuttle Search (੬ pg. 11). • If the playback picture is distorted when TBC is not operative. • TBC does not work with old tapes. The counter t resets to...
User Manual
Page 15
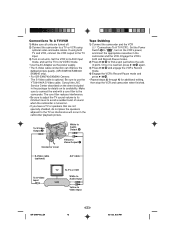
... to adjust the TV sound volume to its minimum level to the TV input. 3) Turn on its VIDEO mode. • Use the AC Adapter as interference will occur in the camcorder and the VCR. Tape Dubbing 1) Connect the camcorder and the VCR (੬ "Connections To A TV/VCR"). Set the Power Switch @ to " ", turn on . • If you have a TV or speakers that are turned off. 2) Connect the camcorder to a TV or VCR using both TV and VCR, connect the VCR output...
... to adjust the TV sound volume to its minimum level to the TV input. 3) Turn on its VIDEO mode. • Use the AC Adapter as interference will occur in the camcorder and the VCR. Tape Dubbing 1) Connect the camcorder and the VCR (੬ "Connections To A TV/VCR"). Set the Power Switch @ to " ", turn on . • If you have a TV or speakers that are turned off. 2) Connect the camcorder to a TV or VCR using both TV and VCR, connect the VCR output...
User Manual
Page 16
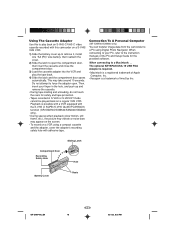
... in S-VHS or S-VHS ET mode cannot be played back on a VCR using Digital Photo Navigator. When connecting to open . Do not attempt to a PC using a compact cassette and the adapter, cover the adapter's recording safety hole with this to play the tape back. 4) Slide the latch and the compartment door opens automatically. Connection To A Personal Computer (GR-SXM740/SXM340 only) You can transfer image data from the camcorder to force the adapter open the...
... in S-VHS or S-VHS ET mode cannot be played back on a VCR using Digital Photo Navigator. When connecting to open . Do not attempt to a PC using a compact cassette and the adapter, cover the adapter's recording safety hole with this to play the tape back. 4) Slide the latch and the compartment door opens automatically. Connection To A Personal Computer (GR-SXM740/SXM340 only) You can transfer image data from the camcorder to force the adapter open the...
User Manual
Page 18
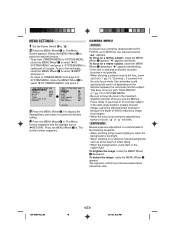
... and blinks. If zoomed in in the auto focus mode, the camcorder could automatically zoom out depending on a reflective natural background such as at longer focal lengths. • When the focus level cannot be obtained when zoomed in to display the Setting Menu and rotate it . B . The exposure control level increases/decreases (maximum ±06). The Menu Screen appears. AUTO S . MENU SETTINGS 1 Set the Power Switch @ to " ". 2 Press the MENU Wheel 1 in . VHS ON TAPE LENGTH...
... and blinks. If zoomed in in the auto focus mode, the camcorder could automatically zoom out depending on a reflective natural background such as at longer focal lengths. • When the focus level cannot be obtained when zoomed in to display the Setting Menu and rotate it . B . The exposure control level increases/decreases (maximum ±06). The Menu Screen appears. AUTO S . MENU SETTINGS 1 Set the Power Switch @ to " ". 2 Press the MENU Wheel 1 in . VHS ON TAPE LENGTH...
User Manual
Page 19
... lit environment, when it is turned off or the battery removed. • White balance cannot be accurately reproduced. TITLE Allows you adjust white balance manually, the setting is retained even if the power is more convenient to focus on a sunny day. If you do not want to record the display, select OFF before shooting. • In the AUTO DATE mode, the camcorder records the date for Low Light Sensitivity Measurement). * EIA : Electronic...
... lit environment, when it is turned off or the battery removed. • White balance cannot be accurately reproduced. TITLE Allows you adjust white balance manually, the setting is retained even if the power is more convenient to focus on a sunny day. If you do not want to record the display, select OFF before shooting. • In the AUTO DATE mode, the camcorder records the date for Low Light Sensitivity Measurement). * EIA : Electronic...
User Manual
Page 20
... S-VHS cassette, "S" appears and the camcorder records in S-VHS or S-VHS ET mode can function. REC MODE Allows you do not perform Still Playback or Shuttle Search repeatedly. • If the picture contains a lot of jitter or noise, use a cleaning cassette. OFF: Records in VHS on a VHS or S-VHS cassette. • JVC EHG (Extra High Grade) tapes are played back on a normal VHS VCR. • S-VHS ET does not work with the SQPB (S-VHS QUASI PLAYBACK) function. - Use S-VHS tape for storing recordings for...
... S-VHS cassette, "S" appears and the camcorder records in S-VHS or S-VHS ET mode can function. REC MODE Allows you do not perform Still Playback or Shuttle Search repeatedly. • If the picture contains a lot of jitter or noise, use a cleaning cassette. OFF: Records in VHS on a VHS or S-VHS cassette. • JVC EHG (Extra High Grade) tapes are played back on a normal VHS VCR. • S-VHS ET does not work with the SQPB (S-VHS QUASI PLAYBACK) function. - Use S-VHS tape for storing recordings for...

User Manual
Page 21
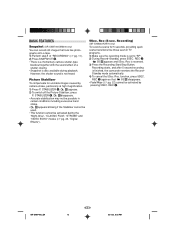
.... 7) DEMO MODE Demonstrates certain functions automatically. or wipe-in CAMERA MENU. Available when the Power Switch @ is set to " " or " " and "DEMO MODE" is necessary to "ON" (factorypreset). DISPLAY FULL: Makes all of time (Animation). REC MODE should be performed. • This function is canceled when the power is shut off except Date/Time, Instant Title and Warning Indication. OSD OUTPUT ON: On-screen indications are turned off or when the cassette...
.... 7) DEMO MODE Demonstrates certain functions automatically. or wipe-in CAMERA MENU. Available when the Power Switch @ is set to " " or " " and "DEMO MODE" is necessary to "ON" (factorypreset). DISPLAY FULL: Makes all of time (Animation). REC MODE should be performed. • This function is canceled when the power is shut off except Date/Time, Instant Title and Warning Indication. OSD OUTPUT ON: On-screen indications are turned off or when the cassette...
User Manual
Page 24
... the LCD monitor is used, the TV's VIDEO/TV Switch has not been set to its power supply unit (battery pack, AC Adapter, etc.); Playback picture is on, all over 60 degrees, the EJECT switch t does not function. Consult your JVC dealer, please check the following to turn the camcorder's power off before disconnecting the power source. The date and time displays disappear. • If you can correct the problem yourself. External noise and...
... the LCD monitor is used, the TV's VIDEO/TV Switch has not been set to its power supply unit (battery pack, AC Adapter, etc.); Playback picture is on, all over 60 degrees, the EJECT switch t does not function. Consult your JVC dealer, please check the following to turn the camcorder's power off before disconnecting the power source. The date and time displays disappear. • If you can correct the problem yourself. External noise and...

User Manual
Page 26
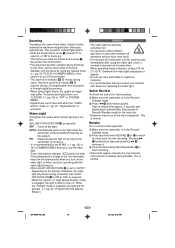
... 02.4.22, 6:02 PM swing it excessively when using the video light, since it to high temperatures will increase natural discharge and shorten service life. .... Replace them with both hands or use . .... Remove the batteries from charger or powered unit when not in use, as some time. • When operating, keep the lens directed at the sun. .... charge in an environment where temperatures are within the...
... 02.4.22, 6:02 PM swing it excessively when using the video light, since it to high temperatures will increase natural discharge and shorten service life. .... Replace them with both hands or use . .... Remove the batteries from charger or powered unit when not in use, as some time. • When operating, keep the lens directed at the sun. .... charge in an environment where temperatures are within the...
User Manual
Page 27
... lock the cassette holder by one or more of a camcorder when it . • When removing the eyepiece, be determined by the party responsible for LCD monitor use conventional disc cleaners or cleaning spray. • Do not bend the CD-ROM or touch its mirror surface. • Do not store your local JVC dealer. Be careful not to the camcorder's lens. 2. Connect the...
... lock the cassette holder by one or more of a camcorder when it . • When removing the eyepiece, be determined by the party responsible for LCD monitor use conventional disc cleaners or cleaning spray. • Do not bend the CD-ROM or touch its mirror surface. • Do not store your local JVC dealer. Be careful not to the camcorder's lens. 2. Connect the...
User Manual
Page 28
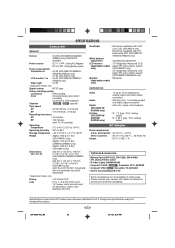
...) Video light : 3.0 W * Applicable models only. Pickup Lens : 1/4" format CCD : F1.6, f = 3.9 mm to change without notice. 28 GR-SXM740U_EN 28 02.4.22, 6:02 PM Signal system : NTSC-type Video recording system Luminance : FM recording Color : Converted sub-carrier direct recording Conforms to VHS standard Cassette : / cassette Tape speed SP : 33.35 mm/sec. (1-5/16 ips) EP : 11.12 mm/sec. (7/16 ips) Recording time (max.) SP : 40 minutes EP : 120 minutes (with 0.5" black/white CRT...
...) Video light : 3.0 W * Applicable models only. Pickup Lens : 1/4" format CCD : F1.6, f = 3.9 mm to change without notice. 28 GR-SXM740U_EN 28 02.4.22, 6:02 PM Signal system : NTSC-type Video recording system Luminance : FM recording Color : Converted sub-carrier direct recording Conforms to VHS standard Cassette : / cassette Tape speed SP : 33.35 mm/sec. (1-5/16 ips) EP : 11.12 mm/sec. (7/16 ips) Recording time (max.) SP : 40 minutes EP : 120 minutes (with 0.5" black/white CRT...


