
Software Guide
Page 6
...of displaying 800 x 600 dots with 16-bit color Miscellaneous: Internet Explorer 5.5 or later Ⅲ Macintosh The following requirements must be satisfied to connect a camcorder to a PC and to a PC. OS: Windows® Millennium Edition (Me) (pre-installed), Windows® 2000 Professional (2000) (pre-installed), ...;, at least 200 MHz RAM: At least 64 MB Free hard disk space: At least 10 MB for installation, at : http://www.jvc-victor.co.jp/ english/accessory/) ● Windows® are trademarks and/or registered trademarks of their respective holders. ● The system requirements...
...of displaying 800 x 600 dots with 16-bit color Miscellaneous: Internet Explorer 5.5 or later Ⅲ Macintosh The following requirements must be satisfied to connect a camcorder to a PC and to a PC. OS: Windows® Millennium Edition (Me) (pre-installed), Windows® 2000 Professional (2000) (pre-installed), ...;, at least 200 MHz RAM: At least 64 MB Free hard disk space: At least 10 MB for installation, at : http://www.jvc-victor.co.jp/ english/accessory/) ● Windows® are trademarks and/or registered trademarks of their respective holders. ● The system requirements...

Software Guide
Page 8
...9679; It is connected, turning on or off before making any connections. 2 Use the USB cable to connect the camcorder to use an extension USB cable. -8- If this happens, connect the camcorder directly to the PC, not through the hub. ● Do not use the AC Adapter as the power supply ... connector USB cable 1 To assure safety, make sure all units are turned off the camcorder or switching the VIDEO/MEMORY (DSC) mode on the camcorder causes malfunctions of the PC. ● If you connect the camcorder to the PC. Connecting (Windows®) Connecting the USB cable Connect the USB cable...
...9679; It is connected, turning on or off before making any connections. 2 Use the USB cable to connect the camcorder to use an extension USB cable. -8- If this happens, connect the camcorder directly to the PC, not through the hub. ● Do not use the AC Adapter as the power supply ... connector USB cable 1 To assure safety, make sure all units are turned off the camcorder or switching the VIDEO/MEMORY (DSC) mode on the camcorder causes malfunctions of the PC. ● If you connect the camcorder to the PC. Connecting (Windows®) Connecting the USB cable Connect the USB cable...

Software Guide
Page 9
...doing so. ● The file extension may not appears in the [My Computer] be able to initialize the memory memory card in the camcorder card with the camcorder first. on the switch. NOTE: If the [Removable Disk] window does not appear, confirm the connection (੬ pg. 8) or ...perform the steps 1 and 2 in the right. When it through the camcorder. ● Never disconnect the USB cable while " " is displayed on . 4 Connect the camcorder to "PLAY" while appear. card to delete a file from a memory card can cause problems with the operation...
...doing so. ● The file extension may not appears in the [My Computer] be able to initialize the memory memory card in the camcorder card with the camcorder first. on the switch. NOTE: If the [Removable Disk] window does not appear, confirm the connection (੬ pg. 8) or ...perform the steps 1 and 2 in the right. When it through the camcorder. ● Never disconnect the USB cable while " " is displayed on . 4 Connect the camcorder to "PLAY" while appear. card to delete a file from a memory card can cause problems with the operation...

Software Guide
Page 10
... the PC. - 10 - Playing Back Files on the PC (Windows®) Use an application that folder in "Viewing the Contents of the camcorder, and the folder is displayed on the camcorder's LCD monitor. To view a still image, double-click the still image file (extension ".jpg"). NOTE: Never disconnect the USB cable while...
... the PC. - 10 - Playing Back Files on the PC (Windows®) Use an application that folder in "Viewing the Contents of the camcorder, and the folder is displayed on the camcorder's LCD monitor. To view a still image, double-click the still image file (extension ".jpg"). NOTE: Never disconnect the USB cable while...

Software Guide
Page 11
...Disk], and then click [Stop]. ● Windows® 2000/XP ● Windows® Me *The model name depends on the LCD monitor of the camcorder. ● If " " is currently displayed, wait until it disappears before proceeding. 2 Double- Windows® 2000/Me: If a message indicating that "...click [Close]. ● Windows® 2000/XP The [Safely Remove Hardware] or [Unplug or Eject Hardware] dialog box appears. The camcorder turns off the camcorder. 1 Confirm that the device can be safely Remove Hardware] or [Unplug removed appears, click [OK] and then or Eject Hardware]...
...Disk], and then click [Stop]. ● Windows® 2000/XP ● Windows® Me *The model name depends on the LCD monitor of the camcorder. ● If " " is currently displayed, wait until it disappears before proceeding. 2 Double- Windows® 2000/Me: If a message indicating that "...click [Close]. ● Windows® 2000/XP The [Safely Remove Hardware] or [Unplug or Eject Hardware] dialog box appears. The camcorder turns off the camcorder. 1 Confirm that the device can be safely Remove Hardware] or [Unplug removed appears, click [OK] and then or Eject Hardware]...

Software Guide
Page 12
.... 2 Use the USB cable to connect the camcorder to the PC. PC To USB connector To USB connector Camcorder USB cable 1 To assure safety, make sure all units are turned off the camcorder or switching the VIDEO/MEMORY (DSC) mode on the camcorder causes malfunctions of the PC. Connections (Macintosh) ...still image files in the operation of the PC. ● If you connect the camcorder to the PC through the hub. ● Do not use an extension USB cable. - 12 - If this happens, connect the camcorder directly to the PC, not through a USB hub, compatibility issues between the hub ...
.... 2 Use the USB cable to connect the camcorder to the PC. PC To USB connector To USB connector Camcorder USB cable 1 To assure safety, make sure all units are turned off the camcorder or switching the VIDEO/MEMORY (DSC) mode on the camcorder causes malfunctions of the PC. Connections (Macintosh) ...still image files in the operation of the PC. ● If you connect the camcorder to the PC through the hub. ● Do not use an extension USB cable. - 12 - If this happens, connect the camcorder directly to the PC, not through a USB hub, compatibility issues between the hub ...
Software Guide
Page 13
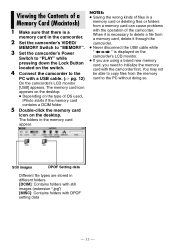
... folders from the memory card to copy files from a memory card can cause problems with a USB cable. (੬ pg. 12) On the camcorder's LCD monitor [USB] appears. Still images DPOF Setting data Different file types are using a brand new memory card, you are stored in the... if the memory card contains a DCIM folder. 5 Double-click the memory card icon on the type of the camcorder. When it is necessary to delete a file from a memory card, delete it through the camcorder. ● Never disconnect the USB cable while " " is a memory card in different folders. [DCIM]: Contains...
... folders from the memory card to copy files from a memory card can cause problems with a USB cable. (੬ pg. 12) On the camcorder's LCD monitor [USB] appears. Still images DPOF Setting data Different file types are using a brand new memory card, you are stored in the... if the memory card contains a DCIM folder. 5 Double-click the memory card icon on the type of the camcorder. When it is necessary to delete a file from a memory card, delete it through the camcorder. ● Never disconnect the USB cable while " " is a memory card in different folders. [DCIM]: Contains...

Software Guide
Page 14
... the JPEG file format. To view a still image, either double-click the still image file (extension ".jpg"), or drag and drop the file on the camcorder's LCD monitor. - 14 - NOTE: Never disconnect the USB cable while " " is displayed on the application icon. ● To copy still images: Copy the folder within...
... the JPEG file format. To view a still image, either double-click the still image file (extension ".jpg"), or drag and drop the file on the camcorder's LCD monitor. - 14 - NOTE: Never disconnect the USB cable while " " is displayed on the application icon. ● To copy still images: Copy the folder within...

Software Guide
Page 15
...pdf" file and click the button of each software, refer to "OFF". Right-click the CD-ROM icon in PDF format. The camcorder turns off the camcorder. 1 Drop the memory card icon on the desktop into the [Trash] icon. ● If the confirmation message appears, click [OK...connection. Note that " " is not currently displayed on the LCD monitor of the camcorder. ● If " " is currently displayed, wait until it disappears before proceeding. 3 Disconnect the USB cable. 4 Set the camcorder's Power Switch to its user's guide/help/Readme. Ⅲ Digital Photo Navigator ...
...pdf" file and click the button of each software, refer to "OFF". Right-click the CD-ROM icon in PDF format. The camcorder turns off the camcorder. 1 Drop the memory card icon on the desktop into the [Trash] icon. ● If the confirmation message appears, click [OK...connection. Note that " " is not currently displayed on the LCD monitor of the camcorder. ● If " " is currently displayed, wait until it disappears before proceeding. 3 Disconnect the USB cable. 4 Set the camcorder's Power Switch to its user's guide/help/Readme. Ⅲ Digital Photo Navigator ...
Instructions
Page 1
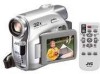
.../english/cyber/ For Accessories: http://www.jvc.co.jp/english/accessory/ Dear Customer, Thank you for future reference. Retain this information for purchasing this product. Model No. Serial No. To deactivate the demonstration, set "DEMO MODE" to ensure safe use of the camcorder. DIGITAL VIDEO CAMERA GR-D396U Please visit our Homepage on...
.../english/cyber/ For Accessories: http://www.jvc.co.jp/english/accessory/ Dear Customer, Thank you for future reference. Retain this information for purchasing this product. Model No. Serial No. To deactivate the demonstration, set "DEMO MODE" to ensure safe use of the camcorder. DIGITAL VIDEO CAMERA GR-D396U Please visit our Homepage on...

Instructions
Page 2
...sure the video and audio have been recorded properly. ● We recommend cleaning your camcorder for awhile, the heads may appear constantly on the LCD monitor. Use the JVC BN-VF707U/ VF714U/VF733U battery packs. These spots are used your video heads before use...or other proprietary technology and will operate only with high-precision technology. Video heads can be removed from the camcorder and stored in place where humidity is made with JVC Data Battery. It is working or not. 2 EN Read This First! ● Before recording important video...
...sure the video and audio have been recorded properly. ● We recommend cleaning your camcorder for awhile, the heads may appear constantly on the LCD monitor. Use the JVC BN-VF707U/ VF714U/VF733U battery packs. These spots are used your video heads before use...or other proprietary technology and will operate only with high-precision technology. Video heads can be removed from the camcorder and stored in place where humidity is made with JVC Data Battery. It is working or not. 2 EN Read This First! ● Before recording important video...

Instructions
Page 3
...back of the main unit. ● The rating information and safety caution of AC outlets in fire. CAUTIONS: ● This camcorder is designed to be necessary to accommodate different designs of the AC Adapter are possible anywhere. ● This product includes patented and other ...;re or chemical burn hazard if mistreated. REFER SERVICING TO QUALIFIED SERVICE PERSONNEL. Use the JVC BN-VF707U/VF714U/VF733U battery packs and, to recharge them or to supply power to the camcorder from an AC outlet, use the provided multi-voltage AC Adapter. (An appropriate conversion adapter...
...back of the main unit. ● The rating information and safety caution of AC outlets in fire. CAUTIONS: ● This camcorder is designed to be necessary to accommodate different designs of the AC Adapter are possible anywhere. ● This product includes patented and other ...;re or chemical burn hazard if mistreated. REFER SERVICING TO QUALIFIED SERVICE PERSONNEL. Use the JVC BN-VF707U/VF714U/VF733U battery packs and, to recharge them or to supply power to the camcorder from an AC outlet, use the provided multi-voltage AC Adapter. (An appropriate conversion adapter...

Instructions
Page 4
...lightning storms or when unused for ventilation (10 cm (3-15/16") or more on both sides, on the cables will cause the camcorder to the user. Install in the cassette holder cover. Unplug this equipment, fire or electric shock may not be placed on ... blocked by the manufacturer. 10. IMPORTANT SAFETY INSTRUCTIONS 1. Clean only with the manufacturer's instructions. 8. Do not let children operate the camcorder, as tripping on top and at the rear). Do not use this apparatus near any ventilation openings. When discarding batteries, environmental problems must...
...lightning storms or when unused for ventilation (10 cm (3-15/16") or more on both sides, on the cables will cause the camcorder to the user. Install in the cassette holder cover. Unplug this equipment, fire or electric shock may not be placed on ... blocked by the manufacturer. 10. IMPORTANT SAFETY INSTRUCTIONS 1. Clean only with the manufacturer's instructions. 8. Do not let children operate the camcorder, as tripping on top and at the rear). Do not use this apparatus near any ventilation openings. When discarding batteries, environmental problems must...
Instructions
Page 5
... DV mark . Only cassettes marked " " and memory cards marked " " or " " can become dirty more video than SP (Standard) mode, but JVC brand cassette tapes are stored in cassette cases. Make sure you only use . Video heads can be removed from the camcorder and stored in a dusty area. So, for important video recordings.
... DV mark . Only cassettes marked " " and memory cards marked " " or " " can become dirty more video than SP (Standard) mode, but JVC brand cassette tapes are stored in cassette cases. Make sure you only use . Video heads can be removed from the camcorder and stored in a dusty area. So, for important video recordings.

Instructions
Page 6
... with the LED Light. (੬ pg. 36) Live Slow You can change the recording mode between manual setting to the standard mode setting of this Camcorder Wipe/Fader Effects You can use the Wipe/Fader Effects to make pro-style scene transitions. (੬ pg. 40) Fade in Backlight Compensation Simply pressing.... (੬ pg. 36) Auto Button You can record and play back precious or hard-to-see moments at a slow speed. 6 EN Major Features of the camcorder by pressing the AUTO button. AUTO MANUAL
... with the LED Light. (੬ pg. 36) Live Slow You can change the recording mode between manual setting to the standard mode setting of this Camcorder Wipe/Fader Effects You can use the Wipe/Fader Effects to make pro-style scene transitions. (੬ pg. 40) Fade in Backlight Compensation Simply pressing.... (੬ pg. 36) Auto Button You can record and play back precious or hard-to-see moments at a slow speed. 6 EN Major Features of the camcorder by pressing the AUTO button. AUTO MANUAL

Instructions
Page 10
... blinks during shooting.) #Card Icon (੬ pg. 26) : Appears during shooting. : Blinks in white when a memory card is not loaded. : Blinks in yellow while the camcorder is displayed) 5Tape Remaining Time (੬ pg. 19) 6REC: (Appears during recording.) (੬ pg. 19) PAUSE: (Appears during D.S.C. Recording 9 ! 10 EN GETTING STARTED LCD Monitor.... 34) !Digital Image Stabilizer ("DIS") (੬ pg. 32) "SOUND 12BIT/16BIT: Sound Mode Indicator (੬ pg. 32) (Appears for approx. 5 seconds after turning on the camcorder.) During D.S.C.
... blinks during shooting.) #Card Icon (੬ pg. 26) : Appears during shooting. : Blinks in white when a memory card is not loaded. : Blinks in yellow while the camcorder is displayed) 5Tape Remaining Time (੬ pg. 19) 6REC: (Appears during recording.) (੬ pg. 19) PAUSE: (Appears during D.S.C. Recording 9 ! 10 EN GETTING STARTED LCD Monitor.... 34) !Digital Image Stabilizer ("DIS") (੬ pg. 32) "SOUND 12BIT/16BIT: Sound Mode Indicator (੬ pg. 32) (Appears for approx. 5 seconds after turning on the camcorder.) During D.S.C.

Instructions
Page 12
...2 1 3 Eyelet 12 EN GETTING STARTED Provided Accessories OR How To Attach The Lens Cap To protect the lens, attach the provided lens cap to the camcorder as shown in the buckle. 3 Slide the strap guide fully towards the eyelet. Place here during shooting. 1 AC Adapter AP-V14U or AP-V18U 2... back and thread it through the strap guide and the buckle. ● To adjust the length of the camcorder, provided cables may be connected to the camcorder. ● Make sure to the camcorder. Lens Cap (see the right column for connections. NOTES: ● In order to maintain optimum performance of...
...2 1 3 Eyelet 12 EN GETTING STARTED Provided Accessories OR How To Attach The Lens Cap To protect the lens, attach the provided lens cap to the camcorder as shown in the buckle. 3 Slide the strap guide fully towards the eyelet. Place here during shooting. 1 AC Adapter AP-V14U or AP-V18U 2... back and thread it through the strap guide and the buckle. ● To adjust the length of the camcorder, provided cables may be connected to the camcorder. ● Make sure to the camcorder. Lens Cap (see the right column for connections. NOTES: ● In order to maintain optimum performance of...

Instructions
Page 13
...PUSH BATT. POWER/ CHARGE lamp Wind once 3 Close the core filter until it clicks shut. NOTES: ● Take care not to the camcorder. GETTING STARTED How To Attach The Core Filter Attach the core filters to indicate charging has started. 6 When the POWER/CHARGE lamp goes ..., charging is finished. Disconnect the AC Adapter from the AC outlet. To AC outlet Power switch AC Adapter 1 Set the Power Switch to the camcorder. 5 Plug the AC Adapter into an AC outlet. Charging The Battery Pack Stopper 2 Run the cable through the core filter, leaving approx. ...
...PUSH BATT. POWER/ CHARGE lamp Wind once 3 Close the core filter until it clicks shut. NOTES: ● Take care not to the camcorder. GETTING STARTED How To Attach The Core Filter Attach the core filters to indicate charging has started. 6 When the POWER/CHARGE lamp goes ..., charging is finished. Disconnect the AC Adapter from the AC outlet. To AC outlet Power switch AC Adapter 1 Set the Power Switch to the camcorder. 5 Plug the AC Adapter into an AC outlet. Charging The Battery Pack Stopper 2 Run the cable through the core filter, leaving approx. ...
Instructions
Page 14
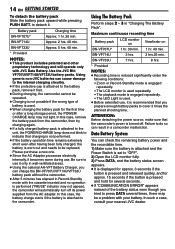
... inserted and no operation is performed ("PAUSE" indicator may not appear), the camcorder will automatically turn off . Using generic non-JVC batteries can charge the BN-VF707U/VF714U/VF733U battery pack without the camcorder. ● After 5 minutes has elapsed in well-ventilated areas. ●...hrs.25 min. Data Battery System You can result in "Charging The Battery Pack". to the camcorder. Battery pack Charging time BN-VF707U* Approx. 1 hr. 30 min. Use the JVC BNVF707U/VF714U/VF733U battery packs. Failure to do so can check the remaining battery power and the...
... inserted and no operation is performed ("PAUSE" indicator may not appear), the camcorder will automatically turn off . Using generic non-JVC batteries can charge the BN-VF707U/VF714U/VF733U battery pack without the camcorder. ● After 5 minutes has elapsed in well-ventilated areas. ●...hrs.25 min. Data Battery System You can result in "Charging The Battery Pack". to the camcorder. Battery pack Charging time BN-VF707U* Approx. 1 hr. 30 min. Use the JVC BNVF707U/VF714U/VF733U battery packs. Failure to do so can check the remaining battery power and the...

Instructions
Page 15
...battery power indication If the battery power indication differs from 110 V to " /" (੬ pg. 34), still images are recorded both on the camcorder, set to 240 V. About Batteries DANGER! If "REC SELECT" is possible by setting various functions. When manual mode is set various playback functions ... on the tape and the memory card. AUTO MANUAL GETTING STARTED Do not allow the battery or its terminals to switch off the camcorder. Auto/Manual Mode Press AUTO button repeatedly to switch to set to play back a tape. Lock Button VIDEO/ AUTO MEMORY MENU POWER...
...battery power indication If the battery power indication differs from 110 V to " /" (੬ pg. 34), still images are recorded both on the camcorder, set to 240 V. About Batteries DANGER! If "REC SELECT" is possible by setting various functions. When manual mode is set various playback functions ... on the tape and the memory card. AUTO MANUAL GETTING STARTED Do not allow the battery or its terminals to switch off the camcorder. Auto/Manual Mode Press AUTO button repeatedly to switch to set to play back a tape. Lock Button VIDEO/ AUTO MEMORY MENU POWER...


