
Instructions
Page 2
... internal charging circuitry. ● This camcorder is designed exclusively for important recordings, we recommend using SP mode. ● For safety and reliability. in a closed car in use without proper permission is not in summer. - These spots are used your cassette tapes and camcorder are stored in cassette cases. So, for the digital video cassette, SD Memory Card and MultiMediaCard. Use the JVC BN-VF707U/ VF714U/VF733U battery packs. Any commercial use and check...
... internal charging circuitry. ● This camcorder is designed exclusively for important recordings, we recommend using SP mode. ● For safety and reliability. in a closed car in use without proper permission is not in summer. - These spots are used your cassette tapes and camcorder are stored in cassette cases. So, for the digital video cassette, SD Memory Card and MultiMediaCard. Use the JVC BN-VF707U/ VF714U/VF733U battery packs. Any commercial use and check...

Instructions
Page 7
... Shooting 20 Time Code 20 Quick Review 21 Recording From The Middle Of A Tape...... 21 VIDEO PLAYBACK 21 Normal Playback 21 Still Playback 21 Shuttle Search 22 Blank Search 22 Connections To A TV Or VCR 23 Playback Using The Remote Control 24 DIGITAL STILL CAMERA (D.S.C.) RECORDING & PLAYBACK 26 D.S.C. RECORDING 26 Basic Shooting (D.S.C. PLAYBACK 27 Normal Playback Of Images 27 Auto Playback Of Images 27 Index Playback Of Files 27 Removing On-Screen Display 27 ADDITIONAL FEATURES FOR D.S.C 28 Resetting The File Name 28 Protecting Files 28 Deleting Files 29 Setting...
... Shooting 20 Time Code 20 Quick Review 21 Recording From The Middle Of A Tape...... 21 VIDEO PLAYBACK 21 Normal Playback 21 Still Playback 21 Shuttle Search 22 Blank Search 22 Connections To A TV Or VCR 23 Playback Using The Remote Control 24 DIGITAL STILL CAMERA (D.S.C.) RECORDING & PLAYBACK 26 D.S.C. RECORDING 26 Basic Shooting (D.S.C. PLAYBACK 27 Normal Playback Of Images 27 Auto Playback Of Images 27 Index Playback Of Files 27 Removing On-Screen Display 27 ADDITIONAL FEATURES FOR D.S.C 28 Resetting The File Name 28 Protecting Files 28 Deleting Files 29 Setting...
Instructions
Page 9
...; pg. 27) LED Light Button [LIGHT] !Diopter Adjustment Control (੬ pg. 17) "Auto Button [AUTO] (੬ pg. 15) #Snapshot Button [SNAPSHOT] (੬ pg. 26, 37) Live Slow Button (੬ pg. 31, 36) $Power Zoom Lever [T/W] (੬ pg. 20) Speaker Volume Control [VOL pg. 21) %Battery Release Button [PUSH BATT.] (੬ pg. 13) &Recording Start/Stop Button (੬ pg. 19) (Power Switch [REC, PLAY, OFF] (੬ pg. 15) )Lock Button (੬ pg. 15) ~Cassette Open/Eject Switch [OPEN/EJECT] (੬ pg. 18...
...; pg. 27) LED Light Button [LIGHT] !Diopter Adjustment Control (੬ pg. 17) "Auto Button [AUTO] (੬ pg. 15) #Snapshot Button [SNAPSHOT] (੬ pg. 26, 37) Live Slow Button (੬ pg. 31, 36) $Power Zoom Lever [T/W] (੬ pg. 20) Speaker Volume Control [VOL pg. 21) %Battery Release Button [PUSH BATT.] (੬ pg. 13) &Recording Start/Stop Button (੬ pg. 19) (Power Switch [REC, PLAY, OFF] (੬ pg. 15) )Lock Button (੬ pg. 15) ~Cassette Open/Eject Switch [OPEN/EJECT] (੬ pg. 18...
Instructions
Page 14
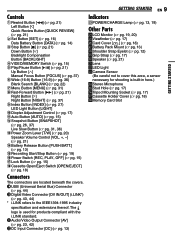
... the Power Switch is set to "OFF". 2) Open the LCD monitor fully. 3) Press DATA, and the battery status screen appears. ● It is displayed for approx. 3 seconds if the button is pressed and released quickly, and for approx. 15 seconds if the button is worn out and needs to indicate that the camcorder's power is used . ● Before extended use . BN-VF714U Approx. 2 hrs. 40 min. Battery pack Charging time...
... the Power Switch is set to "OFF". 2) Open the LCD monitor fully. 3) Press DATA, and the battery status screen appears. ● It is displayed for approx. 3 seconds if the button is pressed and released quickly, and for approx. 15 seconds if the button is worn out and needs to indicate that the camcorder's power is used . ● Before extended use . BN-VF714U Approx. 2 hrs. 40 min. Battery pack Charging time...

Instructions
Page 15
... tape. ● Allows you to set to "REC", the currently selected image size appears. Lock Button VIDEO/ AUTO MEMORY MENU POWER/ CHARGE lamp Power Switch Choose the appropriate operation mode according to your preference using the menus. (੬ pg. 32) OFF: Allows you to record in a memory card or access data stored in the AC range from the actual operating time, fully charge the battery, and then run it may not turn on the camcorder, set to 240 V. Operation Mode To turn...
... tape. ● Allows you to set to "REC", the currently selected image size appears. Lock Button VIDEO/ AUTO MEMORY MENU POWER/ CHARGE lamp Power Switch Choose the appropriate operation mode according to your preference using the menus. (੬ pg. 32) OFF: Allows you to record in a memory card or access data stored in the AC range from the actual operating time, fully charge the battery, and then run it may not turn on the camcorder, set to 240 V. Operation Mode To turn...

Instructions
Page 19
...) ● Loading A Cassette (੬ pg. 18) VIDEO/MEMORY Zoom Lever POWER/CHARGE Lamp Lock Button Recording Start/Stop Button 1 Remove the lens cap. (੬ pg. 12) 2 Open the LCD monitor fully. 3 Set the VIDEO/MEMORY Switch to "VIDEO". 4 Set the Power Switch to the desired mode in LP (Long Play) mode, ੬ pg. 32. 5 To start recording, press the Recording Start/ Stop Button. The camcorder re-enters the Record-Standby mode. Tape Remaining Time Approximate tape remaining time appears on the LCD monitor and the viewfinder...
...) ● Loading A Cassette (੬ pg. 18) VIDEO/MEMORY Zoom Lever POWER/CHARGE Lamp Lock Button Recording Start/Stop Button 1 Remove the lens cap. (੬ pg. 12) 2 Open the LCD monitor fully. 3 Set the VIDEO/MEMORY Switch to "VIDEO". 4 Set the Power Switch to the desired mode in LP (Long Play) mode, ੬ pg. 32. 5 To start recording, press the Recording Start/ Stop Button. The camcorder re-enters the Record-Standby mode. Tape Remaining Time Approximate tape remaining time appears on the LCD monitor and the viewfinder...

Instructions
Page 27
... Of Images". 2 Press INDEX. Operation mode indicator Folder/file number ON SCREEN DIGITAL STILL CAMERA (D.S.C.) RECORDING & PLAYBACK Auto Playback Of Images You can run through a photo album. 2 6 1 Lock Button Power Switch VIDEO/ MEMORY 7 MENU 1 Load a memory card. (੬ pg. 18) 2 Set the VIDEO/MEMORY Switch to "MEMORY". 3 Set the Power Switch to "PLAY" while pressing down the Lock Button located on the card with another device with the camcorder are displayed in descending order. ● If you want. 1 Perform steps 1 - 3 in the memory card. You can view...
... Of Images". 2 Press INDEX. Operation mode indicator Folder/file number ON SCREEN DIGITAL STILL CAMERA (D.S.C.) RECORDING & PLAYBACK Auto Playback Of Images You can run through a photo album. 2 6 1 Lock Button Power Switch VIDEO/ MEMORY 7 MENU 1 Load a memory card. (੬ pg. 18) 2 Set the VIDEO/MEMORY Switch to "MEMORY". 3 Set the Power Switch to "PLAY" while pressing down the Lock Button located on the card with another device with the camcorder are displayed in descending order. ● If you want. 1 Perform steps 1 - 3 in the memory card. You can view...

Instructions
Page 31
... camcorder settings. (੬ pg. 31 - 35) 1 3 2 Lock Button VIDEO/ MEMORY 4 MENU Power Switch 1 For Video and D.S.C. Screen for Video and Screen for Video D.S.C. Video Playback Menu SP LP REC MODE (੬ pg. 35) SOUND MODE (੬ pg. 35) NARRATION (੬ pg. 35) BRIGHT (੬ pg. 35) DATE/TIME (੬ pg. 35) ON SCREEN (੬ pg. 35) TIME CODE (੬ pg. 35) Selected menu icon Example: REC MODE Menu REC MODE 1) Press 3 or 4 to "PLAY" while pressing down the Lock Button located on the switch...
... camcorder settings. (੬ pg. 31 - 35) 1 3 2 Lock Button VIDEO/ MEMORY 4 MENU Power Switch 1 For Video and D.S.C. Screen for Video and Screen for Video D.S.C. Video Playback Menu SP LP REC MODE (੬ pg. 35) SOUND MODE (੬ pg. 35) NARRATION (੬ pg. 35) BRIGHT (੬ pg. 35) DATE/TIME (੬ pg. 35) ON SCREEN (੬ pg. 35) TIME CODE (੬ pg. 35) Selected menu icon Example: REC MODE Menu REC MODE 1) Press 3 or 4 to "PLAY" while pressing down the Lock Button located on the switch...

Instructions
Page 32
... there may be played back on this camcorder. ● During playback of a tape recorded on the zoom position, the lens may not be possible if hand shake is excessive, or depending on the shooting condition. ● The " " indicator blinks or goes out if the Stabilizer cannot be changed only when the Power Switch is set to "REC". [ ] = Factory-preset REC MODE [SP]*: To record in the sound. NOTES: ●...
... there may be played back on this camcorder. ● During playback of a tape recorded on the zoom position, the lens may not be possible if hand shake is excessive, or depending on the shooting condition. ● The " " indicator blinks or goes out if the Stabilizer cannot be changed only when the Power Switch is set to "REC". [ ] = Factory-preset REC MODE [SP]*: To record in the sound. NOTES: ●...

Instructions
Page 33
... "PLAY". [ ] = Factory-preset MELODY OFF: Even though not heard while shooting, shutter sound is recorded on the tape. [ON]: A melody sounds when any operation is performed. AUTO : The shutter speed is displayed. Shooting a subject in low or poor lighting at slow shutter speed provides a brighter image than in the viewfinder when the viewfinder is pulled out while the LCD monitor is opened . While the shutter speed is being automatically adjusted, " " is automatically adjusted...
... "PLAY". [ ] = Factory-preset MELODY OFF: Even though not heard while shooting, shutter sound is recorded on the tape. [ON]: A melody sounds when any operation is performed. AUTO : The shutter speed is displayed. Shooting a subject in low or poor lighting at slow shutter speed provides a brighter image than in the viewfinder when the viewfinder is pulled out while the LCD monitor is opened . While the shutter speed is being automatically adjusted, " " is automatically adjusted...
Instructions
Page 35
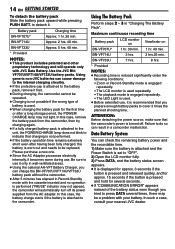
... stereo on both "L" and "R" channels in VIDEO Menu when using this camcorder as in which the recording was made, and plays the sound back. BRIGHT ੬ pg. 17, "Brightness Adjustment Of The Display" DATE/TIME [OFF]: The DATE/TIME does not appear. ADVANCED FEATURES SOUND MODE [STEREO ]: Sound is recommended you to set the video recording mode (SP or LP) depending on page 31, select "SOUND MODE" or "NARRATION" from the "R" channel...
... stereo on both "L" and "R" channels in VIDEO Menu when using this camcorder as in which the recording was made, and plays the sound back. BRIGHT ੬ pg. 17, "Brightness Adjustment Of The Display" DATE/TIME [OFF]: The DATE/TIME does not appear. ADVANCED FEATURES SOUND MODE [STEREO ]: Sound is recommended you to set the video recording mode (SP or LP) depending on page 31, select "SOUND MODE" or "NARRATION" from the "R" channel...

Instructions
Page 37
... recorded image is not grainy, it may look like photographs onto a tape. 1 Set the VIDEO/MEMORY Switch to "VIDEO". 2 Set the Power Switch to "REC". To prevent this case, use of a tripod is selected. Manual focus is recommended in situations listed below. ● When two subjects overlap in the same scene. ● When illumination is strobing due to the slow shutter speed. 1 Set the Power Switch to both " " or " ". ● Snapshot mode...
... recorded image is not grainy, it may look like photographs onto a tape. 1 Set the VIDEO/MEMORY Switch to "VIDEO". 2 Set the Power Switch to "REC". To prevent this case, use of a tripod is selected. Manual focus is recommended in situations listed below. ● When two subjects overlap in the same scene. ● When illumination is strobing due to the slow shutter speed. 1 Set the Power Switch to both " " or " ". ● Snapshot mode...

Instructions
Page 44
... camcorder. ● When using a DV cable, make sure to a PC. [B] Using DV cable It is displayed on the LCD monitor since this can result in the camcorder or the camcorder is not powered, the camcorder does not enter the USB mode. ● The date/time information cannot be captured into the PC. ● Refer to the instruction manuals of the PC and Software. ● The still images can use the AC Adapter...
... camcorder. ● When using a DV cable, make sure to a PC. [B] Using DV cable It is displayed on the LCD monitor since this can result in the camcorder or the camcorder is not powered, the camcorder does not enter the USB mode. ● The date/time information cannot be captured into the PC. ● Refer to the instruction manuals of the PC and Software. ● The still images can use the AC Adapter...

Instructions
Page 46
... connected properly. ➜Connect the AC Adapter securely. (੬ pg. 14) ● The battery pack is set to "MEMORY". ➜Set the VIDEO/MEMORY Switch to the Auto mode. (੬ pg. 37) ● The lens is selected. ➜Disengage the 16:9 (16:9 indicator) Wide mode. (੬ pg. 36) Playback The tape is moving, but there is no playback picture and the screen becomes blue. ➜Clean the video heads with an optional cleaning cassette...
... connected properly. ➜Connect the AC Adapter securely. (੬ pg. 14) ● The battery pack is set to "MEMORY". ➜Set the VIDEO/MEMORY Switch to the Auto mode. (੬ pg. 37) ● The lens is selected. ➜Disengage the 16:9 (16:9 indicator) Wide mode. (੬ pg. 36) Playback The tape is moving, but there is no playback picture and the screen becomes blue. ➜Clean the video heads with an optional cleaning cassette...
Instructions
Page 47
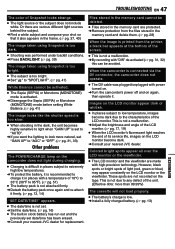
... (MONOTONE) mode before setting White Balance. (੬ pg. 41) The image looks like the shutter speed is too slow. ● When shooting in the memory card are not recorded on the LCD monitor become dark due to "AGC" or "OFF". (੬ pg. 31, 33) Other problems The POWER/CHARGE lamp on again, then operate it firmly. (੬ pg. 13, 14) "SET DATE/TIME!" TROUBLESHOOTING EN 47 The color of the screen. ●...
... (MONOTONE) mode before setting White Balance. (੬ pg. 41) The image looks like the shutter speed is too slow. ● When shooting in the memory card are not recorded on the LCD monitor become dark due to "AGC" or "OFF". (੬ pg. 31, 33) Other problems The POWER/CHARGE lamp on again, then operate it firmly. (੬ pg. 13, 14) "SET DATE/TIME!" TROUBLESHOOTING EN 47 The color of the screen. ●...

Instructions
Page 48
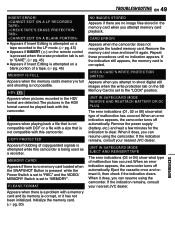
... the Power Switch is set to "REC" and the VIDEO/MEMORY Switch is set to "VIDEO". (੬ pg. 15) USE CLEANING CASSETTE Appears if dirt is set to "REC" and the VIDEO/MEMORY Switch is detected on a blank portion of some kind has occured. Appears if a tape is not loaded when the Recording Start/Stop Button or SNAPSHOT Button is pressed while the Power Switch is set to "VIDEO". 48 EN TROUBLESHOOTING The memory card cannot be removed from the camcorder...
... the Power Switch is set to "REC" and the VIDEO/MEMORY Switch is set to "VIDEO". (੬ pg. 15) USE CLEANING CASSETTE Appears if dirt is set to "REC" and the VIDEO/MEMORY Switch is detected on a blank portion of some kind has occured. Appears if a tape is not loaded when the Recording Start/Stop Button or SNAPSHOT Button is pressed while the Power Switch is set to "VIDEO". 48 EN TROUBLESHOOTING The memory card cannot be removed from the camcorder...
Instructions
Page 49
TROUBLESHOOTING EN 49 INSERT ERROR!
TROUBLESHOOTING EN 49 INSERT ERROR!
Instructions
Page 52
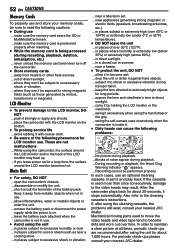
....). ... never unload the memory card and never turn off the camcorder. ● Store memory cards ... where they won 't be performed properly. allow it against hard objects. ... remove the battery pack or disconnect the power supply while the power is inside it stops automatically. leave the battery pack attached when the camcorder is being accessed (during playback. ... near a television set. ... In such cases, use ... After the camcorder plays back for about...
....). ... never unload the memory card and never turn off the camcorder. ● Store memory cards ... where they won 't be performed properly. allow it against hard objects. ... remove the battery pack or disconnect the power supply while the power is inside it stops automatically. leave the battery pack attached when the camcorder is being accessed (during playback. ... near a television set. ... In such cases, use ... After the camcorder plays back for about...

Instructions
Page 54
...) Maximum recording time (using 80 min. For Digital Still Camera Storage media SD Memory Card/MultiMediaCard Compression system JPEG (compatible) File size Still image: 1 mode (640 x 480 pixels) Picture quality 2 modes (FINE/STANDARD) Approximate number of storable images ੬ pg. 26 For Connectors AV Video output: 1.0 V (p-p), 75 Ω, analog Audio output: 300 mV (rms), 1 kΩ, analog, stereo DV Input/output: 4-pin, IEEE1394 compliant USB Mini USB-B type, USB 1.1 compliant AC Adapter Power requirement AC 110 V to change without battery, cassette and lens cap) Approx...
...) Maximum recording time (using 80 min. For Digital Still Camera Storage media SD Memory Card/MultiMediaCard Compression system JPEG (compatible) File size Still image: 1 mode (640 x 480 pixels) Picture quality 2 modes (FINE/STANDARD) Approximate number of storable images ੬ pg. 26 For Connectors AV Video output: 1.0 V (p-p), 75 Ω, analog Audio output: 300 mV (rms), 1 kΩ, analog, stereo DV Input/output: 4-pin, IEEE1394 compliant USB Mini USB-B type, USB 1.1 compliant AC Adapter Power requirement AC 110 V to change without battery, cassette and lens cap) Approx...

Instructions
Page 55
... Playback Special Effects 25 Power-Linked Operation 16 Program AE, Effects and Shutter Effects ....... 41 Q Quick Review 21 R Recording Capacity Memory Card 26 Tape 19 Recording Media Selection 34 Remote Control 24 Resetting The File Name 28 S Slow-Motion Playback 25 Snapshot Mode 33, 37 Sound Mode 32, 35 Speaker Volume 21 Specifications 54 Spot Exposure Control 39 T Tape Speed (REC MODE 32, 35 Tele Macro 32 Time Code 20, 34, 35 Tripod Mounting 17 Troubleshooting 46-49 W Warning Indications 48, 49 White Balance...
... Playback Special Effects 25 Power-Linked Operation 16 Program AE, Effects and Shutter Effects ....... 41 Q Quick Review 21 R Recording Capacity Memory Card 26 Tape 19 Recording Media Selection 34 Remote Control 24 Resetting The File Name 28 S Slow-Motion Playback 25 Snapshot Mode 33, 37 Sound Mode 32, 35 Speaker Volume 21 Specifications 54 Spot Exposure Control 39 T Tape Speed (REC MODE 32, 35 Tele Macro 32 Time Code 20, 34, 35 Tripod Mounting 17 Troubleshooting 46-49 W Warning Indications 48, 49 White Balance...


