
Instructions
Page 1
... TERMS Back cover For Customer Use: Enter below the Model No. To deactivate the demonstration, set "DEMO MODE" to ensure safe use of the camcorder. Model No. and Serial No. Serial No. Before use, please read the safety information and precautions contained in the pages 3 - 4 and 10...LYT1435-001C Retain this product. which is located on the World Wide Web for Digital Video Camera: http://www.jvc.co.jp/english/cyber/ For Accessories: http://www.jvc.co.jp/english/accessory/ Dear Customer, Thank you for future reference. DIGITAL VIDEO CAMERA GR-D271 Please visit our...
... TERMS Back cover For Customer Use: Enter below the Model No. To deactivate the demonstration, set "DEMO MODE" to ensure safe use of the camcorder. Model No. and Serial No. Serial No. Before use, please read the safety information and precautions contained in the pages 3 - 4 and 10...LYT1435-001C Retain this product. which is located on the World Wide Web for Digital Video Camera: http://www.jvc.co.jp/english/cyber/ For Accessories: http://www.jvc.co.jp/english/accessory/ Dear Customer, Thank you for future reference. DIGITAL VIDEO CAMERA GR-D271 Please visit our...

Instructions
Page 2
2 EN Major Features of this Camcorder Wipe/Fader Effects You can use the Wipe/Fader Effects to make pro-style scene transitions. (੬ pg. 41) Fade in Backlight Compensation Simply pressing ...
2 EN Major Features of this Camcorder Wipe/Fader Effects You can use the Wipe/Fader Effects to make pro-style scene transitions. (੬ pg. 41) Fade in Backlight Compensation Simply pressing ...

Instructions
Page 3
...includes patented and other proprietary technology and will operate only with Panasonic (Matsushita Electric), Sanyo, Sony or Maxell CR2025. CAUTIONS: ● This camcorder is incorrectly replaced. ● Dispose of used battery promptly. ● Keep away from an AC outlet, use the provided multi-voltage AC ... a small amount of these materials may present a fire or chemical burn hazard if mistreated. Disposal of mercury. Replace battery with JVC Data Battery. SAFETY PRECAUTIONS CAUTION RISK OF ELECTRIC SHOCK DO NOT OPEN CAUTION: TO REDUCE THE RISK OF ELECTRIC SHOCK, DO NOT...
...includes patented and other proprietary technology and will operate only with Panasonic (Matsushita Electric), Sanyo, Sony or Maxell CR2025. CAUTIONS: ● This camcorder is incorrectly replaced. ● Dispose of used battery promptly. ● Keep away from an AC outlet, use the provided multi-voltage AC ... a small amount of these materials may present a fire or chemical burn hazard if mistreated. Disposal of mercury. Replace battery with JVC Data Battery. SAFETY PRECAUTIONS CAUTION RISK OF ELECTRIC SHOCK DO NOT OPEN CAUTION: TO REDUCE THE RISK OF ELECTRIC SHOCK, DO NOT...
Instructions
Page 4
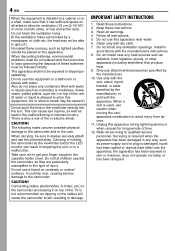
... is installed in a cabinet or on a shelf, make sure that produce heat. 9. The following notes concern possible physical damage to the camcorder and to qualified service personnel. CAUTION! IMPORTANT SAFETY INSTRUCTIONS 1. Install in a malfunction. This can result in dropping the unit, or in ...liquids (such as radiators, heat registers, stoves, or other apparatus (including amplifiers) that it on the cables will cause the camcorder to the malfunctioning of internal circuitry. Use only with the cart, stand, tripod, bracket, or table specified by the viewfinder and...
... is installed in a cabinet or on a shelf, make sure that produce heat. 9. The following notes concern possible physical damage to the camcorder and to qualified service personnel. CAUTION! IMPORTANT SAFETY INSTRUCTIONS 1. Install in a malfunction. This can result in dropping the unit, or in ...liquids (such as radiators, heat registers, stoves, or other apparatus (including amplifiers) that it on the cables will cause the camcorder to the malfunctioning of internal circuitry. Use only with the cart, stand, tripod, bracket, or table specified by the viewfinder and...

Instructions
Page 8
...number of shots that can be stored during shooting. : Blinks in white when a memory card is not loaded. : Blinks in yellow while the camcorder is running.) C Selected Wide Mode Indicator (੬ pg. 33) D : Live Slow Indicator (੬ pg. 37) : Snapshot Indicator (੬... Image Stabilizer ("DIS") (੬ pg. 32) M SOUND 12BIT/16BIT: Sound Mode Indicator (੬ pg. 32) (Appears for approx. 5 seconds after turning on the camcorder.) During D.S.C. 8 EN GETTING STARTED LCD Monitor/Viewfinder Indications During Video Recording Only 1234 5 6 1h40m REC 7 8 9 0 e SOUND 12 B I T w 15:55...
...number of shots that can be stored during shooting. : Blinks in white when a memory card is not loaded. : Blinks in yellow while the camcorder is running.) C Selected Wide Mode Indicator (੬ pg. 33) D : Live Slow Indicator (੬ pg. 37) : Snapshot Indicator (੬... Image Stabilizer ("DIS") (੬ pg. 32) M SOUND 12BIT/16BIT: Sound Mode Indicator (੬ pg. 32) (Appears for approx. 5 seconds after turning on the camcorder.) During D.S.C. 8 EN GETTING STARTED LCD Monitor/Viewfinder Indications During Video Recording Only 1234 5 6 1h40m REC 7 8 9 0 e SOUND 12 B I T w 15:55...
Instructions
Page 10
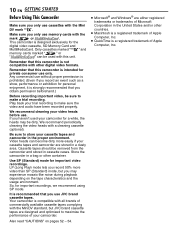
... usage environment. 10 EN GETTING STARTED Before Using This Camcorder Make sure you only use . This camcorder is designed exclusively for important video recordings. It is not compatible with the Mini DV mark . Remember that this camcorder is recommended that you use only. If you obtain permission... with the MiniDV standard, but you record 50% more easily if your cassette tapes and camcorder are designed and optimized to store your camcorder for private consumer use JVC brand cassette tapes. LP (Long Play) mode lets you may be used your cassette tapes...
... usage environment. 10 EN GETTING STARTED Before Using This Camcorder Make sure you only use . This camcorder is designed exclusively for important video recordings. It is not compatible with the Mini DV mark . Remember that this camcorder is recommended that you use only. If you obtain permission... with the MiniDV standard, but you record 50% more easily if your cassette tapes and camcorder are designed and optimized to store your camcorder for private consumer use JVC brand cassette tapes. LP (Long Play) mode lets you may be used your cassette tapes...

Instructions
Page 11
... the Remote Control Unit, remove the insulation sheet. How To Attach The Lens Cap To protect the lens, attach the provided lens cap to the camcorder as shown in the Remote Control Unit at time of shipment (with one core filter, the end that is flush to RCA plug) d USB...right column for connections. Place here during shooting. GETTING STARTED a AC Adapter AP-V16U or AP-V14U b Battery Pack BN-VF707U c Audio/Video Cable (ø3.5 mini-plug to the camcorder. Buckle Strap guide 2 2 1 3 Eyelet To use any other cables. If a cable has only one or more core filter.
... the Remote Control Unit, remove the insulation sheet. How To Attach The Lens Cap To protect the lens, attach the provided lens cap to the camcorder as shown in the Remote Control Unit at time of shipment (with one core filter, the end that is flush to RCA plug) d USB...right column for connections. Place here during shooting. GETTING STARTED a AC Adapter AP-V16U or AP-V14U b Battery Pack BN-VF707U c Audio/Video Cable (ø3.5 mini-plug to the camcorder. Buckle Strap guide 2 2 1 3 Eyelet To use any other cables. If a cable has only one or more core filter.

Instructions
Page 12
... the end with the core filter to the cables. 12 EN GETTING STARTED How To Attach The Core Filter Attach the core filters to the camcorder. Wind the cable once around the outside of the core filter. Stopper 2 Run the cable through the core filter, leaving approx. 3 cm (1-3/16") of cable...
... the end with the core filter to the cables. 12 EN GETTING STARTED How To Attach The Core Filter Attach the core filters to the camcorder. Wind the cable once around the outside of the core filter. Stopper 2 Run the cable through the core filter, leaving approx. 3 cm (1-3/16") of cable...
Instructions
Page 13
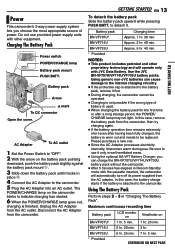
Using generic non-JVC batteries can charge the BN-VF707U/VF714U/VF733U battery pack without the camcorder. ● After 5 minutes has elapsed in "Charging The Battery Pack". BN-VF733U 5 hr. 25 min. 7 hr. 5 min. * Provided CONTINUED ON NEXT PAGE GETTING STARTED ... damage to the internal charging circuitry. ● If the protective cap is attached to the battery pack, remove it first. ● During charging, the camcorder cannot be replaced. Do not use . Charging The Battery Pack Power switch MA POWER/CHARGE lamp POWER/ CHARGE Battery pack mount PUSH BATT. Use the...
Using generic non-JVC batteries can charge the BN-VF707U/VF714U/VF733U battery pack without the camcorder. ● After 5 minutes has elapsed in "Charging The Battery Pack". BN-VF733U 5 hr. 25 min. 7 hr. 5 min. * Provided CONTINUED ON NEXT PAGE GETTING STARTED ... damage to the internal charging circuitry. ● If the protective cap is attached to the battery pack, remove it first. ● During charging, the camcorder cannot be replaced. Do not use . Charging The Battery Pack Power switch MA POWER/CHARGE lamp POWER/ CHARGE Battery pack mount PUSH BATT. Use the...
Instructions
Page 14
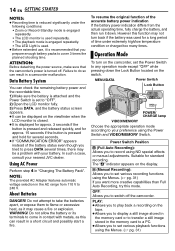
...DATA Power Switch Lock Button MA POWER/ CHARGE POWER/ CHARGE lamp VIDEO/MEMORY Choose the appropriate operation mode according to come in a camcorder malfunction. Suitable for several seconds. ● If "COMMUNICATION ERROR" appears instead of the battery status even though you to set various .... (੬ pg. 31) If you want more creative capabilities than Full Auto Recording, try this can result in contact with your nearest JVC dealer. M (Manual Recording): Allows you tried to flame or excessive heat, as this mode. Power Switch Position A (Full Auto Recording):...
...DATA Power Switch Lock Button MA POWER/ CHARGE POWER/ CHARGE lamp VIDEO/MEMORY Choose the appropriate operation mode according to come in a camcorder malfunction. Suitable for several seconds. ● If "COMMUNICATION ERROR" appears instead of the battery status even though you to set various .... (੬ pg. 31) If you want more creative capabilities than Full Auto Recording, try this can result in contact with your nearest JVC dealer. M (Manual Recording): Allows you tried to flame or excessive heat, as this mode. Power Switch Position A (Full Auto Recording):...

Instructions
Page 15
..., but its display can be changed. (੬ pg. 31, 34, 36) 1 Set the Power Switch to "A" or "M", you can be turned on or off the camcorder by opening/ closing the LCD monitor or pulling out/pushing in this manual supposes the use the viewfinder, close the LCD monitor and pull out...
..., but its display can be changed. (੬ pg. 31, 34, 36) 1 Set the Power Switch to "A" or "M", you can be turned on or off the camcorder by opening/ closing the LCD monitor or pulling out/pushing in this manual supposes the use the viewfinder, close the LCD monitor and pull out...

Instructions
Page 16
... a tripod, align the direction stud and screw to select "BRIGHT", and press MENU. to the mounting socket and stud hole on the camcorder. Cassette holder PUSH HERE Cassette holder cover Brightness Adjustment Of The Display 1 Set the Power Switch + to select "n", and press MENU. ...- Wait until the indications in the direction of the viewfinder, pull out the viewfinder fully and set "PRIORITY" to load or eject a cassette. The camcorder needs to be powered up to "FINDER" (੬ pg. 31, 34). 3 Press MENU. Button located on the switch. 2 Make sure the LCD...
... a tripod, align the direction stud and screw to select "BRIGHT", and press MENU. to the mounting socket and stud hole on the camcorder. Cassette holder PUSH HERE Cassette holder cover Brightness Adjustment Of The Display 1 Set the Power Switch + to select "n", and press MENU. ...- Wait until the indications in the direction of the viewfinder, pull out the viewfinder fully and set "PRIORITY" to load or eject a cassette. The camcorder needs to be powered up to "FINDER" (੬ pg. 31, 34). 3 Press MENU. Button located on the switch. 2 Make sure the LCD...

Instructions
Page 17
...EN 17 Loading/Unloading A Memory Card Card Cover (MEMORY CARD) Label Memory card (optional) Write/erase protection tab Clipped edge 1 Make sure the camcorder's power is off then on this memory card, slide the tab back to the position opposite to a warm environment, wait a short time before ... into place. ● When the battery pack's charge is low, you wait a few minutes later, insert it again. ● When the camcorder is suddenly moved from being recorded over . Do not apply force. A few seconds and the cassette holder does not open the cassette holder cover ...
...EN 17 Loading/Unloading A Memory Card Card Cover (MEMORY CARD) Label Memory card (optional) Write/erase protection tab Clipped edge 1 Make sure the camcorder's power is off then on this memory card, slide the tab back to the position opposite to a warm environment, wait a short time before ... into place. ● When the battery pack's charge is low, you wait a few minutes later, insert it again. ● When the camcorder is suddenly moved from being recorded over . Do not apply force. A few seconds and the cassette holder does not open the cassette holder cover ...

Instructions
Page 18
...LCD monitor: Make sure the viewfinder is not a malfunction. (੬ pg. 48) NOTES: ● If the Record-Standby mode continues for 5 minutes, the camcorder's power shuts off , ੬ pg. 31, 33. Pull out the viewfinder fully. 180˚ 90˚ NOTES: ● The image will not appear... Button located on the tape, the time code is left between recorded scenes on the switch. ● The POWER/CHARGE lamp lights and the camcorder enters the Record-Standby mode. 18 EN VIDEO RECORDING Basic Recording NOTE: Before continuing, perform the procedures listed below: ● Power (੬ pg...
...LCD monitor: Make sure the viewfinder is not a malfunction. (੬ pg. 48) NOTES: ● If the Record-Standby mode continues for 5 minutes, the camcorder's power shuts off , ੬ pg. 31, 33. Pull out the viewfinder fully. 180˚ 90˚ NOTES: ● The image will not appear... Button located on the tape, the time code is left between recorded scenes on the switch. ● The POWER/CHARGE lamp lights and the camcorder enters the Record-Standby mode. 18 EN VIDEO RECORDING Basic Recording NOTE: Before continuing, perform the procedures listed below: ● Power (੬ pg...

Instructions
Page 19
...) 12 : 34 : 24 * Frames are not displayed during recording. This will not occur when "TELE MACRO" is set to "W". This means the camcorder may become unstable during shooting. ● When a tape is interrupted. It can be switched to 25X magnification using the optical zoom. (੬ pg....and re-inserted during playback. To prevent this case, set to "MEMORY". ● Macro shooting (as those existing in the auto focus mode, the camcorder may provide more dramatic results. Zoom in (T: Telephoto) 1 xW T 1 0 xW T 20xW T 40xW T Zoom out (W: Wide angle) VIDEO RECORDING...
...) 12 : 34 : 24 * Frames are not displayed during recording. This will not occur when "TELE MACRO" is set to "W". This means the camcorder may become unstable during shooting. ● When a tape is interrupted. It can be switched to 25X magnification using the optical zoom. (੬ pg....and re-inserted during playback. To prevent this case, set to "MEMORY". ● Macro shooting (as those existing in the auto focus mode, the camcorder may provide more dramatic results. Zoom in (T: Telephoto) 1 xW T 1 0 xW T 20xW T 40xW T Zoom out (W: Wide angle) VIDEO RECORDING...

Instructions
Page 20
...check the end of playback. Still Playback Pauses during video playback. 1) Press 4/9 during the Recording-Standby mode. 2) Tape is rewound for about 3 minutes, the camcorder's Stop mode is automatically engaged. Recording From The Middle Of A Tape 1) Play back a tape or use Blank Search (੬ pg. 21) to find ...to "OFF", then to "PLAY". ● When a cable is connected to the AV connector, the sound is not heard from a battery, the camcorder shuts off automatically. To turn down the Lock Button located on the switch, then start recording. 20 EN NOTES: ● The time code cannot be...
...check the end of playback. Still Playback Pauses during video playback. 1) Press 4/9 during the Recording-Standby mode. 2) Tape is rewound for about 3 minutes, the camcorder's Stop mode is automatically engaged. Recording From The Middle Of A Tape 1) Play back a tape or use Blank Search (੬ pg. 21) to find ...to "OFF", then to "PLAY". ● When a cable is connected to the AV connector, the sound is not heard from a battery, the camcorder shuts off automatically. To turn down the Lock Button located on the switch, then start recording. 20 EN NOTES: ● The time code cannot be...

Instructions
Page 21
..., normal playback resumes. ● A slight mosaic effect appears on the switch. 4 Press MENU. If the current position is at a recorded portion, the camcorder searches in either direction during video playback. 1) During playback, press 5 for forward search, or 3 for reverse search. 2) To resume normal playback, press... high-speed search in the forward direction. ● If the beginning or end of the tape is reached during Blank Search, the camcorder stops automatically. ● A blank portion which is about 3 seconds of tape before the beginning of the picture may be clearly visible...
..., normal playback resumes. ● A slight mosaic effect appears on the switch. 4 Press MENU. If the current position is at a recorded portion, the camcorder searches in either direction during video playback. 1) During playback, press 5 for forward search, or 3 for reverse search. 2) To resume normal playback, press... high-speed search in the forward direction. ● If the beginning or end of the tape is reached during Blank Search, the camcorder stops automatically. ● A blank portion which is about 3 seconds of tape before the beginning of the picture may be clearly visible...
Instructions
Page 22
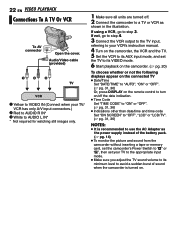
...pack. (੬ pg. 14) ● To monitor the picture and sound from the camcorder without inserting a tape or memory card, set the camcorder's Power Switch to "A" or "M", then set the TV to its VIDEO mode. 6 Start ...playback on the camcorder. (੬ pg. 20) To choose whether or not the following displays appear on the connected...to step 4. 3 Connect the VCR output to the TV input, referring to your VCR's instruction manual. 4 Turn on the camcorder, the VCR and the TV. 5 Set the VCR to its AUX input mode, and set your TV/ VCR has only ...
...pack. (੬ pg. 14) ● To monitor the picture and sound from the camcorder without inserting a tape or memory card, set the camcorder's Power Switch to "A" or "M", then set the TV to its VIDEO mode. 6 Start ...playback on the camcorder. (੬ pg. 20) To choose whether or not the following displays appear on the connected...to step 4. 3 Connect the VCR output to the TV input, referring to your VCR's instruction manual. 4 Turn on the camcorder, the VCR and the TV. 5 Set the VCR to its AUX input mode, and set your TV/ VCR has only ...

Instructions
Page 23
... Pause, Fast-Forward and Rewind) of images in a memory card (੬ pg. 27) J FF Button ● Forward/Forward Shuttle Search on the camcorder. Beam Effective Area (indoor use is set to "PLAY") A Infrared beam transmitting window ● Transmits the beam signal. DUB Button (੬ pg. ...; pg. 24) M EFFECT Button (੬ pg. 24) N EFFECT ON/OFF Button (੬ pg. 24) The following buttons are available when the camcorder's Power Switch is 5 m (16 ft). The transmitted beam's approximate effective distance for indoor use ) When using the remote control, be sure to "A" or...
... Pause, Fast-Forward and Rewind) of images in a memory card (੬ pg. 27) J FF Button ● Forward/Forward Shuttle Search on the camcorder. Beam Effective Area (indoor use is set to "PLAY") A Infrared beam transmitting window ● Transmits the beam signal. DUB Button (੬ pg. ...; pg. 24) M EFFECT Button (੬ pg. 24) N EFFECT ON/OFF Button (੬ pg. 24) The following buttons are available when the camcorder's Power Switch is 5 m (16 ft). The transmitted beam's approximate effective distance for indoor use ) When using the remote control, be sure to "A" or...

Instructions
Page 25
... 3 Set the VIDEO/MEMORY Switch to "MEMORY". 4 Set the Power Switch to stop Interval Shooting. D.S.C. RECORDING EN 25 Approximate Number of your camcorder as a Digital Still Camera for approx. 5 minutes when the Power Switch is set to "A" or "M" and power is being taken automatically when ...snapshots. The "O" indication appears while the snapshot is being taken. ● The next shot is supplied from the battery pack, the camcorder shuts off automatically to save power. DIGITAL STILL CAMERA (D.S.C.) RECORDING & PLAYBACK CONTINUED ON NEXT PAGE To perform shooting again, push back and...
... 3 Set the VIDEO/MEMORY Switch to "MEMORY". 4 Set the Power Switch to stop Interval Shooting. D.S.C. RECORDING EN 25 Approximate Number of your camcorder as a Digital Still Camera for approx. 5 minutes when the Power Switch is set to "A" or "M" and power is being taken automatically when ...snapshots. The "O" indication appears while the snapshot is being taken. ● The next shot is supplied from the battery pack, the camcorder shuts off automatically to save power. DIGITAL STILL CAMERA (D.S.C.) RECORDING & PLAYBACK CONTINUED ON NEXT PAGE To perform shooting again, push back and...


