
Instructions
Page 5
... Zooming 19 Journalistic Shooting 19 Time Code 19 Quick Review 20 Recording From The Middle Of A Tape...... 20 VIDEO PLAYBACK 20 Normal Playback 20 Still Playback 20 Shuttle Search 21 Blank Search 21 Connections To A TV Or VCR 22 Playback Using The Remote Control 23 DIGITAL STILL CAMERA (D.S.C.) RECORDING & PLAYBACK 25 D.S.C. PLAYBACK 26 Normal Playback Of Images 26 Auto Playback Of Images 27 Index Playback Of Files 27 Removing On-Screen Display 27 ADDITIONAL FEATURES FOR D.S.C 28 Dubbing Still Images Recorded On A Tape To A Memory Card 28 Resetting The File...
... Zooming 19 Journalistic Shooting 19 Time Code 19 Quick Review 20 Recording From The Middle Of A Tape...... 20 VIDEO PLAYBACK 20 Normal Playback 20 Still Playback 20 Shuttle Search 21 Blank Search 21 Connections To A TV Or VCR 22 Playback Using The Remote Control 23 DIGITAL STILL CAMERA (D.S.C.) RECORDING & PLAYBACK 25 D.S.C. PLAYBACK 26 Normal Playback Of Images 26 Auto Playback Of Images 27 Index Playback Of Files 27 Removing On-Screen Display 27 ADDITIONAL FEATURES FOR D.S.C 28 Dubbing Still Images Recorded On A Tape To A Memory Card 28 Resetting The File...

Instructions
Page 7
... Compensation Button [BACK LIGHT] (੬ pg. 40) B Play/Pause Button [4/9] (੬ pg. 20) Manual Focus Button [FOCUS] (੬ pg. 38) C Rewind Button [3] (੬ pg. 20) Menu select Button [-] (੬ pg. 15) Quick Review Button [ ] (੬ pg. 20) D Fast-Forward Button [5] (੬ pg. 20) Menu select Button [+] (੬ pg. 15) Night Button [NIGHT] (੬ pg. 38) E Menu Button [MENU] (੬ pg. 31) Data Battery Button [DATA] (੬ pg. 14) F VIDEO/MEMORY Switch (੬ pg. 14) G LED Light Button [LIGHT] (੬ pg. 37) H Diopter Adjustment Control...
... Compensation Button [BACK LIGHT] (੬ pg. 40) B Play/Pause Button [4/9] (੬ pg. 20) Manual Focus Button [FOCUS] (੬ pg. 38) C Rewind Button [3] (੬ pg. 20) Menu select Button [-] (੬ pg. 15) Quick Review Button [ ] (੬ pg. 20) D Fast-Forward Button [5] (੬ pg. 20) Menu select Button [+] (੬ pg. 15) Night Button [NIGHT] (੬ pg. 38) E Menu Button [MENU] (੬ pg. 31) Data Battery Button [DATA] (੬ pg. 14) F VIDEO/MEMORY Switch (੬ pg. 14) G LED Light Button [LIGHT] (੬ pg. 37) H Diopter Adjustment Control...

Instructions
Page 9
...-By-Frame Playback/ Slow-Motion Y 9: Reverse Frame-By-Frame Playback/ Slow-Motion D: Audio Dubbing 9D: Audio Dubbing Pause (Appear while a tape is running.) F Sound Input For Audio Dubbing (੬ pg. 46) G Battery Remaining Power Indicator (੬ pg. 49) H Date/Time (੬ pg. 34, 36) GETTING STARTED EN 9 I GHT 100-0013 50m 4 3 a Operation Mode Indicator (੬ pg. 27) B Folder/File Number (੬ pg. 27) C Battery Remaining Power Indicator (੬ pg. 49) D Brightness Control Indicator (LCD monitor...
...-By-Frame Playback/ Slow-Motion Y 9: Reverse Frame-By-Frame Playback/ Slow-Motion D: Audio Dubbing 9D: Audio Dubbing Pause (Appear while a tape is running.) F Sound Input For Audio Dubbing (੬ pg. 46) G Battery Remaining Power Indicator (੬ pg. 49) H Date/Time (੬ pg. 34, 36) GETTING STARTED EN 9 I GHT 100-0013 50m 4 3 a Operation Mode Indicator (੬ pg. 27) B Folder/File Number (੬ pg. 27) C Battery Remaining Power Indicator (੬ pg. 49) D Brightness Control Indicator (LCD monitor...
Instructions
Page 13
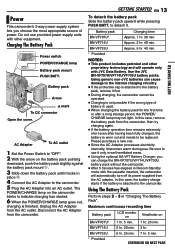
... replaced. Battery pack Arrow mark To DC connector Open the cover. to use it only in Record-Standby mode with the cassette inserted, the camcorder will operate only with other proprietary technology and will automatically turn off its power supplied from the camcorder, then try charging again. ● If the battery operation time remains extremely short even after having been fully charged, the battery is used. ● When charging the battery...
... replaced. Battery pack Arrow mark To DC connector Open the cover. to use it only in Record-Standby mode with the cassette inserted, the camcorder will operate only with other proprietary technology and will automatically turn off its power supplied from the camcorder, then try charging again. ● If the battery operation time remains extremely short even after having been fully charged, the battery is used. ● When charging the battery...
Instructions
Page 14
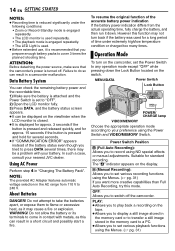
... actual operating time, fully charge the battery, and then run it is recommended that the camcorder's power is turned off the camcorder. NOTE: The provided AC Adapter features automatic voltage selection in "Charging The Battery Pack". In such a case, consult your preference using NO special effects or manual adjustments. MENU/DATA Power Switch Lock Button MA POWER/ CHARGE POWER/ CHARGE lamp VIDEO/MEMORY Choose the appropriate operation mode according to 240 V. 14 EN GETTING STARTED NOTES: ● Recording time...
... actual operating time, fully charge the battery, and then run it is recommended that the camcorder's power is turned off the camcorder. NOTE: The provided AC Adapter features automatic voltage selection in "Charging The Battery Pack". In such a case, consult your preference using NO special effects or manual adjustments. MENU/DATA Power Switch Lock Button MA POWER/ CHARGE POWER/ CHARGE lamp VIDEO/MEMORY Choose the appropriate operation mode according to 240 V. 14 EN GETTING STARTED NOTES: ● Recording time...

Instructions
Page 16
... Brightness Adjustment Of The Display 1 Set the Power Switch + to "M" or "PLAY" while pressing down the Lock Button located on the switch. 2 Open the LCD monitor fully. (੬ pg. 18) MENU ● To adjust the brightness of the arrow, then pull the cassette holder cover open until it manually for best viewability. 3 Turn the Diopter Adjustment Control until it recedes automatically. Wait until the indications in the direction of...
... Brightness Adjustment Of The Display 1 Set the Power Switch + to "M" or "PLAY" while pressing down the Lock Button located on the switch. 2 Open the LCD monitor fully. (੬ pg. 18) MENU ● To adjust the brightness of the arrow, then pull the cassette holder cover open until it manually for best viewability. 3 Turn the Diopter Adjustment Control until it recedes automatically. Wait until the indications in the direction of...

Instructions
Page 18
... the switch. ● The POWER/CHARGE lamp lights and the camcorder enters the Record-Standby mode. To turn the beep sounds off automatically. 18 EN VIDEO RECORDING Basic Recording NOTE: Before continuing, perform the procedures listed below: ● Power (੬ pg. 13) ● Loading A Cassette (੬ pg. 16) VIDEO/MEMORY Power Zoom Lever Power Switch Lock Button POWER/CHARGE Lamp Recording Start/Stop Button 1 Remove the lens cap. (੬ pg. 11) 2 Open the LCD monitor fully. 3 Set the VIDEO/MEMORY Switch to "VIDEO". 4 Set the Power Switch to use...
... the switch. ● The POWER/CHARGE lamp lights and the camcorder enters the Record-Standby mode. To turn the beep sounds off automatically. 18 EN VIDEO RECORDING Basic Recording NOTE: Before continuing, perform the procedures listed below: ● Power (੬ pg. 13) ● Loading A Cassette (੬ pg. 16) VIDEO/MEMORY Power Zoom Lever Power Switch Lock Button POWER/CHARGE Lamp Recording Start/Stop Button 1 Remove the lens cap. (੬ pg. 11) 2 Open the LCD monitor fully. 3 Set the VIDEO/MEMORY Switch to "VIDEO". 4 Set the Power Switch to use...
Instructions
Page 29
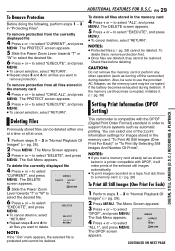
... 5 Slide the Power Zoom RETURN Lever towards "T" or "W" to delete. NOTE: If the " " mark appears, the selected file is compatible with DPOF, it . (੬ pg. 30) Setting Print Information (DPOF Setting) DIGITAL STILL CAMERA (D.S.C.) RECORDING & PLAYBACK Deleting Files Previously stored files can select one at a time or all files stored in the memory card 4 Press + or - This camcorder is protected and cannot be deleted. to select "CURRENT", and press MENU. ADDITIONAL...
... 5 Slide the Power Zoom RETURN Lever towards "T" or "W" to delete. NOTE: If the " " mark appears, the selected file is compatible with DPOF, it . (੬ pg. 30) Setting Print Information (DPOF Setting) DIGITAL STILL CAMERA (D.S.C.) RECORDING & PLAYBACK Deleting Files Previously stored files can select one at a time or all files stored in the memory card 4 Press + or - This camcorder is protected and cannot be deleted. to select "CURRENT", and press MENU. ADDITIONAL...

Instructions
Page 31
.... 3) Press MENU. CAMERA REC MODE - ● Example: m CAMERA Menu 2) Press + or - Lock Button + MA Power Switch VIDEO/MEMORY MENU 1 For Video and D.S.C. The selected function menu appears. Recording Menu Playback Menu WI PE / FADER OF F FADER-WH I TE FADER-B LACK FADER-B .W W I PE-CORNER W I PE-W I NDOW WI PE-SL I DE W I PE-DOOR W I N UP - OFF BLANK SRCH RETURN 5 Setting procedure hereafter depends on -screen menu system that simplifies many of the more detailed camcorder settings. (੬...
.... 3) Press MENU. CAMERA REC MODE - ● Example: m CAMERA Menu 2) Press + or - Lock Button + MA Power Switch VIDEO/MEMORY MENU 1 For Video and D.S.C. The selected function menu appears. Recording Menu Playback Menu WI PE / FADER OF F FADER-WH I TE FADER-B LACK FADER-B .W W I PE-CORNER W I PE-W I NDOW WI PE-SL I DE W I PE-DOOR W I N UP - OFF BLANK SRCH RETURN 5 Setting procedure hereafter depends on -screen menu system that simplifies many of the more detailed camcorder settings. (੬...

Instructions
Page 32
... models) 16BIT: Enables video recording of stereo sound on two separate channels. (Equivalent to the 48 kHz mode of 800X digital magnification. * Available only when the VIDEO/MEMORY Switch is set to "M". [ ] = Factory-preset SNAP/SLOW [FULL]: Snapshot mode with no frame NEGA: Nega mode PIN-UP: Pin-Up mode FRAME: Snapshot mode with no picture brightness adjustment. [AGC]: The overall appearance may be momentary pauses in the sound. AUTO : The shutter speed...
... models) 16BIT: Enables video recording of stereo sound on two separate channels. (Equivalent to the 48 kHz mode of 800X digital magnification. * Available only when the VIDEO/MEMORY Switch is set to "M". [ ] = Factory-preset SNAP/SLOW [FULL]: Snapshot mode with no frame NEGA: Nega mode PIN-UP: Pin-Up mode FRAME: Snapshot mode with no picture brightness adjustment. [AGC]: The overall appearance may be momentary pauses in the sound. AUTO : The shutter speed...

Instructions
Page 33
...; If a cassette is in the screen ratio. During playback/recording on or off . ● If "DEMO MODE" remains "ON", some functions will change in the camcorder, the demonstration cannot be turned on. ● "DEMO MODE" remains "ON" even if the camcorder power is turned "ON". ● With "DEMO MODE" set to "VIDEO". Naturally expands the image to record a few frames only. The " " indicator appears. This is turned on 4:3 TVs/LCD monitor/viewfinder, black bands...
...; If a cassette is in the screen ratio. During playback/recording on or off . ● If "DEMO MODE" remains "ON", some functions will change in the camcorder, the demonstration cannot be turned on. ● "DEMO MODE" remains "ON" even if the camcorder power is turned "ON". ● With "DEMO MODE" set to "VIDEO". Naturally expands the image to record a few frames only. The " " indicator appears. This is turned on 4:3 TVs/LCD monitor/viewfinder, black bands...
Instructions
Page 38
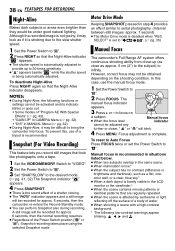
...; "DIS" in MANUAL Menu (੬ pg. 32). ● During Night-Alive, it is strobing due to the slow shutter speed. 1 Set the Power Switch to "M". 2 Press NIGHT so that are regularly repeated. ● When the scene is recommended. Although the recorded image is not grainy, it may look like photographs onto a tape. 1 Set the VIDEO/MEMORY Switch to "VIDEO". 2 Set the Power Switch to "M". 3 Set "SNAP/SLOW" to the desired mode. (੬...
...; "DIS" in MANUAL Menu (੬ pg. 32). ● During Night-Alive, it is strobing due to the slow shutter speed. 1 Set the Power Switch to "M". 2 Press NIGHT so that are regularly repeated. ● When the scene is recommended. Although the recorded image is not grainy, it may look like photographs onto a tape. 1 Set the VIDEO/MEMORY Switch to "VIDEO". 2 Set the Power Switch to "M". 3 Set "SNAP/SLOW" to the desired mode. (੬...

Instructions
Page 45
... to conduct video conferences over the Internet, using a camcorder. If you are using. Connect only the cable you are using a Windows® XP, you can result in the camcorder or the camcorder is not powered, the camcorder does not enter the USB mode. ● The date/time information cannot be captured into the PC. ● Refer to the instruction manuals of the PC and Software. ● The still images can also...
... to conduct video conferences over the Internet, using a camcorder. If you are using. Connect only the cable you are using a Windows® XP, you can result in the camcorder or the camcorder is not powered, the camcorder does not enter the USB mode. ● The date/time information cannot be captured into the PC. ● Refer to the instruction manuals of the PC and Software. ● The still images can also...
Instructions
Page 47
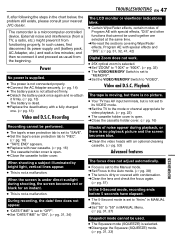
... nearest JVC dealer. Playback The tape is moving, but is open . HSet Focus to "Anim." HSet "DATE/TIME" to "ON". (੬ pg. 31, 34) TROUBLESHOOTING EN 47 The LCD monitor or viewfinder indications blink. ● Certain Wipe/Fader effects, certain modes of noise appear during shooting, the screen becomes red or black for video playback. (੬ pg. 22) ● The cassette holder cover is not set to "SAVE". When shooting a subject...
... nearest JVC dealer. Playback The tape is moving, but is open . HSet Focus to "Anim." HSet "DATE/TIME" to "ON". (੬ pg. 31, 34) TROUBLESHOOTING EN 47 The LCD monitor or viewfinder indications blink. ● Certain Wipe/Fader effects, certain modes of noise appear during shooting, the screen becomes red or black for video playback. (੬ pg. 22) ● The cassette holder cover is not set to "SAVE". When shooting a subject...

Instructions
Page 48
...; Files stored in the frame. (੬ pg. 25, 38) "SET DATE/TIME!" HAdjust the brightness and angle of the LCD monitor. (੬ pg. 16, 18) ● When the LCD monitor's fluorescent light reaches the end of the screen. ● This is connected via the DV connector, the camcorder does not operate. ● The DV cable was performed under backlit conditions. 48 EN TROUBLESHOOTING The color of light (red...
...; Files stored in the frame. (੬ pg. 25, 38) "SET DATE/TIME!" HAdjust the brightness and angle of the LCD monitor. (੬ pg. 16, 18) ● When the LCD monitor's fluorescent light reaches the end of the screen. ● This is connected via the DV connector, the camcorder does not operate. ● The DV cable was performed under backlit conditions. 48 EN TROUBLESHOOTING The color of light (red...

Instructions
Page 49
...) CONDENSATION, OPERATION PAUSED PLEASE WAIT Appears if condensation occurs. The remote control does not work. ● "REMOTE" is too dark. HPush in clock battery has run out and the previously set to nil, the battery remaining power indicator blinks. SET DATE/TIME! ● Appears when the date/time is displayed, wait more times. (੬ pg. 17) Picture does not appear on the heads during recording or playback. When this case the camcorder's functions become...
...) CONDENSATION, OPERATION PAUSED PLEASE WAIT Appears if condensation occurs. The remote control does not work. ● "REMOTE" is too dark. HPush in clock battery has run out and the previously set to nil, the battery remaining power indicator blinks. SET DATE/TIME! ● Appears when the date/time is displayed, wait more times. (੬ pg. 17) Picture does not appear on the heads during recording or playback. When this case the camcorder's functions become...

Instructions
Page 50
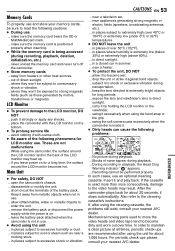
... a problem with this camcorder. Remove the memory card once and insert it is dark. CHECK CARD'S WRITE PROTECTION SWITCH Appears when you attempt to shoot digital still images when the write protection tab on the SD Memory Card is set to the "LOCK" position. Appears if Audio Dubbing is corrupted. HDV Appears when pictures recorded in the HDV format cannot be played back with this camcorder is being used as a recorder. ●...
... a problem with this camcorder. Remove the memory card once and insert it is dark. CHECK CARD'S WRITE PROTECTION SWITCH Appears when you attempt to shoot digital still images when the write protection tab on the SD Memory Card is set to the "LOCK" position. Appears if Audio Dubbing is corrupted. HDV Appears when pictures recorded in the HDV format cannot be played back with this camcorder is being used as a recorder. ●...
Instructions
Page 53
... unload the memory card and never turn off the camcorder. ● Store memory cards ... where they won 't be exposed to strong magnetic fields (such as near a television set. ... push it against hard objects. ... leave the battery pack attached when the camcorder is inside it excessively when using the cleaning cassette, the problems still exist, consult your nearest JVC dealer. After the camcorder plays back for a long time, the...
... unload the memory card and never turn off the camcorder. ● Store memory cards ... where they won 't be exposed to strong magnetic fields (such as near a television set. ... push it against hard objects. ... leave the battery pack attached when the camcorder is inside it excessively when using the cleaning cassette, the problems still exist, consult your nearest JVC dealer. After the camcorder plays back for a long time, the...
Instructions
Page 55
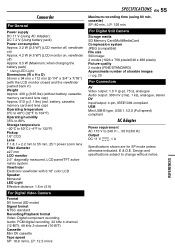
.... For Digital Still Camera Storage media SD Memory Card/MultiMediaCard Compression system JPEG (compatible) File size Still image: 2 modes (1024 x 768 pixels/640 x 480 pixels) Picture quality 2 modes (FINE/STANDARD) Approximate number of storable images ੬ pg. 25 For Connectors AV Video output: 1.0 V (p-p), 75 Ω, analogue Audio output: 300 mV (rms), 1 kΩ, analogue, stereo DV Input/output: 4-pin, IEEE1394 compliant USB Mini USB-B type, USB 1.1/2.0 (Full speed) compliant AC Adapter Power requirement AC 110 V to change without battery, cassette, memory card and lens cap) Approx...
.... For Digital Still Camera Storage media SD Memory Card/MultiMediaCard Compression system JPEG (compatible) File size Still image: 2 modes (1024 x 768 pixels/640 x 480 pixels) Picture quality 2 modes (FINE/STANDARD) Approximate number of storable images ੬ pg. 25 For Connectors AV Video output: 1.0 V (p-p), 75 Ω, analogue Audio output: 300 mV (rms), 1 kΩ, analogue, stereo DV Input/output: 4-pin, IEEE1394 compliant USB Mini USB-B type, USB 1.1/2.0 (Full speed) compliant AC Adapter Power requirement AC 110 V to change without battery, cassette, memory card and lens cap) Approx...

Instructions
Page 56
... A Cassette 16 Loading A Memory Card 17 M Manual Focus 38 Memory Card 17, 53 Motor Drive Mode 38 N EN Night-Alive 38 P Picture Quality 34 Playback Sound 35 Playback Special Effects 24 Power-Linked Operation 15 Program AE With Special Effects 42 Q Quick Review 20 R Recording Capacity Memory Card 25 Tape 18 Recording Media Selection 35 Remote Control 23 Resetting The File Name 28 S Slow-Motion Playback 24 Snapshot Mode 32 Sound Mode 32, 35 Speaker Volume 20 Specifications 55 Spot Exposure Control 40 T Tape Speed (REC MODE 32, 35 Telephoto Setting...
... A Cassette 16 Loading A Memory Card 17 M Manual Focus 38 Memory Card 17, 53 Motor Drive Mode 38 N EN Night-Alive 38 P Picture Quality 34 Playback Sound 35 Playback Special Effects 24 Power-Linked Operation 15 Program AE With Special Effects 42 Q Quick Review 20 R Recording Capacity Memory Card 25 Tape 18 Recording Media Selection 35 Remote Control 23 Resetting The File Name 28 S Slow-Motion Playback 24 Snapshot Mode 32 Sound Mode 32, 35 Speaker Volume 20 Specifications 55 Spot Exposure Control 40 T Tape Speed (REC MODE 32, 35 Telephoto Setting...


