Instruction Manual
Page 2
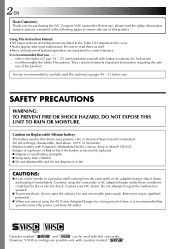
... battery The battery used with cassettes marked " ". Replace battery with button locations, etc. However, S-VHS recordings are separated for purchasing the JVC Compact VHS camcorder. It is incorrectly replaced. Ⅲ Dispose of used battery promptly. Ⅲ Keep away from AC outlet. 625 Cassettes marked " " .... Refer servicing to repair the malfunction yourself. Ⅲ To prevent shock, do not dispose of this camcorder. Continue using the AC Power Adapter/Charger for a long period of this device may present a fire or chemical burn hazard if mistreated.
... battery The battery used with cassettes marked " ". Replace battery with button locations, etc. However, S-VHS recordings are separated for purchasing the JVC Compact VHS camcorder. It is incorrectly replaced. Ⅲ Dispose of used battery promptly. Ⅲ Keep away from AC outlet. 625 Cassettes marked " " .... Refer servicing to repair the malfunction yourself. Ⅲ To prevent shock, do not dispose of this camcorder. Continue using the AC Power Adapter/Charger for a long period of this device may present a fire or chemical burn hazard if mistreated.
Instruction Manual
Page 3
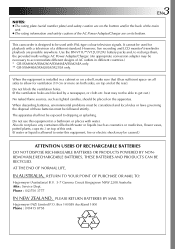
... governing the disposal of a different standard. Use the BN-V11U**/V12U/V20U battery packs and, to recharge them, the provided multi-voltage AC Power Adapter/Charger. (An appropriate conversion adapter may not be able to get out.) No naked flame sources, such as cosmetics or medicines, flower vases, potted plants, cups etc.) on... for ventilation (10 cm or more on both sides, on top of this unit. (If water or liquid is allowed to dripping or splashing. This camcorder is installed in different countries.) * GR-SXM460A/SXM260A/SXM46EA/SXM26EA only. ** GR-SXM46EA/SXM26EA/SX21EA only.
... governing the disposal of a different standard. Use the BN-V11U**/V12U/V20U battery packs and, to recharge them, the provided multi-voltage AC Power Adapter/Charger. (An appropriate conversion adapter may not be able to get out.) No naked flame sources, such as cosmetics or medicines, flower vases, potted plants, cups etc.) on... for ventilation (10 cm or more on both sides, on top of this unit. (If water or liquid is allowed to dripping or splashing. This camcorder is installed in different countries.) * GR-SXM460A/SXM260A/SXM46EA/SXM26EA only. ** GR-SXM46EA/SXM26EA/SX21EA only.
Instruction Manual
Page 5
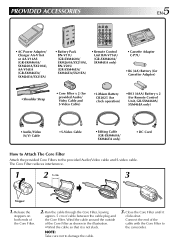
... with the Core Filter to the camcorder. Wind the cable around the outside of the Core Filter. 2. NOTE: Take care not to the provided Audio/Video cable and S-video cable. PROVIDED ACCESSORIES 5 EN •AC Power Adapter/ Charger AA-V16A or AA-V16AS (GR-SXM460A/ SXM260A/SX210A), AA-V16EA (GR-SXM46EA/ SXM26EA/SX21EA) •Battery...
... with the Core Filter to the camcorder. Wind the cable around the outside of the Core Filter. 2. NOTE: Take care not to the provided Audio/Video cable and S-video cable. PROVIDED ACCESSORIES 5 EN •AC Power Adapter/ Charger AA-V16A or AA-V16AS (GR-SXM460A/ SXM260A/SX210A), AA-V16EA (GR-SXM46EA/ SXM26EA/SX21EA) •Battery...
Instruction Manual
Page 6
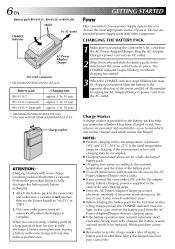
BN-V20U** (optional) approx. 1 hr. 50 min. * GR-SXM460A/SXM260A/SX210A only. ** Provided with some charge left over also reduces performance. The camcorder power turns off . The CHARGE indicator begins blinking to "AUTO" or "PRO.". 2. Remember to unplug the AC Adapter/Charger's power cord from the AC Power Adapter/Charger, then try charging again. ● If the battery...
BN-V20U** (optional) approx. 1 hr. 50 min. * GR-SXM460A/SXM260A/SX210A only. ** Provided with some charge left over also reduces performance. The camcorder power turns off . The CHARGE indicator begins blinking to "AUTO" or "PRO.". 2. Remember to unplug the AC Adapter/Charger's power cord from the AC Power Adapter/Charger, then try charging again. ● If the battery...
Instruction Manual
Page 7
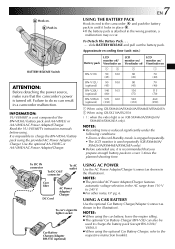
...result in place . •If the battery pack is recommended that the camcorder's power is impossible to 240 V. ● For other notes, ੬ pg. 6. Use the optional AA-V80EG or AA-V80EA AC Power Adapter/Charger. 7 EN USING THE BATTERY PACK Hook its end to the respective ...or AA-V80EA AC Power Adapter/Charger. Failure to do so can also be used repeatedly (GR-SXM460A/ SXM260A/SXM46EA/SXM26EA only). ● Before extended use, it locks in a camcorder malfunction. NOTES: ● Recording time is reduced significantly under the following conditions: •Zoom or Record-Standby ...
...result in place . •If the battery pack is recommended that the camcorder's power is impossible to 240 V. ● For other notes, ੬ pg. 6. Use the optional AA-V80EG or AA-V80EA AC Power Adapter/Charger. 7 EN USING THE BATTERY PACK Hook its end to the respective ...or AA-V80EA AC Power Adapter/Charger. Failure to do so can also be used repeatedly (GR-SXM460A/ SXM260A/SXM46EA/SXM26EA only). ● Before extended use, it locks in a camcorder malfunction. NOTES: ● Recording time is reduced significantly under the following conditions: •Zoom or Record-Standby ...
Instruction Manual
Page 8
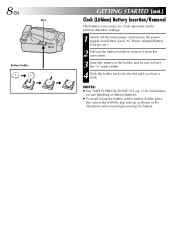
...battery is necessary for information on safe handling of lithium batteries. ● To avoid losing the battery and/or battery holder, place the camcorder with the grip side up as shown in the holder, and be sure to have the "+" mark visible. 4 Slide the holder back...2668; pg. 2) for clock operation and to perform date/time settings. 1 Switch off the unit's power and remove the power supply unit (battery pack, AC Power Adapter/Battery Charger, etc.). 2 Pull out the battery holder to remove it from the camcorder. 3 Insert the battery in the illustration when inserting/removing the battery.
...battery is necessary for information on safe handling of lithium batteries. ● To avoid losing the battery and/or battery holder, place the camcorder with the grip side up as shown in the holder, and be sure to have the "+" mark visible. 4 Slide the holder back...2668; pg. 2) for clock operation and to perform date/time settings. 1 Switch off the unit's power and remove the power supply unit (battery pack, AC Power Adapter/Battery Charger, etc.). 2 Pull out the battery holder to remove it from the camcorder. 3 Insert the battery in the illustration when inserting/removing the battery.

Instruction Manual
Page 35
... to remove it, install one "R6 (AA)" size battery as you would any S-VHS/VHS video cassette recorder. The C-P7U adapter is fully compatible with this to play the tape back as shown, then reattach the cover. Compact video cassette Sliding latch Reels ...automatically. Compartment door 3 Load the cassette adapter into the VCR and play back an S-VHS-C/VHS-C video cassette recorded with any other. PLAYBACK Using The Cassette Adapter EN35 Cassette Adapter Use this camcorder on a regular VHS VCR. It is battery powered and automatically performs tape loading and unloading....
... to remove it, install one "R6 (AA)" size battery as you would any S-VHS/VHS video cassette recorder. The C-P7U adapter is fully compatible with this to play the tape back as shown, then reattach the cover. Compact video cassette Sliding latch Reels ...automatically. Compartment door 3 Load the cassette adapter into the VCR and play back an S-VHS-C/VHS-C video cassette recorded with any other. PLAYBACK Using The Cassette Adapter EN35 Cassette Adapter Use this camcorder on a regular VHS VCR. It is battery powered and automatically performs tape loading and unloading....
Instruction Manual
Page 37
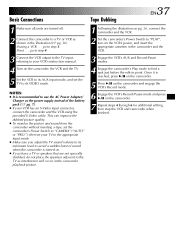
... picture. If not . . . This can improve the dubbed picture quality. ● To monitor the picture and sound from the camcorder without inserting a tape, set the camcorder's Power Switch to "CAMERA" ("AUTO" or "PRO."), then set the TV to find a spot just before the edit-in point. go ... it is turned on. ● If you have a TV or speakers that are turned off. 2 Connect the camcorder to step 3. Basic Connections 1 Make sure all units are not specially shielded, do not place the speakers adjacent to use the AC Power Adapter/ Charger as shown in the illustration (੬ pg. 36).
... picture. If not . . . This can improve the dubbed picture quality. ● To monitor the picture and sound from the camcorder without inserting a tape, set the camcorder's Power Switch to "CAMERA" ("AUTO" or "PRO."), then set the TV to find a spot just before the edit-in point. go ... it is turned on. ● If you have a TV or speakers that are turned off. 2 Connect the camcorder to step 3. Basic Connections 1 Make sure all units are not specially shielded, do not place the speakers adjacent to use the AC Power Adapter/ Charger as shown in the illustration (੬ pg. 36).

Instruction Manual
Page 49
... or cassette adapter is not functioning even if it remains extremely hot for some machines use current even when switched off , otherwise serious injury may result. •Do not place the camcorder into the .... . ... do not short-circuit the terminals. ... NOTES: ● It is recommended that you consult your nearest JVC dealer for an extended period to unnecessary shock. ... CAUTIONS Video Light DANGER: •The video light becomes extremely hot....•When operating, keep a distance of batteries from charger or powered unit when not in a cool, dry place. do not burn. ...
... or cassette adapter is not functioning even if it remains extremely hot for some machines use current even when switched off , otherwise serious injury may result. •Do not place the camcorder into the .... . ... do not short-circuit the terminals. ... NOTES: ● It is recommended that you consult your nearest JVC dealer for an extended period to unnecessary shock. ... CAUTIONS Video Light DANGER: •The video light becomes extremely hot....•When operating, keep a distance of batteries from charger or powered unit when not in a cool, dry place. do not burn. ...
Instruction Manual
Page 52
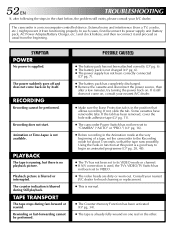
... If the tab has been removed, cover the hole with adhesive tape (੬ pg. 11). ● The camcorder Power Switch has not been set to "CAMERA" ("AUTO" or "PRO.") (੬ pg. 16). ● Before recording in the position that the tape runs smoothly. and then re-connect it from the beginning... consult your nearest JVC dealer. ● Make sure the Erase Protection tab is in the Animation mode at this point is a good way to begin an animated programme (੬ pg. 28, 48). ● The TV has not been set to its power supply unit (battery pack, AC Power Adapter/Battery Charger, etc.)...
... If the tab has been removed, cover the hole with adhesive tape (੬ pg. 11). ● The camcorder Power Switch has not been set to "CAMERA" ("AUTO" or "PRO.") (੬ pg. 16). ● Before recording in the position that the tape runs smoothly. and then re-connect it from the beginning... consult your nearest JVC dealer. ● Make sure the Erase Protection tab is in the Animation mode at this point is a good way to begin an animated programme (੬ pg. 28, 48). ● The TV has not been set to its power supply unit (battery pack, AC Power Adapter/Battery Charger, etc.)...
Instruction Manual
Page 59
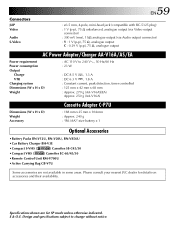
... 125 mm x 42 mm x 68 mm : Approx. 270 g (AA-V16AS/EA) Approx. 250 g (AA-V16A) Dimensions (W x H x D) Weight Accessory Cassette Adapter C-P7U : 188 mm x 25 mm x 104 mm : Approx. 240 g : "R6 (AA)"-size battery x 1 Optional Accessories •Battery Packs BN-V12U, BN...via Audio output connector) : Y : 1 V (p-p), 75 Ω, analogue output C : 0.29 V (p-p), 75 Ω, analogue output AC Power Adapter/Charger AA-V16A/AS/EA Power requirement Power consumption Output Charge VTR Charging system Dimensions (W x H x D) Weight : AC 110 V to change without notice. E & O.E. Specifications shown ...
... 125 mm x 42 mm x 68 mm : Approx. 270 g (AA-V16AS/EA) Approx. 250 g (AA-V16A) Dimensions (W x H x D) Weight Accessory Cassette Adapter C-P7U : 188 mm x 25 mm x 104 mm : Approx. 240 g : "R6 (AA)"-size battery x 1 Optional Accessories •Battery Packs BN-V12U, BN...via Audio output connector) : Y : 1 V (p-p), 75 Ω, analogue output C : 0.29 V (p-p), 75 Ω, analogue output AC Power Adapter/Charger AA-V16A/AS/EA Power requirement Power consumption Output Charge VTR Charging system Dimensions (W x H x D) Weight : AC 110 V to change without notice. E & O.E. Specifications shown ...


