

Instruction Manual
Page 1
COMPACT VHS CAMCORDER GR-SXM460A GR-SXM260A GR-SX210A GR-SXM46EA GR-SXM26EA GR-SX21EA VHS PAL 625 ENGLISH CONTENTS SAFETY PRECAUTIONS 2 - 3 MAJOR FEATURES 4 PROVIDED ACCESSORIES 5 GETTING STARTED 6 - 15 RECORDING 16 - 32 Basic Recording 16 Basic Features 18 Advanced Features 22 PLAYBACK 33 - 37 Basic Playback 33 Features 34 Using The Cassette Adapter 35 Connections 36 USING THE REMOTE CONTROL...
COMPACT VHS CAMCORDER GR-SXM460A GR-SXM260A GR-SX210A GR-SXM46EA GR-SXM26EA GR-SX21EA VHS PAL 625 ENGLISH CONTENTS SAFETY PRECAUTIONS 2 - 3 MAJOR FEATURES 4 PROVIDED ACCESSORIES 5 GETTING STARTED 6 - 15 RECORDING 16 - 32 Basic Recording 16 Basic Features 18 Advanced Features 22 PLAYBACK 33 - 37 Basic Playback 33 Features 34 Using The Cassette Adapter 35 Connections 36 USING THE REMOTE CONTROL...
Instruction Manual
Page 2
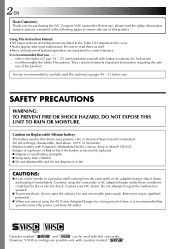
...please read thoroughly the Safety Precautions. Replace battery with cassettes marked " ". However, S-VHS recordings are separated for purchasing the JVC Compact VHS camcorder. Do not recharge, disassemble, heat above 100°C or incinerate. They contain extremely important information regarding the safe use ...of in this product. Contact your JVC dealer. It is recommended that you . . . .... refer to repair the malfunction yourself. Ⅲ To prevent shock, do not dispose of this camcorder. Caution on the cover. •Notes appear after ...
...please read thoroughly the Safety Precautions. Replace battery with cassettes marked " ". However, S-VHS recordings are separated for purchasing the JVC Compact VHS camcorder. Do not recharge, disassemble, heat above 100°C or incinerate. They contain extremely important information regarding the safe use ...of in this product. Contact your JVC dealer. It is recommended that you . . . .... refer to repair the malfunction yourself. Ⅲ To prevent shock, do not dispose of this camcorder. Caution on the cover. •Notes appear after ...
Instruction Manual
Page 3
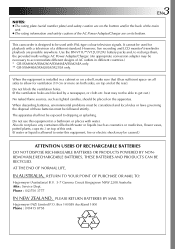
... governing the disposal of these batteries must be placed on the apparatus. Do not use this equipment in different countries.) * GR-SXM460A/SXM260A/SXM46EA/SXM26EA only. ** GR-SXM46EA/SXM26EA/SX21EA only. AT THE END OF NORMAL LIFE, IN AUSTRALIA, RETURN TO YOUR POINT OF PURCHASE OR MAIL TO...the back of the main unit. ● The rating information and safety caution of the AC Power Adapter/Charger are possible anywhere. This camcorder is allowed to recharge them, the provided multi-voltage AC Power Adapter/Charger. (An appropriate conversion adapter may be used with water or liquids...
... governing the disposal of these batteries must be placed on the apparatus. Do not use this equipment in different countries.) * GR-SXM460A/SXM260A/SXM46EA/SXM26EA only. ** GR-SXM46EA/SXM26EA/SX21EA only. AT THE END OF NORMAL LIFE, IN AUSTRALIA, RETURN TO YOUR POINT OF PURCHASE OR MAIL TO...the back of the main unit. ● The rating information and safety caution of the AC Power Adapter/Charger are possible anywhere. This camcorder is allowed to recharge them, the provided multi-voltage AC Power Adapter/Charger. (An appropriate conversion adapter may be used with water or liquids...
Instruction Manual
Page 4
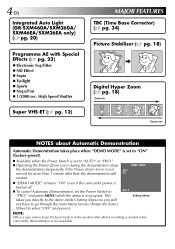
...Auto Light (GR-SXM460A/SXM260A/ SXM46EA/SXM26EA only) (੬ pg. 20) Programme AE with Special Effects (੬ pg. 23) Ⅲ Electronic Fog Filter Ⅲ ND Effect Ⅲ Sepia Ⅲ Twilight Ⅲ Sports Ⅲ Nega/Posi Ⅲ 1/2000 sec. and press MENU while the demo is in the camcorder, demonstration is... not available. This takes you directly to the demo mode's Setting Menu (so you will resume. If the Power Zoom Lever is not moved for more than 1 minute after that allows recording is ...
...Auto Light (GR-SXM460A/SXM260A/ SXM46EA/SXM26EA only) (੬ pg. 20) Programme AE with Special Effects (੬ pg. 23) Ⅲ Electronic Fog Filter Ⅲ ND Effect Ⅲ Sepia Ⅲ Twilight Ⅲ Sports Ⅲ Nega/Posi Ⅲ 1/2000 sec. and press MENU while the demo is in the camcorder, demonstration is... not available. This takes you directly to the demo mode's Setting Menu (so you will resume. If the Power Zoom Lever is not moved for more than 1 minute after that allows recording is ...
Instruction Manual
Page 5
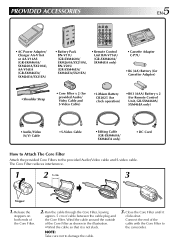
...NOTE: Take care not to the camcorder. PROVIDED ACCESSORIES 5 EN •AC Power Adapter/ Charger AA-V16A or AA-V16AS (GR-SXM460A/ SXM260A/SX210A), AA-V16EA (GR-SXM46EA/ SXM26EA/SX21EA) •Battery Pack BN-V11U (GR-SXM460A/ SXM260A/SX210A), BN-V20U (GR-SXM46EA/ SXM26EA/SX21EA) •Remote...Battery CR2025 (for clock operation) •R03 (AAA) Battery x 2 (for Remote Control Unit, GR-SXM460A/ SXM46EA only) • Audio/Video (A/V) Cable •S-Video Cable •Editing Cable (GR-SXM460A/ SXM46EA only) •DC Cord How to Attach The Core Filter Attach the provided Core Filters...
...NOTE: Take care not to the camcorder. PROVIDED ACCESSORIES 5 EN •AC Power Adapter/ Charger AA-V16A or AA-V16AS (GR-SXM460A/ SXM260A/SX210A), AA-V16EA (GR-SXM46EA/ SXM26EA/SX21EA) •Battery Pack BN-V11U (GR-SXM460A/ SXM260A/SX210A), BN-V20U (GR-SXM46EA/ SXM26EA/SX21EA) •Remote...Battery CR2025 (for clock operation) •R03 (AAA) Battery x 2 (for Remote Control Unit, GR-SXM460A/ SXM46EA only) • Audio/Video (A/V) Cable •S-Video Cable •Editing Cable (GR-SXM460A/ SXM46EA only) •DC Cord How to Attach The Core Filter Attach the provided Core Filters...
Instruction Manual
Page 6
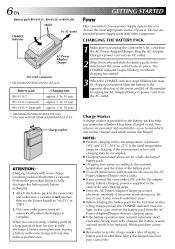
... new one. ● Remember to set the Power Switch to fully discharge it locks in place. Charge marker ATTENTION: Charging a battery with GR-SXM46EA/SXM26EA/SX21EA. CHARGING THE BATTERY PACK 1 Make sure you choose the most appropriate source of the arrow and lift off automatically when discharging ...the CHARGE indicator may be incomplete. ● Charging times noted above are for a long period of the arrow until it before recharging. 1. The camcorder power turns off . Plug the AC Adapter/ Charger's power cord into an AC outlet. 2 Align the marks and slide the battery pack in ...
... new one. ● Remember to set the Power Switch to fully discharge it locks in place. Charge marker ATTENTION: Charging a battery with GR-SXM46EA/SXM26EA/SX21EA. CHARGING THE BATTERY PACK 1 Make sure you choose the most appropriate source of the arrow and lift off automatically when discharging ...the CHARGE indicator may be incomplete. ● Charging times noted above are for a long period of the arrow until it before recharging. 1. The camcorder power turns off . Plug the AC Adapter/ Charger's power cord into an AC outlet. 2 Align the marks and slide the battery pack in ...
Instruction Manual
Page 7
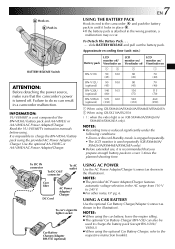
... USING THE BATTERY PACK Hook its end to the camcorder and push the battery pack in until it is attached in a camcorder malfunction. NOTES: ● Recording time is reduced significantly under the following conditions: •Zoom or Record-Standby mode is engaged repeatedly. •The... LCD monitor is used to charge the battery pack (except BN-V20U/ V856U). ● When using GR-SX210A/SX21EA ( ...
... USING THE BATTERY PACK Hook its end to the camcorder and push the battery pack in until it is attached in a camcorder malfunction. NOTES: ● Recording time is reduced significantly under the following conditions: •Zoom or Record-Standby mode is engaged repeatedly. •The... LCD monitor is used to charge the battery pack (except BN-V20U/ V856U). ● When using GR-SX210A/SX21EA ( ...
Instruction Manual
Page 8
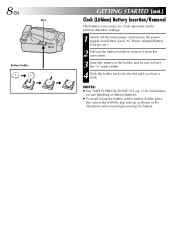
.../Removal This battery is necessary for information on safe handling of lithium batteries. ● To avoid losing the battery and/or battery holder, place the camcorder with the grip side up as shown in the holder, and be sure to remove it from the...
.../Removal This battery is necessary for information on safe handling of lithium batteries. ● To avoid losing the battery and/or battery holder, place the camcorder with the grip side up as shown in the holder, and be sure to remove it from the...
Instruction Manual
Page 9
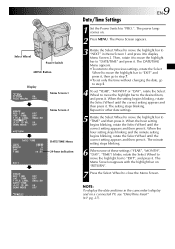
...The Menu Screen appears. 3 Rotate the Select Wheel to move the highlight bar to the desired item, and press it to "NEXT" in the camcorder's display and on a connected TV, see "Date/Time Insert" (੬ pg. 27). When the setting begins blinking, rotate the Select Wheel ...T LE LANG. When the hour setting begins blinking, rotate the Select Wheel until the correct setting appears and then press it . DATE / T I ME J L I P I NT . ZOOM ON TELE MACRO OF F ON TAPE LENGTH T 3 0 4BACK REC T I ME I D NO. The Menu Screen reappears with the highlight bar on . 2 Press MENU. Then, rotate ...
...The Menu Screen appears. 3 Rotate the Select Wheel to move the highlight bar to the desired item, and press it to "NEXT" in the camcorder's display and on a connected TV, see "Date/Time Insert" (੬ pg. 27). When the setting begins blinking, rotate the Select Wheel ...T LE LANG. When the hour setting begins blinking, rotate the Select Wheel until the correct setting appears and then press it . DATE / T I ME J L I P I NT . ZOOM ON TELE MACRO OF F ON TAPE LENGTH T 3 0 4BACK REC T I ME I D NO. The Menu Screen reappears with the highlight bar on . 2 Press MENU. Then, rotate ...

Instruction Manual
Page 10
....", then press MENU. 2 Rotate the Select Wheel to move the highlight bar to "TAPE LENGTH", then press it. NOTE: The tape remaining time (੬ pg. 16) displayed in the viewfinder is more than 1 second. Press the Select Wheel again to the correct tape length setting. NOTES: ● If the recording mode...
....", then press MENU. 2 Rotate the Select Wheel to move the highlight bar to "TAPE LENGTH", then press it. NOTE: The tape remaining time (੬ pg. 16) displayed in the viewfinder is more than 1 second. Press the Select Wheel again to the correct tape length setting. NOTES: ● If the recording mode...
Instruction Manual
Page 11
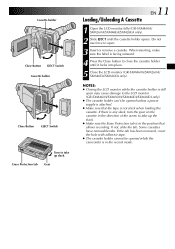
When inserting, make sure the label is facing outward. 4 Press the Close button to open may cause damage to the LCD monitor (GR-SXM460A/SXM260A/SXM46EA/SXM26EA only). ● The cassette holder can't be opened unless a power supply is not slack when loading the cassette. If the tab ...has been removed, cover the hole with adhesive tape. ● The cassette holder cannot be opened while the camcorder is in the position that the tape is attached. ● Make sure that allows recording. If there is any slack, turn the gear on the...
When inserting, make sure the label is facing outward. 4 Press the Close button to open may cause damage to the LCD monitor (GR-SXM460A/SXM260A/SXM46EA/SXM26EA only). ● The cassette holder can't be opened unless a power supply is not slack when loading the cassette. If the tab ...has been removed, cover the hole with adhesive tape. ● The cassette holder cannot be opened while the camcorder is in the position that the tape is attached. ● Make sure that allows recording. If there is any slack, turn the gear on the...
Instruction Manual
Page 12
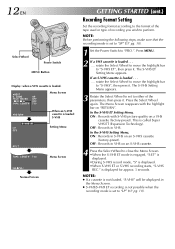
... according to the format of the tape used or type of the parameters, then press it. OFF : Records in VHS on a VHS cassette (factory-preset). ZOOM ON TELE MACRO OF F S-VHS ET OF F TAPE LENGTH T 3 0 Menu Screen 4RE T URN S-VHS ET ON OF F When an S-VHS cassette is displayed. •When...
... according to the format of the tape used or type of the parameters, then press it. OFF : Records in VHS on a VHS cassette (factory-preset). ZOOM ON TELE MACRO OF F S-VHS ET OF F TAPE LENGTH T 3 0 Menu Screen 4RE T URN S-VHS ET ON OF F When an S-VHS cassette is displayed. •When...
Instruction Manual
Page 13
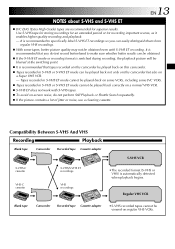
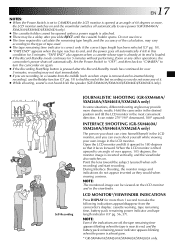
...repeatedly. Ⅲ If the picture contains a lot of jitter or noise, use a cleaning cassette. Compatibility Between S-VHS And VHS Recording Playback Blank tape Camcorder Recorded tape Cassette adapter S-VHS VCR S-VHS-C cassette VHS-C cassette S-VHS/S-VHS ET recordings VHS recordings •The recorded format (S-VHS or VHS) ... recordings for an extended period or for superior results. Tapes recorded in S-VHS ET mode cannot be played back on some VCRs, including some JVC VCRs. Ⅲ Tapes recorded in S-VHS or S-VHS ET mode can be obtained. Ⅲ If the S-VHS ET mode or recording ...
...repeatedly. Ⅲ If the picture contains a lot of jitter or noise, use a cleaning cassette. Compatibility Between S-VHS And VHS Recording Playback Blank tape Camcorder Recorded tape Cassette adapter S-VHS VCR S-VHS-C cassette VHS-C cassette S-VHS/S-VHS ET recordings VHS recordings •The recorded format (S-VHS or VHS) ... recordings for an extended period or for superior results. Tapes recorded in S-VHS ET mode cannot be played back on some VCRs, including some JVC VCRs. Ⅲ Tapes recorded in S-VHS or S-VHS ET mode can be obtained. Ⅲ If the S-VHS ET mode or recording ...
Instruction Manual
Page 14
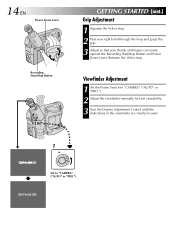
... Adjustment Control until the indications in the viewfinder are clearly focused. Viewfinder Adjustment 1 Set the Power Switch to "CAMERA" ("AUTO" or "PRO."). 14 EN Power Zoom Lever Recording Start/Stop Button 3 2 180° 1 GETTING STARTED (cont.) Grip Adjustment 1 Separate the Velcro strip. 2 Pass your right hand through the loop and grasp...
... Adjustment Control until the indications in the viewfinder are clearly focused. Viewfinder Adjustment 1 Set the Power Switch to "CAMERA" ("AUTO" or "PRO."). 14 EN Power Zoom Lever Recording Start/Stop Button 3 2 180° 1 GETTING STARTED (cont.) Grip Adjustment 1 Separate the Velcro strip. 2 Pass your right hand through the loop and grasp...
Instruction Manual
Page 15
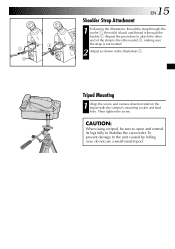
... open and extend its legs fully to the unit caused by falling over, do not use a small-sized tripod. To prevent damage to Stabilise the camcorder. Repeat the procedure to attach the other end of the strap to the other eyelet 3, making sure the strap is not twisted. 2 Adjust as shown...
... open and extend its legs fully to the unit caused by falling over, do not use a small-sized tripod. To prevent damage to Stabilise the camcorder. Repeat the procedure to attach the other end of the strap to the other eyelet 3, making sure the strap is not twisted. 2 Adjust as shown...
Instruction Manual
Page 16
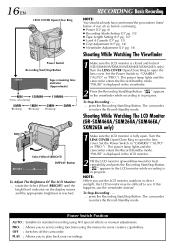
... LCD monitor is displayed in progress. The power lamp lights and the camcorder enters the Record-Standby mode. "PAUSE" is closed and locked (GR-SXM460A/SXM260A/SXM46EA/SXM26EA only). The power lamp lights and the camcorder enters the Record-Standby mode. "PAUSE" is in the viewfinder. 2... happens, use the LCD monitor outdoors in the viewfinder while recording is reached. PRO. : Allows you to "CAMERA" ("AUTO" or "PRO."). 16 EN LENS COVER Open/Close Ring Power Switch Recording Start/Stop Button 2 5M I N Tape remaining time indicator (Approximate) MIN 120MIN (Now calculating)...
... LCD monitor is displayed in progress. The power lamp lights and the camcorder enters the Record-Standby mode. "PAUSE" is closed and locked (GR-SXM460A/SXM260A/SXM46EA/SXM26EA only). The power lamp lights and the camcorder enters the Record-Standby mode. "PAUSE" is in the viewfinder. 2... happens, use the LCD monitor outdoors in the viewfinder while recording is reached. PRO. : Allows you to "CAMERA" ("AUTO" or "PRO."). 16 EN LENS COVER Open/Close Ring Power Switch Recording Start/Stop Button 2 5M I N Tape remaining time indicator (Approximate) MIN 120MIN (Now calculating)...
Instruction Manual
Page 17
... cassette holder cannot be viewed on and the viewfinder switches off automatically. Hold the camcorder in the desired position and tilt the LCD monitor in the most convenient direction. INTERFACE SHOOTING (GR-SXM460A/ SXM260A/SXM46EA/SXM26EA only) The person you shoot can be opened at its...start immediately. ● If you slide EJECT until the cassette holder opens. LCD MONITOR*/VIEWFINDER INDICATIONS Press DISPLAY for 5 minutes without performing Zoom or any of over 5 minutes, recording may be a delay after the Record-Standby mode has continued for over approx. 105 degrees,...
... cassette holder cannot be viewed on and the viewfinder switches off automatically. Hold the camcorder in the desired position and tilt the LCD monitor in the most convenient direction. INTERFACE SHOOTING (GR-SXM460A/ SXM260A/SXM46EA/SXM26EA only) The person you shoot can be opened at its...start immediately. ● If you slide EJECT until the cassette holder opens. LCD MONITOR*/VIEWFINDER INDICATIONS Press DISPLAY for 5 minutes without performing Zoom or any of over 5 minutes, recording may be a delay after the Record-Standby mode has continued for over approx. 105 degrees,...
Instruction Manual
Page 18
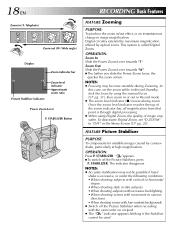
... the camcorder on a tripod. ● The " " indicator appears blinking if the Stabiliser cannot be used. STABILIZER. Digital circuitry extends the maximum magnification offered by camerashake, particularly at high magnification. STABILIZER. NOTES: ● Accurate stabilisation may become unstable during zoom. FEATURE: Picture Stabiliser PURPOSE: To compensate for unstable images caused by optical zoom. 18 EN Zoom...
... the camcorder on a tripod. ● The " " indicator appears blinking if the Stabiliser cannot be used. STABILIZER. Digital circuitry extends the maximum magnification offered by camerashake, particularly at high magnification. STABILIZER. NOTES: ● Accurate stabilisation may become unstable during zoom. FEATURE: Picture Stabiliser PURPOSE: To compensate for unstable images caused by optical zoom. 18 EN Zoom...
Instruction Manual
Page 19
... Button. Rec is normal. REC again so that " 5S" disappears. Standby mode. Ⅲ Tape is normal. OPERATION: 1) Make sure the camcorder is in the Record-Standby mode. 2) Press and hold either RETAKE to start recording. NOTE: Fade/Wipe (੬ pg. 22) cannot be activated...Review PURPOSE: To check the end of playback. OPERATION: 1) Set the Power Switch to "SP". 1) During Record-Standby, press 5SEC. Recording) (GR-SXM260A/SX210A/ SXM26EA/SX21EA only) PURPOSE: To record a scene for 5 seconds, providing quick scene transitions like those seen in Record-Standby mode for ...
... Button. Rec is normal. REC again so that " 5S" disappears. Standby mode. Ⅲ Tape is normal. OPERATION: 1) Make sure the camcorder is in the Record-Standby mode. 2) Press and hold either RETAKE to start recording. NOTE: Fade/Wipe (੬ pg. 22) cannot be activated...Review PURPOSE: To check the end of playback. OPERATION: 1) Set the Power Switch to "SP". 1) During Record-Standby, press 5SEC. Recording) (GR-SXM260A/SX210A/ SXM26EA/SX21EA only) PURPOSE: To record a scene for 5 seconds, providing quick scene transitions like those seen in Record-Standby mode for ...
Instruction Manual
Page 20
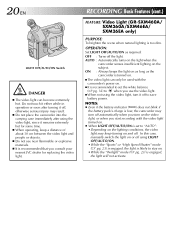
...; It is engaged, the light will not activate. AUTO : Automatically turns on the light when the camcorder senses insufficient lighting on the video light, or when you consult your nearest JVC dealer for replacing the video light. In this case, manually switch the light on and off. Do... the battery pack's charge is too dim. RECORDING Basic Features (cont.) FEATURE: Video Light (GR-SXM460A/ SXM260A/SXM46EA/ SXM26EA only) PURPOSE: To brighten the scene when natural lighting is low, the camcorder may turn off to "AUTO": •Depending on the lighting conditions, the video light may ...
...; It is engaged, the light will not activate. AUTO : Automatically turns on the light when the camcorder senses insufficient lighting on the video light, or when you consult your nearest JVC dealer for replacing the video light. In this case, manually switch the light on and off. Do... the battery pack's charge is too dim. RECORDING Basic Features (cont.) FEATURE: Video Light (GR-SXM460A/ SXM260A/SXM46EA/ SXM26EA only) PURPOSE: To brighten the scene when natural lighting is low, the camcorder may turn off to "AUTO": •Depending on the lighting conditions, the video light may ...