Instruction Manual
Page 1
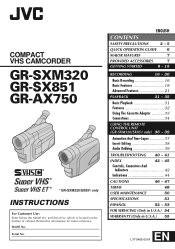
and Serial No. Retain this information for future reference. which is located on the bottom of cabinet. Serial No. COMPACT VHS CAMCORDER GR-SXM320 GR-SX851 GR-AX750 * GR-SXM320/SX851 only INSTRUCTIONS For Customer Use: Enter below the Model No. ENGLISH CONTENTS SAFETY PRECAUTIONS 2 - 5 QUICK OPERATION GUIDE 6 MAJOR... 21 PLAYBACK 31 - 35 Basic Playback 31 Features 32 Using The Cassette Adapter 33 Connections 34 USING THE REMOTE CONTROL UNIT (GR-SXM320/SX851 only) 36 - 39 Animation And Time-Lapse 37 Insert Editing 38 Audio Dubbing 39 TROUBLESHOOTING 40 - 41 INDEX ...
and Serial No. Retain this information for future reference. which is located on the bottom of cabinet. Serial No. COMPACT VHS CAMCORDER GR-SXM320 GR-SX851 GR-AX750 * GR-SXM320/SX851 only INSTRUCTIONS For Customer Use: Enter below the Model No. ENGLISH CONTENTS SAFETY PRECAUTIONS 2 - 5 QUICK OPERATION GUIDE 6 MAJOR... 21 PLAYBACK 31 - 35 Basic Playback 31 Features 32 Using The Cassette Adapter 33 Connections 34 USING THE REMOTE CONTROL UNIT (GR-SXM320/SX851 only) 36 - 39 Animation And Time-Lapse 37 Insert Editing 38 Audio Dubbing 39 TROUBLESHOOTING 40 - 41 INDEX ...
Instruction Manual
Page 2
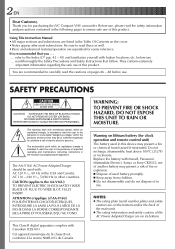
...; Dispose of in the following pages to persons. Using This Instruction Manual •All major sections and subsections are on lithium battery (for purchasing the JVC Compact VHS camcorder.
...; Dispose of in the following pages to persons. Using This Instruction Manual •All major sections and subsections are on lithium battery (for purchasing the JVC Compact VHS camcorder.
Instruction Manual
Page 3
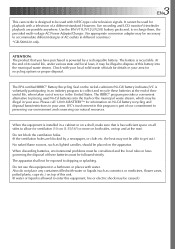
...our commitment to dripping or splashing. The EPA certified RBRC® Battery Recycling Seal on the nickel-cadmium (Ni-Cd) battery indicates JVC is voluntarily participating in an industry program to allow for information on all sides to collect and recycle these batteries must be illegal to...use this battery into the trash or the municipal waste stream, which may be caused.) 3 EN This camcorder is designed to accommodate different designs of AC outlets in different countries.) *GR-SXM320 only. Use the BN-V11U/V12U/V20U battery packs and, to recharge them, the provided multi-...
...our commitment to dripping or splashing. The EPA certified RBRC® Battery Recycling Seal on the nickel-cadmium (Ni-Cd) battery indicates JVC is voluntarily participating in an industry program to allow for information on all sides to collect and recycle these batteries must be illegal to...use this battery into the trash or the municipal waste stream, which may be caused.) 3 EN This camcorder is designed to accommodate different designs of AC outlets in different countries.) *GR-SXM320 only. Use the BN-V11U/V12U/V20U battery packs and, to recharge them, the provided multi-...
Instruction Manual
Page 6
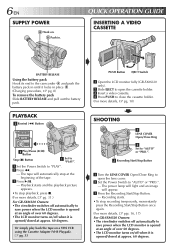
... and pull out the battery pack. QUICK OPERATION GUIDE INSERTING A VIDEO CASSETTE BATTERY RELEASE Using the battery pack Hook its end to the camcorder and push the battery pack in until it is opened /closed at approx. 60 degrees. Playback starts and the playback picture appears. &#...is opened at an angle of the tape. 3 Press 4/6. - 6 EN SUPPLY POWER A Hook on a VHS VCR using the Cassette Adapter (VHS Playpak). ੬ pg. 33 PUSH Button EJECT Switch 1 Open the LCD monitor fully (GR-SXM320 only). 2 Slide EJECT to open the cassette holder. 3 Insert a video cassette. 4 Press PUSH ...
... and pull out the battery pack. QUICK OPERATION GUIDE INSERTING A VIDEO CASSETTE BATTERY RELEASE Using the battery pack Hook its end to the camcorder and push the battery pack in until it is opened /closed at approx. 60 degrees. Playback starts and the playback picture appears. &#...is opened at an angle of the tape. 3 Press 4/6. - 6 EN SUPPLY POWER A Hook on a VHS VCR using the Cassette Adapter (VHS Playpak). ੬ pg. 33 PUSH Button EJECT Switch 1 Open the LCD monitor fully (GR-SXM320 only). 2 Slide EJECT to open the cassette holder. 3 Insert a video cassette. 4 Press PUSH ...
Instruction Manual
Page 7
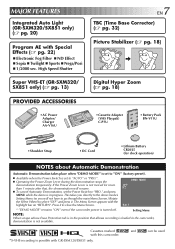
...resume. Ⅲ To cancel Automatic Demonstration, set the Power Switch to "PRO." If the Power Zoom Lever is possible with this camcorder. * S-VHS recording is not moved for clock operation) NOTES about Automatic Demonstration Automatic Demonstration takes place when "DEMO MODE" is set to "ON"...the highlight bar on "RETURN". High Speed Shutter 7 EN TBC (Time Base Corrector) (੬ pg. 32) Picture Stabilizer (੬ pg. 18) Super VHS-ET (GR-SXM320/ SX851 only) (੬ pg. 13) Digital Hyper Zoom (੬ pg. 18) PROVIDED ACCESSORIES • AC Power Adapter/ Charger AA-V16U...
...resume. Ⅲ To cancel Automatic Demonstration, set the Power Switch to "PRO." If the Power Zoom Lever is possible with this camcorder. * S-VHS recording is not moved for clock operation) NOTES about Automatic Demonstration Automatic Demonstration takes place when "DEMO MODE" is set to "ON"...the highlight bar on "RETURN". High Speed Shutter 7 EN TBC (Time Base Corrector) (੬ pg. 32) Picture Stabilizer (੬ pg. 18) Super VHS-ET (GR-SXM320/ SX851 only) (੬ pg. 13) Digital Hyper Zoom (੬ pg. 18) PROVIDED ACCESSORIES • AC Power Adapter/ Charger AA-V16U...

Instruction Manual
Page 8
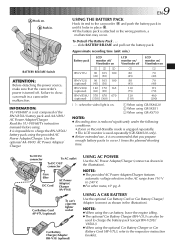
... a battery pack or after detaching a discharged one means charged and which means discharged. In this case, remove the battery pack from your camcorder. CHARGING THE BATTERY PACK 1 Make sure you are provided (red and black)-you choose the most appropriate source of the arrow until it ... time varies according to indicate charging has started. 3 When the CHARGE indicator stops blinking but stays lit, charging is complete. Remember to the camcorder and make sure a cassette is the ideal temperature range for the first time or after having been fully charged, the battery is too cold...
... a battery pack or after detaching a discharged one means charged and which means discharged. In this case, remove the battery pack from your camcorder. CHARGING THE BATTERY PACK 1 Make sure you are provided (red and black)-you choose the most appropriate source of the arrow until it ... time varies according to indicate charging has started. 3 When the CHARGE indicator stops blinking but stays lit, charging is complete. Remember to the camcorder and make sure a cassette is the ideal temperature range for the first time or after having been fully charged, the battery is too cold...
Instruction Manual
Page 9
... (290) ( ) : when the video light is on . Failure to do so can also be used repeatedly (GR-SXM320 only). ● Before extended use, it locks in place . •If the battery pack is attached in a camcorder malfunction. BATTERY RELEASE Switch ATTENTION: Before detaching the power source, make sure that you prepare enough...
... (290) ( ) : when the video light is on . Failure to do so can also be used repeatedly (GR-SXM320 only). ● Before extended use, it locks in place . •If the battery pack is attached in a camcorder malfunction. BATTERY RELEASE Switch ATTENTION: Before detaching the power source, make sure that you prepare enough...
Instruction Manual
Page 10
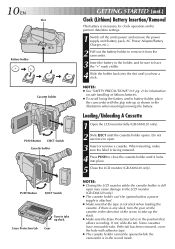
... adhesive tape. ● The cassette holder cannot be opened while the camcorder is attached. ● Make sure that allows recording. Loading/Unloading A Cassette 1 Open the LCD monitor fully (GR-SXM320 only). 2 Slide EJECT until you hear a click. If there is any slack, turn the gear on safe handling of the arrow... Erase Protection tab is in the position that the tape is still open may cause damage to close the cassette holder until it from the camcorder. 3 Insert the battery in the holder, and be sure to open. 3 Insert or remove a cassette. If not, slide the tab. 10 EN Slot ...
... adhesive tape. ● The cassette holder cannot be opened while the camcorder is attached. ● Make sure that allows recording. Loading/Unloading A Cassette 1 Open the LCD monitor fully (GR-SXM320 only). 2 Slide EJECT until you hear a click. If there is any slack, turn the gear on safe handling of the arrow... Erase Protection tab is in the position that the tape is still open may cause damage to close the cassette holder until it from the camcorder. 3 Insert the battery in the holder, and be sure to open. 3 Insert or remove a cassette. If not, slide the tab. 10 EN Slot ...

Instruction Manual
Page 11
... stops blinking. 6 When none of these settings ("YEAR", "MONTH", "DAY", "TIME") blinks, rotate the Select Wheel to move the highlight bar to "NEXT" in the camcorder's display and on "RETURN". 7 Press the Select Wheel to the desired item, and press it . The Menu Screen appears. 3 Rotate the Select Wheel to move...
... stops blinking. 6 When none of these settings ("YEAR", "MONTH", "DAY", "TIME") blinks, rotate the Select Wheel to move the highlight bar to "NEXT" in the camcorder's display and on "RETURN". 7 Press the Select Wheel to the desired item, and press it . The Menu Screen appears. 3 Rotate the Select Wheel to move...
Instruction Manual
Page 14
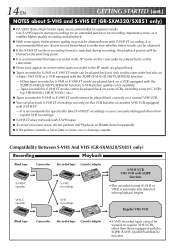
... mode on this camcorder be played back on this VCR but also on a Super VHS VCR or a VCR equipped with the SQPB (S-VHS QUASI PLAYBACK) function. - Use S-VHS tape for storing ...VHS ET recording. Compatibility Between S-VHS And VHS (GR-SXM320/SX851 only) Recording Playback Blank tape S-VHS-C cassette VHS-C cassette Camcorder Recorded tape Cassette adapter S-VHS recordings VHS recordings S-VHS VCR VHS VCR with SQPB function •The recorded format (S-VHS or VHS) is not available. - 14 EN GETTING STARTED (cont.) NOTES about S-VHS and S-VHS ET (GR-SXM320/SX851 only) Ⅲ JVC...
... mode on this camcorder be played back on this VCR but also on a Super VHS VCR or a VCR equipped with the SQPB (S-VHS QUASI PLAYBACK) function. - Use S-VHS tape for storing ...VHS ET recording. Compatibility Between S-VHS And VHS (GR-SXM320/SX851 only) Recording Playback Blank tape S-VHS-C cassette VHS-C cassette Camcorder Recorded tape Cassette adapter S-VHS recordings VHS recordings S-VHS VCR VHS VCR with SQPB function •The recorded format (S-VHS or VHS) is not available. - 14 EN GETTING STARTED (cont.) NOTES about S-VHS and S-VHS ET (GR-SXM320/SX851 only) Ⅲ JVC...

Instruction Manual
Page 15
... buckle 2. Repeat the procedure to attach the other 4 end of the strap to the unit caused by falling over, do not use a small-sized tripod. To prevent damage to the other eyelet 3, making sure the strap is not twisted. 2 Adjust as shown in the viewfinder are clearly focused.... 2 Pass your thumb and fingers can easily operate the Recording Start/Stop Button and Power Zoom Lever. PAUSE 1 2 3 Set to stabilize the camcorder. Tripod Mounting 1 Align the screw and camera direction stud on the tripod with the camera's mounting socket and stud hole. Then tighten the screw. ...
... buckle 2. Repeat the procedure to attach the other 4 end of the strap to the unit caused by falling over, do not use a small-sized tripod. To prevent damage to the other eyelet 3, making sure the strap is not twisted. 2 Adjust as shown in the viewfinder are clearly focused.... 2 Pass your thumb and fingers can easily operate the Recording Start/Stop Button and Power Zoom Lever. PAUSE 1 2 3 Set to stabilize the camcorder. Tripod Mounting 1 Align the screw and camera direction stud on the tripod with the camera's mounting socket and stud hole. Then tighten the screw. ...
Instruction Manual
Page 16
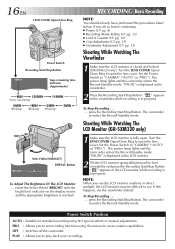
...: You should already have performed the procedures listed below. The power lamp lights and the camcorder enters the Record-Standby mode. press the Recording Start/Stop Button. Shooting While Watching The LCD Monitor (GR-SXM320 only) 1 Make sure the LCD monitor is reached. PRO. : Allows you to.... Turn the LENS COVER Open/ Close Ring to open the lens cover. Turn the LENS COVER Open/Close Ring to open the lens cover. The camcorder re-enters the Record-Standby mode. PLAY : Allows you use the viewfinder instead. If not, do so before continuing. ● Power (੬ ...
...: You should already have performed the procedures listed below. The power lamp lights and the camcorder enters the Record-Standby mode. press the Recording Start/Stop Button. Shooting While Watching The LCD Monitor (GR-SXM320 only) 1 Make sure the LCD monitor is reached. PRO. : Allows you to.... Turn the LENS COVER Open/ Close Ring to open the lens cover. Turn the LENS COVER Open/Close Ring to open the lens cover. The camcorder re-enters the Record-Standby mode. PLAY : Allows you use the viewfinder instead. If not, do so before continuing. ● Power (੬ ...
Instruction Manual
Page 17
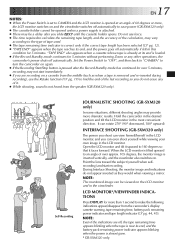
...image can view himself/herself in the LCD monitor, and you do not erase any other operations, the camcorder's power shuts off automatically if left in the LCD monitor. INTERFACE SHOOTING (GR-SXM320 only) The person you shoot can be opened at its end is correct only if the correct tape... the viewfinder also switches on. Set the Power Switch to "OFF", and then back to "CAMERA" to turn the camcorder on and the viewfinder switches off automatically to save power (GR-SXM320 only). ● The cassette holder cannot be viewed on the LCD monitor and in the most convenient direction. It...
...image can view himself/herself in the LCD monitor, and you do not erase any other operations, the camcorder's power shuts off automatically if left in the LCD monitor. INTERFACE SHOOTING (GR-SXM320 only) The person you shoot can be opened at its end is correct only if the correct tape... the viewfinder also switches on. Set the Power Switch to "OFF", and then back to "CAMERA" to turn the camcorder on and the viewfinder switches off automatically to save power (GR-SXM320 only). ● The cassette holder cannot be viewed on the LCD monitor and in the most convenient direction. It...

Instruction Manual
Page 18
... or dim subjects. •When shooting subjects with excessive backlighting. •When shooting scenes with movement in various directions. • When shooting scenes with the camcorder on a tripod. ● The " " indicator appears blinking if the Stabilizer cannot be possible if hand shake is called Digital Zoom. STABILIZER. STABILIZER. OPERATION: Zoom In...
... or dim subjects. •When shooting subjects with excessive backlighting. •When shooting scenes with movement in various directions. • When shooting scenes with the camcorder on a tripod. ● The " " indicator appears blinking if the Stabilizer cannot be possible if hand shake is called Digital Zoom. STABILIZER. STABILIZER. OPERATION: Zoom In...
Instruction Manual
Page 19
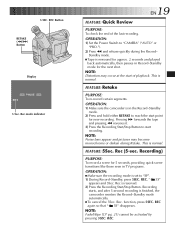
... sure the recording mode is set to reach the start point for new recording. Standby mode. Ⅲ Tape is normal. OPERATION: 1) Make sure the camcorder is finished, the camcorder reenters the Record-Standby mode automatically. Ⅲ To cancel the 5Sec. Pressing 3 forwards the tape and pressing 2 reverses it. 3) Press the Recording Start...
... sure the recording mode is set to reach the start point for new recording. Standby mode. Ⅲ Tape is normal. OPERATION: 1) Make sure the camcorder is finished, the camcorder reenters the Record-Standby mode automatically. Ⅲ To cancel the 5Sec. Pressing 3 forwards the tape and pressing 2 reverses it. 3) Press the Recording Start...
Instruction Manual
Page 20
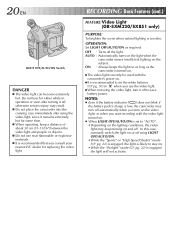
... set the white balance (੬ pg. 30) to when you consult your nearest JVC dealer for some time. Ⅲ When operating, keep turning on and off. AUTO : Automatically turns on the light when the camcorder senses insufficient lighting on . •While the "Twilight" mode (੬ pg. 22...) is too dim. RECORDING Basic Features (cont.) FEATURE: Video Light (GR-SXM320/SX851 only) PURPOSE: To brighten the scene when natural lighting is...
... set the white balance (੬ pg. 30) to when you consult your nearest JVC dealer for some time. Ⅲ When operating, keep turning on and off. AUTO : Automatically turns on the light when the camcorder senses insufficient lighting on . •While the "Twilight" mode (੬ pg. 22...) is too dim. RECORDING Basic Features (cont.) FEATURE: Video Light (GR-SXM320/SX851 only) PURPOSE: To brighten the scene when natural lighting is...
Instruction Manual
Page 23
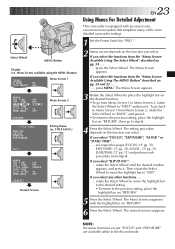
...T I ME T I SH PORTUGUESE Setting Menu (ex. DEMO MODE OF F OF F FRENCH 06 OF F 4RE T URN Normal Screen EN23 Using Menus For Detailed Adjustment This camcorder is equipped with the highlight bar on "RETURN", then go from Menu Screen 1 to Menu Screen 2, rotate the Select Wheel to "NEXT" and press it... 4 Press the Select Wheel. The Menu Screen reappears with an easy-to-use, on-screen menu system that simplifies many of the more detailed camcorder settings. 1 Set the Power Switch to "PRO.". 2 Menu access depends on the desired function. •To go to the previous setting, place...
...T I ME T I SH PORTUGUESE Setting Menu (ex. DEMO MODE OF F OF F FRENCH 06 OF F 4RE T URN Normal Screen EN23 Using Menus For Detailed Adjustment This camcorder is equipped with the highlight bar on "RETURN", then go from Menu Screen 1 to Menu Screen 2, rotate the Select Wheel to "NEXT" and press it... 4 Press the Select Wheel. The Menu Screen reappears with an easy-to-use, on-screen menu system that simplifies many of the more detailed camcorder settings. 1 Set the Power Switch to "PRO.". 2 Menu access depends on the desired function. •To go to the previous setting, place...
Instruction Manual
Page 24
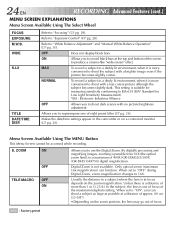
... EN RECORDING Advanced Features (cont.) MENU SCREEN EXPLANATIONS Menu Screen Available Using The Select Wheel FOCUS EXPOSURE Refer to a maximum of 400X (GR-SXM320)/300X (GR-SX851/AX750) digital magnification. When set to shoot with no picture brightness adjustment. Unless there is more convenient to "ON", you can ... a subject as large as possible at the top and bottom of focus. : Factory-preset S.LX MAX NORMAL To record a subject in the camcorder or on the zoom position, the lens may go out of the screen to a subject where the lens is not available. DATE/TIME DISP....
... EN RECORDING Advanced Features (cont.) MENU SCREEN EXPLANATIONS Menu Screen Available Using The Select Wheel FOCUS EXPOSURE Refer to a maximum of 400X (GR-SXM320)/300X (GR-SX851/AX750) digital magnification. When set to shoot with no picture brightness adjustment. Unless there is more convenient to "ON", you can ... a subject as large as possible at the top and bottom of focus. : Factory-preset S.LX MAX NORMAL To record a subject in the camcorder or on the zoom position, the lens may go out of the screen to a subject where the lens is not available. DATE/TIME DISP....
Instruction Manual
Page 25
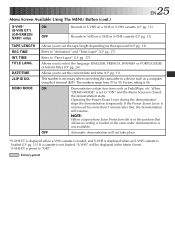
EN25 Menu Screen Available Using The MENU Button (cont.) S-VHS* (S-VHS ET*) (GR-SXM320/ SX851 only) ON OFF Records in S-VHS on a VHS or S-VHS cassette (੬ pg. 13). TAPE LENGTH REC TIME INT. DEMO MODE Allows you to set the current date and time (੬ pg. ...Factory setting is preset to "OFF". : Factory-preset OFF Automatic demonstration will be displayed in VHS on a VHS or S-VHS cassette (੬ pg. 13). DATE/TIME JLIP ID NO. This number is necessary when connecting the camcorder to "ON" and the Menu Screen is not available. If the Power Zoom Lever is ...
EN25 Menu Screen Available Using The MENU Button (cont.) S-VHS* (S-VHS ET*) (GR-SXM320/ SX851 only) ON OFF Records in S-VHS on a VHS or S-VHS cassette (੬ pg. 13). TAPE LENGTH REC TIME INT. DEMO MODE Allows you to set the current date and time (੬ pg. ...Factory setting is preset to "OFF". : Factory-preset OFF Automatic demonstration will be displayed in VHS on a VHS or S-VHS cassette (੬ pg. 13). DATE/TIME JLIP ID NO. This number is necessary when connecting the camcorder to "ON" and the Menu Screen is not available. If the Power Zoom Lever is ...

Instruction Manual
Page 26
... highlight bar to the desired mode, then press it to close the Menu Screen. The desired mode is activated. Instant Titles The camcorder has eight preset titles in the TITLE Menu. The desired mode is activated. •To make the title indication disappear, select "...OFF". 5 The Menu Screen reappears with the highlight bar on "RETURN". AUTO DATE ● Your camcorder automatically records the date for about 5 seconds after recording is initiated in the following situations: •After changing the date. •After loading a...
... highlight bar to the desired mode, then press it to close the Menu Screen. The desired mode is activated. Instant Titles The camcorder has eight preset titles in the TITLE Menu. The desired mode is activated. •To make the title indication disappear, select "...OFF". 5 The Menu Screen reappears with the highlight bar on "RETURN". AUTO DATE ● Your camcorder automatically records the date for about 5 seconds after recording is initiated in the following situations: •After changing the date. •After loading a...


