Instruction Manual
Page 1
... reference. Model No. Serial No. ENGLISH CONTENTS SAFETY PRECAUTIONS 2 - 5 QUICK OPERATION GUIDE 6 MAJOR FEATURES 7 PROVIDED ACCESSORIES 7 GETTING STARTED 8 - 15 RECORDING 16 - 30 Basic Recording 16 Basic Features 18 Advanced Features 21 PLAYBACK 31 - 35 Basic Playback 31 Features 32 Using The Cassette Adapter 33 Connections 34 USING THE REMOTE CONTROL UNIT (GR-SXM320/SX851 only) 36 - 39 Animation And Time-Lapse 37 Insert Editing 38 Audio Dubbing 39 TROUBLESHOOTING 40 - 41...
... reference. Model No. Serial No. ENGLISH CONTENTS SAFETY PRECAUTIONS 2 - 5 QUICK OPERATION GUIDE 6 MAJOR FEATURES 7 PROVIDED ACCESSORIES 7 GETTING STARTED 8 - 15 RECORDING 16 - 30 Basic Recording 16 Basic Features 18 Advanced Features 21 PLAYBACK 31 - 35 Basic Playback 31 Features 32 Using The Cassette Adapter 33 Connections 34 USING THE REMOTE CONTROL UNIT (GR-SXM320/SX851 only) 36 - 39 Animation And Time-Lapse 37 Insert Editing 38 Audio Dubbing 39 TROUBLESHOOTING 40 - 41...
Instruction Manual
Page 2
... (servicing) instructions in the following pages to the presence of uninsulated "dangerous voltage" within an equilateral triangle is recommended that you for easier reference. You are separated for purchasing the JVC Compact VHS camcorder. Cet appareil numérique de la classe B est conforme à la norme NMB-003 du Canada. NOTES: ● The rating plate (serial number...
... (servicing) instructions in the following pages to the presence of uninsulated "dangerous voltage" within an equilateral triangle is recommended that you for easier reference. You are separated for purchasing the JVC Compact VHS camcorder. Cet appareil numérique de la classe B est conforme à la norme NMB-003 du Canada. NOTES: ● The rating plate (serial number...
Instruction Manual
Page 4
... that they exit from overheating, these openings must not be mounted to the product, be fatal. INSTALLATION 1. Power Cord Protection Power supply cords should be taken to keep this product during a lightning storm, or when it can perform many useful functions. Lightning For added protection for this manual for ventilation. PART H) NEC - If the plug should be blocked or covered. •...
... that they exit from overheating, these openings must not be mounted to the product, be fatal. INSTALLATION 1. Power Cord Protection Power supply cords should be taken to keep this product during a lightning storm, or when it can perform many useful functions. Lightning For added protection for this manual for ventilation. PART H) NEC - If the plug should be blocked or covered. •...
Instruction Manual
Page 6
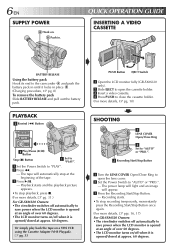
..., 17) For GR-SXM320 Owners: •The viewfinder switches off automatically to save power when the LCD monitor is opened at approx. 60 degrees. PLAYBACK 2 Rewind (2) Button 3 Play/Pause (4/6) Button Stop (5) Button 1 Set to "PLAY". 1 Set the Power Switch to save power when the LCD monitor is opened/closed at an angle of the tape. 3 Press 4/6. - QUICK OPERATION GUIDE INSERTING A VIDEO CASSETTE BATTERY RELEASE Using the battery pack Hook its end to "AUTO" or "PRO.". - Playback starts and the playback picture appears. •To stop at the beginning...
..., 17) For GR-SXM320 Owners: •The viewfinder switches off automatically to save power when the LCD monitor is opened at approx. 60 degrees. PLAYBACK 2 Rewind (2) Button 3 Play/Pause (4/6) Button Stop (5) Button 1 Set to "PLAY". 1 Set the Power Switch to save power when the LCD monitor is opened/closed at an angle of the tape. 3 Press 4/6. - QUICK OPERATION GUIDE INSERTING A VIDEO CASSETTE BATTERY RELEASE Using the battery pack Hook its end to "AUTO" or "PRO.". - Playback starts and the playback picture appears. •To stop at the beginning...
Instruction Manual
Page 7
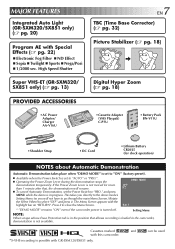
... Speed Shutter 7 EN TBC (Time Base Corrector) (੬ pg. 32) Picture Stabilizer (੬ pg. 18) Super VHS-ET (GR-SXM320/ SX851 only) (੬ pg. 13) Digital Hyper Zoom (੬ pg. 18) PROVIDED ACCESSORIES • AC Power Adapter/ Charger AA-V16U •Cassette Adapter (VHS Playpak) C-P7U •Battery Pack BN-V11U •Shoulder Strap •DC Cord •Lithium Battery CR2025 (for more than 1 minute after that allows recording...
... Speed Shutter 7 EN TBC (Time Base Corrector) (੬ pg. 32) Picture Stabilizer (੬ pg. 18) Super VHS-ET (GR-SXM320/ SX851 only) (੬ pg. 13) Digital Hyper Zoom (੬ pg. 18) PROVIDED ACCESSORIES • AC Power Adapter/ Charger AA-V16U •Cassette Adapter (VHS Playpak) C-P7U •Battery Pack BN-V11U •Shoulder Strap •DC Cord •Lithium Battery CR2025 (for more than 1 minute after that allows recording...

Instruction Manual
Page 8
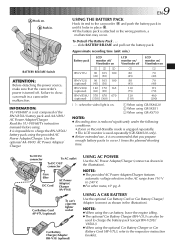
... the CHARGE indicator stops blinking but stays lit, charging is worn out and needs to be replaced. In this case, remove the battery pack from the AC Power Adapter/Charger. CHARGING THE BATTERY PACK 1 Make sure you are not using a battery pack for charging. The camcorder power turns off . Charge Marker A charge marker is complete. Please purchase a new one. ● Remember to set the Power Switch to fully discharge it locks in the opposite direction...
... the CHARGE indicator stops blinking but stays lit, charging is worn out and needs to be replaced. In this case, remove the battery pack from the AC Power Adapter/Charger. CHARGING THE BATTERY PACK 1 Make sure you are not using a battery pack for charging. The camcorder power turns off . Charge Marker A charge marker is complete. Please purchase a new one. ● Remember to set the Power Switch to fully discharge it locks in the opposite direction...
Instruction Manual
Page 9
... using GR-SXM320 2 When using GR-SX851 3 When using GR-AX750 NOTES: ● Recording time is reduced significantly under the following conditions: •Zoom or Record-Standby mode is engaged repeatedly. •The LCD monitor is used to charge the battery pack (except BN-V20U/ V856U). ● When using the optional Car Battery Charger or Car Battery Cord (AP-V7U), refer to the respective instruction booklet. NOTES: ● The provided AC Power Adapter/Charger...
... using GR-SXM320 2 When using GR-SX851 3 When using GR-AX750 NOTES: ● Recording time is reduced significantly under the following conditions: •Zoom or Record-Standby mode is engaged repeatedly. •The LCD monitor is used to charge the battery pack (except BN-V20U/ V856U). ● When using the optional Car Battery Charger or Car Battery Cord (AP-V7U), refer to the respective instruction booklet. NOTES: ● The provided AC Power Adapter/Charger...
Instruction Manual
Page 16
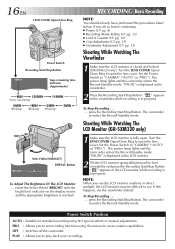
.../Stop Button. "PAUSE" is in progress. The camcorder re-enters the Record-Standby mode. " " appears in the viewfinder while recording is displayed in direct sunlight, the LCD monitor may be difficult to set recording functions using NO special effects or manual adjustments. PRO. : Allows you to see. Set the Power Switch to "CAMERA" ("AUTO" or "PRO."). 16 EN LENS COVER Open/Close Ring Power Switch Recording Start/Stop Button 2 5M I N Tape remaining time indicator (Approximate) MIN 120MIN (Now calculating) 119MIN 0MIN (Blinking) 1MIN (Blinking...
.../Stop Button. "PAUSE" is in progress. The camcorder re-enters the Record-Standby mode. " " appears in the viewfinder while recording is displayed in direct sunlight, the LCD monitor may be difficult to set recording functions using NO special effects or manual adjustments. PRO. : Allows you to see. Set the Power Switch to "CAMERA" ("AUTO" or "PRO."). 16 EN LENS COVER Open/Close Ring Power Switch Recording Start/Stop Button 2 5M I N Tape remaining time indicator (Approximate) MIN 120MIN (Now calculating) 119MIN 0MIN (Blinking) 1MIN (Blinking...
Instruction Manual
Page 17
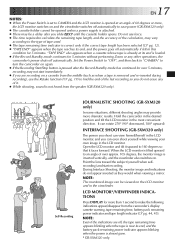
... recording. INTERFACE SHOOTING (GR-SXM320 only) The person you shoot can even shoot yourself while viewing your own image in the most convenient direction. Hold the camcorder in the desired position and tilt the LCD monitor in the LCD monitor. Open the LCD monitor and tilt it upward to 180 degrees so that it . ● While shooting, sound is not heard from the camcorder's display: cassette warning, tape remaining time, battery...
... recording. INTERFACE SHOOTING (GR-SXM320 only) The person you shoot can even shoot yourself while viewing your own image in the most convenient direction. Hold the camcorder in the desired position and tilt the LCD monitor in the LCD monitor. Open the LCD monitor and tilt it upward to 180 degrees so that it . ● While shooting, sound is not heard from the camcorder's display: cassette warning, tape remaining time, battery...
Instruction Manual
Page 24
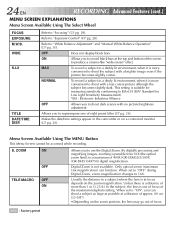
... you to use the Digital Zoom. When set to "ON", you to record black bars at the maximum telephoto setting. Usually the distance to produce a cinema-like "wide-screen" effect. Unless there is more convenient to shoot the subject with no picture brightness adjustment. OFF Does not display black bars. Menu Screen Available Using The MENU Button This Menu Screen cannot be accessed while recording. Makes the date/time settings appear in focus depends on a connected monitor...
... you to use the Digital Zoom. When set to "ON", you to record black bars at the maximum telephoto setting. Usually the distance to produce a cinema-like "wide-screen" effect. Unless there is more convenient to shoot the subject with no picture brightness adjustment. OFF Does not display black bars. Menu Screen Available Using The MENU Button This Menu Screen cannot be accessed while recording. Makes the date/time settings appear in focus depends on a connected monitor...
Instruction Manual
Page 25
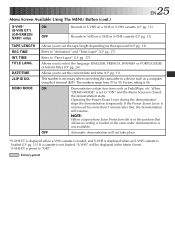
... tape used (੬ pg. 12). The numbers range from 01 to "Time-Lapse" (੬ pg. 27). When "DEMO MODE" is set the current date and time (੬ pg. 11). Operating the Power Zoom Lever during the demonstration stops the demonstration temporarily. S-VHS ET is closed, the demonstration starts. Records in S-VHS on a VHS or S-VHS cassette (੬ pg. 13). TAPE LENGTH REC TIME INT. TIME TITLE LANG. Refer to 99. Refer to "OFF". : Factory...
... tape used (੬ pg. 12). The numbers range from 01 to "Time-Lapse" (੬ pg. 27). When "DEMO MODE" is set the current date and time (੬ pg. 11). Operating the Power Zoom Lever during the demonstration stops the demonstration temporarily. S-VHS ET is closed, the demonstration starts. Records in S-VHS on a VHS or S-VHS cassette (੬ pg. 13). TAPE LENGTH REC TIME INT. TIME TITLE LANG. Refer to 99. Refer to "OFF". : Factory...
Instruction Manual
Page 35
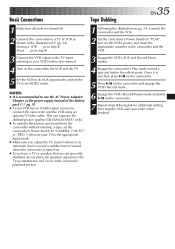
... S-Video cable. Tape Dubbing EN35 1 Following the illustration on pg. 34, connect the camcorder and the VCR. 2 Set the camcorder's Power Switch to step 3. go to "PLAY", turn on the camcorder. 7 Repeat steps 4 through 6 for additional editing, then stop the VCR and camcorder when finished. This can improve the dubbed picture quality (GR-SXM320/SX851 only). ● To monitor the picture and sound from the camcorder without inserting a tape, set the camcorder's Power Switch to "CAMERA" ("AUTO" or "PRO...
... S-Video cable. Tape Dubbing EN35 1 Following the illustration on pg. 34, connect the camcorder and the VCR. 2 Set the camcorder's Power Switch to step 3. go to "PLAY", turn on the camcorder. 7 Repeat steps 4 through 6 for additional editing, then stop the VCR and camcorder when finished. This can improve the dubbed picture quality (GR-SXM320/SX851 only). ● To monitor the picture and sound from the camcorder without inserting a tape, set the camcorder's Power Switch to "CAMERA" ("AUTO" or "PRO...
Instruction Manual
Page 40
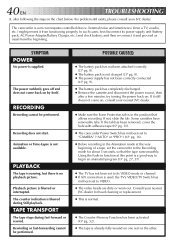
... clock battery; 40 EN TROUBLESHOOTING If, after a few minutes, try turning the power back on. RECORDING Recording cannot be performed. PLAYBACK The tape is running, but there is a microcomputer-controlled device. If not, slide the tab. The camcorder is no playback picture. In such cases, first disconnect its VIDEO mode or channel. ● If A/V connection is used, the TV's VIDEO/TV Switch has not been set to the Recording mode for head cleaning or replacement...
... clock battery; 40 EN TROUBLESHOOTING If, after a few minutes, try turning the power back on. RECORDING Recording cannot be performed. PLAYBACK The tape is running, but there is a microcomputer-controlled device. If not, slide the tab. The camcorder is no playback picture. In such cases, first disconnect its VIDEO mode or channel. ● If A/V connection is used, the TV's VIDEO/TV Switch has not been set to the Recording mode for head cleaning or replacement...
Instruction Manual
Page 41
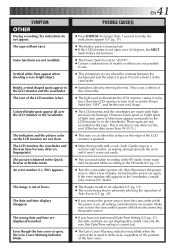
... the camcorder. ● The light used in the viewfinder, consult your nearest JVC dealer. ● The diopter needs to "OFF", and let the unit cool down. ● The LCD monitor and the viewfinder are erased. The tape will not eject. The indicators and the picture color on the tape. The date and time displays disappear. Some functions are displayed/recorded. After a few minutes, try turning the power on the LCD monitor...
... the camcorder. ● The light used in the viewfinder, consult your nearest JVC dealer. ● The diopter needs to "OFF", and let the unit cool down. ● The LCD monitor and the viewfinder are erased. The tape will not eject. The indicators and the picture color on the tape. The date and time displays disappear. Some functions are displayed/recorded. After a few minutes, try turning the power on the LCD monitor...
Instruction Manual
Page 43
... nearest JVC dealer. •JLIP-controlled editing from camcorder to t are located beneath the cover. Controls 1 Diopter Adjustment Control pg. 15 2 Lens Cover Open/Close Ring pg. 16 3 Video Light Switch [LIGHT OFF/AUTO/ON] (GR-SXM320/SX851 only pg. 20 4 5-Second Recording Button [5 SEC. REC pg. 19 5 •Power Zoom Lever [T/W pg. 18 •Speaker Volume Control [VOL.] (GR-SXM320 only pg. 31 6 •Picture Stabilizer Button [P.STABILIZER pg. 18 •Time Base Corrector Button...
... nearest JVC dealer. •JLIP-controlled editing from camcorder to t are located beneath the cover. Controls 1 Diopter Adjustment Control pg. 15 2 Lens Cover Open/Close Ring pg. 16 3 Video Light Switch [LIGHT OFF/AUTO/ON] (GR-SXM320/SX851 only pg. 20 4 5-Second Recording Button [5 SEC. REC pg. 19 5 •Power Zoom Lever [T/W pg. 18 •Speaker Volume Control [VOL.] (GR-SXM320 only pg. 31 6 •Picture Stabilizer Button [P.STABILIZER pg. 18 •Time Base Corrector Button...
Instruction Manual
Page 44
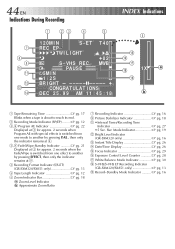
... 6 Zoom Indicator Bar pg. 18 Zoom Level Indicator Approximate Zoom Ratio 7 Recording Indicator pg. 16 0 Picture Stabilizer Indicator pg. 18 ! • Interval Timer/Recording Time Indicator pg. 27 • 5 Sec. Rec Mode Indicator pg. 19 @ Bright Level Indicator (GR-SXM320 only pg. 16 # Instant Title Display pg. 26 $ Date/Time Display pg. 26 % Focus Indicator pg. 29 ^ Exposure Control Level Counter pg. 28 & White Balance Mode Indicator pg. 30 * S-VHS/S-VHS ET Recording Indicator (GR-SXM320...
... 6 Zoom Indicator Bar pg. 18 Zoom Level Indicator Approximate Zoom Ratio 7 Recording Indicator pg. 16 0 Picture Stabilizer Indicator pg. 18 ! • Interval Timer/Recording Time Indicator pg. 27 • 5 Sec. Rec Mode Indicator pg. 19 @ Bright Level Indicator (GR-SXM320 only pg. 16 # Instant Title Display pg. 26 $ Date/Time Display pg. 26 % Focus Indicator pg. 29 ^ Exposure Control Level Counter pg. 28 & White Balance Mode Indicator pg. 30 * S-VHS/S-VHS ET Recording Indicator (GR-SXM320...
Instruction Manual
Page 46
... video light becomes extremely hot. Consult the dealer or an experienced radio/TV technician for a Class B digital device, pursuant to Part 15 of the following two conditions: (1) This device may cause harmful interference to the C-P6U/C-P7U instructions when replacing the battery. 2. When misused, battery can radiate radio frequency energy and, if not installed and used in operation or soon after using the AC Power Adapter/Charger...
... video light becomes extremely hot. Consult the dealer or an experienced radio/TV technician for a Class B digital device, pursuant to Part 15 of the following two conditions: (1) This device may cause harmful interference to the C-P6U/C-P7U instructions when replacing the battery. 2. When misused, battery can radiate radio frequency energy and, if not installed and used in operation or soon after using the AC Power Adapter/Charger...

Instruction Manual
Page 49
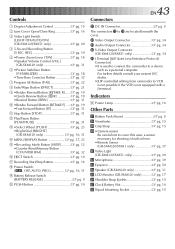
... The LCD Monitor pg. 16 C Car Battery pg. 9 Cassette Adapter pg. 33 Charge Marker pg. 8 Charging The Battery Pack pg. 8 Clean The Camcorder pg. 50 Clock (Lithium) Battery pg. 10 Connection To A VCR/TV pg. 34 Contents cover page Counter Memory pg. 32 D Darken The Image pg. 28 Darken The LCD Monitor pg. 16 Date/Time Display pg. 26 Date/Time Settings pg. 11 Demonstration Mode pg. 7, 25 Digital Zoom pg. 24 Diopter Adjustment pg...
... The LCD Monitor pg. 16 C Car Battery pg. 9 Cassette Adapter pg. 33 Charge Marker pg. 8 Charging The Battery Pack pg. 8 Clean The Camcorder pg. 50 Clock (Lithium) Battery pg. 10 Connection To A VCR/TV pg. 34 Contents cover page Counter Memory pg. 32 D Darken The Image pg. 28 Darken The LCD Monitor pg. 16 Date/Time Display pg. 26 Date/Time Settings pg. 11 Demonstration Mode pg. 7, 25 Digital Zoom pg. 24 Diopter Adjustment pg...
Instruction Manual
Page 51
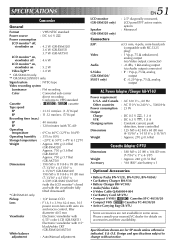
... • Battery Charger BH-VC10U • Audio/Video Cable • S-Video Cable QAM0004-004 • Car Battery Cord AP-V7U • Compact S-VHS ( ) Cassettes ST-C-40/30/20 • Compact VHS ( ) Cassettes TC-40/30/20 • Active Carrying Bag CB-V7U Some accessories are for details on : 5.2 W Video light** : 3.0 W * GR-SXM320 only. ** GR-SXM320/SX851 only. Signal system : NTSC-type Video recording system Luminance : FM recording Color : Converted sub-carrier direct recording Conforms to VHS standard Cassette : / cassette Tape speed SP...
... • Battery Charger BH-VC10U • Audio/Video Cable • S-Video Cable QAM0004-004 • Car Battery Cord AP-V7U • Compact S-VHS ( ) Cassettes ST-C-40/30/20 • Compact VHS ( ) Cassettes TC-40/30/20 • Active Carrying Bag CB-V7U Some accessories are for details on : 5.2 W Video light** : 3.0 W * GR-SXM320 only. ** GR-SXM320/SX851 only. Signal system : NTSC-type Video recording system Luminance : FM recording Color : Converted sub-carrier direct recording Conforms to VHS standard Cassette : / cassette Tape speed SP...
Instruction Manual
Page 55
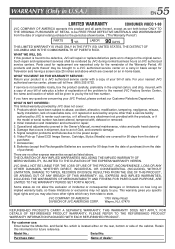
... our Customer Relations Department. If you may be brought to a JVC authorized service center on a carry-in basis except for the period as set forth below the Model No. Initial installation and installation and removal for future reference. Accessories; 8. Batteries (except that occurs in the Owner's Manual, normal maintenance, video and audio head cleaning; 4. There are covered for the remainder of the Warranty Period...
... our Customer Relations Department. If you may be brought to a JVC authorized service center on a carry-in basis except for the period as set forth below the Model No. Initial installation and installation and removal for future reference. Accessories; 8. Batteries (except that occurs in the Owner's Manual, normal maintenance, video and audio head cleaning; 4. There are covered for the remainder of the Warranty Period...


