Instruction Manual
Page 5
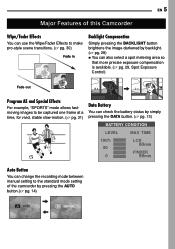
EN 5 Major Features of this Camcorder Wipe/Fader Effects You can use the Wipe/Fader Effects to make pro-style scene transitions. (੬ pg. 30) Fade in Backlight Compensation Simply pressing ... DATA button. (੬ pg. 13) BATTERY CONDITION LEVEL MAX TIME 100% 50 0 LCD 80min FINDER 90min Auto Button You can change the recording mode between manual setting to the standard mode setting of the camcorder by pressing the AUTO button.(੬ pg. 14) AUTO...
EN 5 Major Features of this Camcorder Wipe/Fader Effects You can use the Wipe/Fader Effects to make pro-style scene transitions. (੬ pg. 30) Fade in Backlight Compensation Simply pressing ... DATA button. (੬ pg. 13) BATTERY CONDITION LEVEL MAX TIME 100% 50 0 LCD 80min FINDER 90min Auto Button You can change the recording mode between manual setting to the standard mode setting of the camcorder by pressing the AUTO button.(੬ pg. 14) AUTO...
Instruction Manual
Page 7
...16 Loading/Unloading A Cassette 16 VIDEO RECORDING & PLAYBACK 17 VIDEO RECORDING 17 Basic Recording 17 Tape Remaining Time 17 LCD Monitor And Viewfinder 17 Zooming 18 Journalistic Shooting 18 Time Code 18 Quick Review 19 Recording From The Middle Of A Tape...... 19 VIDEO PLAYBACK 20 Normal Playback 20 Still ... Recording Menus 23 Playback Menus 25 FEATURES FOR RECORDING 26 Wide Mode 26 Night-Scope 26 Snapshot (Record still Image on Tape 26 Manual Focus 27 Exposure Control 27 Iris Lock 28 Backlight Compensation 28 Spot Exposure Control 29 White Balance Adjustment 29...
...16 Loading/Unloading A Cassette 16 VIDEO RECORDING & PLAYBACK 17 VIDEO RECORDING 17 Basic Recording 17 Tape Remaining Time 17 LCD Monitor And Viewfinder 17 Zooming 18 Journalistic Shooting 18 Time Code 18 Quick Review 19 Recording From The Middle Of A Tape...... 19 VIDEO PLAYBACK 20 Normal Playback 20 Still ... Recording Menus 23 Playback Menus 25 FEATURES FOR RECORDING 26 Wide Mode 26 Night-Scope 26 Snapshot (Record still Image on Tape 26 Manual Focus 27 Exposure Control 27 Iris Lock 28 Backlight Compensation 28 Spot Exposure Control 29 White Balance Adjustment 29...
Instruction Manual
Page 9
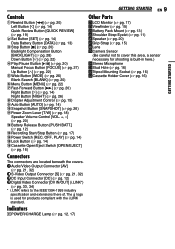
... (੬ pg. 20) Backlight Compensation Button [BACKLIGHT] (੬ pg. 28) Down Button [4] (੬ pg. 22) 4Play/Pause Button [6] (੬ pg. 20) Manual Focus Button [FOCUS] (੬ pg. 27) Up Button [3] (੬ pg. 22) 5Wide Button [WIDE] (੬ pg. 26) Blank Search [BLANK] (੬ pg...2668; pg. 26) 8Diopter Adjustment Control (੬ pg. 15) 9Auto Button [AUTO] (੬ pg. 14) !Snapshot Button [SNAPSHOT] (੬ pg. 26) "Power Zoom Lever [T/W] (੬ pg. 18) Speaker Volume Control [VOL. +, -] (੬ pg. 20) #Battery Release Button [PUSH BATT.] (੬ pg. 12) $Recording Start...
... (੬ pg. 20) Backlight Compensation Button [BACKLIGHT] (੬ pg. 28) Down Button [4] (੬ pg. 22) 4Play/Pause Button [6] (੬ pg. 20) Manual Focus Button [FOCUS] (੬ pg. 27) Up Button [3] (੬ pg. 22) 5Wide Button [WIDE] (੬ pg. 26) Blank Search [BLANK] (੬ pg...2668; pg. 26) 8Diopter Adjustment Control (੬ pg. 15) 9Auto Button [AUTO] (੬ pg. 14) !Snapshot Button [SNAPSHOT] (੬ pg. 26) "Power Zoom Lever [T/W] (੬ pg. 18) Speaker Volume Control [VOL. +, -] (੬ pg. 20) #Battery Release Button [PUSH BATT.] (੬ pg. 12) $Recording Start...

Instruction Manual
Page 10
...;nder)(੬ pg. 15) 1/50 BRIGHT -1 B/W .Date/Time (੬ pg. 15) 1:15 PM 1. 1. 2006 During Video Playback 1Auto/Manual Mode Indicator A : Auto Mode M : Manual Mode 2 : Night-Scope Indicator (੬ pg. 26) : Gain Up Mode (੬ pg. 23) 3Shutter Speed (੬ pg. 31) ...12BIT/16BIT: Sound Mode Indicator (੬ pg. 23) (Appears for approx. 5 seconds after turning on the camcorder.) 8Battery Remaining Power Indicator (੬ pg. 37) 9Approximate Zoom Ratio (੬ pg. 18) !Zoom indicator (੬ pg. 18) "Digital Image Stabilizer (੬ pg. 23) #Wide Mode Indicator (੬ pg...
...;nder)(੬ pg. 15) 1/50 BRIGHT -1 B/W .Date/Time (੬ pg. 15) 1:15 PM 1. 1. 2006 During Video Playback 1Auto/Manual Mode Indicator A : Auto Mode M : Manual Mode 2 : Night-Scope Indicator (੬ pg. 26) : Gain Up Mode (੬ pg. 23) 3Shutter Speed (੬ pg. 31) ...12BIT/16BIT: Sound Mode Indicator (੬ pg. 23) (Appears for approx. 5 seconds after turning on the camcorder.) 8Battery Remaining Power Indicator (੬ pg. 37) 9Approximate Zoom Ratio (੬ pg. 18) !Zoom indicator (੬ pg. 18) "Digital Image Stabilizer (੬ pg. 23) #Wide Mode Indicator (੬ pg...

Instruction Manual
Page 14
... Power-Linked Operation When the Power Switch is selected, the indicator " " appears on the camcorder, set various recording functions using the Menus. (੬ pg. 22) Auto/Manual Mode Press AUTO button repeatedly to switch to your operation. Language Settings Choose the appropriate operation mode... or pulling out/pushing in your preference using no special effects or manual adjustments. If you want to switch off the camcorder by setting various functions. INFORMATION: The following explanations in this manual supposes the use the viewfinder, close the LCD monitor and...
... Power-Linked Operation When the Power Switch is selected, the indicator " " appears on the camcorder, set various recording functions using the Menus. (੬ pg. 22) Auto/Manual Mode Press AUTO button repeatedly to switch to your operation. Language Settings Choose the appropriate operation mode... or pulling out/pushing in your preference using no special effects or manual adjustments. If you want to switch off the camcorder by setting various functions. INFORMATION: The following explanations in this manual supposes the use the viewfinder, close the LCD monitor and...

Instruction Manual
Page 15
...Press 3 or 4 to select "BRIGHT", and press SET or 2. D I SPLAY CLOCK ADJ . MONTH . Pull out the viewfinder fully and adjust it manually for best viewability. 3 Turn the Diopter Adjustment Control until the indications in the viewfinder are in "Language Settings" on the left column. 2 Press... 3 or 4 to easily operate the Recording Start/Stop Button, Power Switch and Power Zoom Lever. If you have input all times, but its display can be turned on or off during playback. (੬ pg. 25) 1 Perform steps 1 -...
...Press 3 or 4 to select "BRIGHT", and press SET or 2. D I SPLAY CLOCK ADJ . MONTH . Pull out the viewfinder fully and adjust it manually for best viewability. 3 Turn the Diopter Adjustment Control until the indications in the viewfinder are in "Language Settings" on the left column. 2 Press... 3 or 4 to easily operate the Recording Start/Stop Button, Power Switch and Power Zoom Lever. If you have input all times, but its display can be turned on or off during playback. (੬ pg. 25) 1 Perform steps 1 -...
Instruction Manual
Page 18
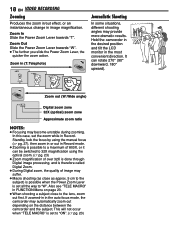
...zoom zone 32X (optical) zoom zone Approximate zoom ratio NOTES: ● Focusing may provide more dramatic results. Also see "TELE MACRO" in (T: Telephoto) 1x 10x 20x 40x Journalistic Shooting In some situations, different shooting angles may become unstable during zooming. Zoom Out Slide the Power Zoom Lever towards "T". Hold the camcorder... slide the Power Zoom Lever, the quicker the zoom action. In this case, set the zoom while in RecordStandby, lock the focus by using the manual focus (੬ pg. 27), then zoom in or out in the auto focus mode, the camcorder may suffer. ●...
...zoom zone 32X (optical) zoom zone Approximate zoom ratio NOTES: ● Focusing may provide more dramatic results. Also see "TELE MACRO" in (T: Telephoto) 1x 10x 20x 40x Journalistic Shooting In some situations, different shooting angles may become unstable during zooming. Zoom Out Slide the Power Zoom Lever towards "T". Hold the camcorder... slide the Power Zoom Lever, the quicker the zoom action. In this case, set the zoom while in RecordStandby, lock the focus by using the manual focus (੬ pg. 27), then zoom in or out in the auto focus mode, the camcorder may suffer. ●...
Instruction Manual
Page 21
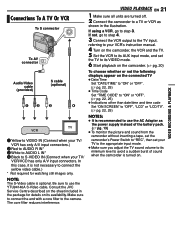
... only. The core filter reduces interference. If not, go to the camera. Consult the JVC Service Centre described on the sheet included in the illustration. NOTE: The S-Video cable is turned on the camcorder, the VCR and the TV. 5 Set the VCR to its AUX input mode, and set .../VCD has only A/V input connectors. If using a VCR, go to step 4. 3 Connect the VCR output to the TV input, referring to your VCR's instruction manual. 4 Turn on . In this case, it is not necessary to connect the yellow video cable.) * Not required for details on the connected TV ● Date...
... only. The core filter reduces interference. If not, go to the camera. Consult the JVC Service Centre described on the sheet included in the illustration. NOTE: The S-Video cable is turned on the camcorder, the VCR and the TV. 5 Set the VCR to its AUX input mode, and set .../VCD has only A/V input connectors. If using a VCR, go to step 4. 3 Connect the VCR output to the TV input, referring to your VCR's instruction manual. 4 Turn on . In this case, it is not necessary to connect the yellow video cable.) * Not required for details on the connected TV ● Date...

Instruction Manual
Page 26
...images: approx. 1 second) Night-Scope Makes dark subjects or areas even brighter than they would be recorded for approx. 5 seconds, then the camcorder re-enters the Record-Standby mode. ● You can perform Snapshot also during recording. A still image will be under good natural lighting. ... to choose the type of a tripod is recommended. During playback/recording on Tape) This feature lets you to your wide-screen TV's instruction manual. Snapshot (Record still Image on 4:3 TVs/LCD monitor/ viewfinder, the image is selected. When using this mode, refer to ...
...images: approx. 1 second) Night-Scope Makes dark subjects or areas even brighter than they would be recorded for approx. 5 seconds, then the camcorder re-enters the Record-Standby mode. ● You can perform Snapshot also during recording. A still image will be under good natural lighting. ... to choose the type of a tripod is recommended. During playback/recording on Tape) This feature lets you to your wide-screen TV's instruction manual. Snapshot (Record still Image on 4:3 TVs/LCD monitor/ viewfinder, the image is selected. When using this mode, refer to ...
Instruction Manual
Page 27
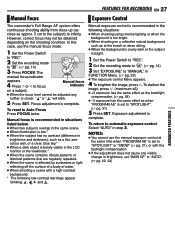
... FEATURES However, correct focus may not be adjusted any visible change in step 3. Exposure adjustment is complete. NOTES: ● You cannot use the manual focus mode. 1 Set the Power Switch to in FUNCTION Menu. (੬ pg. 23) ● The exposure control Menu appears. 4 To brighten... the image, press 3. FEATURES FOR RECORDING EN 27 Manual Focus Exposure Control The camcorder's Full Range AF system offers continuous shooting ability from close-up (as close as when "PROGRAM AE" is set to "SPOTLIGHT". ...
... FEATURES However, correct focus may not be adjusted any visible change in step 3. Exposure adjustment is complete. NOTES: ● You cannot use the manual focus mode. 1 Set the Power Switch to in FUNCTION Menu. (੬ pg. 23) ● The exposure control Menu appears. 4 To brighten... the image, press 3. FEATURES FOR RECORDING EN 27 Manual Focus Exposure Control The camcorder's Full Range AF system offers continuous shooting ability from close-up (as close as when "PROGRAM AE" is set to "SPOTLIGHT". ...

Instruction Manual
Page 28
... disappears. The Menu screen closes. NOTE: Using Backlight Compensation may cause the light around the subject to become too bright and the subject to "MANUAL" in more light. The " " indication appears. Use this function in the following situations: ● When shooting a moving subject. ●... viewfinder changes), such as at the beach or when skiing. ● When shooting objects under a spotlight. ● When zooming. With simple operation, backlight compensation feature brightens the dark subject portion by pressing 3 or 4. To return to the subject changes (so...
... disappears. The Menu screen closes. NOTE: Using Backlight Compensation may cause the light around the subject to become too bright and the subject to "MANUAL" in more light. The " " indication appears. Use this function in the following situations: ● When shooting a moving subject. ●... viewfinder changes), such as at the beach or when skiing. ● When shooting objects under a spotlight. ● When zooming. With simple operation, backlight compensation feature brightens the dark subject portion by pressing 3 or 4. To return to the subject changes (so...

Instruction Manual
Page 29
...Balance Adjustment") FINE : Outdoors on the shooting location and condition, optimum result may not be accurately reproduced. However, more advanced camcorder operators control this function manually to select the desired spot metering area frame. 5 Press SET. ● Spot Exposure Control is engaged. ● Exposure is... "AUTO" appears. [AUTO]: White balance is locked. To change the setting Set "W.BALANCE" in "EFFECT" (੬ pg. 31) ● Digital Zoom (੬ pg. 18) ● Depending on a sunny day. NOTES: ● You cannot use the Spot Exposure Control at the centre of the ...
...Balance Adjustment") FINE : Outdoors on the shooting location and condition, optimum result may not be accurately reproduced. However, more advanced camcorder operators control this function manually to select the desired spot metering area frame. 5 Press SET. ● Spot Exposure Control is engaged. ● Exposure is... "AUTO" appears. [AUTO]: White balance is locked. To change the setting Set "W.BALANCE" in "EFFECT" (੬ pg. 31) ● Digital Zoom (੬ pg. 18) ● Depending on a sunny day. NOTES: ● You cannot use the Spot Exposure Control at the centre of the ...

Instruction Manual
Page 30
...subject. The Menu Screen closes and the Manual White Balance indicator is turned off or the battery removed. 30 EN FEATURES FOR RECORDING Manual White Balance Adjustment Wipe Or Fader Effects Adjust the white balance manually when shooting under various types of lighting conditions... indoors (natural, fluorescent, candlelight, etc.). Adjust zoom or position yourself so that the white...
...subject. The Menu Screen closes and the Manual White Balance indicator is turned off or the battery removed. 30 EN FEATURES FOR RECORDING Manual White Balance Adjustment Wipe Or Fader Effects Adjust the white balance manually when shooting under various types of lighting conditions... indoors (natural, fluorescent, candlelight, etc.). Adjust zoom or position yourself so that the white...

Instruction Manual
Page 31
...function. (Factory-preset) SEPIA : Recorded scenes have a brownish tint like a series of a second. From less than 10 m, adjust the focus manually. Use these settings when an automatic adjustment does not work well, using SPORTS mode. SNOW : Compensates for a classic look more natural. SPOTLIGHT: ...settings allow fast-moving images to be used during RecordStandby. ● Some modes of "SHUTTER 1/500 and 1/4000" is chosen, the camcorder automatically adjusts the focus from approx. 10 m to occur when "SPORTS" or mode of Program AE and Shutter Effects cannot be captured ...
...function. (Factory-preset) SEPIA : Recorded scenes have a brownish tint like a series of a second. From less than 10 m, adjust the focus manually. Use these settings when an automatic adjustment does not work well, using SPORTS mode. SNOW : Compensates for a classic look more natural. SPOTLIGHT: ...settings allow fast-moving images to be used during RecordStandby. ● Some modes of "SHUTTER 1/500 and 1/4000" is chosen, the camcorder automatically adjusts the focus from approx. 10 m to occur when "SPORTS" or mode of Program AE and Shutter Effects cannot be captured ...
Instruction Manual
Page 32
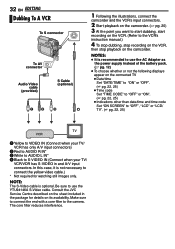
... the VCR's input connectors. 2 Start playback on the camcorder. (੬ pg. 20) 3 At the point you want to start dubbing, start recording on the VCR. (Refer to the camera. Consult the JVC Service Centre described on its availability. NOTE: The S-Video cable is not necessary to connect the yellow video ...for watching still images only. In this case, it is optional. Make sure to connect the end with a core filter to the VCR's instruction manual.) 4 To stop dubbing, stop recording on the VCR, then stop playback on the connected TV ● Date/time Set "DATE/TIME" to "ON"...
... the VCR's input connectors. 2 Start playback on the camcorder. (੬ pg. 20) 3 At the point you want to start dubbing, start recording on the VCR. (Refer to the camera. Consult the JVC Service Centre described on its availability. NOTE: The S-Video cable is not necessary to connect the yellow video ...for watching still images only. In this case, it is optional. Make sure to connect the end with a core filter to the VCR's instruction manual.) 4 To stop dubbing, stop recording on the VCR, then stop playback on the connected TV ● Date/time Set "DATE/TIME" to "ON"...
Instruction Manual
Page 33
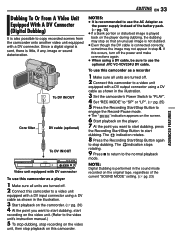
... ● The " DV IN " indication appears on the screen. 6 Start playback on this camcorder to a video unit equipped with a DV connector. The indication stops rotating. 9 Press 7 to return to the video unit's instruction manual.) 5 To stop dubbing, stop recording on the video unit, then stop so that an unusual ... 33 ADVANCED FEATURES Dubbing To Or From A Video Unit Equipped With A DV Connector (Digital Dubbing) It is also possible to use the optional JVC VC-VDV204U DV cable. Since a digital signal is sent, there is played back on the player during dubbing, the dubbing may not appear in...
... ● The " DV IN " indication appears on the screen. 6 Start playback on this camcorder to a video unit equipped with a DV connector. The indication stops rotating. 9 Press 7 to return to the video unit's instruction manual.) 5 To stop dubbing, stop recording on the video unit, then stop so that an unusual ... 33 ADVANCED FEATURES Dubbing To Or From A Video Unit Equipped With A DV Connector (Digital Dubbing) It is also possible to use the optional JVC VC-VDV204U DV cable. Since a digital signal is sent, there is played back on the player during dubbing, the dubbing may not appear in...
Instruction Manual
Page 34
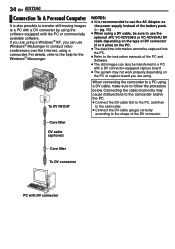
... DV connector PC with the PC or commercially available software. When connecting the camcorder to a PC using a DV cable, make sure to the help for... ● When using a DV cable, be sure to use the optional JVC VC-VDV206U or VC-VDV204U DV cable depending on the type of DV connector...cause malfunctions to the camcorder and/or the PC. ● Connect the DV cable first to the PC, and then to the camcorder. ● Connect ... Windows® Messenger to conduct video conferences over the Internet, using a camcorder. Connecting the cable incorrectly may not work properly depending on the PC. ...
... DV connector PC with the PC or commercially available software. When connecting the camcorder to a PC using a DV cable, make sure to the help for... ● When using a DV cable, be sure to use the optional JVC VC-VDV206U or VC-VDV204U DV cable depending on the type of DV connector...cause malfunctions to the camcorder and/or the PC. ● Connect the DV cable first to the PC, and then to the camcorder. ● Connect ... Windows® Messenger to conduct video conferences over the Internet, using a camcorder. Connecting the cable incorrectly may not work properly depending on the PC. ...
Instruction Manual
Page 35
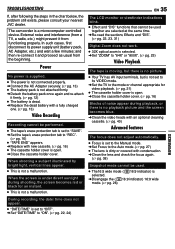
...a subject illuminated by bright light, vertical lines appear. ● This is a microcomputer-controlled device. The camcorder is not a malfunction. Power No power is supplied. ● The power is not connected properly. &#... Effects and "DIS". (੬ pg. 22, 23, 31) Digital Zoom does not work. ● 32X optical zoom is selected. ➜Set "ZOOM" to "64X" or "800X". (੬ pg. 23) Video Playback...problem still exists, please consult your nearest JVC dealer. During recording, the date/ time does not appear. ● "DATE/TIME" is set to the Manual mode. ➜Set Focus to the ...
...a subject illuminated by bright light, vertical lines appear. ● This is a microcomputer-controlled device. The camcorder is not a malfunction. Power No power is supplied. ● The power is not connected properly. &#... Effects and "DIS". (੬ pg. 22, 23, 31) Digital Zoom does not work. ● 32X optical zoom is selected. ➜Set "ZOOM" to "64X" or "800X". (੬ pg. 23) Video Playback...problem still exists, please consult your nearest JVC dealer. During recording, the date/ time does not appear. ● "DATE/TIME" is set to the Manual mode. ➜Set Focus to the ...

Instruction Manual
Page 42
42 EN TERMS A AC Adapter 13 Auto/Manual Mode 14 B Backlight Compensation 28 Battery Pack 11, 12, 39 Blank Search 20 C Changing The Menu Settings 22 - 25 Charging ... Dubbing 32, 33 E Effect Mode 31 Exposure Control 29 I Iris Lock 28 L LCD Monitor and Viewfinder 17, 19 Loading A Cassette 16 M Manual Focus 27 Melody 24 Motor Drive Mode 26 N Night-Scope 26 P Playback Sound 25 Power-Linked Operation 12 Priority 24 Program AE 31 Q Quick ..., 24 Tripod Mounting 16 Troubleshooting 35 W Warning Indications 37 White Balance 29 Wide Mode 26 Wipe Or Fader Effects 30 Z Zooming 18, 23
42 EN TERMS A AC Adapter 13 Auto/Manual Mode 14 B Backlight Compensation 28 Battery Pack 11, 12, 39 Blank Search 20 C Changing The Menu Settings 22 - 25 Charging ... Dubbing 32, 33 E Effect Mode 31 Exposure Control 29 I Iris Lock 28 L LCD Monitor and Viewfinder 17, 19 Loading A Cassette 16 M Manual Focus 27 Melody 24 Motor Drive Mode 26 N Night-Scope 26 P Playback Sound 25 Power-Linked Operation 12 Priority 24 Program AE 31 Q Quick ..., 24 Tripod Mounting 16 Troubleshooting 35 W Warning Indications 37 White Balance 29 Wide Mode 26 Wipe Or Fader Effects 30 Z Zooming 18, 23


