Instruction Manual
Page 1
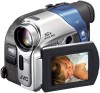
... Serial No. The D.S.C. (Digital Still Camera) features are of the camcorder. DIGITAL VIDEO CAMERA GR-D93 GR-D73 GR-D33 Please visit our Homepage on the World Wide Web for Digital Video Camera: http://www.jvc.co.jp/english/cyber/ For Accessories: http://www.jvc.co.jp/english/accessory/ The camcorder illustrations appearing in the pages 2 - 3 to "OFF". (੬ pg...
... Serial No. The D.S.C. (Digital Still Camera) features are of the camcorder. DIGITAL VIDEO CAMERA GR-D93 GR-D73 GR-D33 Please visit our Homepage on the World Wide Web for Digital Video Camera: http://www.jvc.co.jp/english/cyber/ For Accessories: http://www.jvc.co.jp/english/accessory/ The camcorder illustrations appearing in the pages 2 - 3 to "OFF". (੬ pg...
Instruction Manual
Page 3
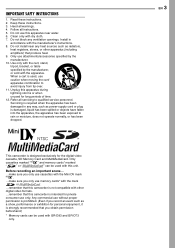
...amplifiers) that this unit. Any commercial use memory cards* with GR-D93 and GR-D73 only. Heed all instructions. 5. Clean only with this camcorder is intended for personal enjoyment, it is used with dry cloth. 7. This camcorder is damaged, liquid has been spilled or objects have fallen ...marked " " and memory cards* marked " " or " " can be used , use only. Read these instructions. 3. Do not use attachments/accessories specified by the manufacturer, or sold with the manufacturer's instructions. 8. Refer all servicing to avoid injury from tip-over. 11.
...amplifiers) that this unit. Any commercial use memory cards* with GR-D93 and GR-D73 only. Heed all instructions. 5. Clean only with this camcorder is intended for personal enjoyment, it is used with dry cloth. 7. This camcorder is damaged, liquid has been spilled or objects have fallen ...marked " " and memory cards* marked " " or " " can be used , use only. Read these instructions. 3. Do not use attachments/accessories specified by the manufacturer, or sold with the manufacturer's instructions. 8. Refer all servicing to avoid injury from tip-over. 11.
Instruction Manual
Page 4
...38 TROUBLESHOOTING 40 CAUTIONS 45 USER MAINTENANCE 48 SPECIFICATIONS 49 INDEX 50 TERMS 54 RECORDING (GR-D93/D73 only 18 Basic Shooting (D.S.C. 4 EN CONTENTS GETTING STARTED 5 ADVANCED FEATURES 25 Provided Accessories 5 Power 6 Grip Adjustment 7 Operation Mode 8 Date/Time Settings 8 Viewfinder Adjustment 9... A Cassette 10 Loading/Unloading A Memory Card (GR-D93/73 only) ...... 10 VIDEO RECORDING & PLAYBACK 11 VIDEO RECORDING 11 Basic Recording 11 LCD Monitor And Viewfinder 12 Tape Remaining Time 12 Zooming 12 Journalistic Shooting 13 Self Recording 13 Time Code...
...38 TROUBLESHOOTING 40 CAUTIONS 45 USER MAINTENANCE 48 SPECIFICATIONS 49 INDEX 50 TERMS 54 RECORDING (GR-D93/D73 only 18 Basic Shooting (D.S.C. 4 EN CONTENTS GETTING STARTED 5 ADVANCED FEATURES 25 Provided Accessories 5 Power 6 Grip Adjustment 7 Operation Mode 8 Date/Time Settings 8 Viewfinder Adjustment 9... A Cassette 10 Loading/Unloading A Memory Card (GR-D93/73 only) ...... 10 VIDEO RECORDING & PLAYBACK 11 VIDEO RECORDING 11 Basic Recording 11 LCD Monitor And Viewfinder 12 Tape Remaining Time 12 Zooming 12 Journalistic Shooting 13 Self Recording 13 Time Code...
Instruction Manual
Page 5
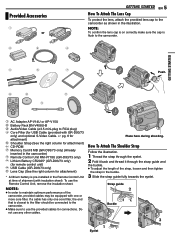
... to use the provided cables for attachment) * A lithium battery is flush to the camcorder as shown in the camcorder) h Remote Control Unit RM-V718U (GR-D93/73 only) i Lithium Battery CR2025* (GR-D93/73 only) (for remote control unit) j USB Cable (GR-D93/73 only) k Lens Cap (See the right column for connections. NOTES: &#... Unit at time of the strap, loosen and then tighten the strap in the buckle. 3 Slide the strap guide fully towards the eyelet. Provided Accessories or GETTING STARTED EN 5 How To Attach The Lens Cap To protect the lens, attach the provided lens cap to the...
... to use the provided cables for attachment) * A lithium battery is flush to the camcorder as shown in the camcorder) h Remote Control Unit RM-V718U (GR-D93/73 only) i Lithium Battery CR2025* (GR-D93/73 only) (for remote control unit) j USB Cable (GR-D93/73 only) k Lens Cap (See the right column for connections. NOTES: &#... Unit at time of the strap, loosen and then tighten the strap in the buckle. 3 Slide the strap guide fully towards the eyelet. Provided Accessories or GETTING STARTED EN 5 How To Attach The Lens Cap To protect the lens, attach the provided lens cap to the...

Instruction Manual
Page 54
...The Display (BRIGHT) .........9 C Changing The Menu Settings 25 Charging The Battery Pack 6 Cleaning The Camcorder 48 Clock adjustment (CLOCK ADJ 8 Connections Charging 6 Dubbing 34, 35 To A PC 36 To ...(QUALITY 27 Playback sound (SOUND MODE, NARRATION) ........ 28 Playback Special Effects 16 Playback Zoom 16 Power Switch Position 8 Priority Setting (PRIORITY 27 Program AE With Special Effects (PROGRAM ...(SPOTLIGHT 31 Strobe (STROBE 31 Twilight (TWILIGHT 31 Protecting Files (PROTECT 22 Provided Accessories 5 R Recording media selection (REC SELECT 28 Recording Mode (REC MODE 26, ...
...The Display (BRIGHT) .........9 C Changing The Menu Settings 25 Charging The Battery Pack 6 Cleaning The Camcorder 48 Clock adjustment (CLOCK ADJ 8 Connections Charging 6 Dubbing 34, 35 To A PC 36 To ...(QUALITY 27 Playback sound (SOUND MODE, NARRATION) ........ 28 Playback Special Effects 16 Playback Zoom 16 Power Switch Position 8 Priority Setting (PRIORITY 27 Program AE With Special Effects (PROGRAM ...(SPOTLIGHT 31 Strobe (STROBE 31 Twilight (TWILIGHT 31 Protecting Files (PROTECT 22 Provided Accessories 5 R Recording media selection (REC SELECT 28 Recording Mode (REC MODE 26, ...
