Instructions
Page 5
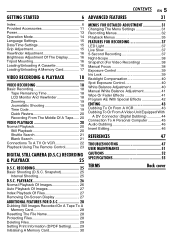
...16 Tripod Mounting 16 Loading/Unloading A Cassette 16 Loading/Unloading A Memory Card 17 VIDEO RECORDING & PLAYBACK 18 VIDEO RECORDING 18 Basic Recording 18 Tape Remaining Time 18 LCD Monitor And Viewfinder 18 Zooming 19 Journalistic Shooting 19 Time Code 19 Quick Review 20 Recording ... CAMERA (D.S.C.) RECORDING & PLAYBACK 25 D.S.C. PLAYBACK 26 Normal Playback Of Images 26 Auto Playback Of Images 27 Index Playback Of Files 27 Removing On-Screen Display 27 ADDITIONAL FEATURES FOR D.S.C 28 Dubbing Still Images Recorded On A Tape To A Memory Card 28 Resetting The File Name...
...16 Tripod Mounting 16 Loading/Unloading A Cassette 16 Loading/Unloading A Memory Card 17 VIDEO RECORDING & PLAYBACK 18 VIDEO RECORDING 18 Basic Recording 18 Tape Remaining Time 18 LCD Monitor And Viewfinder 18 Zooming 19 Journalistic Shooting 19 Time Code 19 Quick Review 20 Recording ... CAMERA (D.S.C.) RECORDING & PLAYBACK 25 D.S.C. PLAYBACK 26 Normal Playback Of Images 26 Auto Playback Of Images 27 Index Playback Of Files 27 Removing On-Screen Display 27 ADDITIONAL FEATURES FOR D.S.C 28 Dubbing Still Images Recorded On A Tape To A Memory Card 28 Resetting The File Name...
Instructions
Page 7
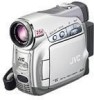
...18) GETTING STARTED EN 7 Other Parts V Monitor Latch (੬ pg. 18) W LCD Monitor (੬ pg. 18, 19) X Viewfinder (੬ pg. 16) Y Card Cover [MEMORY CARD] (੬ pg. 17) Z Battery Pack Mount (੬ pg. 13) a Shoulder Strap Eyelet (੬ pg. 11) b Speaker (੬ pg. 20) c Grip Strap...Button [LIGHT] (੬ pg. 37) H Dioptre Adjustment Control (੬ pg. 16) I Snapshot Button [SNAPSHOT] (੬ pg. 25, 38) Live Slow Button [SLOW] (੬ pg. 31, 37) J Power Zoom Lever [T/W] (੬ pg. 19) Speaker Volume Control [VOL pg. 20) K Battery Release Button [PUSH BATT.] (੬ pg....
...18) GETTING STARTED EN 7 Other Parts V Monitor Latch (੬ pg. 18) W LCD Monitor (੬ pg. 18, 19) X Viewfinder (੬ pg. 16) Y Card Cover [MEMORY CARD] (੬ pg. 17) Z Battery Pack Mount (੬ pg. 13) a Shoulder Strap Eyelet (੬ pg. 11) b Speaker (੬ pg. 20) c Grip Strap...Button [LIGHT] (੬ pg. 37) H Dioptre Adjustment Control (੬ pg. 16) I Snapshot Button [SNAPSHOT] (੬ pg. 25, 38) Live Slow Button [SLOW] (੬ pg. 31, 37) J Power Zoom Lever [T/W] (੬ pg. 19) Speaker Volume Control [VOL pg. 20) K Battery Release Button [PUSH BATT.] (੬ pg....
Instructions
Page 8
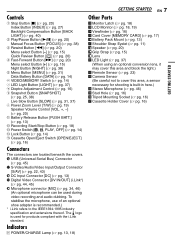
... (Appears when an optional microphone is reading the data in order of quality) (੬ pg. 34) F Remaining Number Of Shots (੬ pg. 25) (Displays the approximate remaining number of shots that can be stored during D.S.C. Recording Only 34 5 6 1024 INTERVAL 15 7 a Image Size: 1024...Time (੬ pg. 18) G REC: (Appears during recording.) (੬ pg. 18) PAUSE: (Appears during shooting. : Blinks in white when a memory card is not loaded. : Blinks in yellow while the camcorder is connected. ੬ pg. 34, "AUX MIC" ) During D.S.C. E Picture Quality: (FINE) and (STANDARD) (in the...
... (Appears when an optional microphone is reading the data in order of quality) (੬ pg. 34) F Remaining Number Of Shots (੬ pg. 25) (Displays the approximate remaining number of shots that can be stored during D.S.C. Recording Only 34 5 6 1024 INTERVAL 15 7 a Image Size: 1024...Time (੬ pg. 18) G REC: (Appears during recording.) (੬ pg. 18) PAUSE: (Appears during shooting. : Blinks in white when a memory card is not loaded. : Blinks in yellow while the camcorder is connected. ੬ pg. 34, "AUX MIC" ) During D.S.C. E Picture Quality: (FINE) and (STANDARD) (in the...
Instructions
Page 10
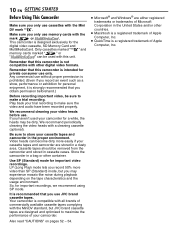
.... Video heads can be removed from the camcorder and stored in a dusty area. It is recommended that this camcorder is intended for the digital video cassette, SD Memory Card and MultiMediaCard. Only cassettes marked " " and memory cards marked " " or " " can become dirty more video than SP (Standard) mode, but JVC brand cassette tapes are stored in cassette...
.... Video heads can be removed from the camcorder and stored in a dusty area. It is recommended that this camcorder is intended for the digital video cassette, SD Memory Card and MultiMediaCard. Only cassettes marked " " and memory cards marked " " or " " can become dirty more video than SP (Standard) mode, but JVC brand cassette tapes are stored in cassette...
Instructions
Page 14
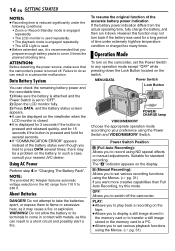
... switch off . Using AC Power Perform step 4 in a camcorder malfunction. WARNING! Do not allow the battery or its terminals to your nearest JVC dealer. Power Switch Position A (Full Auto Recording): Allows you..., and then run it down the Lock Button located on the camcorder, set the Power Switch to do so can result in the memory card to a PC. ● Allows you to cover 3 times the... planned shooting time. OFF: Allows you to 240 V. To resume the original function of time under the following conditions: • Zoom or...
... switch off . Using AC Power Perform step 4 in a camcorder malfunction. WARNING! Do not allow the battery or its terminals to your nearest JVC dealer. Power Switch Position A (Full Auto Recording): Allows you..., and then run it down the Lock Button located on the camcorder, set the Power Switch to do so can result in the memory card to a PC. ● Allows you to cover 3 times the... planned shooting time. OFF: Allows you to 240 V. To resume the original function of time under the following conditions: • Zoom or...
Instructions
Page 15
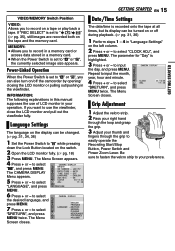
...and minute. 4 Press + or - Repeat to select "CLOCK ADJ.", and press MENU. to easily operate the Recording Start/Stop Button, Power Switch and Power Zoom Lever. Grip Adjustment 1 Adjust the velcro strip. 2 Pass your right hand through the grip to select CLOCK ADJ . 2 0. 1 2 . 0 5 17...off during playback. (੬ pg. 31, 36) 1 Perform steps 1 - 4 in "Language Settings" on or off the camcorder by opening/ closing the LCD monitor or pulling out/pushing in a memory card. ● When the Power Switch is highlighted. 3 Press + or - ENGLISH AUX M I C - The Menu LANGUAGE ...
...and minute. 4 Press + or - Repeat to select "CLOCK ADJ.", and press MENU. to easily operate the Recording Start/Stop Button, Power Switch and Power Zoom Lever. Grip Adjustment 1 Adjust the velcro strip. 2 Pass your right hand through the grip to select CLOCK ADJ . 2 0. 1 2 . 0 5 17...off during playback. (੬ pg. 31, 36) 1 Perform steps 1 - 4 in "Language Settings" on or off the camcorder by opening/ closing the LCD monitor or pulling out/pushing in a memory card. ● When the Power Switch is highlighted. 3 Press + or - ENGLISH AUX M I C - The Menu LANGUAGE ...
Instructions
Page 17
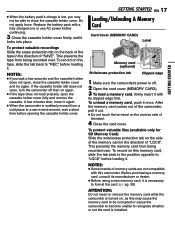
... . This prevents the tape from being recorded over . GETTING STARTED EN 17 Loading/Unloading A Memory Card Card Cover (MEMORY CARD) Label Memory card (optional) Write/erase protection tab Clipped edge 1 Make sure the camcorder's power is off then on the reverse side of memory cards are not compatible with a fully charged one or use AC power before opening the cassette...
... . This prevents the tape from being recorded over . GETTING STARTED EN 17 Loading/Unloading A Memory Card Card Cover (MEMORY CARD) Label Memory card (optional) Write/erase protection tab Clipped edge 1 Make sure the camcorder's power is off then on the reverse side of memory cards are not compatible with a fully charged one or use AC power before opening the cassette...
Instructions
Page 22
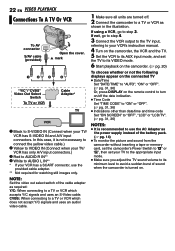
...battery pack. (੬ pg. 14) ● To monitor the picture and sound from the camcorder without inserting a tape or memory card, set the camcorder's Power Switch to "A" or "M", then set your VCR's instruction manual. 4 Turn on the camcorder, the VCR and the TV. 5 Set the VCR to its AUX input mode, and set... the TV to its minimum level to avoid a sudden burst of sound when the camcorder is not ...
...battery pack. (੬ pg. 14) ● To monitor the picture and sound from the camcorder without inserting a tape or memory card, set the camcorder's Power Switch to "A" or "M", then set your VCR's instruction manual. 4 Turn on the camcorder, the VCR and the TV. 5 Set the VCR to its AUX input mode, and set... the TV to its minimum level to avoid a sudden burst of sound when the camcorder is not ...

Instructions
Page 23
.... 3 Slide the holder back in /out (੬ pg. 19, 24) (Also available with the Power Switch set to "A" or "M". o Zoom (T/W) Buttons Zoom in until you hear a click. Beam Effective Area (indoor use is set to point it at the remote sensor. B PAUSE Button ● Pauses... same as the basic operations (Playback, Stop, Pause, Fast-Forward and Rewind) of images in a memory card (੬ pg. 27) J FF Button ● Forward/Forward Shuttle Search on the camcorder. VIDEO RECORDING & PLAYBACK Playback Using The Remote Control The Full-Function Remote Control Unit can operate this...
.... 3 Slide the holder back in /out (੬ pg. 19, 24) (Also available with the Power Switch set to "A" or "M". o Zoom (T/W) Buttons Zoom in until you hear a click. Beam Effective Area (indoor use is set to point it at the remote sensor. B PAUSE Button ● Pauses... same as the basic operations (Playback, Stop, Pause, Fast-Forward and Rewind) of images in a memory card (੬ pg. 27) J FF Button ● Forward/Forward Shuttle Search on the camcorder. VIDEO RECORDING & PLAYBACK Playback Using The Remote Control The Full-Function Remote Control Unit can operate this...

Instructions
Page 25
DIGITAL STILL CAMERA (D.S.C.) RECORDING & PLAYBACK CONTINUED ON NEXT PAGE Still images are recorded in the memory card. D.S.C. The "O" indication appears while the snapshot is supplied from the battery pack, the camcorder shuts off automatically to "A" or "M" while pressing down the Lock Button located on the switch.... Quality/Image Size, etc. RECORDING EN 25 Approximate Number of your camcorder as a Digital Still Camera for taking snapshots. Image Size/Picture Quality 640 x 480/FINE 640 x 480/STANDARD 1024 x 768/FINE 1024 x 768/STANDARD SD Memory Card 8 MB 16 MB 32 MB 64...
DIGITAL STILL CAMERA (D.S.C.) RECORDING & PLAYBACK CONTINUED ON NEXT PAGE Still images are recorded in the memory card. D.S.C. The "O" indication appears while the snapshot is supplied from the battery pack, the camcorder shuts off automatically to "A" or "M" while pressing down the Lock Button located on the switch.... Quality/Image Size, etc. RECORDING EN 25 Approximate Number of your camcorder as a Digital Still Camera for taking snapshots. Image Size/Picture Quality 640 x 480/FINE 640 x 480/STANDARD 1024 x 768/FINE 1024 x 768/STANDARD SD Memory Card 8 MB 16 MB 32 MB 64...
Instructions
Page 26
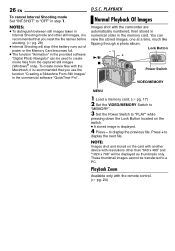
...Normal Playback Of Images Images shot with the remote control. (੬ pg. 24) Press + to "OFF" in the memory card. Playback Zoom Available only with the camcorder are automatically numbered, then stored in numerical order in step 1. 26 EN To cancel Interval Shooting mode Set "INT.SHOT...one at a time, much like flipping through a photo album. - + 4/9 8 Lock Button MA Power Switch VIDEO/MEMORY MENU 1 Load a memory card. (੬ pg. 17) 2 Set the VIDEO/MEMORY Switch to "MEMORY". 3 Set the Power Switch to display the previous file. You can be used to a PC. to "PLAY" ...
...Normal Playback Of Images Images shot with the remote control. (੬ pg. 24) Press + to "OFF" in the memory card. Playback Zoom Available only with the camcorder are automatically numbered, then stored in numerical order in step 1. 26 EN To cancel Interval Shooting mode Set "INT.SHOT...one at a time, much like flipping through a photo album. - + 4/9 8 Lock Button MA Power Switch VIDEO/MEMORY MENU 1 Load a memory card. (੬ pg. 17) 2 Set the VIDEO/MEMORY Switch to "MEMORY". 3 Set the Power Switch to display the previous file. You can be used to a PC. to "PLAY" ...
Instructions
Page 27
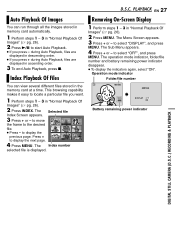
... makes it easy to display the next page. 4 Press MENU. Operation mode indicator Folder/file number You can run through all the images stored in memory card automatically. 1 Perform steps 1 - 3 in "Normal Playback Of Images" (੬ pg. 26). 2 Press 4/9 to select "DISPLAY", and press ... you want. 1 Perform steps 1 - 3 in ascending order. 3 To end Auto Playback, press 8. Index Playback Of Files 1 Perform steps 1 - 3 in the memory card at a time. D.S.C. during Auto Playback, files are displayed in "Normal Playback Of Images" (੬ pg. 26). 2 Press INDEX. to move 1 2 3 the ...
... makes it easy to display the next page. 4 Press MENU. Operation mode indicator Folder/file number You can run through all the images stored in memory card automatically. 1 Perform steps 1 - 3 in "Normal Playback Of Images" (੬ pg. 26). 2 Press 4/9 to select "DISPLAY", and press ... you want. 1 Perform steps 1 - 3 in ascending order. 3 To end Auto Playback, press 8. Index Playback Of Files 1 Perform steps 1 - 3 in the memory card at a time. D.S.C. during Auto Playback, files are displayed in "Normal Playback Of Images" (੬ pg. 26). 2 Press INDEX. to move 1 2 3 the ...
Instructions
Page 28
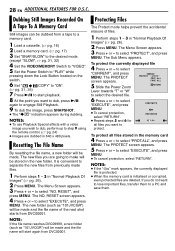
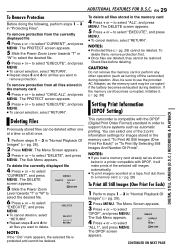
...appears. To protect the currently displayed file 4 Press + or - to select the desired file. 6 Press + or - ALL 5 Slide the Power Zoom RETURN Lever towards "T" or "W" to select "CURRENT", and press MENU. To protect all files you do not want to lose important files, transfer them... 1 - 3 in "Normal Playback Of Images" (੬ pg. 26). 2 Press MENU. It is initialised or corrupted, even protected files are dubbed in the memory card 4 Press + or - The NO. to select "EXECUTE", and press MENU. ● To cancel protection, select "RETURN". The PROTECT screen appears. 5 Press ...
...appears. To protect the currently displayed file 4 Press + or - to select the desired file. 6 Press + or - ALL 5 Slide the Power Zoom RETURN Lever towards "T" or "W" to select "CURRENT", and press MENU. To protect all files you do not want to lose important files, transfer them... 1 - 3 in "Normal Playback Of Images" (੬ pg. 26). 2 Press MENU. It is initialised or corrupted, even protected files are dubbed in the memory card 4 Press + or - The NO. to select "EXECUTE", and press MENU. ● To cancel protection, select "RETURN". The PROTECT screen appears. 5 Press ...
Instructions
Page 29
... such as turning off the camcorder) during deletion. NOTES: ● If you want to select "EXECUTE", and press MENU. ● To cancel selection, select "RETURN". ● Repeat steps 5 and 6 for all files you load a memory card already set as the memory card may be deleted either one... printer compatible with the DPOF (Digital Print Order Format) standard in the memory card 4 Press + or - to select "CURRENT", and press MENU. MENU The Sub Menu appears. 4 Press + or - The PROTECT screen appears. 5 Slide the Power Zoom Lever towards "T" or "W" to select "DELETE", and press MENU. The...
... such as turning off the camcorder) during deletion. NOTES: ● If you want to select "EXECUTE", and press MENU. ● To cancel selection, select "RETURN". ● Repeat steps 5 and 6 for all files you load a memory card already set as the memory card may be deleted either one... printer compatible with the DPOF (Digital Print Order Format) standard in the memory card 4 Press + or - to select "CURRENT", and press MENU. MENU The Sub Menu appears. 4 Press + or - The PROTECT screen appears. 5 Slide the Power Zoom Lever towards "T" or "W" to select "DELETE", and press MENU. The...
Instructions
Page 30
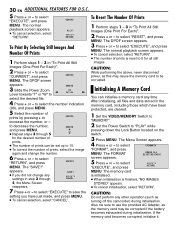
... + or - appears. 3 Slide the Power Zoom Lever towards "T" or "W" to select "CURRENT", and press DPOF MENU. The Menu Screen appears. 4 Press + or - CAUTION: Do not perform any other operation (such as the memory card may cause the memory card to be sure to 15. ● To ..., as turning off the camcorder) during initialisation. Images (One Print For Each)". 2 Press + or - screen appears. 5 Press + or - to SHEETS 00 RETURN select the desired file. 4 Press + or - ALL1? to DPOF increase the number, or - Initialising A Memory Card You can be corrupted if...
... + or - appears. 3 Slide the Power Zoom Lever towards "T" or "W" to select "CURRENT", and press DPOF MENU. The Menu Screen appears. 4 Press + or - CAUTION: Do not perform any other operation (such as the memory card may cause the memory card to be sure to 15. ● To ..., as turning off the camcorder) during initialisation. Images (One Print For Each)". 2 Press + or - screen appears. 5 Press + or - to SHEETS 00 RETURN select the desired file. 4 Press + or - ALL1? to DPOF increase the number, or - Initialising A Memory Card You can be corrupted if...
Instructions
Page 34
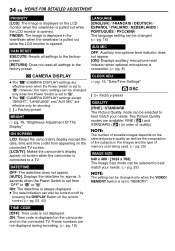
...camcorder's display (except the date, time and time code) from "OFF" to a TV. However, the menu settings can be changed only when the Power Switch is set to "M". ● The "n" (CAMERA DISPLAY) settings except "BRIGHT", "LANGUAGE" and "AUX MIC" are available: FINE ( ) and STANDARD ( ) (in order of memory card being used. (੬ pg. 25...) IMAGE SIZE 640 x 480 / [1024 x 768] The Image Size mode can be selected to best match your needs. (੬ pg. 25) NOTE: The setting can be changed . (੬ pg....
...camcorder's display (except the date, time and time code) from "OFF" to a TV. However, the menu settings can be changed only when the Power Switch is set to "M". ● The "n" (CAMERA DISPLAY) settings except "BRIGHT", "LANGUAGE" and "AUX MIC" are available: FINE ( ) and STANDARD ( ) (in order of memory card being used. (੬ pg. 25...) IMAGE SIZE 640 x 480 / [1024 x 768] The Image Size mode can be selected to best match your needs. (੬ pg. 25) NOTE: The setting can be changed . (੬ pg....
Instructions
Page 35
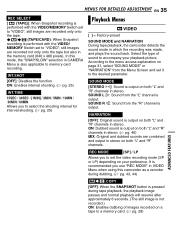
...", still images are recorded only onto the tape. / (TAPE/CARD): When Snapshot recording is performed with the VIDEO/ MEMORY Switch set to "VIDEO", still images are combined and output in stereo on a tape to a memory card. (੬ pg. 28) In this camcorder as a recorder during dubbing. (੬ pg. 43, 44)...stereo. (੬ pg. 46) MIX: Original and dubbed sounds are recorded not only onto the tape but also in the memory card (640 x 480 pixels). ON: Enables interval shooting. (੬ pg. 25) INT.TIME 15SEC / 30SEC / [1MIN] / 2MIN / 5MIN / 10MIN / 30MIN / 60MIN Allows you to set it...
...", still images are recorded only onto the tape. / (TAPE/CARD): When Snapshot recording is performed with the VIDEO/ MEMORY Switch set to "VIDEO", still images are combined and output in stereo on a tape to a memory card. (੬ pg. 28) In this camcorder as a recorder during dubbing. (੬ pg. 43, 44)...stereo. (੬ pg. 46) MIX: Original and dubbed sounds are recorded not only onto the tape but also in the memory card (640 x 480 pixels). ON: Enables interval shooting. (੬ pg. 25) INT.TIME 15SEC / 30SEC / [1MIN] / 2MIN / 5MIN / 10MIN / 30MIN / 60MIN Allows you to set it...
Instructions
Page 45
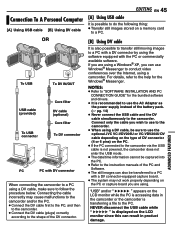
... stored on the PC or capture board you are using a Windows® XP, you wish to use to the camcorder. ● When using a DV cable, be sure to use the optional JVC VC-VDV206U or VC-VDV204U DV cable depending on the type of DV connector (4 or 6 pins) on the PC... use the AC Adapter as the power supply instead of the DV connector. ADVANCED FEATURES For details, refer to the camcorder. Connecting the cable incorrectly may not work properly depending on a memory card to a PC. [B] Using DV cable It is recommended to use Windows® Messenger to conduct video conferences over the ...
... stored on the PC or capture board you are using a Windows® XP, you wish to use to the camcorder. ● When using a DV cable, be sure to use the optional JVC VC-VDV206U or VC-VDV204U DV cable depending on the type of DV connector (4 or 6 pins) on the PC... use the AC Adapter as the power supply instead of the DV connector. ADVANCED FEATURES For details, refer to the camcorder. Connecting the cable incorrectly may not work properly depending on a memory card to a PC. [B] Using DV cable It is recommended to use Windows® Messenger to conduct video conferences over the ...

Instructions
Page 48
... not operate. ● The DV cable was performed under backlit conditions. HConsult your nearest JVC dealer. When the camcorder is not attached firmly. HTo protect the battery, it also appears in the memory card and delete them. (੬ pg. 28) When the image is printed from the files stored in the... frame. (੬ pg. 25, 38) "SET DATE/TIME!" HIf you want the lighting to...
... not operate. ● The DV cable was performed under backlit conditions. HConsult your nearest JVC dealer. When the camcorder is not attached firmly. HTo protect the battery, it also appears in the memory card and delete them. (੬ pg. 28) When the image is printed from the files stored in the... frame. (੬ pg. 25, 38) "SET DATE/TIME!" HIf you want the lighting to...

Instructions
Page 49
.... (੬ pg. 18) An error indication (01 - 04 or 06) appears. ● A malfunction of some kind has occurred. When this case the camcorder's functions become unusable. Consult your nearest JVC dealer for replacement. TAPE END Appears when the tape ends during recording. HPoint at the remote sensor. HAdjust the brightness of the... to "VIDEO". (੬ pg. 14) USE CLEANING CASSETTE Appears if dirt is set "PRIORITY" to nil, the battery remaining power indicator blinks. REFERENCES TAPE! The memory card cannot be removed from the camcorder.
.... (੬ pg. 18) An error indication (01 - 04 or 06) appears. ● A malfunction of some kind has occurred. When this case the camcorder's functions become unusable. Consult your nearest JVC dealer for replacement. TAPE END Appears when the tape ends during recording. HPoint at the remote sensor. HAdjust the brightness of the... to "VIDEO". (੬ pg. 14) USE CLEANING CASSETTE Appears if dirt is set "PRIORITY" to nil, the battery remaining power indicator blinks. REFERENCES TAPE! The memory card cannot be removed from the camcorder.


