Instruction Manual
Page 1
... Digital Video Camera: http://www.jvc.co.jp/english/cyber/ For Accessories: http://www.jvc.co.jp/english/accessory/ Dear Customer, Thank you for future reference. To deactivate the demonstration, set "DEMO MODE" to ensure safe use of the camcorder. and Serial No. Model No. DIGITAL VIDEO CAMERA GR-D350U Please visit our Homepage...
... Digital Video Camera: http://www.jvc.co.jp/english/cyber/ For Accessories: http://www.jvc.co.jp/english/accessory/ Dear Customer, Thank you for future reference. To deactivate the demonstration, set "DEMO MODE" to ensure safe use of the camcorder. and Serial No. Model No. DIGITAL VIDEO CAMERA GR-D350U Please visit our Homepage...
Instruction Manual
Page 2
... charging circuitry. ● Make sure you only use . Store the camcorder in place where humidity is working or not. Using generic non-JVC batteries can become dirty more easily if your cassette tapes and camcorder are stored in the proper environment. in cassette cases. If you obtain... permission beforehand.) ● DO NOT leave the unit - Use the JVC BN-VF707U/ VF714U/VF733U battery packs...
... charging circuitry. ● Make sure you only use . Store the camcorder in place where humidity is working or not. Using generic non-JVC batteries can become dirty more easily if your cassette tapes and camcorder are stored in the proper environment. in cassette cases. If you obtain... permission beforehand.) ● DO NOT leave the unit - Use the JVC BN-VF707U/ VF714U/VF733U battery packs...

Instruction Manual
Page 3
...accommodate different designs of a different standard. REFER SERVICING TO QUALIFIED SERVICE PERSONNEL. Use the JVC BN-VF707U/VF714U/VF733U battery packs and, to recharge them or to supply power to the camcorder from an AC outlet, use the provided multi-voltage AC Adapter. (An appropriate conversion adapter...live recording and LCD monitor/viewfinder playback are on its upper and lower sides. EN 3 See www. CAUTIONS: ● This camcorder is intended to alert the user to the presence of the AC Adapter are possible anywhere. ● This product includes patented and other ...
...accommodate different designs of a different standard. REFER SERVICING TO QUALIFIED SERVICE PERSONNEL. Use the JVC BN-VF707U/VF714U/VF733U battery packs and, to recharge them or to supply power to the camcorder from an AC outlet, use the provided multi-voltage AC Adapter. (An appropriate conversion adapter...live recording and LCD monitor/viewfinder playback are on its upper and lower sides. EN 3 See www. CAUTIONS: ● This camcorder is intended to alert the user to the presence of the AC Adapter are possible anywhere. ● This product includes patented and other ...
Instruction Manual
Page 4
... ventilation openings. Only use attachments/accessories specified by a newspaper, or cloth etc. Refer all instructions. 5. Carrying or holding the camcorder by the manufacturer, or sold with the cart, stand, tripod, bracket, or table specified by the viewfinder and/or...exposed to rain or moisture, does not operate normally, or has been dropped. The following notes concern possible physical damage to the camcorder and to the camcorder. 4 EN When the equipment is used, use caution when moving the cart/ apparatus combination to avoid injury from tipover. 11....
... ventilation openings. Only use attachments/accessories specified by a newspaper, or cloth etc. Refer all instructions. 5. Carrying or holding the camcorder by the manufacturer, or sold with the cart, stand, tripod, bracket, or table specified by the viewfinder and/or...exposed to rain or moisture, does not operate normally, or has been dropped. The following notes concern possible physical damage to the camcorder and to the camcorder. 4 EN When the equipment is used, use caution when moving the cart/ apparatus combination to avoid injury from tipover. 11....
Instruction Manual
Page 5
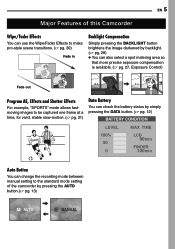
EN 5 Major Features of this Camcorder Wipe/Fader Effects You can use the Wipe/Fader Effects to make pro-style scene transitions. ( pg. 30) Fade in Backlight Compensation Simply pressing the ... TIME 100% 50 0 LCD 90min FINDER 100min Auto Button You can change the recording mode between manual setting to the standard mode setting of the camcorder by pressing the AUTO button.( pg. 13) AUTO MANUAL
EN 5 Major Features of this Camcorder Wipe/Fader Effects You can use the Wipe/Fader Effects to make pro-style scene transitions. ( pg. 30) Fade in Backlight Compensation Simply pressing the ... TIME 100% 50 0 LCD 90min FINDER 100min Auto Button You can change the recording mode between manual setting to the standard mode setting of the camcorder by pressing the AUTO button.( pg. 13) AUTO MANUAL
Instruction Manual
Page 9
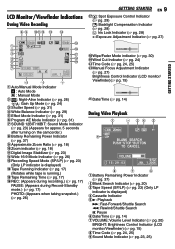
... Indicator ( pg. 31) 6Program AE Mode Indicator ( pg. 31) 7SOUND 12BIT/16BIT: Sound Mode Indicator ( pg. 23) (Appears for approx. 5 seconds after turning on the camcorder.) 8Battery Remaining Power Indicator ( pg. 37) 9Approximate Zoom Ratio ( pg. 18) !Zoom indicator ( pg. 18) "Digital Image Stabilizer ( pg. 23) #Wide 16:9 Mode Indicator ( pg...
... Indicator ( pg. 31) 6Program AE Mode Indicator ( pg. 31) 7SOUND 12BIT/16BIT: Sound Mode Indicator ( pg. 23) (Appears for approx. 5 seconds after turning on the camcorder.) 8Battery Remaining Power Indicator ( pg. 37) 9Approximate Zoom Ratio ( pg. 18) !Zoom indicator ( pg. 18) "Digital Image Stabilizer ( pg. 23) #Wide 16:9 Mode Indicator ( pg...
Instruction Manual
Page 10
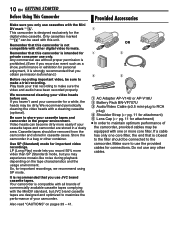
... not compatible with one core filter, the end that you use JVC brand cassette tapes. We recommend periodically cleaning the video heads with this camcorder is intended for private consumer use only. Use SP (Standard) mode for the digital video cassette. Also read "CAUTIONS" on ...mode. Make sure to make a trial recording. Do not use any other container. Play back your camcorder. LP (Long Play) mode lets you record 50% more video than SP (Standard) mode, but JVC brand cassette tapes are stored in a bag or other cables. Only cassettes marked " " can ...
... not compatible with one core filter, the end that you use JVC brand cassette tapes. We recommend periodically cleaning the video heads with this camcorder is intended for private consumer use only. Use SP (Standard) mode for the digital video cassette. Also read "CAUTIONS" on ...mode. Make sure to make a trial recording. Do not use any other container. Play back your camcorder. LP (Long Play) mode lets you record 50% more video than SP (Standard) mode, but JVC brand cassette tapes are stored in a bag or other cables. Only cassettes marked " " can ...
Instruction Manual
Page 11
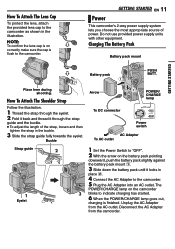
...2 Fold it back and thread it locks in place 2. 4 Connect the AC Adapter to the camcorder. 5 Plug the AC Adapter into an AC outlet. Disconnect the AC Adapter from the AC outlet. GETTING STARTED ...EN 11 Power This camcorder's 2-way power supply system lets you choose the most appropriate source of the strap, loosen... and then tighten the strap in the illustration. Unplug the AC Adapter from the camcorder. The POWER/CHARGE lamp on correctly make sure the cap is finished. NOTE: To con&#...
...2 Fold it back and thread it locks in place 2. 4 Connect the AC Adapter to the camcorder. 5 Plug the AC Adapter into an AC outlet. Disconnect the AC Adapter from the AC outlet. GETTING STARTED ...EN 11 Power This camcorder's 2-way power supply system lets you choose the most appropriate source of the strap, loosen... and then tighten the strap in the illustration. Unplug the AC Adapter from the camcorder. The POWER/CHARGE lamp on correctly make sure the cap is finished. NOTE: To con&#...
Instruction Manual
Page 12
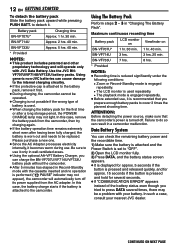
... operation time remains extremely short even after a long storage period, the POWER/ CHARGE lamp may not appear), the camcorder will operate only with your nearest JVC dealer. Use the JVC BNVF707U/VF714U/VF733U battery packs. Failure to the battery pack, remove it first. ● During charging, the... camcorder cannot be a problem with JVC Data Battery. Data Battery System You can result in "Charging The Battery Pack". BN-VF733U Approx. 5 hrs. 40 min. * Provided ...
... operation time remains extremely short even after a long storage period, the POWER/ CHARGE lamp may not appear), the camcorder will operate only with your nearest JVC dealer. Use the JVC BNVF707U/VF714U/VF733U battery packs. Failure to the battery pack, remove it first. ● During charging, the... camcorder cannot be a problem with JVC Data Battery. Data Battery System You can result in "Charging The Battery Pack". BN-VF733U Approx. 5 hrs. 40 min. * Provided ...
Instruction Manual
Page 13
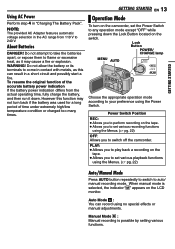
...appears on the tape. ● Allows you to set various playback functions using the Menus. ( pg. 22) OFF: Allows you to switch off the camcorder. However this can record using the Power Switch. When manual mode is possible by setting various functions. About Batteries DANGER! GETTING STARTED Using AC Power...You can result in the AC range from the actual operating time, fully charge the battery, and then run it may not turn on the camcorder, set the Power Switch to any operation mode except "OFF" while pressing down . Do not attempt to take the batteries apart, or ...
...appears on the tape. ● Allows you to set various playback functions using the Menus. ( pg. 22) OFF: Allows you to switch off the camcorder. However this can record using the Power Switch. When manual mode is possible by setting various functions. About Batteries DANGER! GETTING STARTED Using AC Power...You can result in the AC range from the actual operating time, fully charge the battery, and then run it may not turn on the camcorder, set the Power Switch to any operation mode except "OFF" while pressing down . Do not attempt to take the batteries apart, or ...
Instruction Manual
Page 14
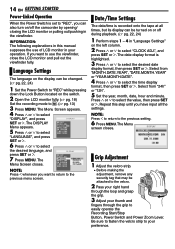
...-Linked Operation When the Power Switch is set to "REC", you have input all times, but its display can be turned on or off the camcorder by opening/ closing the LCD monitor or pulling out/pushing in the viewfinder. INFORMATION: The following explanations in this step until you can...
...-Linked Operation When the Power Switch is set to "REC", you have input all times, but its display can be turned on or off the camcorder by opening/ closing the LCD monitor or pulling out/pushing in the viewfinder. INFORMATION: The following explanations in this step until you can...
Instruction Manual
Page 15
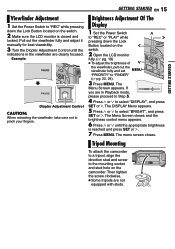
... viewfinder are in Playback mode, please proceed to Step 5. 4 Press 3 or 4 to select "DISPLAY", and press SET or 2. Tripod Mounting To attach the camcorder to a tripod, align the direction stud and screw to the mounting socket and stud hole on the switch. 2 Make sure the LCD monitor is reached..., 24). 3 Press MENU. Brightness Adjustment Of The Display 1 Set the Power Switch 3 to "REC" or "PLAY" while 2 pressing down the Lock Button located on the camcorder. The DISPLAY Menu appears. 5 Press 3 or 4 to pinch your fingers.
... viewfinder are in Playback mode, please proceed to Step 5. 4 Press 3 or 4 to select "DISPLAY", and press SET or 2. Tripod Mounting To attach the camcorder to a tripod, align the direction stud and screw to the mounting socket and stud hole on the switch. 2 Make sure the LCD monitor is reached..., 24). 3 Press MENU. Brightness Adjustment Of The Display 1 Set the Power Switch 3 to "REC" or "PLAY" while 2 pressing down the Lock Button located on the camcorder. The DISPLAY Menu appears. 5 Press 3 or 4 to pinch your fingers.
Instruction Manual
Page 16
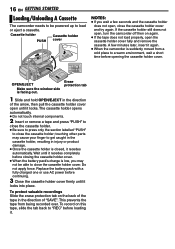
... automatically. Wait until it recedes completely before continuing. 3 Close the cassette holder cover firmly until it again. ● When the camcorder is suddenly moved from being recorded over. Do not apply force. Replace the battery pack with a fully charged one or use AC power before... on again. ● If the tape does not load properly, open until it . 16 EN GETTING STARTED Loading/Unloading A Cassette The camcorder needs to be able to close the cassette holder cover. Cassette holder PUSH Cassette holder cover NOTES: ● If you may cause your ...
... automatically. Wait until it recedes completely before continuing. 3 Close the cassette holder cover firmly until it again. ● When the camcorder is suddenly moved from being recorded over. Do not apply force. Replace the battery pack with a fully charged one or use AC power before... on again. ● If the tape does not load properly, open until it . 16 EN GETTING STARTED Loading/Unloading A Cassette The camcorder needs to be able to close the cassette holder cover. Cassette holder PUSH Cassette holder cover NOTES: ● If you may cause your ...
Instruction Manual
Page 17
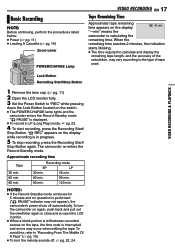
.../CHARGE Lamp VIDEO RECORDING EN 17 Tape Remaining Time Approximate tape remaining time appears on the switch. ● The POWER/CHARGE lamp lights and the camcorder enters the Record-Standby mode. Lock Button Recording Start/Stop Button VIDEO RECORDING & PLAYBACK 1 Remove the lens cap. ( pg. 11) 2 Open ...the time code is in LP (Long Play) mode, pg. 23. 4 To start recording, press the Recording Start/ Stop Button. "---min" means the camcorder is displayed. ● To record in progress. 5 To stop recording, press the Recording Start/ Stop Button again. To avoid this, refer to the type ...
.../CHARGE Lamp VIDEO RECORDING EN 17 Tape Remaining Time Approximate tape remaining time appears on the switch. ● The POWER/CHARGE lamp lights and the camcorder enters the Record-Standby mode. Lock Button Recording Start/Stop Button VIDEO RECORDING & PLAYBACK 1 Remove the lens cap. ( pg. 11) 2 Open ...the time code is in LP (Long Play) mode, pg. 23. 4 To start recording, press the Recording Start/ Stop Button. "---min" means the camcorder is displayed. ● To record in progress. 5 To stop recording, press the Recording Start/ Stop Button again. To avoid this, refer to the type ...
Instruction Manual
Page 18
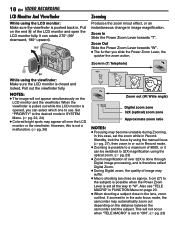
... the focus by using the manual focus ( pg. 27), then zoom in or out in image magnification. Pull on the distance between the camcorder and the subject. This will not appear simultaneously on page 23. ● When shooting a subject close as close to the desired mode in . Also see... "TELE MACRO" in the auto focus mode, the camcorder may appear all the way to 32X magnification using the optical zoom. ( pg. 23) ● Zoom magnification of over the LCD...
... the focus by using the manual focus ( pg. 27), then zoom in or out in image magnification. Pull on the distance between the camcorder and the subject. This will not appear simultaneously on page 23. ● When shooting a subject close as close to the desired mode in . Also see... "TELE MACRO" in the auto focus mode, the camcorder may appear all the way to 32X magnification using the optical zoom. ( pg. 23) ● Zoom magnification of over the LCD...

Instruction Manual
Page 19
Hold the camcorder in the desired position and tilt the LCD monitor in the Recording-Standby mode for about several seconds and played back automatically, then pauses in ... the Still Playback mode. ( pg. 20) 2) Set the Power Switch to find the spot at start recording. This code is interrupted. This means the camcorder may provide more dramatic results. This is recorded on the switch, then start of the last recording. 1) Press QUICK REVIEW during playback. Recording From The...
Hold the camcorder in the desired position and tilt the LCD monitor in the Recording-Standby mode for about several seconds and played back automatically, then pauses in ... the Still Playback mode. ( pg. 20) 2) Set the Power Switch to find the spot at start recording. This code is interrupted. This means the camcorder may provide more dramatic results. This is recorded on the switch, then start of the last recording. 1) Press QUICK REVIEW during playback. Recording From The...

Instruction Manual
Page 20
.... ● The detected blank portion may not be viewed in either direction during Blank Search, the camcorder stops automatically. ● A blank portion which is about 3 minutes, the camcorder's Stop mode is connected to "PLAY" while pressing down the volume. Still Playback Pauses during video playback... playback. 1) During playback, press ¡ for forward search, or 1 for 5 minutes when power is not heard from a battery, the camcorder shuts off automatically. Before you start recording in the forward direction. ● If the beginning or end of a tape to avoid time code ...
.... ● The detected blank portion may not be viewed in either direction during Blank Search, the camcorder stops automatically. ● A blank portion which is about 3 minutes, the camcorder's Stop mode is connected to "PLAY" while pressing down the volume. Still Playback Pauses during video playback... playback. 1) During playback, press ¡ for forward search, or 1 for 5 minutes when power is not heard from a battery, the camcorder shuts off automatically. Before you start recording in the forward direction. ● If the beginning or end of a tape to avoid time code ...
Instruction Manual
Page 21
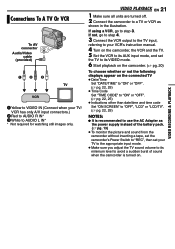
... RECORDING & PLAYBACK If using a VCR, go to step 4. 3 Connect the VCR output to the TV input, referring to your VCR's instruction manual. 4 Turn on the camcorder, the VCR and the TV. 5 Set the VCR to its AUX input mode, and set the TV to its minimum level to avoid a sudden burst... of the battery pack. ( pg. 13) ● To monitor the picture and sound from the camcorder without inserting a tape, set the camcorder's Power Switch to "REC", then set your TV/ VCR has only A/V input connectors.) 2Red to AUDIO R IN* 3White to AUDIO L IN* * Not...
... RECORDING & PLAYBACK If using a VCR, go to step 4. 3 Connect the VCR output to the TV input, referring to your VCR's instruction manual. 4 Turn on the camcorder, the VCR and the TV. 5 Set the VCR to its AUX input mode, and set the TV to its minimum level to avoid a sudden burst... of the battery pack. ( pg. 13) ● To monitor the picture and sound from the camcorder without inserting a tape, set the camcorder's Power Switch to "REC", then set your TV/ VCR has only A/V input connectors.) 2Red to AUDIO R IN* 3White to AUDIO L IN* * Not...
Instruction Manual
Page 22
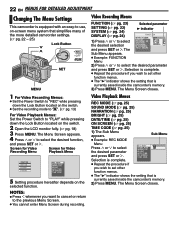
... FUNCTION Menu 2) Press 3 or 4 to set other function menus. ● The "3" indicator shows the setting that is currently saved inside the camcorder's memory. 2) Press MENU. Screen for Video Recording Menu Screen for Video Playback Menu FUNCT I ON SETT I NG SYSTEM D I SPLAY REC ... pg. 24) 1) Press 3 or 4 to set other function menus. ● The "3" indicator shows the setting that is currently saved inside the camcorder's memory. 3) Press MENU. Selection is complete. NOTES: ÷ Press 1 whenever you wish to select the desired selection and press SET or 2. The...
... FUNCTION Menu 2) Press 3 or 4 to set other function menus. ● The "3" indicator shows the setting that is currently saved inside the camcorder's memory. 2) Press MENU. Screen for Video Recording Menu Screen for Video Playback Menu FUNCT I ON SETT I NG SYSTEM D I SPLAY REC ... pg. 24) 1) Press 3 or 4 to set other function menus. ● The "3" indicator shows the setting that is currently saved inside the camcorder's memory. 3) Press MENU. Selection is complete. NOTES: ÷ Press 1 whenever you wish to select the desired selection and press SET or 2. The...
Instruction Manual
Page 23
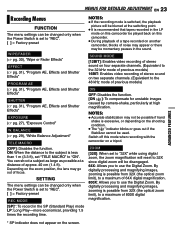
... Disables the function. [ON ]: To compensate for unstable images caused by camera-shake, particularly at high magnification. Switch off this camcorder. ● During playback of a tape recorded on two separate channels. (Equivalent to the 48 kHz mode of 64X digital magnification.... MACRO [OFF]: Disables the function. By digitally processing and magnifying images, zooming is recommended that tapes recorded in the LP mode on this camcorder be momentary pauses in the SP (Standard Play) mode LP: Long Play-more economical, providing 1.5 times the recording time. SOUND MODE ...
... Disables the function. [ON ]: To compensate for unstable images caused by camera-shake, particularly at high magnification. Switch off this camcorder. ● During playback of a tape recorded on two separate channels. (Equivalent to the 48 kHz mode of 64X digital magnification.... MACRO [OFF]: Disables the function. By digitally processing and magnifying images, zooming is recommended that tapes recorded in the LP mode on this camcorder be momentary pauses in the SP (Standard Play) mode LP: Long Play-more economical, providing 1.5 times the recording time. SOUND MODE ...


