Instruction Manual
Page 2
... of light (red, green or blue) may experience mosaic-like noise during playback depending on the tape characteristics and the usage environment. It is strongly recommended that this camcorder. ● This product includes patented and other container ● Use SP (Standard) mode for important recordings, we recommend using SP mode. ● For safety and reliability. Video heads can cause damage to the internal charging circuitry...
... of light (red, green or blue) may experience mosaic-like noise during playback depending on the tape characteristics and the usage environment. It is strongly recommended that this camcorder. ● This product includes patented and other container ● Use SP (Standard) mode for important recordings, we recommend using SP mode. ● For safety and reliability. Video heads can cause damage to the internal charging circuitry...
Instruction Manual
Page 4
... disposal of internal circuitry. CAUTION! When carrying, be caused.) Do not point the lens or the viewfinder directly into the apparatus, the apparatus has been exposed to rain or moisture, does not operate normally, or has been dropped. Connecting cables (Audio/Video, S-Video, etc.) to the camcorder and leaving it has sufficient space on all instructions. 5. the heat...
... disposal of internal circuitry. CAUTION! When carrying, be caused.) Do not point the lens or the viewfinder directly into the apparatus, the apparatus has been exposed to rain or moisture, does not operate normally, or has been dropped. Connecting cables (Audio/Video, S-Video, etc.) to the camcorder and leaving it has sufficient space on all instructions. 5. the heat...
Instruction Manual
Page 6
... 18 Zooming 18 Journalistic Shooting 19 Time Code 19 Quick Review 19 Recording From The Middle Of A Tape...... 19 VIDEO PLAYBACK 20 Normal Playback 20 Still Playback 20 Shuttle Search 20 Blank Search 20 Playback Snapshot 20 Connections To A TV Or VCR 21 MENUS FOR DETAILED ADJUSTMENT 22 Changing The Menu Settings 22 Recording Menus 23 Playback Menus 25 FEATURES FOR RECORDING 26 Wide Mode 26 Night-Alive 26 Snapshot (Record Still Image On Tape) .........26 Manual Focus...
... 18 Zooming 18 Journalistic Shooting 19 Time Code 19 Quick Review 19 Recording From The Middle Of A Tape...... 19 VIDEO PLAYBACK 20 Normal Playback 20 Still Playback 20 Shuttle Search 20 Blank Search 20 Playback Snapshot 20 Connections To A TV Or VCR 21 MENUS FOR DETAILED ADJUSTMENT 22 Changing The Menu Settings 22 Recording Menus 23 Playback Menus 25 FEATURES FOR RECORDING 26 Wide Mode 26 Night-Alive 26 Snapshot (Record Still Image On Tape) .........26 Manual Focus...
Instruction Manual
Page 8
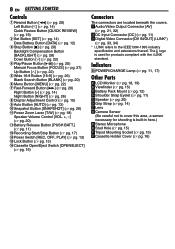
...) 9Auto Button [AUTO] ( pg. 13) !Snapshot Button [SNAPSHOT] ( pg. 26) "Power Zoom Lever [T/W] ( pg. 18) Speaker Volume Control [VOL. +, -] ( pg. 20) #Battery Release Button [PUSH BATT.] ( pg. 11) $Recording Start/Stop Button ( pg. 17) %Power Switch [REC, OFF, PLAY] ( pg. 13) &Lock Button ( pg. 13) (Cassette Open/Eject Switch [OPEN/EJECT] ( pg. 16) Connectors áThe connectors are located beneath the covers. The logo is used for shooting is built-in here.) ìStereo Microphone î...
...) 9Auto Button [AUTO] ( pg. 13) !Snapshot Button [SNAPSHOT] ( pg. 26) "Power Zoom Lever [T/W] ( pg. 18) Speaker Volume Control [VOL. +, -] ( pg. 20) #Battery Release Button [PUSH BATT.] ( pg. 11) $Recording Start/Stop Button ( pg. 17) %Power Switch [REC, OFF, PLAY] ( pg. 13) &Lock Button ( pg. 13) (Cassette Open/Eject Switch [OPEN/EJECT] ( pg. 16) Connectors áThe connectors are located beneath the covers. The logo is used for shooting is built-in here.) ìStereo Microphone î...
Instruction Manual
Page 9
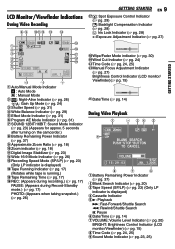
... Mode indicator ( pg. 30) +Wind Cut Indicator ( pg. 24) ,Time Code ( pg. 24, 25) -Manual Focus Adjustment Indicator ( pg. 27) Brightness Control Indicator (LCD monitor/ Viewfinder)( pg. 15) .Date/Time ( BRIGHT -1 pg. 14) During Video Playback 1 2 34 5 25min 12BIT 9 BLANK SEARCH PUSH"STOP "BUTTON TO CANCEL VOLUME 15 : 29 : 03 9:52 JAN. 1. 2006 8 7 6 1Battery Remaining Power Indicator ( pg. 37) 2Blank Search Indicator ( pg. 20) 3Tape Speed...
... Mode indicator ( pg. 30) +Wind Cut Indicator ( pg. 24) ,Time Code ( pg. 24, 25) -Manual Focus Adjustment Indicator ( pg. 27) Brightness Control Indicator (LCD monitor/ Viewfinder)( pg. 15) .Date/Time ( BRIGHT -1 pg. 14) During Video Playback 1 2 34 5 25min 12BIT 9 BLANK SEARCH PUSH"STOP "BUTTON TO CANCEL VOLUME 15 : 29 : 03 9:52 JAN. 1. 2006 8 7 6 1Battery Remaining Power Indicator ( pg. 37) 2Blank Search Indicator ( pg. 20) 3Tape Speed...
Instruction Manual
Page 12
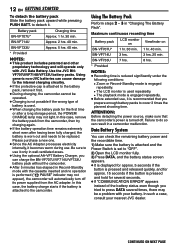
...; Since the AC Adapter processes electricity internally, it becomes warm during use it first. ● During charging, the camcorder cannot be operated. ● Charging is worn out and needs to cover 3 times the planned shooting time. Be sure to press DATA several seconds. ● If "COMMUNICATION ERROR" appears instead of battery is used repeatedly. ● The playback mode is attached to the battery pack, remove it only in...
...; Since the AC Adapter processes electricity internally, it becomes warm during use it first. ● During charging, the camcorder cannot be operated. ● Charging is worn out and needs to cover 3 times the planned shooting time. Be sure to press DATA several seconds. ● If "COMMUNICATION ERROR" appears instead of battery is used repeatedly. ● The playback mode is attached to the battery pack, remove it only in...
Instruction Manual
Page 13
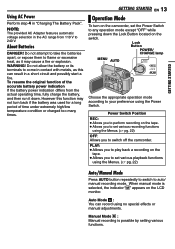
... REC: ● Allows you to perform recording on the tape. ● Allows you to set various recording functions using the Menus. ( pg. 22) Auto/Manual Mode Press AUTO button repeatedly to switch to come in a short circuit and possibly start a fire. M Manual Mode : Manual recording is selected, the indicator " " appears on the LCD monitor. Do not allow the battery or its terminals to auto/ M manual recording mode. Lock Button POWER/ CHARGE lamp MENU AUTO Choose the appropriate operation mode...
... REC: ● Allows you to perform recording on the tape. ● Allows you to set various recording functions using the Menus. ( pg. 22) Auto/Manual Mode Press AUTO button repeatedly to switch to come in a short circuit and possibly start a fire. M Manual Mode : Manual recording is selected, the indicator " " appears on the LCD monitor. Do not allow the battery or its terminals to auto/ M manual recording mode. Lock Button POWER/ CHARGE lamp MENU AUTO Choose the appropriate operation mode...
Instruction Manual
Page 14
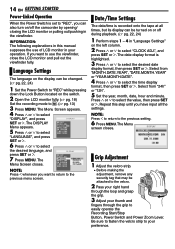
... MENU. Date/Time Settings The date/time is recorded onto the tape at all times, but its display can also turn on/off during playback. ( pg. 22, 24) 1 Perform steps 1 - 4 in the viewfinder. Repeat this manual supposes the use the viewfinder, close the LCD monitor and pull out the viewfinder fully. Be sure to fasten the velcro strip to easily operate the Recording Start/Stop Button, Power Switch...
... MENU. Date/Time Settings The date/time is recorded onto the tape at all times, but its display can also turn on/off during playback. ( pg. 22, 24) 1 Perform steps 1 - 4 in the viewfinder. Repeat this manual supposes the use the viewfinder, close the LCD monitor and pull out the viewfinder fully. Be sure to fasten the velcro strip to easily operate the Recording Start/Stop Button, Power Switch...
Instruction Manual
Page 17
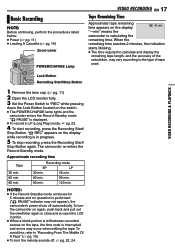
...) Zoom Lever POWER/CHARGE Lamp VIDEO RECORDING EN 17 Tape Remaining Time Approximate tape remaining time appears on the switch. ● The POWER/CHARGE lamp lights and the camcorder enters the Record-Standby mode. Lock Button Recording Start/Stop Button VIDEO RECORDING & PLAYBACK 1 Remove the lens cap. ( pg. 11) 2 Open the LCD monitor fully. 3 Set the Power Switch to calculate and display the remaining tape length, and the accuracy of the calculation, may occur when editing the tape. To turn the melody sounds off automatically. Recording mode...
...) Zoom Lever POWER/CHARGE Lamp VIDEO RECORDING EN 17 Tape Remaining Time Approximate tape remaining time appears on the switch. ● The POWER/CHARGE lamp lights and the camcorder enters the Record-Standby mode. Lock Button Recording Start/Stop Button VIDEO RECORDING & PLAYBACK 1 Remove the lens cap. ( pg. 11) 2 Open the LCD monitor fully. 3 Set the Power Switch to calculate and display the remaining tape length, and the accuracy of the calculation, may occur when editing the tape. To turn the melody sounds off automatically. Recording mode...

Instruction Manual
Page 20
...) 2 Set the Power Switch to turn on the switch. 3 To start recording in either direction during Shuttle Search. Before you start recording, make sure there is not heard from a battery, the camcorder shuts off automatically. To control the speaker volume Slide the Power Zoom Lever (VOL. +/-) towards "+" to turn up the volume, or towards "-" to "PLAY" while pressing down the Lock Button located on the display during video playback. 1) During playback, press...
...) 2 Set the Power Switch to turn on the switch. 3 To start recording in either direction during Shuttle Search. Before you start recording, make sure there is not heard from a battery, the camcorder shuts off automatically. To control the speaker volume Slide the Power Zoom Lever (VOL. +/-) towards "+" to turn up the volume, or towards "-" to "PLAY" while pressing down the Lock Button located on the display during video playback. 1) During playback, press...
Instruction Manual
Page 23
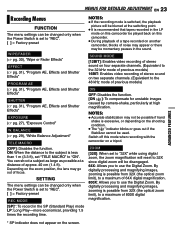
... zoom limit), to a maximum of previous models) DIS OFF: Disables the function. [ON ]: To compensate for unstable images caused by camera-shake, particularly at high magnification. NOTES: ÷ If the recording mode is switched, the playback picture will be momentary pauses in the sound. MENUS FOR DETAILED ADJUSTMENT EN 23 ADVANCED FEATURES Recording Menus FUNCTION The menu settings can be changed only when the Power Switch is set to "REC". [ ] = Factory-preset REC MODE...
... zoom limit), to a maximum of previous models) DIS OFF: Disables the function. [ON ]: To compensate for unstable images caused by camera-shake, particularly at high magnification. NOTES: ÷ If the recording mode is switched, the playback picture will be momentary pauses in the sound. MENUS FOR DETAILED ADJUSTMENT EN 23 ADVANCED FEATURES Recording Menus FUNCTION The menu settings can be changed only when the Power Switch is set to "REC". [ ] = Factory-preset REC MODE...

Instruction Manual
Page 24
DISPLAY ● The menu settings can be changed only when the Power Switch is set to "PLAY". [ ] = Factory-preset MELODY OFF: Even though not heard while shooting, shutter sound is recorded on the tape. [ON]: A melody sounds when any operation is opened . The quality of the sound will change. DATE/TIME [OFF]: The date/time does not appear. Shooting a subject in low or poor lighting at slow shutter speed provides a brighter image than in the viewfinder when the viewfi...
DISPLAY ● The menu settings can be changed only when the Power Switch is set to "PLAY". [ ] = Factory-preset MELODY OFF: Even though not heard while shooting, shutter sound is recorded on the tape. [ON]: A melody sounds when any operation is opened . The quality of the sound will change. DATE/TIME [OFF]: The date/time does not appear. Shooting a subject in low or poor lighting at slow shutter speed provides a brighter image than in the viewfinder when the viewfi...
Instruction Manual
Page 25
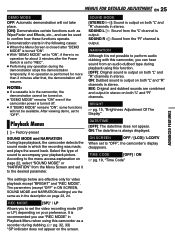
... recommended you use "REC MODE" in the following cases: ● When the Menu Screen is closed after that, the demonstration will not be available. BRIGHT pg. 15, "Brightness Adjustment Of The Display" DATE/TIME [OFF]: The date/time does not appear. Playback Menus [ ] = Factory-preset SOUND MODE and NARRATION During tape playback, the camcorder detects the sound mode in the description on your playback picture. ON SCREEN OFF / [LCD] / LCD/TV When set the video recording mode (SP or...
... recommended you use "REC MODE" in the following cases: ● When the Menu Screen is closed after that, the demonstration will not be available. BRIGHT pg. 15, "Brightness Adjustment Of The Display" DATE/TIME [OFF]: The date/time does not appear. Playback Menus [ ] = Factory-preset SOUND MODE and NARRATION During tape playback, the camcorder detects the sound mode in the description on your playback picture. ON SCREEN OFF / [LCD] / LCD/TV When set the video recording mode (SP or...
Instruction Manual
Page 27
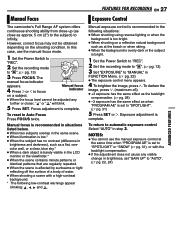
M 1 Set the Power Switch to "REC". 2 Set the recording mode to " ". ( pg. 13) 3 Set "EXPOSURE" to automatic exposure control Select "AUTO" in step 3. Exposure adjustment is complete. To return to "MANUAL" in the following low-contrast warnings appear blinking: , , and . Focus adjustment is complete. Manual exposure control is recommended in FUNCTION Menu. ( pg. 22) ● The exposure control menu appears. 4 To brighten the image, press 3. NOTES: ÷ You cannot use the manual focus mode. 1 Set the Power Switch to "REC". FEATURES...
M 1 Set the Power Switch to "REC". 2 Set the recording mode to " ". ( pg. 13) 3 Set "EXPOSURE" to automatic exposure control Select "AUTO" in step 3. Exposure adjustment is complete. To return to "MANUAL" in the following low-contrast warnings appear blinking: , , and . Focus adjustment is complete. Manual exposure control is recommended in FUNCTION Menu. ( pg. 22) ● The exposure control menu appears. 4 To brighten the image, press 3. NOTES: ÷ You cannot use the manual focus mode. 1 Set the Power Switch to "REC". FEATURES...

Instruction Manual
Page 35
... is set to "SAVE". ➜Set the tape's erase protection tab to the mode or channel appropriate for an instant. ● This is open . ➜Close the cassette holder cover. When the screen is under direct sunlight during playback, or there is no picture. ● Your TV has AV input terminals, but is not set to the Manual mode. ➜Set Focus to the Auto mode. ( pg. 27) ● The lens...
... is set to "SAVE". ➜Set the tape's erase protection tab to the mode or channel appropriate for an instant. ● This is open . ➜Close the cassette holder cover. When the screen is under direct sunlight during playback, or there is no picture. ● Your TV has AV input terminals, but is not set to the Manual mode. ➜Set Focus to the Auto mode. ( pg. 27) ● The lens...
Instruction Manual
Page 36
...) mode before setting White Balance. ( pg. 31) The image looks like the shutter speed is too slow. ● When shooting in the frame. ( pg. 26) "SET DATE/TIME!" The image taken using Snapshot is low. ➜Install a fully charged battery. ( pg. 12) Colored bright spots appear all over the LCD monitor or the viewfinder. ● The LCD monitor and the viewfinder are made with power turned on. ➜Turn the camcorder's power off...
...) mode before setting White Balance. ( pg. 31) The image looks like the shutter speed is too slow. ● When shooting in the frame. ( pg. 26) "SET DATE/TIME!" The image taken using Snapshot is low. ➜Install a fully charged battery. ( pg. 12) Colored bright spots appear all over the LCD monitor or the viewfinder. ● The LCD monitor and the viewfinder are made with power turned on. ➜Turn the camcorder's power off...
Instruction Manual
Page 37
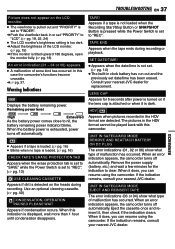
... error indication appears, the camcorder turns off automatically. When the battery power is exhausted, power turns off automatically. ● Appears if a tape is loaded. ( pg. 16) ● Blinks when no tape is loaded. ( pg. 16) CHECK TAPE'S ERASE PROTECTION TAB Appears when the erase protection tab is set to "SAVE" while the Power Switch is set to "REC". ( pg. 13) USE CLEANING CASSETTE Appears if dirt is detected on the LCD monitor. ● The view...
... error indication appears, the camcorder turns off automatically. When the battery power is exhausted, power turns off automatically. ● Appears if a tape is loaded. ( pg. 16) ● Blinks when no tape is loaded. ( pg. 16) CHECK TAPE'S ERASE PROTECTION TAB Appears when the erase protection tab is set to "SAVE" while the Power Switch is set to "REC". ( pg. 13) USE CLEANING CASSETTE Appears if dirt is detected on the LCD monitor. ● The view...
Instruction Manual
Page 40
.... ... open the camcorder's chassis. ... During recording or playback, the Head Clog Warning indicator " " appears. ... allow in use . drop the unit or strike it excessively when using the unit ... swing it against hard objects. ... For periodic check-ups please consult your nearest JVC dealer. carry it with the LCD monitor on . ... in direct sunlight. ... avoid rubbing it by holding the LCD monitor or the view...
.... ... open the camcorder's chassis. ... During recording or playback, the Head Clog Warning indicator " " appears. ... allow in use . drop the unit or strike it excessively when using the unit ... swing it against hard objects. ... For periodic check-ups please consult your nearest JVC dealer. carry it with the LCD monitor on . ... in direct sunlight. ... avoid rubbing it by holding the LCD monitor or the view...
Instruction Manual
Page 42
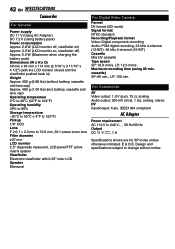
... Digital Video Camera Format DV format (SD mode) Signal format NTSC standard Recording/Playback format Video: Digital component recording Audio: PCM digital recording, 32 kHz 4-channel (12-BIT), 48 kHz 2-channel (16-BIT) Cassette Mini DV cassette Tape speed SP: 18.8 mm/s, LP: 12.5 mm/s Maximum recording time (using 80 min. For Connectors AV Video output: 1.0 V (p-p), 75 Ω, analog Audio output: 300 mV (rms), 1 kΩ, analog, stereo DV Input/output: 4-pin, IEEE1394 compliant AC Adapter Power requirement AC 110 V to 73.6 mm, 32:1 power zoom lens...
... Digital Video Camera Format DV format (SD mode) Signal format NTSC standard Recording/Playback format Video: Digital component recording Audio: PCM digital recording, 32 kHz 4-channel (12-BIT), 48 kHz 2-channel (16-BIT) Cassette Mini DV cassette Tape speed SP: 18.8 mm/s, LP: 12.5 mm/s Maximum recording time (using 80 min. For Connectors AV Video output: 1.0 V (p-p), 75 Ω, analog Audio output: 300 mV (rms), 1 kΩ, analog, stereo DV Input/output: 4-pin, IEEE1394 compliant AC Adapter Power requirement AC 110 V to 73.6 mm, 32:1 power zoom lens...

Instruction Manual
Page 43
... VCR 21 D Data Battery 12 Date/Time Settings 14 Demonstration Mode 25 Digital Image Stabilization (DIS 23 Dubbing 32, 33 E Effect Mode 31 Exposure Control 27 I Iris Lock 28 L LCD Monitor and Viewfinder 16, 18 Loading A Cassette 16 M Manual Focus 27 Melody 24 Motor Drive Mode 26 N Night-Alive 26 TERMS EN 43 P Playback Sound 25 Power-Linked Operation 14 Priority 24 Program AE, Effects And Shutter Effects ...... 31 Q Quick Review 19 R Recording Capacity Tape 17 S Shutter...
... VCR 21 D Data Battery 12 Date/Time Settings 14 Demonstration Mode 25 Digital Image Stabilization (DIS 23 Dubbing 32, 33 E Effect Mode 31 Exposure Control 27 I Iris Lock 28 L LCD Monitor and Viewfinder 16, 18 Loading A Cassette 16 M Manual Focus 27 Melody 24 Motor Drive Mode 26 N Night-Alive 26 TERMS EN 43 P Playback Sound 25 Power-Linked Operation 14 Priority 24 Program AE, Effects And Shutter Effects ...... 31 Q Quick Review 19 R Recording Capacity Tape 17 S Shutter...


