Owners Manual
Page 3
... CONTENTS ...2 REFERENCE DOCUMENTS 2 REGISTER YOUR PRODUCT 6 SPECIAL NOTES 7 LABEL LOCATIONS 9 M91 Standard...9 M91 Heavy Duty...10 All Wheelchairs...10 TYPICAL PRODUCT PARAMETERS 11 PRONTO M91...11 SECTION 1-GENERAL GUIDELINES 13 Controller Settings/Repair or Service 13 Accessories Information ...13 Operation Information ...13 Batteries...15 Charging Batteries ...15 Grounding Instructions ...16 Rain Test...16 Weight Training ...17...
... CONTENTS ...2 REFERENCE DOCUMENTS 2 REGISTER YOUR PRODUCT 6 SPECIAL NOTES 7 LABEL LOCATIONS 9 M91 Standard...9 M91 Heavy Duty...10 All Wheelchairs...10 TYPICAL PRODUCT PARAMETERS 11 PRONTO M91...11 SECTION 1-GENERAL GUIDELINES 13 Controller Settings/Repair or Service 13 Accessories Information ...13 Operation Information ...13 Batteries...15 Charging Batteries ...15 Grounding Instructions ...16 Rain Test...16 Weight Training ...17...
Owners Manual
Page 4
.../Adjust Monthly...27 Inspect/Adjust Periodically...27 Troubleshooting Guide ...28 Troubleshooting - Electrical...29 Information Gauge Display Diagnostics 29 Service Indicator Light Diagnostics 29 Checking Battery Charge Level...30 SECTION 5-WHEELCHAIR OPERATION 31 Operating the Wheelchair...31 Turning the Power On/Off ...31 On/Off Button ...31 Using the Joystick ...36 Installing...37 Adjusting the Seat Height ...37 Adjusting Seat Position on Seat Frame 39 Adjusting Seat Depth ...40 Replacing the Seat Positioning Strap ...41 Pronto® M91™ with SureStep® 4 Part No 1141450
.../Adjust Monthly...27 Inspect/Adjust Periodically...27 Troubleshooting Guide ...28 Troubleshooting - Electrical...29 Information Gauge Display Diagnostics 29 Service Indicator Light Diagnostics 29 Checking Battery Charge Level...30 SECTION 5-WHEELCHAIR OPERATION 31 Operating the Wheelchair...31 Turning the Power On/Off ...31 On/Off Button ...31 Using the Joystick ...36 Installing...37 Adjusting the Seat Height ...37 Adjusting Seat Position on Seat Frame 39 Adjusting Seat Depth ...40 Replacing the Seat Positioning Strap ...41 Pronto® M91™ with SureStep® 4 Part No 1141450
Owners Manual
Page 6
... No 1141450 Ensuring long-term maintenance and servicing of registering include: 1. Pronto® M91™ with product information, maintenance tips and industry news. Register ONLINE at warranty.invacare.com Please have your model number and purchase date available to complete your... Forks ...58 SECTION 11-BATTERIES 59 Installing/Removing the Batteries...60 Installing...60 Removing ...62 Connecting/Disconnecting the Battery Wiring Harness 62 Connecting ...63 Disconnecting ...63 Charging Batteries ...64 Battery Charger Operation...65 On-Board Battery Charger...65 Independent Charger ......
... No 1141450 Ensuring long-term maintenance and servicing of registering include: 1. Pronto® M91™ with product information, maintenance tips and industry news. Register ONLINE at warranty.invacare.com Please have your model number and purchase date available to complete your... Forks ...58 SECTION 11-BATTERIES 59 Installing/Removing the Batteries...60 Installing...60 Removing ...62 Connecting/Disconnecting the Battery Wiring Harness 62 Connecting ...63 Disconnecting ...63 Charging Batteries ...64 Battery Charger Operation...65 On-Board Battery Charger...65 Independent Charger ......
Owners Manual
Page 11
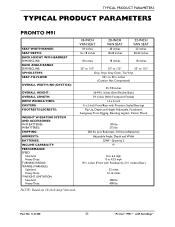
..., Depth and Height Adjustable, Footboard, Swingaway Front Rigging, Elevating Legrest, Center Mount 199 lbs 273 lbs 260 lbs (w/o Batteries), 310 lbs (w/Batteries) Adjustable Angle, Depth and Width 22NF - Part No 1141450 11 Pronto® M91™ with Footboard); 21½ inches (Rear) 22 miles 12-16 miles 300 lbs 400 lbs NOTE: Based on...
..., Depth and Height Adjustable, Footboard, Swingaway Front Rigging, Elevating Legrest, Center Mount 199 lbs 273 lbs 260 lbs (w/o Batteries), 310 lbs (w/Batteries) Adjustable Angle, Depth and Width 22NF - Part No 1141450 11 Pronto® M91™ with Footboard); 21½ inches (Rear) 22 miles 12-16 miles 300 lbs 400 lbs NOTE: Based on...
Owners Manual
Page 12
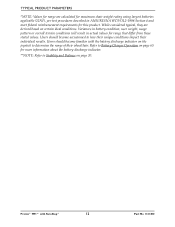
... pattern or overall terrain conditions will result in ANSI/RESNA WC/VOL2‐1998 Section 4 and meet federal reimbursement requirements for this product. Pronto® M91™ with the battery discharge indicator on page 20. TYPICAL PRODUCT PARAMETERS *NOTE: Values for range are derived based on certain ideal conditions. Users should become familiar...
... pattern or overall terrain conditions will result in ANSI/RESNA WC/VOL2‐1998 Section 4 and meet federal reimbursement requirements for this product. Pronto® M91™ with the battery discharge indicator on page 20. TYPICAL PRODUCT PARAMETERS *NOTE: Values for range are derived based on certain ideal conditions. Users should become familiar...

Owners Manual
Page 15
...unit. All battery terminal covers (two on the front battery and two on the rear battery) MUST be replaced IMMEDIATELY. NEVER attempt to recharge the batteries by attaching cables directly to the object you are transferring onto. Part No 1141450 15 Pronto® M91™ with batteries. DO .... DO NOT remove fuse or mounting hardware from moving. Some battery manufacturers mold a carrying strap and/or hold down flanges directly into a battery box may result. Use of fire and electric shock. Invacare strongly recommends their use as a safety device withstanding high stress ...
...unit. All battery terminal covers (two on the front battery and two on the rear battery) MUST be replaced IMMEDIATELY. NEVER attempt to recharge the batteries by attaching cables directly to the object you are transferring onto. Part No 1141450 15 Pronto® M91™ with batteries. DO .... DO NOT remove fuse or mounting hardware from moving. Some battery manufacturers mold a carrying strap and/or hold down flanges directly into a battery box may result. Use of fire and electric shock. Invacare strongly recommends their use as a safety device withstanding high stress ...
Owners Manual
Page 16
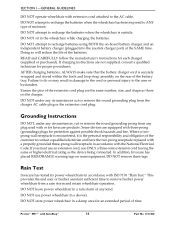
...or remove the round grounding prong from any plug used with or for proper procedures. In addition, Invacare has placed RED/ORANGE warning tags on ‐board battery charger and an independent battery charger (plugged into the joystick charger port) at the SAME time. Where a two‐ prong... wall receptacle is encountered, it is the personal responsibility and obligation of the battery tray. Pronto® M91™ with extension cord attached to the user or bystanders. DO NOT use ONLY a three‐wire extension cord having the same...
...or remove the round grounding prong from any plug used with or for proper procedures. In addition, Invacare has placed RED/ORANGE warning tags on ‐board battery charger and an independent battery charger (plugged into the joystick charger port) at the SAME time. Where a two‐ prong... wall receptacle is encountered, it is the personal responsibility and obligation of the battery tray. Pronto® M91™ with extension cord attached to the user or bystanders. DO NOT use ONLY a three‐wire extension cord having the same...
Owners Manual
Page 17
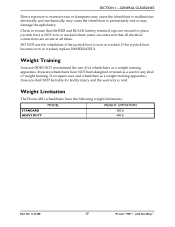
... LIMITATION STANDARD HEAVY DUTY 300 lb 400 lb Part No 1141450 17 Pronto® M91™ with SureStep® Weight Limitation The Pronto M91 wheelchairs have NOT been designed or tested as a weight training apparatus, Invacare shall NOT be liable for any kind of its wheelchairs as a ...weight training apparatus. Check to prematurely rust or may cause the wheelchair to ensure that the RED and BLACK battery terminal...
... LIMITATION STANDARD HEAVY DUTY 300 lb 400 lb Part No 1141450 17 Pronto® M91™ with SureStep® Weight Limitation The Pronto M91 wheelchairs have NOT been designed or tested as a weight training apparatus, Invacare shall NOT be liable for any kind of its wheelchairs as a ...weight training apparatus. Check to prematurely rust or may cause the wheelchair to ensure that the RED and BLACK battery terminal...
Owners Manual
Page 23
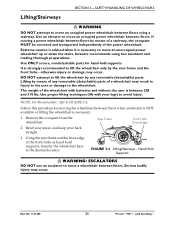
...174; Rear Frame Front Forks (Front Edge) 2. Part No 1141450 23 Pronto® M91™ with your back straight. 3. Extreme caution is advised when it...wheelchair may result in injury to the user or damage to the wheelchair. FIGURE 3.4 Lifting/Stairways - Invacare recommends using a stairway. Follow this procedure, refer to FIGURE 3.4. Remove the occupant from the wheelchair... the wheelchair is between floors by any removable (detachable) parts of the wheelchair with batteries and without the user is necessary: 1. Use ONLY secure, nondetachable parts for moving ...
...174; Rear Frame Front Forks (Front Edge) 2. Part No 1141450 23 Pronto® M91™ with your back straight. 3. Extreme caution is advised when it...wheelchair may result in injury to the user or damage to the wheelchair. FIGURE 3.4 Lifting/Stairways - Invacare recommends using a stairway. Follow this procedure, refer to FIGURE 3.4. Remove the occupant from the wheelchair... the wheelchair is between floors by any removable (detachable) parts of the wheelchair with batteries and without the user is necessary: 1. Use ONLY secure, nondetachable parts for moving ...
Owners Manual
Page 28
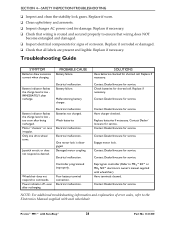
... damage. Replace if necessary. Pronto® M91™ with wheelchair). Replace if necessary. ❑ Check that all labels are present and legible. Electrical malfunction. SOLUTIONS Have batteries checked for shorted cell. Check batteries for shorted cell. Contact Dealer/Invacare for service. Contact Dealer/Invacare for service. Contact Dealer/Invacare for service. Replace batteries if necessary. Replace if necessary...
... damage. Replace if necessary. Pronto® M91™ with wheelchair). Replace if necessary. ❑ Check that all labels are present and legible. Electrical malfunction. SOLUTIONS Have batteries checked for shorted cell. Check batteries for shorted cell. Contact Dealer/Invacare for service. Contact Dealer/Invacare for service. Contact Dealer/Invacare for service. Replace batteries if necessary. Replace if necessary...
Owners Manual
Page 29
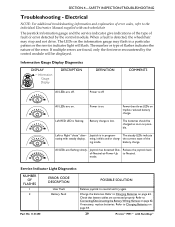
... to neutral and try again. Release the joystick back of the ing mode. Check that battery cables are off . Refer to Charging Batteries on implies reduced battery charge. Power is detected, the wheelchair may flash in program- SECTION 4-SAFETY INSPECTION/TROUBLESHOOTING ... 64. battery charge. When a fault is off . Joystick is on . All LEDs are on . mode. Service Indicator Light Diagnostics NUMBER OF FLASHES 1 2 ERROR CODE DESCRIPTION User Fault Battery Fault POSSIBLE SOLUTION Release joystick to Neutral. Part No 1141450 29 Pronto® M91™ ...
... to neutral and try again. Release the joystick back of the ing mode. Check that battery cables are off . Refer to Charging Batteries on implies reduced battery charge. Power is detected, the wheelchair may flash in program- SECTION 4-SAFETY INSPECTION/TROUBLESHOOTING ... 64. battery charge. When a fault is off . Joystick is on . All LEDs are on . mode. Service Indicator Light Diagnostics NUMBER OF FLASHES 1 2 ERROR CODE DESCRIPTION User Fault Battery Fault POSSIBLE SOLUTION Release joystick to Neutral. Part No 1141450 29 Pronto® M91™ ...
Owners Manual
Page 30
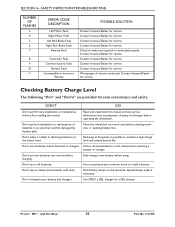
... Level The following "Do's" and "Don'ts" are provided for your battery and chargers. Recharge as frequently as possible to a work area before operating the wheelchair. Don't tip or tilt batteries. Pronto® M91™ with tools. Contact Invacare/Dealer for service. DON'T DO Don't perform any installation or maintenance without first reading this manual...
... Level The following "Do's" and "Don'ts" are provided for your battery and chargers. Recharge as frequently as possible to a work area before operating the wheelchair. Don't tip or tilt batteries. Pronto® M91™ with tools. Contact Invacare/Dealer for service. DON'T DO Don't perform any installation or maintenance without first reading this manual...

Owners Manual
Page 34
... direction compensation to a stop, simply release the joystick. The Information Gauge display also serves as the Remote Programmer Communication connection. Pronto® M91™ with the wheelchair. The larger bars in the speedometer will light. • Press and hold both the tortoise button ... housing, it provides the following steps: i. Perform one of the joystick housing. ii. B. Red LEDs are lit, indicating batteries are running out of the wheelchair status. A chart of the diagnostic indications is detected by the programmed settings. C. The smaller...
... direction compensation to a stop, simply release the joystick. The Information Gauge display also serves as the Remote Programmer Communication connection. Pronto® M91™ with the wheelchair. The larger bars in the speedometer will light. • Press and hold both the tortoise button ... housing, it provides the following steps: i. Perform one of the joystick housing. ii. B. Red LEDs are lit, indicating batteries are running out of the wheelchair status. A chart of the diagnostic indications is detected by the programmed settings. C. The smaller...

Owners Manual
Page 59
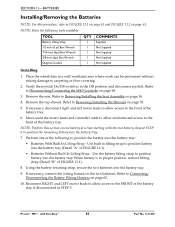
... technician. Invacare strongly recommends that battery installation and battery replacement always be used - NOTE: If there is tightened securely - Before reinstalling the existing or new battery(ies), clean the baking soda from the battery tray or battery(ies) being sure to the battery may occur...connected to the battery terminal(s)/post(s) as shown in FIGURE 11.3 otherwise damage to avoid contact with a cracked or otherwise damaged case. Part No 1141450 59 Pronto® M91™ with mounting holes through the terminal. For proper battery connection, batteries MUST use ...
... technician. Invacare strongly recommends that battery installation and battery replacement always be used - NOTE: If there is tightened securely - Before reinstalling the existing or new battery(ies), clean the baking soda from the battery tray or battery(ies) being sure to the battery may occur...connected to the battery terminal(s)/post(s) as shown in FIGURE 11.3 otherwise damage to avoid contact with a cracked or otherwise damaged case. Part No 1141450 59 Pronto® M91™ with mounting holes through the terminal. For proper battery connection, batteries MUST use ...
Owners Manual
Page 60
... allow unobstructed access to the front of the battery tray. 6. Move aside the motor leads and controller cable to allow access to FIGURE 11.1 on page 61 and FIGURE 11.2 on page 36. 4. Pronto® M91™ with the rear battery. NOTE: Perform this procedure, refer to the... front of the battery tray. Using the battery retaining strap, secure the two batteries into the battery tray. 7. Reconnect RIGHT and LEFT motor leads to allow access ...
... allow unobstructed access to the front of the battery tray. 6. Move aside the motor leads and controller cable to allow access to FIGURE 11.1 on page 61 and FIGURE 11.2 on page 36. 4. Pronto® M91™ with the rear battery. NOTE: Perform this procedure, refer to the... front of the battery tray. Using the battery retaining strap, secure the two batteries into the battery tray. 7. Reconnect RIGHT and LEFT motor leads to allow access ...
Owners Manual
Page 61
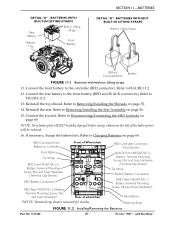
.... Refer to Removing/Installing the Shrouds on page 64. Retaining Strap FIGURE 11.2 Installing/Removing the Batteries Part No 1141450 61 Pronto® M91™ with /without Lifting straps 11. If necessary, charge the battery(ies). DETAIL "A" - BATTERIES WITHOUT BUILT-IN LIFTING STRAPS Battery Lifting Straps Battery Terminals/Posts Battery FIGURE 11.1 Batteries with SureStep® Connect the joystick.
.... Refer to Removing/Installing the Shrouds on page 64. Retaining Strap FIGURE 11.2 Installing/Removing the Batteries Part No 1141450 61 Pronto® M91™ with /without Lifting straps 11. If necessary, charge the battery(ies). DETAIL "A" - BATTERIES WITHOUT BUILT-IN LIFTING STRAPS Battery Lifting Straps Battery Terminals/Posts Battery FIGURE 11.1 Batteries with SureStep® Connect the joystick.
Owners Manual
Page 62
...) and one of the following to remove the battery from the battery tray: • Batteries With Built‐in Lifting Strap‐ Use built in lifting strap to the front of FIGURE 11.1). Pronto® M91™ with the POSITIVE (+) RED battery cable and mounting screw connected. SECTION 11-BATTERIES Removing 1. If necessary, disconnect right and left...
...) and one of the following to remove the battery from the battery tray: • Batteries With Built‐in Lifting Strap‐ Use built in lifting strap to the front of FIGURE 11.1). Pronto® M91™ with the POSITIVE (+) RED battery cable and mounting screw connected. SECTION 11-BATTERIES Removing 1. If necessary, disconnect right and left...

Owners Manual
Page 63
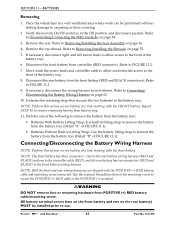
.... 7. Using new tie‐wraps, secure the terminal covers to the battery terminals as shown in FIGURE 11.3. 4. Part No 1141450 63 Pronto® M91™ with Fuse Hardware Tie-Wrap Locknut FIGURE 11.3 Tie-Wrap Battery POSITIVE (+) Battery Terminal Connecting/Disconnecting the Battery Wiring Harness Disconnecting NOTE: For this procedure, refer to FIGURE 11.3 on...
.... 7. Using new tie‐wraps, secure the terminal covers to the battery terminals as shown in FIGURE 11.3. 4. Part No 1141450 63 Pronto® M91™ with Fuse Hardware Tie-Wrap Locknut FIGURE 11.3 Tie-Wrap Battery POSITIVE (+) Battery Terminal Connecting/Disconnecting the Battery Wiring Harness Disconnecting NOTE: For this procedure, refer to FIGURE 11.3 on...

Owners Manual
Page 64
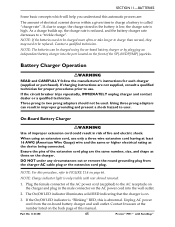
... be used. Plan to recharge the batteries when the wheelchair is outside. READ and CAREFULLY follow the manufactures instructions for proper procedures prior to the POSITIVE (+) battery terminal/post as shown in FIGURE 11.3. 5. Pronto® M91™ with SureStep® 64 Part... No 1141450 Peel back BLACK battery terminal cover from BLACK battery cable on -board battery charger AND an independent battery charger (plugged into the joystick ...
... be used. Plan to recharge the batteries when the wheelchair is outside. READ and CAREFULLY follow the manufactures instructions for proper procedures prior to the POSITIVE (+) battery terminal/post as shown in FIGURE 11.3. 5. Pronto® M91™ with SureStep® 64 Part... No 1141450 Peel back BLACK battery terminal cover from BLACK battery cable on -board battery charger AND an independent battery charger (plugged into the joystick ...
Owners Manual
Page 65
... more often or take longer to charge than normal, they may need to charge a battery is "Blinking" RED, this manual. NOTE: Charge indicator light is on page 66. Contact Invacare at least 16 AWG (American Wire Gauge) wire and the same or higher electrical rating...indicator illuminates solid RED indicating that the charger is only visible with SureStep® Part No 1141450 65 Pronto® M91™ with rear shroud removed. 1. SECTION 11-BATTERIES Some basic concepts which will help you understand this automatic process are: The amount of electrical current drawn...
... more often or take longer to charge than normal, they may need to charge a battery is "Blinking" RED, this manual. NOTE: Charge indicator light is on page 66. Contact Invacare at least 16 AWG (American Wire Gauge) wire and the same or higher electrical rating...indicator illuminates solid RED indicating that the charger is only visible with SureStep® Part No 1141450 65 Pronto® M91™ with rear shroud removed. 1. SECTION 11-BATTERIES Some basic concepts which will help you understand this automatic process are: The amount of electrical current drawn...


