

Integration Guide
Page 2
... mises a jour de BIOS, accedez a : http://downloadcenter.intel.com. One Liste getesteter Speichermodule finden Sie unter: http://www.intel.com/NUCSupport. M:IRAR.*IJUBMVI 2, 3.1M http://www.intel.com/support/tw/motherboards/desktop/sb/CS-O34O57.htm. : I4HcIpopmaqmo no ...*!fflLt < V. Per scaricare i driver piu recenti e gli aggiornamenti del BIOS, andare all 'indirizzo: http://www.intel.com/support/it . ;XO URL l.t < http://www.intel.com/NUCSupport. CrIlrICOK TeCTIVOBaHHbIX nnaHoK naMATH MO)KHO H TM 3Recb: http://www.inteLcom/NUCSupport. Para obter uma lista ...
... mises a jour de BIOS, accedez a : http://downloadcenter.intel.com. One Liste getesteter Speichermodule finden Sie unter: http://www.intel.com/NUCSupport. M:IRAR.*IJUBMVI 2, 3.1M http://www.intel.com/support/tw/motherboards/desktop/sb/CS-O34O57.htm. : I4HcIpopmaqmo no ...*!fflLt < V. Per scaricare i driver piu recenti e gli aggiornamenti del BIOS, andare all 'indirizzo: http://www.intel.com/support/it . ;XO URL l.t < http://www.intel.com/NUCSupport. CrIlrICOK TeCTIVOBaHHbIX nnaHoK naMATH MO)KHO H TM 3Recb: http://www.inteLcom/NUCSupport. Para obter uma lista ...
User Guide
Page 3
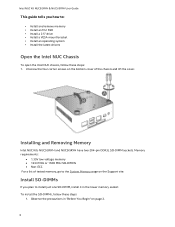
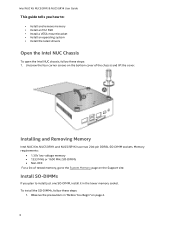
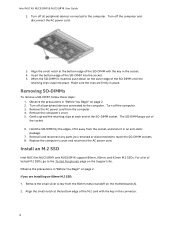
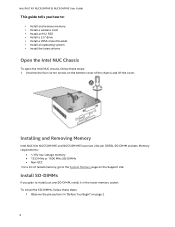
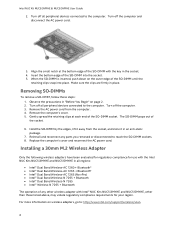
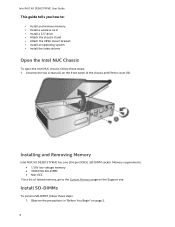
...8226; Install a 2.5" drive • Install a VESA mount bracket • Install an operating system • Install the latest drivers Open the Intel NUC Chassis To open the Intel NUC chassis, follow these steps: 1. To install the SO-DIMMs, follow these steps: 1. Unscrew the four corner screws on the bottom cover ...of tested memory, go to the System Memory page on the Support site: Install SO-DIMMs If you how to ...
...8226; Install a 2.5" drive • Install a VESA mount bracket • Install an operating system • Install the latest drivers Open the Intel NUC Chassis To open the Intel NUC chassis, follow these steps: 1. To install the SO-DIMMs, follow these steps: 1. Unscrew the four corner screws on the bottom cover ...of tested memory, go to the System Memory page on the Support site: Install SO-DIMMs If you how to ...
User Guide
Page 4
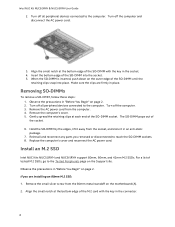
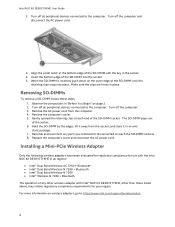
...SSDs, go to the computer. Remove the small silver screw from the 80mm metal standoff on the Support site. Align the small notch at the bottom edge of the SO-DIMM with the key in the... SO-DIMM by the edges, lift it away from the computer. 4. Install an M.2 SSD Intel NUC Kits NUC5i3RYH and NUC5i5RYH support 80mm, 60mm, and 42mm M.2 SSDs. Align the small notch at each end of the socket...When the SO-DIMM is inserted, push down on the outer edge of the SO-DIMM into place. Intel NUC Kit NUC5i3RYH & NUC5i5RYH User Guide 2. Turn off the computer. 3. Gently spread the retaining clips ...
...SSDs, go to the computer. Remove the small silver screw from the 80mm metal standoff on the Support site. Align the small notch at the bottom edge of the SO-DIMM with the key in the... SO-DIMM by the edges, lift it away from the computer. 4. Install an M.2 SSD Intel NUC Kits NUC5i3RYH and NUC5i5RYH support 80mm, 60mm, and 42mm M.2 SSDs. Align the small notch at each end of the socket...When the SO-DIMM is inserted, push down on the outer edge of the SO-DIMM into place. Intel NUC Kit NUC5i3RYH & NUC5i5RYH User Guide 2. Turn off the computer. 3. Gently spread the retaining clips ...

User Guide
Page 5
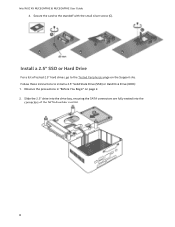
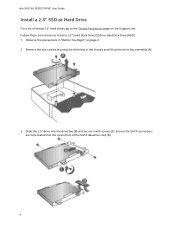
Intel NUC Kit NUC5i3RYH & NUC5i5RYH User Guide 3. Insert the bottom edge of the M.2 card with the key in "Before You Begin" on the motherboard (A). 2. Observe the ... the bottom edge of the M.2 card into the connector (D). 5. Insert the bottom edge of tested 2.5" hard drives, go to the Tested Peripherals page on the Support site. Install a 2.5" SSD or Hard Drive For a list of the M.2 card into the connector (B). 4. If you are installing a 60mm or 42mm M.2 SSD: 1. Remove the small...
Intel NUC Kit NUC5i3RYH & NUC5i5RYH User Guide 3. Insert the bottom edge of the M.2 card with the key in "Before You Begin" on the motherboard (A). 2. Observe the ... the bottom edge of the M.2 card into the connector (D). 5. Insert the bottom edge of tested 2.5" hard drives, go to the Tested Peripherals page on the Support site. Install a 2.5" SSD or Hard Drive For a list of the M.2 card into the connector (B). 4. If you are installing a 60mm or 42mm M.2 SSD: 1. Remove the small...

User Guide
Page 8
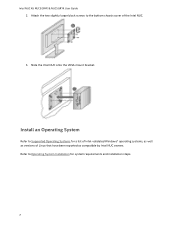
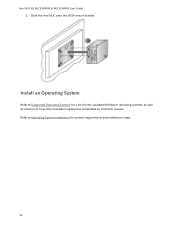
Refer to Operating System Installation for a list of Intel-validated Windows* operating systems, as well as versions of the Intel NUC. 3. Install an Operating System Refer to the bottom chassis cover of Linux that have been reported as compatible by Intel NUC owners. Attach the two slightly larger black screws to Supported Operating Systems for system requirements and installation steps. 8 Slide the Intel NUC onto the VESA mount bracket. Intel NUC Kit NUC5i3RYH & NUC5i5RYH User Guide 2.
Refer to Operating System Installation for a list of Intel-validated Windows* operating systems, as well as versions of the Intel NUC. 3. Install an Operating System Refer to the bottom chassis cover of Linux that have been reported as compatible by Intel NUC owners. Attach the two slightly larger black screws to Supported Operating Systems for system requirements and installation steps. 8 Slide the Intel NUC onto the VESA mount bracket. Intel NUC Kit NUC5i3RYH & NUC5i5RYH User Guide 2.
Integration Guide
Page 2
...lista das unidades de estado solid° testadas, acesse: http://www.intel.com/NUCSupport. : For information regarding regulatory compliance, go to : http://www.intel.com/NUCSupport. -iwz http://www.intel.com/support/cn/motherboards/desktop/sb/CS-034057.htm. Per informazioni relative alla conformita ...htm. Para obtener information sobre el cumplimiento de normativas, visite: http://www.intel.com/support/sp/motherboards/desktop/sb/CS-O34O57.htm. Informationen zu den gesetzlichen Bestimmungen finden Sie unter: http://www.intel.com/support/de/motherboards/desktop/sb/CS-034057.htm. AM7 %15 4 7 A...
...lista das unidades de estado solid° testadas, acesse: http://www.intel.com/NUCSupport. : For information regarding regulatory compliance, go to : http://www.intel.com/NUCSupport. -iwz http://www.intel.com/support/cn/motherboards/desktop/sb/CS-034057.htm. Per informazioni relative alla conformita ...htm. Para obtener information sobre el cumplimiento de normativas, visite: http://www.intel.com/support/sp/motherboards/desktop/sb/CS-O34O57.htm. Informationen zu den gesetzlichen Bestimmungen finden Sie unter: http://www.intel.com/support/de/motherboards/desktop/sb/CS-034057.htm. AM7 %15 4 7 A...
User Guide
Page 3
... NUC5i5RYK have two 204-pin DDR3L SO-DIMM sockets. Observe the precautions in the lower memory socket. To install the SO-DIMMs, follow these steps: 1. Intel NUC Kit NUC5i3RYK & NUC5i5RYK User Guide This guide tells you plan to install just one SO-DIMM, install it in "Before You Begin" on the... Support site: Install SO-DIMMs If you how to the System Memory page on page 2. 3 Memory requirements: 1.35V low voltage memory 1333 MHz or ...
... NUC5i5RYK have two 204-pin DDR3L SO-DIMM sockets. Observe the precautions in the lower memory socket. To install the SO-DIMMs, follow these steps: 1. Intel NUC Kit NUC5i3RYK & NUC5i5RYK User Guide This guide tells you plan to install just one SO-DIMM, install it in "Before You Begin" on the... Support site: Install SO-DIMMs If you how to the System Memory page on page 2. 3 Memory requirements: 1.35V low voltage memory 1333 MHz or ...
User Guide
Page 4
...socket, and store it in place. Reinstall and reconnect any parts you are firmly in an anti-static package. 7. Install an M.2 SSD Intel NUC Kits NUC5i3RYK and NUC5i5RYK support 80mm, 60mm, and 42mm M.2 SSDs. Remove the small silver screw from the computer. 4. Insert the bottom edge of the SO-DIMM ...of the SO-DIMM into place. Gently spread the retaining clips at the bottom edge of the SO-DIMM with the key in the socket. 4. Intel NUC Kit NUC5i3RYK & NUC5i5RYK User Guide 2. Turn off all peripheral devices connected to the computer. When the SO-DIMM is inserted, push down ...
...socket, and store it in place. Reinstall and reconnect any parts you are firmly in an anti-static package. 7. Install an M.2 SSD Intel NUC Kits NUC5i3RYK and NUC5i5RYK support 80mm, 60mm, and 42mm M.2 SSDs. Remove the small silver screw from the computer. 4. Insert the bottom edge of the SO-DIMM ...of the SO-DIMM into place. Gently spread the retaining clips at the bottom edge of the SO-DIMM with the key in the socket. 4. Intel NUC Kit NUC5i3RYK & NUC5i5RYK User Guide 2. Turn off all peripheral devices connected to the computer. When the SO-DIMM is inserted, push down ...
User Guide
Page 7
Attach the two slightly larger black screws to Supported Operating Systems for system requirements and installation steps. 7 Refer to Operating System Installation for a list of Intel-validated Windows* operating systems, as well as versions of the Intel NUC. 3. Install an Operating System Refer to the bottom chassis cover of Linux that have been reported as compatible by Intel NUC owners. Intel NUC Kit NUC5i3RYK & NUC5i5RYK User Guide 2. Slide the Intel NUC onto the VESA mount bracket.
Attach the two slightly larger black screws to Supported Operating Systems for system requirements and installation steps. 7 Refer to Operating System Installation for a list of Intel-validated Windows* operating systems, as well as versions of the Intel NUC. 3. Install an Operating System Refer to the bottom chassis cover of Linux that have been reported as compatible by Intel NUC owners. Intel NUC Kit NUC5i3RYK & NUC5i5RYK User Guide 2. Slide the Intel NUC onto the VESA mount bracket.
User Guide
Page 3
To install the SO-DIMMs, follow these steps: 1. Installing and Removing Memory Intel NUC Kits NUC5i3MYHE and NUC5i5MYHE have two 204-pin DDR3L SO-DIMM sockets. Unscrew the four corner screws on the bottom cover of tested memory, go to the System Memory ... chassis and lift the cover. Observe the precautions in the lower memory socket. Intel NUC Kit NUC5i3MYHE & NUC5i5MYHE User Guide This guide tells you plan to install just one SO-DIMM, install it in "Before You Begin" on the Support site: Install SO-DIMMs If you how to: • Install and remove memory...
To install the SO-DIMMs, follow these steps: 1. Installing and Removing Memory Intel NUC Kits NUC5i3MYHE and NUC5i5MYHE have two 204-pin DDR3L SO-DIMM sockets. Unscrew the four corner screws on the bottom cover of tested memory, go to the System Memory ... chassis and lift the cover. Observe the precautions in the lower memory socket. Intel NUC Kit NUC5i3MYHE & NUC5i5MYHE User Guide This guide tells you plan to install just one SO-DIMM, install it in "Before You Begin" on the Support site: Install SO-DIMMs If you how to: • Install and remove memory...
User Guide
Page 4
... peripheral devices connected to : http://www.intel.com/support/wireless/wlan. 4 Reinstall and reconnect any other wireless adapter with the key in an anti-static package. 7. Observe the precautions in place. The SO-DIMM pops out of the SO-DIMM with Intel® NUC Kits NUC5i3MYHE and NUC5i5MYHE, other than those listed above, may...
... peripheral devices connected to : http://www.intel.com/support/wireless/wlan. 4 Reinstall and reconnect any other wireless adapter with the key in an anti-static package. 7. Observe the precautions in place. The SO-DIMM pops out of the SO-DIMM with Intel® NUC Kits NUC5i3MYHE and NUC5i5MYHE, other than those listed above, may...

User Guide
Page 7
...a list of tested M.2 SSDs, go to the connectors on the wireless card (E). Remove the standoff from the 80mm metal standoff on the Support site. If you are installing a 42mm M.2 SSD: 1. Attach the antenna leads to the Tested Peripherals page on the motherboard (A). 2. ...at the bottom edge of the M.2 card with the key in "Before You Begin" on the motherboard (A). 2. Intel NUC Kit NUC5i3MYHE & NUC5i5MYHE User Guide 8. Install an M.2 SSD Intel NUC Kits NUC5i3MYHE and NUC5i5MYHE support 80mm and 42mm M.2 SSDs. Secure the card to the standoff with the small silver screw (D).
...a list of tested M.2 SSDs, go to the connectors on the wireless card (E). Remove the standoff from the 80mm metal standoff on the Support site. If you are installing a 42mm M.2 SSD: 1. Attach the antenna leads to the Tested Peripherals page on the motherboard (A). 2. ...at the bottom edge of the M.2 card with the key in "Before You Begin" on the motherboard (A). 2. Intel NUC Kit NUC5i3MYHE & NUC5i5MYHE User Guide 8. Install an M.2 SSD Intel NUC Kits NUC5i3MYHE and NUC5i5MYHE support 80mm and 42mm M.2 SSDs. Secure the card to the standoff with the small silver screw (D).
User Guide
Page 8
Intel NUC Kit NUC5i3MYHE & NUC5i5MYHE User Guide 4. Secure the card to install a 2.5" Solid State Drive (SSD) or Hard Disk Drive (HDD): 1. Install a 2.5" SSD or Hard Drive For a list of the SATA daughter card (A). 8 Follow these instructions to the standoff with the small silver screw (C). Slide the 2.5" drive into the drive bay, ensuring the SATA connectors are fully seated into the connectors of tested 2.5" hard drives, go to the Tested Peripherals page on page 2. 2. Observe the precautions in "Before You Begin" on the Support site.
Intel NUC Kit NUC5i3MYHE & NUC5i5MYHE User Guide 4. Secure the card to install a 2.5" Solid State Drive (SSD) or Hard Disk Drive (HDD): 1. Install a 2.5" SSD or Hard Drive For a list of the SATA daughter card (A). 8 Follow these instructions to the standoff with the small silver screw (C). Slide the 2.5" drive into the drive bay, ensuring the SATA connectors are fully seated into the connectors of tested 2.5" hard drives, go to the Tested Peripherals page on page 2. 2. Observe the precautions in "Before You Begin" on the Support site.
User Guide
Page 11
Refer to Supported Operating Systems for system requirements and installation steps. 11 Slide the Intel NUC onto the VESA mount bracket. Install an Operating System Refer to Operating System Installation for a list of Intel-validated Windows* operating systems, as well as versions of Linux that have been reported as compatible by Intel NUC owners. Intel NUC Kit NUC5i3MYHE & NUC5i5MYHE User Guide 3.
Refer to Supported Operating Systems for system requirements and installation steps. 11 Slide the Intel NUC onto the VESA mount bracket. Install an Operating System Refer to Operating System Installation for a list of Intel-validated Windows* operating systems, as well as versions of Linux that have been reported as compatible by Intel NUC owners. Intel NUC Kit NUC5i3MYHE & NUC5i5MYHE User Guide 3.

Integration Guide
Page 2
...un elenco delle memorie sottoposte a test, andare all 2 al ofi d Al 2: http://www.intel.com/support/kr/motherboards/desktop/sb/CS-034057.htm. Al-g-5 VJ-V- A Wycie z urzezeniem Intel' DE3815TYKE dowolnej innej karty sieci bezprzewodowej ni2 wymieniona powyiej mote spowodowat naruszenie zgodnotci z przepisami w danym ... evaluated for regulatory compliance for your region. Informationen zu den gesetzlichen Bestimmungen finden Sie unter: http://www.intel.com/support/de/motherboards/desktop/sb/CS-034057.htm. Per ulteriori informazioni sugli adattatori wireless, andare all regions: &#...
...un elenco delle memorie sottoposte a test, andare all 2 al ofi d Al 2: http://www.intel.com/support/kr/motherboards/desktop/sb/CS-034057.htm. Al-g-5 VJ-V- A Wycie z urzezeniem Intel' DE3815TYKE dowolnej innej karty sieci bezprzewodowej ni2 wymieniona powyiej mote spowodowat naruszenie zgodnotci z przepisami w danym ... evaluated for regulatory compliance for your region. Informationen zu den gesetzlichen Bestimmungen finden Sie unter: http://www.intel.com/support/de/motherboards/desktop/sb/CS-034057.htm. Per ulteriori informazioni sugli adattatori wireless, andare all regions: &#...
User Guide
Page 3
Unscrew the two screws (A) on the Support site. Memory requirements: 1.35V low voltage memory 1066 MHz SO-DIMM Non-ECC For a list of tested memory, go to : • Install ...; Install a 2.5" drive • Attach the chassis stand • Attach the VESA mount bracket • Install an operating system • Install the latest drivers Open the Intel NUC Chassis To open the Intel NUC chassis, follow these steps: 1. Install SO-DIMMs To install a SO-DIMM, follow these steps: 1. Installing and Removing Memory...
Unscrew the two screws (A) on the Support site. Memory requirements: 1.35V low voltage memory 1066 MHz SO-DIMM Non-ECC For a list of tested memory, go to : • Install ...; Install a 2.5" drive • Attach the chassis stand • Attach the VESA mount bracket • Install an operating system • Install the latest drivers Open the Intel NUC Chassis To open the Intel NUC chassis, follow these steps: 1. Install SO-DIMMs To install a SO-DIMM, follow these steps: 1. Installing and Removing Memory...
User Guide
Page 4
... away from the computer. 4. For more information on the outer edge of any parts you removed or disconnected to : http://www.intel.com/support/wireless/wlan. 4 Align the small notch at each end of the socket. 6. Turn off all regions: ...; Intel® Dual Band Wireless-AC 7260 + Bluetooth* Intel® Dual Band Wireless-N 7260 + Bluetooth Intel® Dual Band Wireless-N 7260 Intel® Wireless-N 7260 + Bluetooth The operation of...
... away from the computer. 4. For more information on the outer edge of any parts you removed or disconnected to : http://www.intel.com/support/wireless/wlan. 4 Align the small notch at each end of the socket. 6. Turn off all regions: ...; Intel® Dual Band Wireless-AC 7260 + Bluetooth* Intel® Dual Band Wireless-N 7260 + Bluetooth Intel® Dual Band Wireless-N 7260 Intel® Wireless-N 7260 + Bluetooth The operation of...
User Guide
Page 7
... drive bay assembly (A). 3. Slide the 2.5" drive into the connectors of tested 2.5" hard drives, go to install a 2.5" Solid State Drive (SSD) or Hard Disk Drive (HDD): 1. Intel NUC Kit DE3815TYKHE User Guide Install a 2.5" SSD or Hard Drive For a list of the SATA daughter card (D). 7 Remove the two screws securing the drive bay...
... drive bay assembly (A). 3. Slide the 2.5" drive into the connectors of tested 2.5" hard drives, go to install a 2.5" Solid State Drive (SSD) or Hard Disk Drive (HDD): 1. Intel NUC Kit DE3815TYKHE User Guide Install a 2.5" SSD or Hard Drive For a list of the SATA daughter card (D). 7 Remove the two screws securing the drive bay...

User Guide
Page 10
Intel NUC Kit DE3815TYKHE User Guide 2. Install an Operating System Refer to Supported Operating Systems for system requirements and installation steps. 10 Attach the two slightly larger black screws to Operating System Installation for a list of Intel-validated Windows* operating systems, as well as compatible by Intel NUC owners. Refer to the bottom chassis cover of Linux that have been reported as versions of the Intel NUC. 3. Slide the Intel NUC onto the VESA mount bracket.
Intel NUC Kit DE3815TYKHE User Guide 2. Install an Operating System Refer to Supported Operating Systems for system requirements and installation steps. 10 Attach the two slightly larger black screws to Operating System Installation for a list of Intel-validated Windows* operating systems, as well as compatible by Intel NUC owners. Refer to the bottom chassis cover of Linux that have been reported as versions of the Intel NUC. 3. Slide the Intel NUC onto the VESA mount bracket.

Integration Guide
Page 2
... relative alla conformite normative, andare all 'indirizzo: http://www.intel.com/support/it /motherboards/desktop/sb/CS-034057.htm. Support nomermuca Asistencia Assistance Support Supporto itt - Via - 't URL *f IN L Z < http://www.intel.com/jp/support/motherboards/desktop/sb/CS-034057.htm. F V)14113EgMEI RgilRAllalBEg5t A... B3pbIBy. Axicymynn-roped c..nep,yer no agan-repam 6ecnpoeogHorn CBA3H MO)KHO HaRTH agecb: http://www.intel.com/support/wireless/wlan. Las baterfas usadas se deben desechar de acuerdo con las normativas medloamblentales locales. FCC Declaration ...
... relative alla conformite normative, andare all 'indirizzo: http://www.intel.com/support/it /motherboards/desktop/sb/CS-034057.htm. Support nomermuca Asistencia Assistance Support Supporto itt - Via - 't URL *f IN L Z < http://www.intel.com/jp/support/motherboards/desktop/sb/CS-034057.htm. F V)14113EgMEI RgilRAllalBEg5t A... B3pbIBy. Axicymynn-roped c..nep,yer no agan-repam 6ecnpoeogHorn CBA3H MO)KHO HaRTH agecb: http://www.intel.com/support/wireless/wlan. Las baterfas usadas se deben desechar de acuerdo con las normativas medloamblentales locales. FCC Declaration ...


