Quick Setup Guide (English)
Page 4
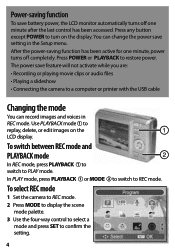
... Setup menu. To switch between REC mode and PLAYBACK mode In REC mode, press PLAYBACK to switch to confirm the setting. Press POWER or PLAYBACK to REC mode. 4 Power-saving function To save setting in REC mode. The power save feature will not activate while you are: • Recording or playing movie clips or audio files • Playing a slideshow • Connecting the camera to a computer or printer with the USB cable Changing the mode You can change the power save battery power, the LCD monitor automatically turns off completely. Use PLAYBACK mode to turn...
... Setup menu. To switch between REC mode and PLAYBACK mode In REC mode, press PLAYBACK to switch to confirm the setting. Press POWER or PLAYBACK to REC mode. 4 Power-saving function To save setting in REC mode. The power save feature will not activate while you are: • Recording or playing movie clips or audio files • Playing a slideshow • Connecting the camera to a computer or printer with the USB cable Changing the mode You can change the power save battery power, the LCD monitor automatically turns off completely. Use PLAYBACK mode to turn...
Quick Setup Guide (English)
Page 7
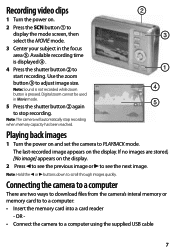
... the mode screen, then select the MOVIE mode. 3 Center your subject in Movie mode. 5 Press the shutter button again to stop recording when memory capacity has been reached. Use the zoom button to a computer using the supplied USB cable 7 Digital zoom cannot be used in the focus area . Note: The camera will automatically stop recording. OR • Connect the camera to adjust image size. Available recording time is pressed. Note: Sound is not recorded while zoom button is displayed . 4 Press the shutter button to start recording. Playing back images 1 Turn the power...
... the mode screen, then select the MOVIE mode. 3 Center your subject in Movie mode. 5 Press the shutter button again to stop recording when memory capacity has been reached. Use the zoom button to a computer using the supplied USB cable 7 Digital zoom cannot be used in the focus area . Note: The camera will automatically stop recording. OR • Connect the camera to adjust image size. Available recording time is pressed. Note: Sound is not recorded while zoom button is displayed . 4 Press the shutter button to start recording. Playing back images 1 Turn the power...
User Manual (English)
Page 3
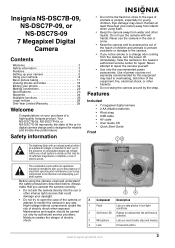
... flash too close to alert you notice smoke or a strange odor coming from infants when using the camera, read and understand the safety precautions described below. Insignia NS-DSC7B-09, NS-DSC7P-09, or NS-DSC7S-09 7 Megapixel Digital Camera Contents Welcome 3 Safety information 3 Features 3 Setting up your camera 5 Using your camera 8 Basic picture taking 11 Viewing photos and video 18 Editing your photos 19 Making connections 22 Specifications 23 Appendix 24 Available functions...
... flash too close to alert you notice smoke or a strange odor coming from infants when using the camera, read and understand the safety precautions described below. Insignia NS-DSC7B-09, NS-DSC7P-09, or NS-DSC7S-09 7 Megapixel Digital Camera Contents Welcome 3 Safety information 3 Features 3 Setting up your camera 5 Using your camera 8 Basic picture taking 11 Viewing photos and video 18 Editing your photos 19 Making connections 22 Specifications 23 Appendix 24 Available functions...

User Manual (English)
Page 4
... photos. 2 Playback button Press to view the photos you have taken. 3 Menu button Press to open the mode palette, from which you can select a scene mode. 10 ASM button Press to set the ASM (Aperture, Shutter, Manual Exposure) mode. # Button 1 Speaker 2 Power button 3 Shutter button 4 Strap ring 5 USB/AV jack 6 Battery cover 7 Tripod socket Description Lets you hear audio clips and memos recorded on the camera. In menu mode, press to confirm your settings. 7 Macro button Press to enable shooting close-up photos. 8 LCD Use...
... photos. 2 Playback button Press to view the photos you have taken. 3 Menu button Press to open the mode palette, from which you can select a scene mode. 10 ASM button Press to set the ASM (Aperture, Shutter, Manual Exposure) mode. # Button 1 Speaker 2 Power button 3 Shutter button 4 Strap ring 5 USB/AV jack 6 Battery cover 7 Tripod socket Description Lets you hear audio clips and memos recorded on the camera. In menu mode, press to confirm your settings. 7 Macro button Press to enable shooting close-up photos. 8 LCD Use...

User Manual (English)
Page 6
... SET. To set the date and time: 1 Turn the power on the LCD monitor. 3 Press , , , or to select SETUP , then press SET. The initial menu is displayed on . 2 Press PLAY, then press MENU. The initial menu is displayed on page 18 to add a date stamp to your photos. 6 Repeat Step 4 for all settings, then press SET or MENU to the next setting. Insignia NS-DSC7B-09, NS-DSC7P-09, or NS-DSC7S-09 7 Megapixel Digital Camera Making initial settings When using the camera...
... SET. To set the date and time: 1 Turn the power on the LCD monitor. 3 Press , , , or to select SETUP , then press SET. The initial menu is displayed on . 2 Press PLAY, then press MENU. The initial menu is displayed on page 18 to add a date stamp to your photos. 6 Repeat Step 4 for all settings, then press SET or MENU to the next setting. Insignia NS-DSC7B-09, NS-DSC7P-09, or NS-DSC7S-09 7 Megapixel Digital Camera Making initial settings When using the camera...
User Manual (English)
Page 7
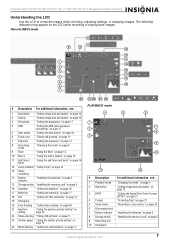
... Shutter speed "Using the shutter priority setting" on page 15 24 White balance "Setting the white balance" on page 17 PLAYBACK mode # Description For additional information, see... 1 Playback mode "Changing the mode" on page 9 2 Resolution "Setting image size and quality" on page 12 3 DPOF "Setting the Digital Print Order Format (DPOF)" on page 21 4 Protect "Protecting files" on page 21 5 Voice memo "Recording a voice memo" on page 16 6 File number/total 7 Battery indicator "Installing the batteries" on page 5 8 Storage media "Installing the memory card" on the LCD...
... Shutter speed "Using the shutter priority setting" on page 15 24 White balance "Setting the white balance" on page 17 PLAYBACK mode # Description For additional information, see... 1 Playback mode "Changing the mode" on page 9 2 Resolution "Setting image size and quality" on page 12 3 DPOF "Setting the Digital Print Order Format (DPOF)" on page 21 4 Protect "Protecting files" on page 21 5 Voice memo "Recording a voice memo" on page 16 6 File number/total 7 Battery indicator "Installing the batteries" on page 5 8 Storage media "Installing the memory card" on the LCD...
User Manual (English)
Page 8
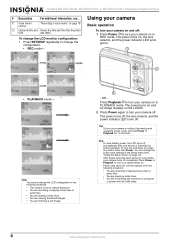
... the power indicator LED turns green. • PLAYBACK mode- Tips To turn your camera on in the following situations: • You are recording or playing movie clips or audio files. • You are playing a slide show . • You are viewing thumbnail images. • You are connecting the camera to a computer or printer with the USB cable. 8 www.insignia-products.com OR - The power turns on , press any button other than Power. Using your camera Basic operation To turn your camera...
... the power indicator LED turns green. • PLAYBACK mode- Tips To turn your camera on in the following situations: • You are recording or playing movie clips or audio files. • You are playing a slide show . • You are viewing thumbnail images. • You are connecting the camera to a computer or printer with the USB cable. 8 www.insignia-products.com OR - The power turns on , press any button other than Power. Using your camera Basic operation To turn your camera...

User Manual (English)
Page 9
... set it to record mode. 2 Press the ASM button to toggle between modes: • In REC mode, press Playback to switch to playback mode. • In playback mode, press Playback or Mode to switch to replay, delete, or edit images on the LCD monitor. Slows the shutter speed to help capture the subject's smile. Increases black and white contrast. 3 Press , , , or to select the scene mode you use the playback mode to record mode. Selecting the ASM (Aperture Priority, Shutter Priority, Manual Exposure) mode...
... set it to record mode. 2 Press the ASM button to toggle between modes: • In REC mode, press Playback to switch to playback mode. • In playback mode, press Playback or Mode to switch to replay, delete, or edit images on the LCD monitor. Slows the shutter speed to help capture the subject's smile. Increases black and white contrast. 3 Press , , , or to select the scene mode you use the playback mode to record mode. Selecting the ASM (Aperture Priority, Shutter Priority, Manual Exposure) mode...
User Manual (English)
Page 10
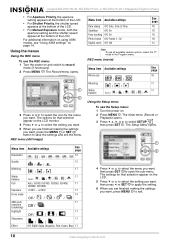
... menu To use the Setup menu: 1 Turn the power on the LCD monitor. 4 Press or to exit. REC menu (movie) Menu item Available settings Movie size See page 16 Metering 17 White 17 balance 3 Press or to select SETUP , then press SET . For additional information on page 14. The Setup Menu opens. The Record menu opens. The initial menu (Record or Playback) opens. 3 Press , , , or to select the icon for that selection appear on . 2 Press MENU . Menu item Available settings Date stamp Off, Date, Date & Time...
... menu To use the Setup menu: 1 Turn the power on the LCD monitor. 4 Press or to exit. REC menu (movie) Menu item Available settings Movie size See page 16 Metering 17 White 17 balance 3 Press or to select SETUP , then press SET . For additional information on page 14. The Setup Menu opens. The Record menu opens. The initial menu (Record or Playback) opens. 3 Press , , , or to select the icon for that selection appear on . 2 Press MENU . Menu item Available settings Date stamp Off, Date, Date & Time...

User Manual (English)
Page 11
.... If the shutter speed is completed. To avoid a blurred photo, use a tripod to focus the image. A "COMPLETED" message displays when the formatting is too slow, the image may be blurred. The focus area turns green when in record mode. Insignia NS-DSC7B-09, NS-DSC7P-09, or NS-DSC7S-09 7 Megapixel Digital Camera Setup menu Menu item Sounds Auto Review Power Save Date & Time Language File No. Image Format Available settings Lets you set the date and time. Resetting the file number is idle before formatting. Lets you set the USB mode to connect the camera to a printer or...
.... If the shutter speed is completed. To avoid a blurred photo, use a tripod to focus the image. A "COMPLETED" message displays when the formatting is too slow, the image may be blurred. The focus area turns green when in record mode. Insignia NS-DSC7B-09, NS-DSC7P-09, or NS-DSC7S-09 7 Megapixel Digital Camera Setup menu Menu item Sounds Auto Review Power Save Date & Time Language File No. Image Format Available settings Lets you set the date and time. Resetting the file number is idle before formatting. Lets you set the USB mode to connect the camera to a printer or...
User Manual (English)
Page 12
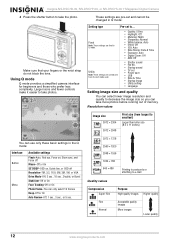
... the lens. Fixed Note: These settings are fixed in Q mode: Setting type Pre-set to... Insignia NS-DSC7B-09, NS-DSC7P-09, or NS-DSC7S-09 7 Megapixel Digital Camera 4 Press the shutter button to take photos. Resolution values Image size 3072 × 2304 3072 × 2048 Print size (from the last mode used. • Quality: S.Fine • Highlight: Off • Metering: Multi • Sharpness: Normal • White balance: Auto • Effect: Off • ISO: Auto • Date Stamp: Date & Time • Exposure: Auto • Digital Zoom: Off...
... the lens. Fixed Note: These settings are fixed in Q mode: Setting type Pre-set to... Insignia NS-DSC7B-09, NS-DSC7P-09, or NS-DSC7S-09 7 Megapixel Digital Camera 4 Press the shutter button to take photos. Resolution values Image size 3072 × 2304 3072 × 2048 Print size (from the last mode used. • Quality: S.Fine • Highlight: Off • Metering: Multi • Sharpness: Normal • White balance: Auto • Effect: Off • ISO: Auto • Date Stamp: Date & Time • Exposure: Auto • Digital Zoom: Off...
User Manual (English)
Page 13
The digital zoom uses a software process. Press the T again the camera switches to compose the photo on the LCD. Slow sync-Flash fires with a slow shutter speed. The optical zoom mechanically adjusts the lens of an image through the various flash modes. When the zoom button is pressed, the flash icon changes. The flash does not activate when taking photos not only for a wide-angle shot. The power turns on, the lens extends, and the power indicator LED turns green. 2 Press the zoom button to digital zoom automatically...
The digital zoom uses a software process. Press the T again the camera switches to compose the photo on the LCD. Slow sync-Flash fires with a slow shutter speed. The optical zoom mechanically adjusts the lens of an image through the various flash modes. When the zoom button is pressed, the flash icon changes. The flash does not activate when taking photos not only for a wide-angle shot. The power turns on, the lens extends, and the power indicator LED turns green. 2 Press the zoom button to digital zoom automatically...

User Manual (English)
Page 14
... the macro button again to exit macro mode. 3 Press the shutter button to enter macro mode. Note When using the self-timer, make sure that lets you focus on , the lens extends, and the power indicator LED turns green. 2 Press the macro button to take the photo. Insignia NS-DSC7B-09, NS-DSC7P-09, or NS-DSC7S-09 7 Megapixel Digital Camera Using the macro feature Your camera is equipped with a macro feature that you use a tripod or place the digital camera on in record mode. The power turns on very...
... the macro button again to exit macro mode. 3 Press the shutter button to enter macro mode. Note When using the self-timer, make sure that lets you focus on , the lens extends, and the power indicator LED turns green. 2 Press the macro button to take the photo. Insignia NS-DSC7B-09, NS-DSC7P-09, or NS-DSC7S-09 7 Megapixel Digital Camera Using the macro feature Your camera is equipped with a macro feature that you use a tripod or place the digital camera on in record mode. The power turns on very...

User Manual (English)
Page 15
... power indicator LED turns green. 2 Press the ASM button to toggle between ASM modes. Insignia NS-DSC7B-09, NS-DSC7P-09, or NS-DSC7S-09 7 Megapixel Digital Camera 2 Press the ASM button to toggle between the standard exposure and the selected exposure appears in red. Note The larger the aperture value, the smaller the lens opening, allowing less light to select the aperture setting you shoot without a flash in record mode. Faster shutter speeds let you take movie clips: 1 Press Power to turn...
... power indicator LED turns green. 2 Press the ASM button to toggle between ASM modes. Insignia NS-DSC7B-09, NS-DSC7P-09, or NS-DSC7S-09 7 Megapixel Digital Camera 2 Press the ASM button to toggle between the standard exposure and the selected exposure appears in red. Note The larger the aperture value, the smaller the lens opening, allowing less light to select the aperture setting you shoot without a flash in record mode. Faster shutter speeds let you take movie clips: 1 Press Power to turn...
User Manual (English)
Page 16
... camera on , the lens extends, and the power indicator LED turns green. 2 Press the playback button to switch to playback mode. 3 Press or to select the still image to which you want to add a voice memo. You cannot delete only the voice memo. Setting the movie size 4 Press to start recording. 6 Press the zoom button to adjust the image size. The power turns on in Movie mode. The Playback menu opens. The mode palette opens. 3 Press , , , or to select the Voice REC icon...
... camera on , the lens extends, and the power indicator LED turns green. 2 Press the playback button to switch to playback mode. 3 Press or to select the still image to which you want to add a voice memo. You cannot delete only the voice memo. Setting the movie size 4 Press to start recording. 6 Press the zoom button to adjust the image size. The power turns on in Movie mode. The Playback menu opens. The mode palette opens. 3 Press , , , or to select the Voice REC icon...
User Manual (English)
Page 17
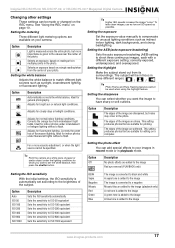
... 7 Megapixel Digital Camera Changing other settings These settings can select whether you want the image to have sharp or soft outlines. Ideal for editing on your images in record mode or in the photo. This setting produces photos that are available on a computer. Selects an exposure, based on page 10. To take clean images, use as low an ISO speed as sunlight, incandescent lighting, or fluorescent lighting. Adjusts for printing. Setting the AEB (auto exposure bracketing) Sets...
... 7 Megapixel Digital Camera Changing other settings These settings can select whether you want the image to have sharp or soft outlines. Ideal for editing on your images in record mode or in the photo. This setting produces photos that are available on a computer. Selects an exposure, based on page 10. To take clean images, use as low an ISO speed as sunlight, incandescent lighting, or fluorescent lighting. Adjusts for printing. Setting the AEB (auto exposure bracketing) Sets...
User Manual (English)
Page 18
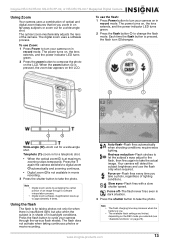
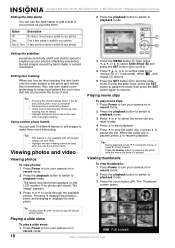
... use the a photo frame. Viewing photos and video Viewing photos To view photos: 1 Press Power to turn your camera on in record mode. 2 Press the playback button to switch to brighten up your camera on the LCD monitor. Tips During playback, press to rewind the movie, or press to playback mode. Insignia NS-DSC7B-09, NS-DSC7P-09, or NS-DSC7S-09 7 Megapixel Digital Camera Setting the date stamp You can add 10 different frames to still images to playback mode. If the AF area shows green, focus...
... use the a photo frame. Viewing photos and video Viewing photos To view photos: 1 Press Power to turn your camera on in record mode. 2 Press the playback button to switch to brighten up your camera on the LCD monitor. Tips During playback, press to rewind the movie, or press to playback mode. Insignia NS-DSC7B-09, NS-DSC7P-09, or NS-DSC7S-09 7 Megapixel Digital Camera Setting the date stamp You can add 10 different frames to still images to playback mode. If the AF area shows green, focus...

User Manual (English)
Page 19
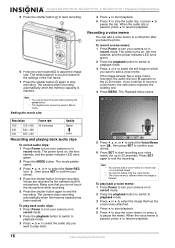
... in record mode. 2 Press the playback button to switch to playback mode. 3 Press or to select the photo you want , then press SET again to view the photo in the Thumbnail screen. Tip Resizing can decrease (not increase) the size of the photo is saved as a new file. OR - Copying, deleting, and protecting files Copying files You can protect or delete multiple photos in full screen. See "Editing your camera (see "Installing the memory card" on in record mode. 2 Press the playback button to switch to playback mode...
... in record mode. 2 Press the playback button to switch to playback mode. 3 Press or to select the photo you want , then press SET again to view the photo in the Thumbnail screen. Tip Resizing can decrease (not increase) the size of the photo is saved as a new file. OR - Copying, deleting, and protecting files Copying files You can protect or delete multiple photos in full screen. See "Editing your camera (see "Installing the memory card" on in record mode. 2 Press the playback button to switch to playback mode...
User Manual (English)
Page 21
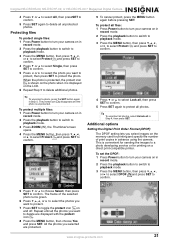
... to select Lock all unprotected photos. Additional options Setting the Digital Print Order Format (DPOF) The DPOF setting lets you selected are displayed with the protect icon . 8 Press the MENU button, then choose Yes and press SET. To protect multiple files: 1 Press Power button to turn your camera on in Step 4, then press SET. All the photos you select images on the LCD. 6 Repeat Step 5 to delete are protected. This is convenient for printing on a direct print-compatible printer. www.insignia-products...
... to select Lock all unprotected photos. Additional options Setting the Digital Print Order Format (DPOF) The DPOF setting lets you selected are displayed with the protect icon . 8 Press the MENU button, then choose Yes and press SET. To protect multiple files: 1 Press Power button to turn your camera on in Step 4, then press SET. All the photos you select images on the LCD. 6 Repeat Step 5 to delete are protected. This is convenient for printing on a direct print-compatible printer. www.insignia-products...
User Manual (English)
Page 23
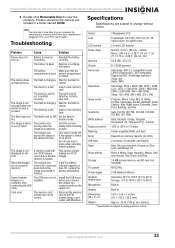
... recorded when the shutter button is full. This camera cannot display non-DCIF images. Specifications Specifications are located in .~3.28 ft. (40 cm~1m) Aperture f/2.8 (W) / f/5.2 (T) Shutter 8~1/2000 seconds File format Still Image: EXIF 2.2-compatible format (JPEG compression ), DCF compatible. Note You can also move files to view the contents. a photo. www.insignia-products.com 23 Folders stored on the LCD. Install a correctly. The flash is within 15 to charge. If the low battery indicator appears on . Card error The memory card format...
... recorded when the shutter button is full. This camera cannot display non-DCIF images. Specifications Specifications are located in .~3.28 ft. (40 cm~1m) Aperture f/2.8 (W) / f/5.2 (T) Shutter 8~1/2000 seconds File format Still Image: EXIF 2.2-compatible format (JPEG compression ), DCF compatible. Note You can also move files to view the contents. a photo. www.insignia-products.com 23 Folders stored on the LCD. Install a correctly. The flash is within 15 to charge. If the low battery indicator appears on . Card error The memory card format...


