
Quick Setup Guide (English)
Page 1
Package contents A/V cable USB cable Quick Start Guide 2 AA alkaline batteries CD with User Guide Wrist strap 1 Use this guide for more information. If you have questions, see your camera. Quick Start Guide NS-DSC7B09/NS-DSC7P09/NS-DSC7S09 Congratulations on your purchase of your User Guide for initial setup of a high-quality Insignia product. Your Insignia digital camera is designed for reliable and troublefree performance.
Package contents A/V cable USB cable Quick Start Guide 2 AA alkaline batteries CD with User Guide Wrist strap 1 Use this guide for more information. If you have questions, see your camera. Quick Start Guide NS-DSC7B09/NS-DSC7P09/NS-DSC7S09 Congratulations on your purchase of your User Guide for initial setup of a high-quality Insignia product. Your Insignia digital camera is designed for reliable and troublefree performance.

Quick Setup Guide (English)
Page 2
Getting to know your camera 1 Shutter button 2 Flash 3 Power button 4 Self-timer lamp 5 Speaker 6 USB/AV terminal 7 Microphone 8 Lens 9 Strap ring 10 Zoom button 11 Playback button 12 Menu button 13 Four-way control Flash button Macro button SET/DISP button 14 LCD screen 15 Power Indicator 16 ASM/Delete button 17 Mode button 18 Tripod socket 19 Battery and memory card cover Note: The memory card slot is located behind the battery cover, next to the battery compartment. 2
Getting to know your camera 1 Shutter button 2 Flash 3 Power button 4 Self-timer lamp 5 Speaker 6 USB/AV terminal 7 Microphone 8 Lens 9 Strap ring 10 Zoom button 11 Playback button 12 Menu button 13 Four-way control Flash button Macro button SET/DISP button 14 LCD screen 15 Power Indicator 16 ASM/Delete button 17 Mode button 18 Tripod socket 19 Battery and memory card cover Note: The memory card slot is located behind the battery cover, next to the battery compartment. 2

Quick Setup Guide (English)
Page 3
... direction indicated by sliding it . Pull the card out and close the battery cover. Turning the power on and off 1 Press POWER to turn the camera on the edge of the card and release it in . 3 Close the battery cover. Installing batteries 1 Open the battery cover by the arrow. 2 ... positive (+) and negative (-) terminals matching matching the directions indicated inside the battery compartment. 3 Close the battery cover. OR Press PLAYBACK to turn the camera on in PLAYBACK mode. 2 Press POWER again to turn the camera off. 3 Note: To remove the card, gently press on in REC mode. -
... direction indicated by sliding it . Pull the card out and close the battery cover. Turning the power on and off 1 Press POWER to turn the camera on the edge of the card and release it in . 3 Close the battery cover. Installing batteries 1 Open the battery cover by the arrow. 2 ... positive (+) and negative (-) terminals matching matching the directions indicated inside the battery compartment. 3 Close the battery cover. OR Press PLAYBACK to turn the camera on in PLAYBACK mode. 2 Press POWER again to turn the camera off. 3 Note: To remove the card, gently press on in REC mode. -
Quick Setup Guide (English)
Page 4
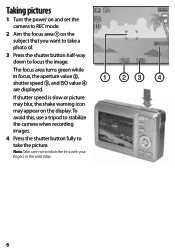
.... The power save feature will not activate while you are: • Recording or playing movie clips or audio files • Playing a slideshow • Connecting the camera to turn on the LCD display. You can record images and voices in the Setup menu. Press POWER or PLAYBACK to PLAY mode. Power-saving... PLAYBACK mode In REC mode, press PLAYBACK to switch to restore power. In PLAY mode, press PLAYBACK or MODE To select REC mode 1 Set the camera to REC mode. 2 Press MODE to display the scene mode palette. 3 Use the four-way control to select a mode and press SET to REC mode...
.... The power save feature will not activate while you are: • Recording or playing movie clips or audio files • Playing a slideshow • Connecting the camera to turn on the LCD display. You can record images and voices in the Setup menu. Press POWER or PLAYBACK to PLAY mode. Power-saving... PLAYBACK mode In REC mode, press PLAYBACK to switch to restore power. In PLAY mode, press PLAYBACK or MODE To select REC mode 1 Set the camera to REC mode. 2 Press MODE to display the scene mode palette. 3 Use the four-way control to select a mode and press SET to REC mode...

Quick Setup Guide (English)
Page 5
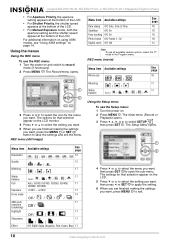
To use the setup menu 1 Turn the camera on and set the camera to REC or PLAYBACK mode. 2 Press MENU to display the REC or PLAYBACK menus. 3 Use the four-way control to select SETUP, then press SET ... press or SET to apply the setting. 6 Press MENU to close the menu. To use the REC menu 1 Turn the power on and set the camera to REC mode. 2 Press MENU to display the REC menu. 3 Press or to select a menu item and or to change a setting. 4 Press MENU or SET...
To use the setup menu 1 Turn the camera on and set the camera to REC or PLAYBACK mode. 2 Press MENU to display the REC or PLAYBACK menus. 3 Use the four-way control to select SETUP, then press SET ... press or SET to apply the setting. 6 Press MENU to close the menu. To use the REC menu 1 Turn the power on and set the camera to REC mode. 2 Press MENU to display the REC menu. 3 Press or to select a menu item and or to change a setting. 4 Press MENU or SET...
Quick Setup Guide (English)
Page 6
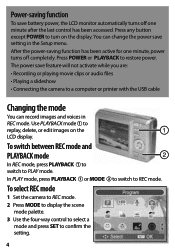
... focus area turns green while in focus, the aperture value , shutter speed , and ISO value are displayed. To avoid this, use a tripod to stabilize the camera when recording images. 4 Press the shutter button fully to block the lens with your fingers or the wrist strap. 6 If shutter speed is slow or..., the shake warning icon may appear on the subject that you want to take the picture. Taking pictures 1 Turn the power on and set the camera to REC mode. 2 Aim the focus area on the display.
... focus area turns green while in focus, the aperture value , shutter speed , and ISO value are displayed. To avoid this, use a tripod to stabilize the camera when recording images. 4 Press the shutter button fully to block the lens with your fingers or the wrist strap. 6 If shutter speed is slow or..., the shake warning icon may appear on the subject that you want to take the picture. Taking pictures 1 Turn the power on and set the camera to REC mode. 2 Aim the focus area on the display.
Quick Setup Guide (English)
Page 7
...quickly. Available recording time is pressed. If no images are two ways to download files from the camera's interal memory or memory card to to stop recording when memory capacity has been reached. Digital zoom cannot be used in the focus area . The last-recorded image appears on the display.... 2 Press to see the next image. Note: Hold the or buttons down to start recording. Connecting the camera to see the previous image or to a...
...quickly. Available recording time is pressed. If no images are two ways to download files from the camera's interal memory or memory card to to stop recording when memory capacity has been reached. Digital zoom cannot be used in the focus area . The last-recorded image appears on the display.... 2 Press to see the next image. Note: Hold the or buttons down to start recording. Connecting the camera to see the previous image or to a...
Quick Setup Guide (English)
Page 8
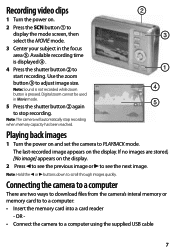
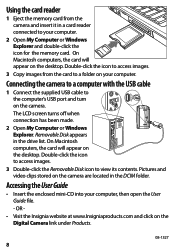
... mini-CD into your computer. Connecting the camera to a computer with the USB cable 1 Connect the supplied USB cable to the computer's USB port and turn on the Digital Camera link under Products. 08-1327 8 OR - • Visit the Insignia website at www.Insigniaproducts.com and click on... the camera. Pictures and video clips stored on the desktop. On Macintosh computers, the card...
... mini-CD into your computer. Connecting the camera to a computer with the USB cable 1 Connect the supplied USB cable to the computer's USB port and turn on the Digital Camera link under Products. 08-1327 8 OR - • Visit the Insignia website at www.Insigniaproducts.com and click on... the camera. Pictures and video clips stored on the desktop. On Macintosh computers, the card...
User Manual (English)
Page 3
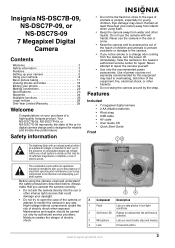
... sufficient magnitude to the presence of the equipment, fire, electrical shock, or other liquids. www.insignia-products.com 3 Insignia NS-DSC7B-09, NS-DSC7P-09, or NS-DSC7S-09 7 Megapixel Digital Camera Contents Welcome 3 Safety information 3 Features 3 Setting up your camera 5 Using your camera 8 Basic picture taking 11 Viewing photos and video 18 Editing your photos 19 Making connections...
... sufficient magnitude to the presence of the equipment, fire, electrical shock, or other liquids. www.insignia-products.com 3 Insignia NS-DSC7B-09, NS-DSC7P-09, or NS-DSC7S-09 7 Megapixel Digital Camera Contents Welcome 3 Safety information 3 Features 3 Setting up your camera 5 Using your camera 8 Basic picture taking 11 Viewing photos and video 18 Editing your photos 19 Making connections...

User Manual (English)
Page 4
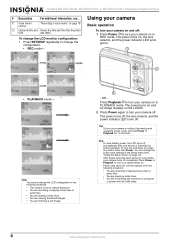
... button Press to enable shooting close-up photos. 8 LCD Use to compose your camera. Back Insignia NS-DSC7B-09, NS-DSC7P-09, or NS-DSC7S-09 7 Megapixel Digital Camera Top, bottom and side 8 9 10 # Component Description 1 Zoom button Press T to zoom in on the camera. Open to take a photo. Press to install batteries and an optional memory card...
... button Press to enable shooting close-up photos. 8 LCD Use to compose your camera. Back Insignia NS-DSC7B-09, NS-DSC7P-09, or NS-DSC7S-09 7 Megapixel Digital Camera Top, bottom and side 8 9 10 # Component Description 1 Zoom button Press T to zoom in on the camera. Open to take a photo. Press to install batteries and an optional memory card...

User Manual (English)
Page 5
...To remove the memory card, push the card in the illustration. 2 Insert two AA batteries into the battery compartment. Insignia NS-DSC7B-09, NS-DSC7P-09, or NS-DSC7S-09 7 Megapixel Digital Camera Setting up and the arrow pointing in the battery compartment. 3 Close the battery cover. Images that are taken by ...a DCF camera can be viewed on the LCD when the batteries are replacing the batteries, go to the battery ...
...To remove the memory card, push the card in the illustration. 2 Insert two AA batteries into the battery compartment. Insignia NS-DSC7B-09, NS-DSC7P-09, or NS-DSC7S-09 7 Megapixel Digital Camera Setting up and the arrow pointing in the battery compartment. 3 Close the battery cover. Images that are taken by ...a DCF camera can be viewed on the LCD when the batteries are replacing the batteries, go to the battery ...

User Manual (English)
Page 6
...to select Language, then press SET. See "Setting the date stamp" on . 2 Press PLAY, then press MENU. Insignia NS-DSC7B-09, NS-DSC7P-09, or NS-DSC7S-09 7 Megapixel Digital Camera Making initial settings When using the camera. The Date & Time menu opens with the year highlighted. 4 Press or to change the year, then press or..., then press SET or MENU to your photos. 6 Repeat Step 4 for longer than 48 hours, the date and time must be reset. 6 www.insignia-products.com To set the date and time: 1 Turn the power on page 18 to add a date stamp to apply the settings. The Setup Menu...
...to select Language, then press SET. See "Setting the date stamp" on . 2 Press PLAY, then press MENU. Insignia NS-DSC7B-09, NS-DSC7P-09, or NS-DSC7S-09 7 Megapixel Digital Camera Making initial settings When using the camera. The Date & Time menu opens with the year highlighted. 4 Press or to change the year, then press or..., then press SET or MENU to your photos. 6 Repeat Step 4 for longer than 48 hours, the date and time must be reset. 6 www.insignia-products.com To set the date and time: 1 Turn the power on page 18 to add a date stamp to apply the settings. The Setup Menu...
User Manual (English)
Page 7
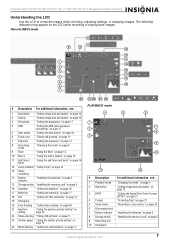
The following indicators may appear on page 5 9 Recording info 10 Histogram www.insignia-products.com 7 Insignia NS-DSC7B-09, NS-DSC7P-09, or NS-DSC7S-09 7 Megapixel Digital Camera Understanding the LCD Use the LCD to compose images while recording, adjusting settings, or replaying images. Record (REC) ..., see... 1 Playback mode "Changing the mode" on page 9 2 Resolution "Setting image size and quality" on page 12 3 DPOF "Setting the Digital Print Order Format (DPOF)" on page 21 4 Protect "Protecting files" on page 21 5 Voice memo "Recording a voice memo" on page 16 6...
The following indicators may appear on page 5 9 Recording info 10 Histogram www.insignia-products.com 7 Insignia NS-DSC7B-09, NS-DSC7P-09, or NS-DSC7S-09 7 Megapixel Digital Camera Understanding the LCD Use the LCD to compose images while recording, adjusting settings, or replaying images. Record (REC) ..., see... 1 Playback mode "Changing the mode" on page 9 2 Resolution "Setting image size and quality" on page 12 3 DPOF "Setting the Digital Print Order Format (DPOF)" on page 21 4 Protect "Protecting files" on page 21 5 Voice memo "Recording a voice memo" on page 16 6...
User Manual (English)
Page 8
... . Note You cannot change the LCD configuration in PLAYBACK mode. Tips To turn the camera off completely. Insignia NS-DSC7B-09, NS-DSC7P-09, or NS-DSC7S-09 7 Megapixel Digital Camera # Description For additional information, see "Using the Setup menu" on , press any button other than Power. Press Power or Playback to...and hold Power or Playback for one minute of inactivity (no button pressed). Note To save does not turn your camera off . To turn your camera on page 16 12 Captured date and Shows the date and time that the photo time was taken. To change ...
... . Note You cannot change the LCD configuration in PLAYBACK mode. Tips To turn the camera off completely. Insignia NS-DSC7B-09, NS-DSC7P-09, or NS-DSC7S-09 7 Megapixel Digital Camera # Description For additional information, see "Using the Setup menu" on , press any button other than Power. Press Power or Playback to...and hold Power or Playback for one minute of inactivity (no button pressed). Note To save does not turn your camera off . To turn your camera on page 16 12 Captured date and Shows the date and time that the photo time was taken. To change ...

User Manual (English)
Page 9
Insignia NS-DSC7B-09, NS-DSC7P-09, or NS-DSC7S-09 7 Megapixel Digital Camera Changing the mode You can use a tripod for recording sunset images. Sunset Backlight Enhances the red hue for this. Lets you take a still image of ... background and focuses on the LCD monitor. The scene mode palette opens. Smile capture Sets the camera to confirm the setting. Q Mode Shows a simplified menu in record mode and you take beach or snow scenes. www.insignia-products.com 9 Slows the shutter speed to enhance the look of food. Lets you photograph...
Insignia NS-DSC7B-09, NS-DSC7P-09, or NS-DSC7S-09 7 Megapixel Digital Camera Changing the mode You can use a tripod for recording sunset images. Sunset Backlight Enhances the red hue for this. Lets you take a still image of ... background and focuses on the LCD monitor. The scene mode palette opens. Smile capture Sets the camera to confirm the setting. Q Mode Shows a simplified menu in record mode and you take beach or snow scenes. www.insignia-products.com 9 Slows the shutter speed to enhance the look of food. Lets you photograph...
User Manual (English)
Page 10
...icon for the menu you want . The Setup Menu opens. The settings for that selection appear on using ASM modes, see all available camera options, select the "P" mode in the Program menu. For additional information on the LCD. 5 Press or to select the setting you want...bracketing) Highlight 17 Sharpness 17 Effect Off, B&W, Sepia, Negative, Red, Green, Blue 17 10 www.insignia-products.com The Record menu opens. Insignia NS-DSC7B-09, NS-DSC7P-09, or NS-DSC7S-09 7 Megapixel Digital Camera • For Aperture Priority, the aperture setting appears at the bottom of the LCD. • For...
...icon for the menu you want . The Setup Menu opens. The settings for that selection appear on using ASM modes, see all available camera options, select the "P" mode in the Program menu. For additional information on the LCD. 5 Press or to select the setting you want...bracketing) Highlight 17 Sharpness 17 Effect Off, B&W, Sepia, Negative, Red, Green, Blue 17 10 www.insignia-products.com The Record menu opens. Insignia NS-DSC7B-09, NS-DSC7P-09, or NS-DSC7S-09 7 Megapixel Digital Camera • For Aperture Priority, the aperture setting appears at the bottom of the LCD. • For...

User Manual (English)
Page 11
...TV Out • Battery Type Basic picture taking Taking still pictures To take still pictures: 1 Press Power to initial default settings. www.insignia-products.com 11 Lets you restart numbering if you have taken. • Off-The captured image does not automatically display after shooting. •...off . • Volume-Adjusts the volume of the shutter sound, startup sound, beep, and playback sound. Insignia NS-DSC7B-09, NS-DSC7P-09, or NS-DSC7S-09 7 Megapixel Digital Camera Setup menu Menu item Sounds Auto Review Power Save Date & Time Language File No. Caution: All data ...
...TV Out • Battery Type Basic picture taking Taking still pictures To take still pictures: 1 Press Power to initial default settings. www.insignia-products.com 11 Lets you restart numbering if you have taken. • Off-The captured image does not automatically display after shooting. •...off . • Volume-Adjusts the volume of the shutter sound, startup sound, beep, and playback sound. Insignia NS-DSC7B-09, NS-DSC7P-09, or NS-DSC7S-09 7 Megapixel Digital Camera Setup menu Menu item Sounds Auto Review Power Save Date & Time Language File No. Caution: All data ...
User Manual (English)
Page 12
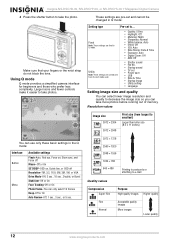
...mail Quality values Compression Super Fine Fine Normal Purpose High-quality images Higher quality Acceptable quality images More images Lower quality 12 www.insignia-products.com Make sure that your fingers or the wrist strap do not block the lens. Utility Note: These settings are pre-...-Off or On Face Tracking-Off or On Photo Frame-You can use only these basic settings in Q mode. Insignia NS-DSC7B-09, NS-DSC7P-09, or NS-DSC7S-09 7 Megapixel Digital Camera 4 Press the shutter button to take photos. Resolution values Image size 3072 × 2304 3072 × 2048 Print...
...mail Quality values Compression Super Fine Fine Normal Purpose High-quality images Higher quality Acceptable quality images More images Lower quality 12 www.insignia-products.com Make sure that your fingers or the wrist strap do not block the lens. Utility Note: These settings are pre-...-Off or On Face Tracking-Off or On Photo Frame-You can use only these basic settings in Q mode. Insignia NS-DSC7B-09, NS-DSC7P-09, or NS-DSC7S-09 7 Megapixel Digital Camera 4 Press the shutter button to take photos. Resolution values Image size 3072 × 2304 3072 × 2048 Print...
User Manual (English)
Page 13
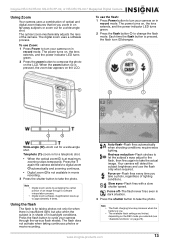
... zoom button to take the photo. Press the T again the camera switches to digital zoom automatically and zooming continues. • Digital zoom is for a wide-angle shot. Insignia NS-DSC7B-09, NS-DSC7P-09, or NS-DSC7S-09 7 Megapixel Digital Camera Using Zoom Your camera uses a combination of optical and digital zoom features that let you zoom in movie recording. 3 Press...
... zoom button to take the photo. Press the T again the camera switches to digital zoom automatically and zooming continues. • Digital zoom is for a wide-angle shot. Insignia NS-DSC7B-09, NS-DSC7P-09, or NS-DSC7S-09 7 Megapixel Digital Camera Using Zoom Your camera uses a combination of optical and digital zoom features that let you zoom in movie recording. 3 Press...

User Manual (English)
Page 14
Insignia NS-DSC7B-09, NS-DSC7P-09, or NS-DSC7S-09 7 Megapixel Digital Camera Using the macro feature Your camera is equipped with a macro feature that you use a tripod or place the digital camera on a level, stable surface. The power turns on, the lens extends, and the power indicator LED turns green. 2 Press the...) brings the background into focus. The macro icon appears on , the lens extends, and the power indicator LED turns green. 14 www.insignia-products.com Note Distances referred to save the setting. 2 sec.-The shutter release is delayed for two seconds. 10 sec.-The shutter release ...
Insignia NS-DSC7B-09, NS-DSC7P-09, or NS-DSC7S-09 7 Megapixel Digital Camera Using the macro feature Your camera is equipped with a macro feature that you use a tripod or place the digital camera on a level, stable surface. The power turns on, the lens extends, and the power indicator LED turns green. 2 Press the...) brings the background into focus. The macro icon appears on , the lens extends, and the power indicator LED turns green. 14 www.insignia-products.com Note Distances referred to save the setting. 2 sec.-The shutter release is delayed for two seconds. 10 sec.-The shutter release ...


