Quick Setup Guide (English)
Page 4
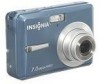
...; Connecting the camera to a computer or printer with the USB cable Changing the mode You can change the power save battery power, the LCD monitor automatically turns off one minute, power turns off completely. to switch to turn on the LCD display. Press any button except POWER to REC mode. 4 Press POWER or PLAYBACK to replay, delete, or edit images on the display. Use PLAYBACK mode to restore power. To switch between REC mode and PLAYBACK mode In REC mode, press PLAYBACK to switch to confirm the setting. Power-saving function To save setting in...
...; Connecting the camera to a computer or printer with the USB cable Changing the mode You can change the power save battery power, the LCD monitor automatically turns off one minute, power turns off completely. to switch to turn on the LCD display. Press any button except POWER to REC mode. 4 Press POWER or PLAYBACK to replay, delete, or edit images on the display. Use PLAYBACK mode to restore power. To switch between REC mode and PLAYBACK mode In REC mode, press PLAYBACK to switch to confirm the setting. Power-saving function To save setting in...
Quick Setup Guide (English)
Page 7
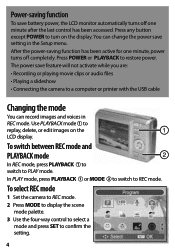
... previous image or to start recording. Playing back images 1 Turn the power on and set the camera to adjust image size. OR • Connect the camera to display the mode screen, then select the MOVIE mode. 3 Center your subject in Movie mode. 5 Press the shutter button again to scroll through images quickly. Note: Sound is not recorded while zoom button is displayed . 4 Press the shutter button to see the next image. Recording video clips 1 Turn the power on. 2 Press the SCN button to a computer using the supplied USB cable 7 Available recording time is...
... previous image or to start recording. Playing back images 1 Turn the power on and set the camera to adjust image size. OR • Connect the camera to display the mode screen, then select the MOVIE mode. 3 Center your subject in Movie mode. 5 Press the shutter button again to scroll through images quickly. Note: Sound is not recorded while zoom button is displayed . 4 Press the shutter button to see the next image. Recording video clips 1 Turn the power on. 2 Press the SCN button to a computer using the supplied USB cable 7 Available recording time is...
User Manual (English)
Page 3
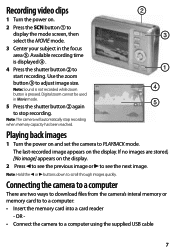
... to constitute a risk of a high-quality Insignia product. Before using flash. • Keep the camera away from the camera, turn the power off immediately. Insignia NS-DSC7B-09, NS-DSC7P-09, or NS-DSC7S-09 7 Megapixel Digital Camera Contents Welcome 3 Safety information 3 Features 3 Setting up your camera 5 Using your camera 8 Basic picture taking 11 Viewing photos and video 18 Editing your photos 19 Making connections 22 Specifications 23 Appendix 24 Available functions 25 Legal notices 28 One-Year...
... to constitute a risk of a high-quality Insignia product. Before using flash. • Keep the camera away from the camera, turn the power off immediately. Insignia NS-DSC7B-09, NS-DSC7P-09, or NS-DSC7S-09 7 Megapixel Digital Camera Contents Welcome 3 Safety information 3 Features 3 Setting up your camera 5 Using your camera 8 Basic picture taking 11 Viewing photos and video 18 Editing your photos 19 Making connections 22 Specifications 23 Appendix 24 Available functions 25 Legal notices 28 One-Year...

User Manual (English)
Page 4
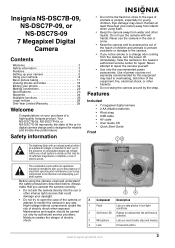
... photos. 2 Playback button Press to view the photos you have taken. 3 Menu button Press to open the mode palette, from which you can select a scene mode. 10 ASM button Press to set the ASM (Aperture, Shutter, Manual Exposure) mode. # Button 1 Speaker 2 Power button 3 Shutter button 4 Strap ring 5 USB/AV jack 6 Battery cover 7 Tripod socket Description Lets you hear audio clips and memos recorded on the camera. In menu mode, press to confirm your settings. 7 Macro button Press to enable shooting close-up photos. 8 LCD Use...
... photos. 2 Playback button Press to view the photos you have taken. 3 Menu button Press to open the mode palette, from which you can select a scene mode. 10 ASM button Press to set the ASM (Aperture, Shutter, Manual Exposure) mode. # Button 1 Speaker 2 Power button 3 Shutter button 4 Strap ring 5 USB/AV jack 6 Battery cover 7 Tripod socket Description Lets you hear audio clips and memos recorded on the camera. In menu mode, press to confirm your settings. 7 Macro button Press to enable shooting close-up photos. 8 LCD Use...

User Manual (English)
Page 6
... the setting. 6 Press MENU to exit the menu. 5 Press or to change the settings continuously. The initial menu is displayed on page 18 to add a date stamp to your photos. 6 Repeat Step 4 for longer than 48 hours, the date and time must be reset. 6 www.insignia-products.com The Setup Menu opens. 4 Press or to select SETUP , then press SET. Insignia NS-DSC7B-09, NS-DSC7P-09, or NS-DSC7S-09 7 Megapixel Digital Camera Making initial settings When using the camera.
... the setting. 6 Press MENU to exit the menu. 5 Press or to change the settings continuously. The initial menu is displayed on page 18 to add a date stamp to your photos. 6 Repeat Step 4 for longer than 48 hours, the date and time must be reset. 6 www.insignia-products.com The Setup Menu opens. 4 Press or to select SETUP , then press SET. Insignia NS-DSC7B-09, NS-DSC7P-09, or NS-DSC7S-09 7 Megapixel Digital Camera Making initial settings When using the camera.
User Manual (English)
Page 7
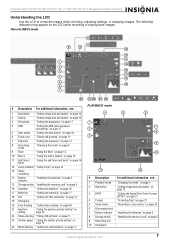
... Shutter speed "Using the shutter priority setting" on page 15 24 White balance "Setting the white balance" on page 17 PLAYBACK mode # Description For additional information, see... 1 Playback mode "Changing the mode" on page 9 2 Resolution "Setting image size and quality" on page 12 3 DPOF "Setting the Digital Print Order Format (DPOF)" on page 21 4 Protect "Protecting files" on page 21 5 Voice memo "Recording a voice memo" on page 16 6 File number/total 7 Battery indicator "Installing the batteries" on page 5 8 Storage media "Installing the memory card" on the LCD...
... Shutter speed "Using the shutter priority setting" on page 15 24 White balance "Setting the white balance" on page 17 PLAYBACK mode # Description For additional information, see... 1 Playback mode "Changing the mode" on page 9 2 Resolution "Setting image size and quality" on page 12 3 DPOF "Setting the Digital Print Order Format (DPOF)" on page 21 4 Protect "Protecting files" on page 21 5 Voice memo "Recording a voice memo" on page 16 6 File number/total 7 Battery indicator "Installing the batteries" on page 5 8 Storage media "Installing the memory card" on the LCD...
User Manual (English)
Page 8
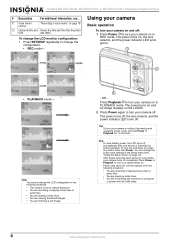
..., or NS-DSC7S-09 7 Megapixel Digital Camera # Description For additional information, see "Using the Setup menu" on page 10). Tips To turn your camera on , the lens extends, and the power indicator LED turns green. • PLAYBACK mode- To change the LCD monitor configuration: • Press SET/DISP repeatedly to a computer or printer with the USB cable. 8 www.insignia-products.com OR - Press Power or Playback to turn the camera off in PLAYBACK mode. Using your camera Basic operation To turn your camera back...
..., or NS-DSC7S-09 7 Megapixel Digital Camera # Description For additional information, see "Using the Setup menu" on page 10). Tips To turn your camera on , the lens extends, and the power indicator LED turns green. • PLAYBACK mode- To change the LCD monitor configuration: • Press SET/DISP repeatedly to a computer or printer with the USB cable. 8 www.insignia-products.com OR - Press Power or Playback to turn the camera off in PLAYBACK mode. Using your camera Basic operation To turn your camera back...

User Manual (English)
Page 9
... photos. Kids Night scene Fireworks Snow Lets you take beach or snow scenes. We recommend that you photograph a backlit image. Sharpens the image to record mode. Increases black and white contrast. 3 Press , , , or to confirm the setting. For recording movie clips. Selecting the ASM (Aperture Priority, Shutter Priority, Manual Exposure) mode: To select the ASM mode: 1 Turn on the LCD monitor. Q Mode Shows a simplified menu in record mode and you want, then press SET...
... photos. Kids Night scene Fireworks Snow Lets you take beach or snow scenes. We recommend that you photograph a backlit image. Sharpens the image to record mode. Increases black and white contrast. 3 Press , , , or to confirm the setting. For recording movie clips. Selecting the ASM (Aperture Priority, Shutter Priority, Manual Exposure) mode: To select the ASM mode: 1 Turn on the LCD monitor. Q Mode Shows a simplified menu in record mode and you want, then press SET...
User Manual (English)
Page 10
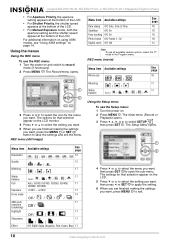
... menu To use the Setup menu: 1 Turn the power on and switch to open the sub-menu. Insignia NS-DSC7B-09, NS-DSC7P-09, or NS-DSC7S-09 7 Megapixel Digital Camera • For Aperture Priority, the aperture setting appears at the bottom of the LCD. • For Shutter Priority, the shutter speed appears at the bottom of the LCD. • For Manual Exposure mode, both the aperture setting and the shutter speed appear at the bottom of the LCD. REC menu (movie) Menu item Available settings Movie size...
... menu To use the Setup menu: 1 Turn the power on and switch to open the sub-menu. Insignia NS-DSC7B-09, NS-DSC7P-09, or NS-DSC7S-09 7 Megapixel Digital Camera • For Aperture Priority, the aperture setting appears at the bottom of the LCD. • For Shutter Priority, the shutter speed appears at the bottom of the LCD. • For Manual Exposure mode, both the aperture setting and the shutter speed appear at the bottom of the LCD. REC menu (movie) Menu item Available settings Movie size...

User Manual (English)
Page 11
... power indicator LED turns green. 2 Compose the photo on in focus, and the shutter speed , aperture value and ISO value are downloaded to initial default settings. www.insignia-products.com 11 Lets you select a language for avoiding file name duplication when images are displayed. Make sure that the camera is no card inserted. The focus area turns green when in record mode. See "Setting the date stamp" on a television with the supplied AV cable. A "COMPLETED" message displays when the formatting is changed. Caution: All data...
... power indicator LED turns green. 2 Compose the photo on in focus, and the shutter speed , aperture value and ISO value are downloaded to initial default settings. www.insignia-products.com 11 Lets you select a language for avoiding file name duplication when images are displayed. Make sure that the camera is no card inserted. The focus area turns green when in record mode. See "Setting the date stamp" on a television with the supplied AV cable. A "COMPLETED" message displays when the formatting is changed. Caution: All data...
User Manual (English)
Page 12
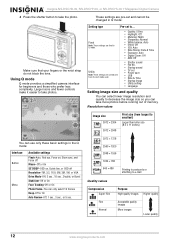
...: Normal • White balance: Auto • Effect: Off • ISO: Auto • Date Stamp: Date & Time • Exposure: Auto • Digital Zoom: Off • AEB: Off • Shutter sound • File No. • Startup sound • TV out • Power save • USB • Date & Time • Startup image • Utility setting • Language Setting image size and quality You can take more photos before running out of memory. These settings are pre-set and cannot be changed in Q mode. Using Q mode Q mode provides a simplified camera interface for beginners...
...: Normal • White balance: Auto • Effect: Off • ISO: Auto • Date Stamp: Date & Time • Exposure: Auto • Digital Zoom: Off • AEB: Off • Shutter sound • File No. • Startup sound • TV out • Power save • USB • Date & Time • Startup image • Utility setting • Language Setting image size and quality You can take more photos before running out of memory. These settings are pre-set and cannot be changed in Q mode. Using Q mode Q mode provides a simplified camera interface for beginners...
User Manual (English)
Page 13
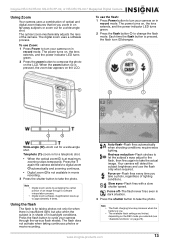
... for taking continuous photos or movie recording. www.insignia-products.com 13 Wide-angle (W)-zoom out for a wide-angle shot. Insignia NS-DSC7B-09, NS-DSC7P-09, or NS-DSC7S-09 7 Megapixel Digital Camera Using Zoom Your camera uses a combination of optical and digital zoom features that let you zoom in on -Flash fires every time you selected (see "Available functions" on , the lens extends, and the power indicator LED turns green. 2 Press the flash button to change the flash mode. The optical zoom mechanically adjusts the lens...
... for taking continuous photos or movie recording. www.insignia-products.com 13 Wide-angle (W)-zoom out for a wide-angle shot. Insignia NS-DSC7B-09, NS-DSC7P-09, or NS-DSC7S-09 7 Megapixel Digital Camera Using Zoom Your camera uses a combination of optical and digital zoom features that let you zoom in on -Flash fires every time you selected (see "Available functions" on , the lens extends, and the power indicator LED turns green. 2 Press the flash button to change the flash mode. The optical zoom mechanically adjusts the lens...

User Manual (English)
Page 14
... the shutter button to take a continuous series of continuous still images. The power turns on , the lens extends, and the power indicator LED turns green. 14 www.insignia-products.com A higher aperture value (a smaller lens opening ) lets you soften the background. Use burst to record a series of photos. The power turns on , the lens extends, and the power indicator LED turns green. 3 Press or to select the Drive mode icon . The macro icon appears on a level, stable surface. Using ASM settings Using the aperture priority setting...
... the shutter button to take a continuous series of continuous still images. The power turns on , the lens extends, and the power indicator LED turns green. 14 www.insignia-products.com A higher aperture value (a smaller lens opening ) lets you soften the background. Use burst to record a series of photos. The power turns on , the lens extends, and the power indicator LED turns green. 3 Press or to select the Drive mode icon . The macro icon appears on a level, stable surface. Using ASM settings Using the aperture priority setting...

User Manual (English)
Page 15
... aperture and shutter speed for the best photo. 4 Press the shutter button to turn your camera on , the lens extends, and the power indicator LED turns green. 2 Press the MODE button. The LCD shows the recording time available . 3 Press or to select the aperture setting you can manually set a shutter speed to toggle between the standard exposure and the selected exposure appears in record mode. Using the shutter priority setting In this mode you want . Insignia NS-DSC7B-09, NS-DSC7P-09, or NS-DSC7S-09 7 Megapixel Digital Camera...
... aperture and shutter speed for the best photo. 4 Press the shutter button to turn your camera on , the lens extends, and the power indicator LED turns green. 2 Press the MODE button. The LCD shows the recording time available . 3 Press or to select the aperture setting you can manually set a shutter speed to toggle between the standard exposure and the selected exposure appears in record mode. Using the shutter priority setting In this mode you want . Insignia NS-DSC7B-09, NS-DSC7P-09, or NS-DSC7S-09 7 Megapixel Digital Camera...
User Manual (English)
Page 16
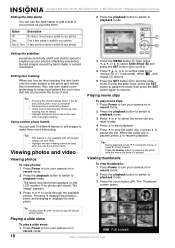
Setting the movie size 4 Press to start playback. 5 Press to stop recording. The Playback menu opens. The mode palette opens. 3 Press , , , or to select the Voice REC icon , then press SET to confirm your camera on , the lens extends, and the power indicator LED turns green. 2 Press the playback button to switch to playback mode. 3 Press or to select the still image to which you do not touch the microphone while recording. 5 Press the shutter button again to pause...
Setting the movie size 4 Press to start playback. 5 Press to stop recording. The Playback menu opens. The mode palette opens. 3 Press , , , or to select the Voice REC icon , then press SET to confirm your camera on , the lens extends, and the power indicator LED turns green. 2 Press the playback button to switch to playback mode. 3 Press or to select the still image to which you do not touch the microphone while recording. 5 Press the shutter button again to pause...
User Manual (English)
Page 17
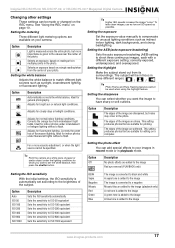
... equivalent Sets the sensitivity to ISO 1600 equivalent B&W Sepia Negative Mosaic Red Green Blue The image is converted to black and white A sepia tone is added to the image The image is measured across the entire photo, but noise may occur in the photo. Adjusts for indoor photos under fluorescent lights without a flash. Ideal for normal indoor lighting conditions. Tip Higher ISO speeds increase the image "noise." To take clean images, use...
... equivalent Sets the sensitivity to ISO 1600 equivalent B&W Sepia Negative Mosaic Red Green Blue The image is converted to black and white A sepia tone is added to the image The image is measured across the entire photo, but noise may occur in the photo. Adjusts for indoor photos under fluorescent lights without a flash. Ideal for normal indoor lighting conditions. Tip Higher ISO speeds increase the image "noise." To take clean images, use...
User Manual (English)
Page 18
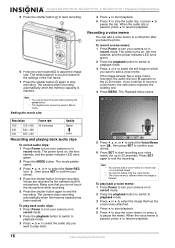
... focus of lens. When the audio clip is added to your photos A date and time stamp is paused, press to resume playback. Setting the stabilizer Increases sensitivity (ISO) and shutter speed to brighten up your camera on in the photo and follows their movements. Highlight and photo frame cannot be limited. Viewing photos and video Viewing photos To view photos: 1 Press Power to turn your camera on in record mode. 2 Press the playback button to switch to playback mode. 3 Press the zoom button...
... focus of lens. When the audio clip is added to your photos A date and time stamp is paused, press to resume playback. Setting the stabilizer Increases sensitivity (ISO) and shutter speed to brighten up your camera on in the photo and follows their movements. Highlight and photo frame cannot be limited. Viewing photos and video Viewing photos To view photos: 1 Press Power to turn your camera on in record mode. 2 Press the playback button to switch to playback mode. 3 Press the zoom button...

User Manual (English)
Page 19
... finish. Insignia NS-DSC7B-09, NS-DSC7P-09, or NS-DSC7S-09 7 Megapixel Digital Camera 4 Press , , , or to select the photo you want to resize. 4 Press the MENU button, then press , , , or to select Resize and press SET to confirm. 5 Press or to select a size option, then press SET again to finishing resizing. Tip You can protect or delete multiple photos in record mode. 2 Press the playback button to switch to playback mode. 4 Press...
... finish. Insignia NS-DSC7B-09, NS-DSC7P-09, or NS-DSC7S-09 7 Megapixel Digital Camera 4 Press , , , or to select the photo you want to resize. 4 Press the MENU button, then press , , , or to select Resize and press SET to confirm. 5 Press or to select a size option, then press SET again to finishing resizing. Tip You can protect or delete multiple photos in record mode. 2 Press the playback button to switch to playback mode. 4 Press...
User Manual (English)
Page 21
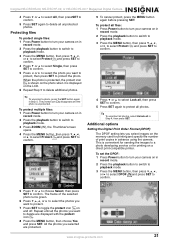
... displayed on the LCD. 6 Repeat Step 5 to a photo developing service or for printing on in record mode. 2 Press the playback button to switch to playback mode. 3 Press ZOOM (W), the Thumbnail screen opens. 4 Press the MENU button, then press , , , or to select Protect and press SET to confirm. 9 To cancel protect, press the MENU button again before pressing SET. Tip To unprotect a photo, press the SET button again in advance using the camera. To protect multiple files: 1 Press Power button to turn your camera on a direct print-compatible printer. To set...
... displayed on the LCD. 6 Repeat Step 5 to a photo developing service or for printing on in record mode. 2 Press the playback button to switch to playback mode. 3 Press ZOOM (W), the Thumbnail screen opens. 4 Press the MENU button, then press , , , or to select Protect and press SET to confirm. 9 To cancel protect, press the MENU button again before pressing SET. Tip To unprotect a photo, press the SET button again in advance using the camera. To protect multiple files: 1 Press Power button to turn your camera on a direct print-compatible printer. To set...
User Manual (English)
Page 23
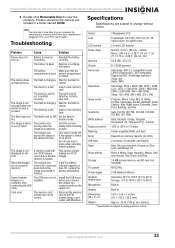
... Text Sensitivity Auto, ISO 50, ISO 100, ISO 200, ISO 400, ISO 800, ISO 1600 White balance Auto, Daylight, Cloudy, Tungsten, Fluorescent (H), Fluorescent (L), Custom Exposure control -2EV to the FAT format, using a card reader with non-DCIF images (recorded on the LCD. Self-timer 2 seconds, 10 seconds, and Double Flash Auto, Red eye reduction, Always on memory capacity (no limit). battery compartment is charging. The camera does The flash is full. The memory is charging. Set the flash to a computer after connecting the USB cable. Turn macro mode ON...
... Text Sensitivity Auto, ISO 50, ISO 100, ISO 200, ISO 400, ISO 800, ISO 1600 White balance Auto, Daylight, Cloudy, Tungsten, Fluorescent (H), Fluorescent (L), Custom Exposure control -2EV to the FAT format, using a card reader with non-DCIF images (recorded on the LCD. Self-timer 2 seconds, 10 seconds, and Double Flash Auto, Red eye reduction, Always on memory capacity (no limit). battery compartment is charging. The camera does The flash is full. The memory is charging. Set the flash to a computer after connecting the USB cable. Turn macro mode ON...


