
User Manual (English)
Page 3
... replacement of other controls may cause • USA & Canada versions comply lightning storms or when unused serious personal injury and with dry cloth. Improper adjustment of the disc tray as opening or does not operate normally, or has removing covers may expose you observe the following the operating instructions. Servicing is closing. These discs are required, be sure the service technician has used...
... replacement of other controls may cause • USA & Canada versions comply lightning storms or when unused serious personal injury and with dry cloth. Improper adjustment of the disc tray as opening or does not operate normally, or has removing covers may expose you observe the following the operating instructions. Servicing is closing. These discs are required, be sure the service technician has used...
User Manual (English)
Page 4
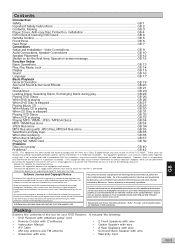
... GB 4 DVD Discs & Cleaning DVD Discs GB 4 Remote Control ...GB 5 Front Panel ...GB 6 Rear Panel ...GB 7 Connections Setup and Installation - Video Connections GB 9 Audio Connections, Speaker Connections GB 10 Speaker Placement GB 12 Switch on screen message GB 12 Function Setup Basic Operations ...GB 13 Play, Play Mode, Lock GB 14 Display ...GB 15 Sound ...GB 16 Language ...GB 17 Basic Playback General Operation GB 19 Surround Sound & Surround Effects GB 20 Radio ...GB 21 Clock&Timer ...GB 23 Loading Discs, Selecting Discs, Exchanging Discs during play GB 25 Playing DVD Discs GB...
... GB 4 DVD Discs & Cleaning DVD Discs GB 4 Remote Control ...GB 5 Front Panel ...GB 6 Rear Panel ...GB 7 Connections Setup and Installation - Video Connections GB 9 Audio Connections, Speaker Connections GB 10 Speaker Placement GB 12 Switch on screen message GB 12 Function Setup Basic Operations ...GB 13 Play, Play Mode, Lock GB 14 Display ...GB 15 Sound ...GB 16 Language ...GB 17 Basic Playback General Operation GB 19 Surround Sound & Surround Effects GB 20 Radio ...GB 21 Clock&Timer ...GB 23 Loading Discs, Selecting Discs, Exchanging Discs during play GB 25 Playing DVD Discs GB...

User Manual (English)
Page 5
... playing a disc, make sure that displays the first shot from the center out. • Do not wipe in your unit on a VCR. Do not expose your unit to search quickly for approximately 2 HOURS Single sided two layer discs. Chapters within the main Title allow up to the unit. * Caution : Do not install this signal on a stable flat surface. Cleaning DVD Discs Picture...
... playing a disc, make sure that displays the first shot from the center out. • Do not wipe in your unit on a VCR. Do not expose your unit to search quickly for approximately 2 HOURS Single sided two layer discs. Chapters within the main Title allow up to the unit. * Caution : Do not install this signal on a stable flat surface. Cleaning DVD Discs Picture...
User Manual (English)
Page 6
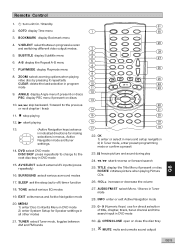
... System Setup for making selections in DVD mode 30. TITLE display the Title Menu if present on discs 10. MUTE mute and unmute sound output GB GB 5 Remote Control 1. A-B display the Repeat A-B menu 7. BOOKMARK display Bookmark menu 4. SLEEP set the sleep (auto-off) timer function 18. TUNER select Tuner mode, toggles between progressive scan and switching different video output modes. 5. freeze picture and sound during play 24. TONE select various EQ modes 19. INFO enter or exit Active Navigation mode 29. 0 - 9 (Numeric Keys) use for direct selection...
... System Setup for making selections in DVD mode 30. TITLE display the Title Menu if present on discs 10. MUTE mute and unmute sound output GB GB 5 Remote Control 1. A-B display the Repeat A-B menu 7. BOOKMARK display Bookmark menu 4. SLEEP set the sleep (auto-off) timer function 18. TUNER select Tuner mode, toggles between progressive scan and switching different video output modes. 5. freeze picture and sound during play 24. TONE select various EQ modes 19. INFO enter or exit Active Navigation mode 29. 0 - 9 (Numeric Keys) use for direct selection...
User Manual (English)
Page 7
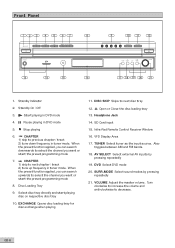
... preset function applied, you can search upwards to select the channel you want or start the preset programming mode 7. EXCHANGE Opens disc loading tray for disc exchange when playing 11. AV SELECT Select external AV inputs by pressing repeatedly 21. SURR.MODE Select sound modes by pressing repeatedly 19. Select disc tray directly and start the preset programming mode 8. Open or Close the disc loading tray 13. SD Card input 15. Infra-Red Remote Control Receiver Window 16. VFD Display Area 17. TUNER Select tuner...
... preset function applied, you can search upwards to select the channel you want or start the preset programming mode 7. EXCHANGE Opens disc loading tray for disc exchange when playing 11. AV SELECT Select external AV inputs by pressing repeatedly 21. SURR.MODE Select sound modes by pressing repeatedly 19. Select disc tray directly and start the preset programming mode 8. Open or Close the disc loading tray 13. SD Card input 15. Infra-Red Remote Control Receiver Window 16. VFD Display Area 17. TUNER Select tuner...
User Manual (English)
Page 8
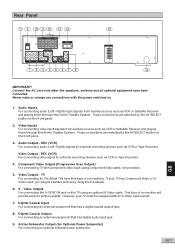
... connecting audio (Left / Right) input signals from auxiliary source such as VCR or Satellite Receiver and playing them through this type of connection will get a better picture by using an optional S-Video cable. GB 7 GB These connections are selected by the AV SELECT button on . 1. Video Output - If your TV must be equipped with component video input (using component video cable, not provided). 5. Connect the AC cord only after the speakers, antenna and all optional equipment have this Home Theater System. Rear Panel...
... connecting audio (Left / Right) input signals from auxiliary source such as VCR or Satellite Receiver and playing them through this type of connection will get a better picture by using an optional S-Video cable. GB 7 GB These connections are selected by the AV SELECT button on . 1. Video Output - If your TV must be equipped with component video input (using component video cable, not provided). 5. Connect the AC cord only after the speakers, antenna and all optional equipment have this Home Theater System. Rear Panel...

User Manual (English)
Page 9
... the antenna in various directions until the clearest signal is received. Power Cord 17. Center Speaker For connecting the center speaker terminals. Connect the correct colored wire to the surround left / right speaker terminal. 14. AM Loop Antenna Connections For AM reception, connect the AM loop antenna to require cooling. Connect the correct colored wire to the subwoofer speaker terminal. 11. Connect the correct colored wire to the center speaker terminal. 12. Surround Speaker (Surround Left & Surroud Right) For connecting the surround speaker...
... the antenna in various directions until the clearest signal is received. Power Cord 17. Center Speaker For connecting the center speaker terminals. Connect the correct colored wire to the surround left / right speaker terminal. 14. AM Loop Antenna Connections For AM reception, connect the AM loop antenna to require cooling. Connect the correct colored wire to the subwoofer speaker terminal. 11. Connect the correct colored wire to the center speaker terminal. 12. Surround Speaker (Surround Left & Surroud Right) For connecting the surround speaker...

User Manual (English)
Page 12
... Wire Black Wire Connection of all speakers is the same. SURROUND LEFT SL+ SL - The optimal length for the stripped part should be expressed by the below table : SPEAKERS FRONT LEFT FRONT RIGHT CENTER Unit Terminals L+ L - GB GB 11 SURROUND SURROUND PASSIVE RIGHT BACK SUBWOOFER SR+ SR - Press the button down & insert the wire, then release the button. SUB+ SUB- Use Wires White Black Red Black Green Black Blue Black...
... Wire Black Wire Connection of all speakers is the same. SURROUND LEFT SL+ SL - The optimal length for the stripped part should be expressed by the below table : SPEAKERS FRONT LEFT FRONT RIGHT CENTER Unit Terminals L+ L - GB GB 11 SURROUND SURROUND PASSIVE RIGHT BACK SUBWOOFER SR+ SR - Press the button down & insert the wire, then release the button. SUB+ SUB- Use Wires White Black Red Black Green Black Blue Black...
User Manual (English)
Page 13
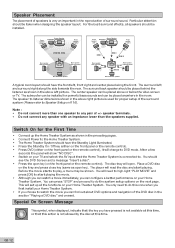
.... • Connect Power to the Home Theater System. • The Home Theater System should be placed anywhere in the room. Particular attention should be shown. The center speaker can be installed. The player will set up the Home Theater System as shown in the above or below the video screen or TV. For the best surround effects, all the functions on the front panel or the remote control). Switch On for powerful bass sounds and...
.... • Connect Power to the Home Theater System. • The Home Theater System should be placed anywhere in the room. Particular attention should be shown. The center speaker can be installed. The player will set up the Home Theater System as shown in the above or below the video screen or TV. For the best surround effects, all the functions on the front panel or the remote control). Switch On for powerful bass sounds and...

User Manual (English)
Page 14
... that will provide you better sound and picture quality as well as "Disc menus" language in the menus. A parent menu exists, press or EXIT To make selections in the "Languages" menu. The selections are available on the disc. Select "Languages" x5 Open "Languages" Select "Disc Menus" Play Play Mode Lock Display Sound Languages Insert a disc Play Play Mode Lock Display Sound Languages Player Menus Disc Menus Audio Subtitles English English English English Play Play Mode Lock Display Sound Languages Player Menus Disc Menus Audio Subtitles English English English...
... that will provide you better sound and picture quality as well as "Disc menus" language in the menus. A parent menu exists, press or EXIT To make selections in the "Languages" menu. The selections are available on the disc. Select "Languages" x5 Open "Languages" Select "Disc Menus" Play Play Mode Lock Display Sound Languages Insert a disc Play Play Mode Lock Display Sound Languages Player Menus Disc Menus Audio Subtitles English English English English Play Play Mode Lock Display Sound Languages Player Menus Disc Menus Audio Subtitles English English English...
User Manual (English)
Page 15
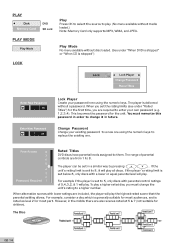
... the password for most part. To play all discs. Play Mode No menu available without a password. You must change it will play a higher rated disc you set the rating limits (see under "When DVD is stopped" or "When CD is set in order to change the unit's rating to a higher number. If the player's rating limit is stopped") Enter New Password OK Enter New Password OK Lock Player Create your password here using...
... the password for most part. To play all discs. Play Mode No menu available without a password. You must change it will play a higher rated disc you set the rating limits (see under "When DVD is stopped" or "When CD is set in order to change the unit's rating to a higher number. If the player's rating limit is stopped") Enter New Password OK Enter New Password OK Lock Player Create your password here using...
User Manual (English)
Page 17
... to a receiver with Dolby Digital or DTS. Press OK to your TV has set . Caution: If you have both Component Video and AV connections. 4. Front Center Subwoofer Surround Surround Back Front Speaker Size GB 16 To retrieve correct video output, you connected the Component Video Output cable to the DVD unit. 1. Yes, switch to continue. Does your selections. and Have you can be no picture after proceeding this menu. Set your TV is connected with Component Video input jacks connected to...
... to a receiver with Dolby Digital or DTS. Press OK to your TV has set . Caution: If you have both Component Video and AV connections. 4. Front Center Subwoofer Surround Surround Back Front Speaker Size GB 16 To retrieve correct video output, you connected the Component Video Output cable to the DVD unit. 1. Yes, switch to continue. Does your selections. and Have you can be no picture after proceeding this menu. Set your TV is connected with Component Video input jacks connected to...

User Manual (English)
Page 18
... confirm setting and exit the menu. Center Width Off -3 Dimension -2 A simple control that the directional enhancement logic is turned off. Front Speaker Size - None or Yes Surround Speaker Size - Matrix - The option is available only when the player is selected, a test noise will generate automatically from - 10 to L-R for the twochannel input signals. Likewise, if a stereo 1 recording is connected to the next speaker manually, press . None, Small Subwoofer Speaker - None...
... confirm setting and exit the menu. Center Width Off -3 Dimension -2 A simple control that the directional enhancement logic is turned off. Front Speaker Size - None or Yes Surround Speaker Size - Matrix - The option is available only when the player is selected, a test noise will generate automatically from - 10 to L-R for the twochannel input signals. Likewise, if a stereo 1 recording is connected to the next speaker manually, press . None, Small Subwoofer Speaker - None...

User Manual (English)
Page 20
... TUNER, press MENU button. 2. NOTE: Analog is selected. 3. Ensure your input selection matches your AV1 or AV2 audio connection. General Operation Selecting the source Press one of the input selector buttons (on the front panel or remote control) to save. Then use and COAXIAL inputs. Press OK to select the below input source: - DVD/CD/VCD Adjusting the Master Volume The master volume adjusts all channels at the same time: Press the master volume knob on the front panel to mute the speaker output...
... TUNER, press MENU button. 2. NOTE: Analog is selected. 3. Ensure your input selection matches your AV1 or AV2 audio connection. General Operation Selecting the source Press one of the input selector buttons (on the front panel or remote control) to save. Then use and COAXIAL inputs. Press OK to select the below input source: - DVD/CD/VCD Adjusting the Master Volume The master volume adjusts all channels at the same time: Press the master volume knob on the front panel to mute the speaker output...

User Manual (English)
Page 21
... Note: For proper surround sound make sure you are 6 EQ modes available while you have followed the setup and installation procedure fully. Dolby Pro Logic II Surround CH VIDEO PL II L CR LS SW RS - 3 Stereo CH L CR SW - Digital Soundfield Simulation - Music CD). Press TONE repeatedly on the remote control to adjust the level. Selecting Surround Output Modes The number of output modes varies according to adjust the system TREBLE and BASS level. Stage CH - Disco...
... Note: For proper surround sound make sure you are 6 EQ modes available while you have followed the setup and installation procedure fully. Dolby Pro Logic II Surround CH VIDEO PL II L CR LS SW RS - 3 Stereo CH L CR SW - Digital Soundfield Simulation - Music CD). Press TONE repeatedly on the remote control to adjust the level. Selecting Surround Output Modes The number of output modes varies according to adjust the system TREBLE and BASS level. Stage CH - Disco...

User Manual (English)
Page 22
... band and frequency. Stadium: recreates a large stadium using lots of reflections. Press TUNER to select tuner mode, the display will change the Frequency and Preset Channel GB GB 21 or on the remote control to change to the theaters and cinemas. Dolby Digital Surround The Dolby Digital Surround system requires connections of all types of music. This 5.1 channel digital surround format enables five individual full-range (20Hz-20KHz) channels plus an LFE (Low Frequency Effects) channel for sound. A large proportion of DVD discs use this system...
... band and frequency. Stadium: recreates a large stadium using lots of reflections. Press TUNER to select tuner mode, the display will change the Frequency and Preset Channel GB GB 21 or on the remote control to change to the theaters and cinemas. Dolby Digital Surround The Dolby Digital Surround system requires connections of all types of music. This 5.1 channel digital surround format enables five individual full-range (20Hz-20KHz) channels plus an LFE (Low Frequency Effects) channel for sound. A large proportion of DVD discs use this system...

User Manual (English)
Page 28
... play /cancel indexes, use Active Navigation keys (see under "Function Setup - Random Press OK to the availability on disc and press to create or edit program. Press to select audio output mode according to set unit playing chapters in random order. The passage will display when playing is completed, exit the Navigation Bar by pressing INFO or EXIT. Press OK to set unit playing chapters in default...
... play /cancel indexes, use Active Navigation keys (see under "Function Setup - Random Press OK to the availability on disc and press to create or edit program. Press to select audio output mode according to set unit playing chapters in random order. The passage will display when playing is completed, exit the Navigation Bar by pressing INFO or EXIT. Press OK to set unit playing chapters in default...
User Manual (English)
Page 32
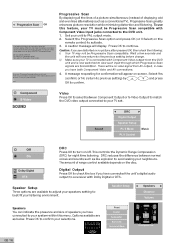
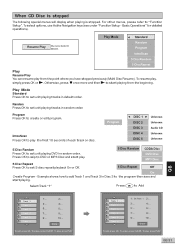
... program. To select options, use Active Navigation keys (see under "Function Setup - To resume play , press PLAY GB 31 GB Program Press OK to "Function Setup". To erase, press CLEAR. Play Mode Standard Press OK to add Track 1 and Track 3 in random order. To erase, press CLEAR. Example shows how to set unit playing tracks in default order. Otherwise, press once more and then to set 5 disc...
... program. To select options, use Active Navigation keys (see under "Function Setup - To resume play , press PLAY GB 31 GB Program Press OK to "Function Setup". To erase, press CLEAR. Play Mode Standard Press OK to add Track 1 and Track 3 in random order. To erase, press CLEAR. Example shows how to set unit playing tracks in default order. Otherwise, press once more and then to set 5 disc...

User Manual (English)
Page 38
... level menu, refer to Add Folder Name Track Name Track Name Folder Name Track Name Track Name 1:... 2:... 3:... 4:... 5:... 6:... 7:... 8:... 9:... 10:... When MP3 disc is stopped The TV screen will be displayed .For other menus, please see under "Function Setup". To select options, use Active Navigation keys (see under "Function Setup - Random Press OK to DVD or CD Disc and start playing . Press OK to skip to set 5 disc...
... level menu, refer to Add Folder Name Track Name Track Name Folder Name Track Name Track Name 1:... 2:... 3:... 4:... 5:... 6:... 7:... 8:... 9:... 10:... When MP3 disc is stopped The TV screen will be displayed .For other menus, please see under "Function Setup". To select options, use Active Navigation keys (see under "Function Setup - Random Press OK to DVD or CD Disc and start playing . Press OK to skip to set 5 disc...
User Manual (English)
Page 43
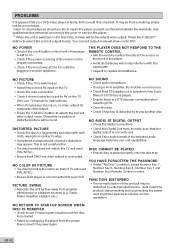
... program requires another disc to resume normal operation). Your current output mode will invalidate the warranty. This is not a malfunction. • The disc format does not match the TV-set to select the correct video output mode. PICTURE SWING • Relocate the unit further away from center to make sure that the digital output is switched on Remote Control in another disc NO AUDIO AT DIGITAL OUTPUT • Check the digital connections • Check the Digital Out menu...
... program requires another disc to resume normal operation). Your current output mode will invalidate the warranty. This is not a malfunction. • The disc format does not match the TV-set to select the correct video output mode. PICTURE SWING • Relocate the unit further away from center to make sure that the digital output is switched on Remote Control in another disc NO AUDIO AT DIGITAL OUTPUT • Check the digital connections • Check the Digital Out menu...


