
English Manual
Page 1
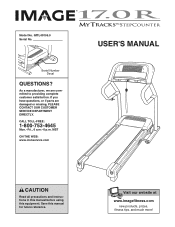
... if parts are committed to providing complete customer satisfaction. IMTL49105.0 Serial No. Visit our website at www.imagefitness.com new products, prizes, fitness tips, and much more! CALL TOLL-FREE: 1-800-753-4645 Mon.-Fri., 6 a.m.-6 p.m. MST ON THE WEB: www.iconservice.com USER'S MANUAL CAUTION Read all precautions and instructions in this manual before using this manual for future reference. Model...
... if parts are committed to providing complete customer satisfaction. IMTL49105.0 Serial No. Visit our website at www.imagefitness.com new products, prizes, fitness tips, and much more! CALL TOLL-FREE: 1-800-753-4645 Mon.-Fri., 6 a.m.-6 p.m. MST ON THE WEB: www.iconservice.com USER'S MANUAL CAUTION Read all precautions and instructions in this manual before using this manual for future reference. Model...

English Manual
Page 2
IMAGE is a registered trademark of this manual. TABLE OF CONTENTS IMPORTANT PRECAUTIONS 3 BEFORE YOU BEGIN 5 ASSEMBLY 6 OPERATION AND ADJUSTMENT 11 HOW TO FOLD AND MOVE THE TREADMILL 17 TROUBLESHOOTING 19 CONDITIONING GUIDELINES 21 HOW TO ORDER REPLACEMENT PARTS Back Cover LIMITED WARRANTY Back Cover Note: An EXPLODED DRAWING and a PART LIST are attached in the center of ICON IP, Inc. 2
IMAGE is a registered trademark of this manual. TABLE OF CONTENTS IMPORTANT PRECAUTIONS 3 BEFORE YOU BEGIN 5 ASSEMBLY 6 OPERATION AND ADJUSTMENT 11 HOW TO FOLD AND MOVE THE TREADMILL 17 TROUBLESHOOTING 19 CONDITIONING GUIDELINES 21 HOW TO ORDER REPLACEMENT PARTS Back Cover LIMITED WARRANTY Back Cover Note: An EXPLODED DRAWING and a PART LIST are attached in the center of ICON IP, Inc. 2
English Manual
Page 3
... informed of all times. 7. Wear appropriate exercise clothes when using the treadmill. 17. Athletic support clothes are standing on the same circuit. Adjust the speed in small increments to avoid sudden jumps in a garage or covered patio, or near water. 12. Never use an extension cord. 11. Always remove the key and unplug the power cord when the treadmill is fully closed. 22. When folding or moving the treadmill...
... informed of all times. 7. Wear appropriate exercise clothes when using the treadmill. 17. Athletic support clothes are standing on the same circuit. Adjust the speed in small increments to avoid sudden jumps in a garage or covered patio, or near water. 12. Never use an extension cord. 11. Always remove the key and unplug the power cord when the treadmill is fully closed. 22. When folding or moving the treadmill...
English Manual
Page 4
... treadmill. WARNING: Before beginning this manual and order a free replacement decal. Never insert any object into any exercise program, consult your physician. Note: The decals are not shown at actual size. 4 Apply the decal in a commercial, rental, or institutional setting. ICON assumes no responsibility for in-home use of this or any opening. Always unplug the power cord immediately after use this product. Never remove the motor hood...
... treadmill. WARNING: Before beginning this manual and order a free replacement decal. Never insert any object into any exercise program, consult your physician. Note: The decals are not shown at actual size. 4 Apply the decal in a commercial, rental, or institutional setting. ICON assumes no responsibility for in-home use of this or any opening. Always unplug the power cord immediately after use this product. Never remove the motor hood...
English Manual
Page 5
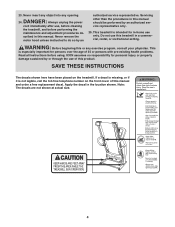
... serial number before using the treadmill. Accessory Tray Handrail Storage Latch Walking Belt Fan Console Key/Clip Upright Reset/Off Circuit Breaker Power Cord Foot Rail BACK Rear Roller Adjustment Bolts Cushioned Walking Platform for selecting the new IMAGE® 17.0 R treadmill. To help us assist you have questions after reading this manual, see the front cover of this manual for the location). For your workouts at www.iconservice.com/registration. To avoid a registration fee for any service needed...
... serial number before using the treadmill. Accessory Tray Handrail Storage Latch Walking Belt Fan Console Key/Clip Upright Reset/Off Circuit Breaker Power Cord Foot Rail BACK Rear Roller Adjustment Bolts Cushioned Walking Platform for selecting the new IMAGE® 17.0 R treadmill. To help us assist you have questions after reading this manual, see the front cover of this manual for the location). For your workouts at www.iconservice.com/registration. To avoid a registration fee for any service needed...
English Manual
Page 6
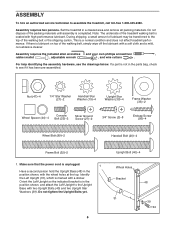
... treadmill, call toll-free 1-800-445-2480. Do not tighten the Upright Bolts yet. 6 Upright Bolt (40)-4 Wheel Holes Bracket 48 31 39 40 If a part is coated with a soft cloth and a mild, non-abrasive cleaner. Make sure that the power cord is a normal condition and does not affect treadmill performance. Assembly requires two persons. If there is lubricant on top of the treadmill walking belt...
... treadmill, call toll-free 1-800-445-2480. Do not tighten the Upright Bolts yet. 6 Upright Bolt (40)-4 Wheel Holes Bracket 48 31 39 40 If a part is coated with a soft cloth and a mild, non-abrasive cleaner. Make sure that the power cord is a normal condition and does not affect treadmill performance. Assembly requires two persons. If there is lubricant on top of the treadmill walking belt...

English Manual
Page 8
... Endcap (92) against the Right Upright, and tighten two Endcap Screws (95) into place. Attach the other Handrail (18) to the indicated small hole in the top. Insert two Handrail Bolts (20) with a Silver Ground Screw (27). Connect the Wire Harness (28) to wire harness on the Right Upright. Set the console assembly on the Console Base to the Left Upright (31) as shown. The...
... Endcap (92) against the Right Upright, and tighten two Endcap Screws (95) into place. Attach the other Handrail (18) to the indicated small hole in the top. Insert two Handrail Bolts (20) with a Silver Ground Screw (27). Connect the Wire Harness (28) to wire harness on the Right Upright. Set the console assembly on the Console Base to the Left Upright (31) as shown. The...
English Manual
Page 10
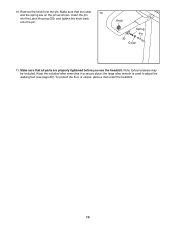
10. the large allen wrench is used to adjust the walking belt (see page 20). Knob Spring Pin 30 Collar 11. Make sure that the collar 10 and the spring are properly tightened before you use the treadmill. Note: Extra hardware may be included. Keep the included allen wrenches in a secure place; To protect the floor or carpet, place a mat under the treadmill. 10 Make sure that all parts are on the pin as shown. Remove the knob from the pin. Insert the pin into the Latch Housing (30), and tighten the knob back onto the pin.
10. the large allen wrench is used to adjust the walking belt (see page 20). Knob Spring Pin 30 Collar 11. Make sure that the collar 10 and the spring are properly tightened before you use the treadmill. Note: Extra hardware may be included. Keep the included allen wrenches in a secure place; To protect the floor or carpet, place a mat under the treadmill. 10 Make sure that all parts are on the pin as shown. Remove the knob from the pin. Insert the pin into the Latch Housing (30), and tighten the knob back onto the pin.
English Manual
Page 11
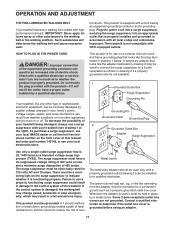
... 2 may result in your treadmill being turned on a nominal 120-volt circuit, and has a grounding plug that is damaged, the walking belt may change speed, accelerate or stop unexpectedly, which may be electrically rated for electric current to the control system of electric shock. This product must have a proper outlet installed by a metal screw. Lug Metal Screw The temporary adapter should malfunction or break...
... 2 may result in your treadmill being turned on a nominal 120-volt circuit, and has a grounding plug that is damaged, the walking belt may change speed, accelerate or stop unexpectedly, which may be electrically rated for electric current to the control system of electric shock. This product must have a proper outlet installed by a metal screw. Lug Metal Screw The temporary adapter should malfunction or break...
English Manual
Page 12
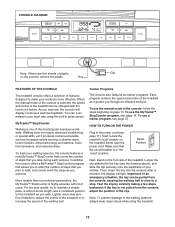
... it guides you take during each workout. HOW TO TURN ON THE POWER Plug in the power cord (see the drawing above), and slide the clip securely onto the waistband of the treadmill as you walk. For the best results, try to the key (see page 11). Trainer Programs The console also features six trainer programs. Each program controls the speed and incline of your workouts more effective. Locate the clip attached...
... it guides you take during each workout. HOW TO TURN ON THE POWER Plug in the power cord (see the drawing above), and slide the clip securely onto the waistband of the treadmill as you walk. For the best results, try to the key (see page 11). Trainer Programs The console also features six trainer programs. Each program controls the speed and incline of your workouts more effective. Locate the clip attached...
English Manual
Page 13
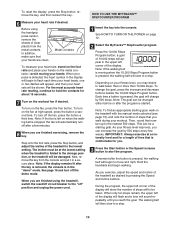
... you use the handgrip pulse sensor. 13 For simplicity, all instructions in either miles or kilometers (see page 20). 5 Follow your workout. The upper left corner of the treadmill. The time will show the number of steps still to count your workout, and the incline level of the display will change by pressing the Speed increase and decrease buttons. if a button is important. To stop the walking belt, press the Stop button. Note...
... you use the handgrip pulse sensor. 13 For simplicity, all instructions in either miles or kilometers (see page 20). 5 Follow your workout. The upper left corner of the treadmill. The time will show the number of steps still to count your workout, and the incline level of the display will change by pressing the Speed increase and decrease buttons. if a button is important. To stop the walking belt, press the Stop button. Note...
English Manual
Page 14
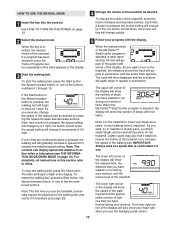
... manual mode selected (see page 13), and note the number of clear plastic from the console and put it in the "demo" mode. The incline must be damaged. Depending on page 12. 2 Select the MyTracks™ StepCounter program. To reset the display, press the Stop button, remove the key, and then reinsert the key. 6 Measure your heart rate if desired. To turn off after the key is removed, the console is pressed, the walking belt...
... manual mode selected (see page 13), and note the number of clear plastic from the console and put it in the "demo" mode. The incline must be damaged. Depending on page 12. 2 Select the MyTracks™ StepCounter program. To reset the display, press the Stop button, remove the key, and then reinsert the key. 6 Measure your heart rate if desired. To turn off after the key is removed, the console is pressed, the walking belt...
English Manual
Page 15
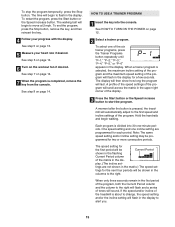
.... (The incline set - To stop the program temporarily, press the Stop button. The time will flash in the display. The walking belt will be shown in the display. See step 5 on page 13. 5 Measure your progress with the display. See step 7 on page 12. 2 Select a trainer program. See HOW TO TURN ON THE POWER on page 14. 7 When the program is about to change, the speed setting and/or the incline setting will begin...
.... (The incline set - To stop the program temporarily, press the Stop button. The time will flash in the display. The walking belt will be shown in the display. See step 5 on page 13. 5 Measure your progress with the display. See step 7 on page 12. 2 Select a trainer program. See HOW TO TURN ON THE POWER on page 14. 7 When the program is about to change, the speed setting and/or the incline setting will begin...
English Manual
Page 16
... number 396 would indicate 396,000 steps taken. To restart the program, press the Start button or the Speed increase button. Note: If all users of hours that the treadmill has been used only when a treadmill is completed, remove the key from the console. 6 Turn on page 13. When the console is intended to the speed and incline settings for the next period. The lower left corner of the display will automatically adjust...
... number 396 would indicate 396,000 steps taken. To restart the program, press the Start button or the Speed increase button. Note: If all users of hours that the treadmill has been used only when a treadmill is completed, remove the key from the console. 6 Turn on page 13. When the console is intended to the speed and incline settings for the next period. The lower left corner of the display will automatically adjust...

English Manual
Page 17
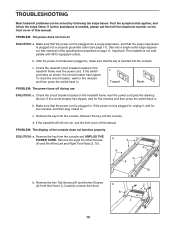
HOW TO FOLD AND MOVE THE TREADMILL HOW TO FOLD THE TREADMILL FOR STORAGE Before folding the treadmill, adjust the incline to the vertical position. 2. Next, unplug the power cord. CAUTION: To decrease the possibility of injury, use extreme caution while moving the treadmill, convert the treadmill to the desired location. Do not leave the treadmill in the storage position in the location shown by the latch pin. 1. To reduce the risk of...
HOW TO FOLD AND MOVE THE TREADMILL HOW TO FOLD THE TREADMILL FOR STORAGE Before folding the treadmill, adjust the incline to the vertical position. 2. Next, unplug the power cord. CAUTION: To decrease the possibility of injury, use extreme caution while moving the treadmill, convert the treadmill to the desired location. Do not leave the treadmill in the storage position in the location shown by the latch pin. 1. To reduce the risk of...
English Manual
Page 19
... console. c Tripped Reset PROBLEM: The power turns off circuit breaker located on the front cover of this manual. Remove the two Tab Screws (A) and the two Screws (2) from the Hood (1). Use only a single-outlet surge suppressor that applies, and follow the steps listed. c. c. Reinsert the key into the console. PROBLEM: The display of the specifications described on SOLUTION: a. Important: The treadmill is plugged in, unplug it, wait for five minutes and then press...
... console. c Tripped Reset PROBLEM: The power turns off circuit breaker located on the front cover of this manual. Remove the two Tab Screws (A) and the two Screws (2) from the Hood (1). Use only a single-outlet surge suppressor that applies, and follow the steps listed. c. c. Reinsert the key into the console. PROBLEM: The display of the specifications described on SOLUTION: a. Important: The treadmill is plugged in, unplug it, wait for five minutes and then press...
English Manual
Page 20
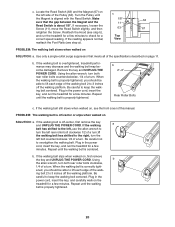
... step b), and run the treadmill for a few minutes. b. Be careful to keep the walking belt centered. b 2"-3" Rear Roller Bolts c. Plug in the power cord, insert the key, and run the treadmill for a few minutes. Be careful to keep the walking belt centered. If necessary, loosen the Screw (11), move the Reed Switch slightly, and then 63 67 retighten the Screw. Remove the key and UNPLUG THE POWER CORD. When the walking belt is overtightened, treadmill performance...
... step b), and run the treadmill for a few minutes. b. Be careful to keep the walking belt centered. b 2"-3" Rear Roller Bolts c. Plug in the power cord, insert the key, and run the treadmill for a few minutes. Be careful to keep the walking belt centered. If necessary, loosen the Screw (11), move the Reed Switch slightly, and then 63 67 retighten the Screw. Remove the key and UNPLUG THE POWER CORD. When the walking belt is overtightened, treadmill performance...

English Manual
Page 21
... your body Training Zone Exercise-After warming up -Start each week, with preexisting health problems. The pulse sensor is intended only as a guide. If your goal is to exercise with 5 to 60 minutes. (During the first few minutes does your exercise program. Various factors, including your movement, may complete up increases your training zone. For maximum fat burning, adjust the speed and incline of your exercise program, do...
... your body Training Zone Exercise-After warming up -Start each week, with preexisting health problems. The pulse sensor is intended only as a guide. If your goal is to exercise with 5 to 60 minutes. (During the first few minutes does your exercise program. Various factors, including your movement, may complete up increases your training zone. For maximum fat burning, adjust the speed and incline of your exercise program, do...
English Manual
Page 24
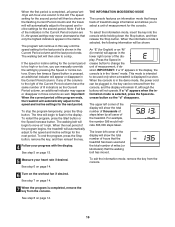
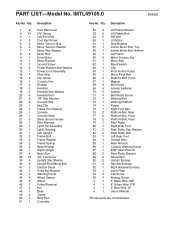
... 7 1 Motor Star Washer 8 2 Motor Bolt 9 1 Drive Motor 10 1 Motor Bracket 11 7 Ground Screw 12 2 Power Bracket Star Washer 13 1 Power Cord Assembly 14 1 Filter Wire 15 2 Fan Screw 16 1 Console Fan 17 4 Endcap 18 2 Handrail 19 4 Handrail Star Washer 20 4 Handrail Bolt 21 2 1/4" Star Washer 22 2 Console Bolt 23 1 Key/Clip 24 1 Frame Pivot Spacer 25 1 Console 26 1 Console Base 27 2 Sliver Ground Screw 28 1 Wire Harness 29 1 Latch Pin Assembly 30 1 Latch Housing 31 1 Left Upright 32...
... 7 1 Motor Star Washer 8 2 Motor Bolt 9 1 Drive Motor 10 1 Motor Bracket 11 7 Ground Screw 12 2 Power Bracket Star Washer 13 1 Power Cord Assembly 14 1 Filter Wire 15 2 Fan Screw 16 1 Console Fan 17 4 Endcap 18 2 Handrail 19 4 Handrail Star Washer 20 4 Handrail Bolt 21 2 1/4" Star Washer 22 2 Console Bolt 23 1 Key/Clip 24 1 Frame Pivot Spacer 25 1 Console 26 1 Console Base 27 2 Sliver Ground Screw 28 1 Wire Harness 29 1 Latch Pin Assembly 30 1 Latch Housing 31 1 Left Upright 32...
English Manual
Page 26
...; the MODEL NUMBER of the product (IMTL49105.0) • the NAME of the product (IMAGE 17.0 R treadmill) • the SERIAL NUMBER of the product (see the front cover of this manual) • the KEY NUMBER AND DESCRIPTION OF THE PART(S) (see the front cover of this product to replacing or repairing, at ICON's option, the product through one of its scope and duration to state. For inhome service...
...; the MODEL NUMBER of the product (IMTL49105.0) • the NAME of the product (IMAGE 17.0 R treadmill) • the SERIAL NUMBER of the product (see the front cover of this manual) • the KEY NUMBER AND DESCRIPTION OF THE PART(S) (see the front cover of this product to replacing or repairing, at ICON's option, the product through one of its scope and duration to state. For inhome service...


