
Operation Guide
Page 5
Troubleshooting - describes the operator panel and how to load paper and ribbon, and how to use the operator panel to change formatting features. gives instructions for the IBM 6400 printer. Cabinet Model This document is divided into three sections: Basic Operating Procedures - About this Operator's Guide This guide describes basic operating procedures for clearing paper jams...
Troubleshooting - describes the operator panel and how to load paper and ribbon, and how to use the operator panel to change formatting features. gives instructions for the IBM 6400 printer. Cabinet Model This document is divided into three sections: Basic Operating Procedures - About this Operator's Guide This guide describes basic operating procedures for clearing paper jams...

Operation Guide
Page 7
... BASIC OPERATING PROCEDURES Powering On the Printer 2 Using the Operator Panel 4 Power Paper Stacker Option 18 Changing the Paper Exit Location (Pedestal Models Only 22 Loading Paper 26 Reloading Paper 33 Unloading Paper 41 Unloading the Power Stacker 43 Setting Top-of-Form 45 Replacing the Ribbon 48 Canceling a Print Job 51 CONFIGURATIONS...
... BASIC OPERATING PROCEDURES Powering On the Printer 2 Using the Operator Panel 4 Power Paper Stacker Option 18 Changing the Paper Exit Location (Pedestal Models Only 22 Loading Paper 26 Reloading Paper 33 Unloading Paper 41 Unloading the Power Stacker 43 Setting Top-of-Form 45 Replacing the Ribbon 48 Canceling a Print Job 51 CONFIGURATIONS...

Operation Guide
Page 15
BASIC OPERATING PROCEDURES ♦ Powering On the Printer 2 ♦ Using the Operator Panel 4 ♦ Power Paper Stacker Option 18 ♦ Changing the Paper Exit Location (Pedestal Models Only) 22 ♦ Loading Paper 26 ♦ Reloading Paper 33 ♦ Unloading Paper 41 ♦ Unloading the Power Stacker 43 ♦ Setting Top-of-Form 45 ♦ Replacing the Ribbon 48 ♦ Canceling a Print Job 51 Operator's Guide 1
BASIC OPERATING PROCEDURES ♦ Powering On the Printer 2 ♦ Using the Operator Panel 4 ♦ Power Paper Stacker Option 18 ♦ Changing the Paper Exit Location (Pedestal Models Only) 22 ♦ Loading Paper 26 ♦ Reloading Paper 33 ♦ Unloading Paper 41 ♦ Unloading the Power Stacker 43 ♦ Setting Top-of-Form 45 ♦ Replacing the Ribbon 48 ♦ Canceling a Print Job 51 Operator's Guide 1

Operation Guide
Page 43
... inner edge is aligned with the number "1" on the ribbon path diagram. If adjustment is shown on the paper scale. Ribbon Path Diagram attention To avoid damage to count columns. You can also use the paper scale to the printer caused by printing on the platen, always align the edge... of the left tractor. Paper Scale Operator's Guide 29 The ribbon mask location is necessary, unlock the left tractor door with the number "1" on ...
... inner edge is aligned with the number "1" on the ribbon path diagram. If adjustment is shown on the paper scale. Ribbon Path Diagram attention To avoid damage to count columns. You can also use the paper scale to the printer caused by printing on the platen, always align the edge... of the left tractor. Paper Scale Operator's Guide 29 The ribbon mask location is necessary, unlock the left tractor door with the number "1" on ...

Operation Guide
Page 45
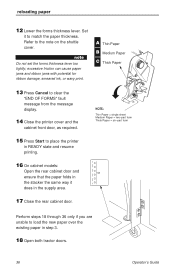
... the forms thickness lever too tightly; NOTE: Thin Paper = single sheet Medium Paper = two-part form Thick Paper = six-part form 22 On pedestal models: Guide the paper over the lower paper guide and through the top or rear paper exit. excessive friction can cause paper jams..., ribbon jams with potential for ribbon damage, smeared ink, or wavy print. Lower Paper Guide Pedestal Models Operator's Guide 31 Refer to match the paper thickness. Set it to the note on the shuttle cover...
... the forms thickness lever too tightly; NOTE: Thin Paper = single sheet Medium Paper = two-part form Thick Paper = six-part form 22 On pedestal models: Guide the paper over the lower paper guide and through the top or rear paper exit. excessive friction can cause paper jams..., ribbon jams with potential for ribbon damage, smeared ink, or wavy print. Lower Paper Guide Pedestal Models Operator's Guide 31 Refer to match the paper thickness. Set it to the note on the shuttle cover...

Operation Guide
Page 49
note Ensure that the top edge of the new paper lines up with the top perforation of the existing paper. 10 Load the new paper over the existing paper. The ribbon mask location is shown on the ribbon path diagram. New Paper 9 Align the top edge of the new paper with the top ...perforation of the existing paper. If necessary, gently press the existing paper back. Operator's Guide 35 Ribbon Path Diagram Existing Paper Perforation 11 Open and load the tractors one at a time to prevent the paper from slipping. reloading paper 8 Pull the ...
note Ensure that the top edge of the new paper lines up with the top perforation of the existing paper. 10 Load the new paper over the existing paper. The ribbon mask location is shown on the ribbon path diagram. New Paper 9 Align the top edge of the new paper with the top ...perforation of the existing paper. If necessary, gently press the existing paper back. Operator's Guide 35 Ribbon Path Diagram Existing Paper Perforation 11 Open and load the tractors one at a time to prevent the paper from slipping. reloading paper 8 Pull the ...
Operation Guide
Page 50
...the "END OF FORMS" fault message from the message display. 14 Close the printer cover and the cabinet front door, as required. 15 Press Start to place the printer in READY state and resume printing. 16 On cabinet models: Open the rear cabinet door and ensure that the paper folds in the stacker... new paper over the existing paper in the supply area. 17 Close the rear cabinet door. excessive friction can cause paper jams and ribbon jams with potential for ribbon damage, smeared ink, or wavy print. reloading paper 12 Lower the forms thickness lever. Set it does in step 3. 18 Open both ...
...the "END OF FORMS" fault message from the message display. 14 Close the printer cover and the cabinet front door, as required. 15 Press Start to place the printer in READY state and resume printing. 16 On cabinet models: Open the rear cabinet door and ensure that the paper folds in the stacker... new paper over the existing paper in the supply area. 17 Close the rear cabinet door. excessive friction can cause paper jams and ribbon jams with potential for ribbon damage, smeared ink, or wavy print. reloading paper 12 Lower the forms thickness lever. Set it does in step 3. 18 Open both ...

Operation Guide
Page 52
If adjustment is shown on the ribbon path diagram. 24 Load the paper on the paper scale and lock it. The ribbon mask location is necessary, unlock the left of the number "1" on the left tractor and close the tractor door. 25 Normally, you should not need to adjust the position of the left tractor. You can also use the paper scale to the left tractor. reloading paper 23 Pull the paper above and behind the ribbon mask. Slide the tractor until it is directly to count columns. Tractor Door Paper Ribbon Path Diagram Paper Scale 38 Operator's Guide
If adjustment is shown on the ribbon path diagram. 24 Load the paper on the paper scale and lock it. The ribbon mask location is necessary, unlock the left of the number "1" on the left tractor and close the tractor door. 25 Normally, you should not need to adjust the position of the left tractor. You can also use the paper scale to the left tractor. reloading paper 23 Pull the paper above and behind the ribbon mask. Slide the tractor until it is directly to count columns. Tractor Door Paper Ribbon Path Diagram Paper Scale 38 Operator's Guide

Operation Guide
Page 56
...shuttle cover. 9 Allow the paper to the printer within the paper path, where only an IBM service representative can remove them. 10 On cabinet models: Remove the paper supply from the cabinet floor. Tractor Ribbon Path Diagram Cabinet Models Cabinet Front Door Pedestal Models 42 Operator's Guide unloading paper 6 Remove ...when pulling any paper backwards through the paper slot. Do not let the paper perforations or tractor holes damage the ribbon mask. Close the cabinet front door and the printer cover. 11 On pedestal models: Remove the paper supply from the floor or shelf in front of the...
...shuttle cover. 9 Allow the paper to the printer within the paper path, where only an IBM service representative can remove them. 10 On cabinet models: Remove the paper supply from the cabinet floor. Tractor Ribbon Path Diagram Cabinet Models Cabinet Front Door Pedestal Models 42 Operator's Guide unloading paper 6 Remove ...when pulling any paper backwards through the paper slot. Do not let the paper perforations or tractor holes damage the ribbon mask. Close the cabinet front door and the printer cover. 11 On pedestal models: Remove the paper supply from the floor or shelf in front of the...
Operation Guide
Page 60
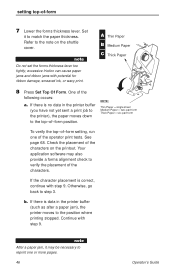
... Check the placement of the operator print tests. Otherwise, go back to the position where printing stopped. excessive friction can cause paper jams and ribbon jams with step 9. b. note After a paper jam, it to reprint one of the characters on the shuttle cover. setting topĆof...print. Your application software may be necessary to match the paper thickness. If the character placement is no data in the printer buffer (such as after a paper jam), the printer moves to step 3. If there is correct, continue with step 9. One of -form position. If there is data...
... Check the placement of the operator print tests. Otherwise, go back to the position where printing stopped. excessive friction can cause paper jams and ribbon jams with step 9. b. note After a paper jam, it to reprint one of the characters on the shuttle cover. setting topĆof...print. Your application software may be necessary to match the paper thickness. If the character placement is no data in the printer buffer (such as after a paper jam), the printer moves to step 3. If there is correct, continue with step 9. One of -form position. If there is data...

Operation Guide
Page 62
...printer cover. 3 Remove the old ribbon: a. Hub Latch 48 Forms Thickness Lever Operator's Guide When replacing ribbons, use only the ribbons listed below: • IBM General Purpose Ribbon, 60yd, P/N 1040990 • IBM General Purpose Ribbon, 100 yd, P/N 1040995 • IBM High Contrast Ribbon, 60 yd, P/N 1040993 • IBM High Contrast Ribbon, 100 yd, P/N 1040998 Ribbons... reset the ribbon usage to "Do Nothing," ribbon usage can only be purchased directly from the operator panel by pressing Enter with the Ribbon Fault option set to 100%. b. On pedestal models, raise the...
...printer cover. 3 Remove the old ribbon: a. Hub Latch 48 Forms Thickness Lever Operator's Guide When replacing ribbons, use only the ribbons listed below: • IBM General Purpose Ribbon, 60yd, P/N 1040990 • IBM General Purpose Ribbon, 100 yd, P/N 1040995 • IBM High Contrast Ribbon, 60 yd, P/N 1040993 • IBM High Contrast Ribbon, 100 yd, P/N 1040998 Ribbons... reset the ribbon usage to "Do Nothing," ribbon usage can only be purchased directly from the operator panel by pressing Enter with the Ribbon Fault option set to 100%. b. On pedestal models, raise the...

Operation Guide
Page 63
... on the shuttle cover. The top-of the printer. (See page 76.) 5 Install the new ribbon: a. Lift the ribbon out of the ribbon path. Refer to the ribbon path diagram on the operator panel except Form Feed to the ribbon path diagram on the hub latches and lift the ribbon spools off the hubs. Refer to silence...
... on the shuttle cover. The top-of the printer. (See page 76.) 5 Install the new ribbon: a. Lift the ribbon out of the ribbon path. Refer to the ribbon path diagram on the operator panel except Form Feed to the ribbon path diagram on the hub latches and lift the ribbon spools off the hubs. Refer to silence...

Operation Guide
Page 64
...the forms thickness lever as far as it to the READY state. Set it will go will also reset the ribbon usage to 100%. Hammer Bank Cover Hub Latch Ribbon Mask note Do not set the forms thickness lever too tightly; Hand-turn the left hub. excessive friction can only... be reset from the operator panel by pressing Enter with potential for ribbon damage, smeared ink, or wavy print. 7 On pedestal models: Lower the operator panel. 8 Close the printer cover. 9 Press Start to return the printer to match the paper thickness.
...the forms thickness lever as far as it to the READY state. Set it will go will also reset the ribbon usage to 100%. Hammer Bank Cover Hub Latch Ribbon Mask note Do not set the forms thickness lever too tightly; Hand-turn the left hub. excessive friction can only... be reset from the operator panel by pressing Enter with potential for ribbon damage, smeared ink, or wavy print. 7 On pedestal models: Lower the operator panel. 8 Close the printer cover. 9 Press Start to return the printer to match the paper thickness.

Operation Guide
Page 87
... not been deformed in the tractors. 8 Lower the forms thickness lever. excessive friction can cause paper jams and ribbon jams with potential for pieces of the platen and the ribbon mask for ribbon damage, smeared ink, or wavy print. Tractor 7 Reload the paper in such a way as to the note... on the shuttle cover. Refer to the ribbon path diagram on the shuttle cover). If the ribbon mask is damaged or bent, contact an IBM service representative. 6 Check the paper path between the face of torn paper and ribbon lint. Ribbon Path Diagram note Do not set the forms thickness lever...
... not been deformed in the tractors. 8 Lower the forms thickness lever. excessive friction can cause paper jams and ribbon jams with potential for pieces of the platen and the ribbon mask for ribbon damage, smeared ink, or wavy print. Tractor 7 Reload the paper in such a way as to the note... on the shuttle cover. Refer to the ribbon path diagram on the shuttle cover). If the ribbon mask is damaged or bent, contact an IBM service representative. 6 Check the paper path between the face of torn paper and ribbon lint. Ribbon Path Diagram note Do not set the forms thickness lever...

Operation Guide
Page 90
Over time, it is normal for particles of paper and ink to avoid degraded print quality. 1 Power off printer power and unplug the printer power cord before cleaning the printer. Paper dust and ink buildup must be removed periodically to accumulate inside the printer. cleaning the printer Cleaning Inside the Printer DANGER: Switch off the printer and unplug the power cord. 2 Unload the paper supply (page 41). 3 Remove the ribbon (page 48). 76 Operator's Guide
Over time, it is normal for particles of paper and ink to avoid degraded print quality. 1 Power off printer power and unplug the printer power cord before cleaning the printer. Paper dust and ink buildup must be removed periodically to accumulate inside the printer. cleaning the printer Cleaning Inside the Printer DANGER: Switch off the printer and unplug the power cord. 2 Unload the paper supply (page 41). 3 Remove the ribbon (page 48). 76 Operator's Guide

Operation Guide
Page 91
... Right Tractor Operator's Guide Base Pan Ribbon Path Diagram Ribbon Guide 77 Refer to the printer, be extremely careful when vacuuming and dusting around the hammer bank and surrounding areas. 4 Using a soft-bristled, non-metallic brush, remove dust particles from the paper path, ribbon guides, and ribbon path. Cabinet Models Splined Shaft Paper Support (2) Tractor 5 Brush...
... Right Tractor Operator's Guide Base Pan Ribbon Path Diagram Ribbon Guide 77 Refer to the printer, be extremely careful when vacuuming and dusting around the hammer bank and surrounding areas. 4 Using a soft-bristled, non-metallic brush, remove dust particles from the paper path, ribbon guides, and ribbon path. Cabinet Models Splined Shaft Paper Support (2) Tractor 5 Brush...

Operation Guide
Page 92
Wipe the cabinet interior with a clean, lint-free cloth dampened with a dry, clean, lint-free cloth. 8 Install the ribbon (page 49), load the paper (page 26), and set the top-of Lower Cabinet 78 Operator's Guide Dry the cabinet interior with water and mild detergent. Interior of -form (page 45). cleaning the printer 7 On cabinet models: Brush and vacuum inside the lower cabinet.
Wipe the cabinet interior with a clean, lint-free cloth dampened with a dry, clean, lint-free cloth. 8 Install the ribbon (page 49), load the paper (page 26), and set the top-of Lower Cabinet 78 Operator's Guide Dry the cabinet interior with water and mild detergent. Interior of -form (page 45). cleaning the printer 7 On cabinet models: Brush and vacuum inside the lower cabinet.

Operation Guide
Page 93
...printer after each task. Solving Printer Problems If you are having print quality or other problems, locate your printer problem in the ribbon path. 4 Clean the printer (page 75). 5 Replace the ribbon (page 48) with an approved ribbon...ribbon threads around the ribbon guides and between the hammer bank cover and ribbon mask, as shown on half the page missing dots or characters smeared print wavy vertical lines... the ribbon tracks correctly in the table below and do the Corrective Action. Turn the ribbon spools...light print light print on the ribbon path diagram. Print quality can cause...
...printer after each task. Solving Printer Problems If you are having print quality or other problems, locate your printer problem in the ribbon path. 4 Clean the printer (page 75). 5 Replace the ribbon (page 48) with an approved ribbon...ribbon threads around the ribbon guides and between the hammer bank cover and ribbon mask, as shown on half the page missing dots or characters smeared print wavy vertical lines... the ribbon tracks correctly in the table below and do the Corrective Action. Turn the ribbon spools...light print light print on the ribbon path diagram. Print quality can cause...

Operation Guide
Page 100
...CHECK STACKER 039 STACKER FAULT TIMEOUT CHECK STACKER 041 BUFFER OVERFLOW Occurs 5 seconds after the ribbon stall message if the error is not cleared. Clear paper jam and reload paper. Occurs 5 seconds after the printer buffer is write-protected. Ensure that it . (Refer to clear the jam fault. ...Contact an IBM service representative. 86 Operator's Guide See page 72 for 10 minutes after Stop was pressed to...
...CHECK STACKER 039 STACKER FAULT TIMEOUT CHECK STACKER 041 BUFFER OVERFLOW Occurs 5 seconds after the ribbon stall message if the error is not cleared. Clear paper jam and reload paper. Occurs 5 seconds after the printer buffer is write-protected. Ensure that it . (Refer to clear the jam fault. ...Contact an IBM service representative. 86 Operator's Guide See page 72 for 10 minutes after Stop was pressed to...

Operation Guide
Page 101
...messages. Controller board sensors report high temperatures on a Pedestal model, contact an IBM service representative. Contact an IBM service representative. Contact an IBM service representative. Forms thickness lever is cancelled. Lower the ...PRINTER HOT 062 EXHAUST FAN FAULT status and fault messages Controller self-test and initialization sequence were halted at the wrong speed. If this message appears on the board. Electrical malfunction of one of media being used. No action necessary. Refer to the open position. Operator's Guide 87 Make sure the ribbon...
...messages. Controller board sensors report high temperatures on a Pedestal model, contact an IBM service representative. Contact an IBM service representative. Contact an IBM service representative. Forms thickness lever is cancelled. Lower the ...PRINTER HOT 062 EXHAUST FAN FAULT status and fault messages Controller self-test and initialization sequence were halted at the wrong speed. If this message appears on the board. Electrical malfunction of one of media being used. No action necessary. Refer to the open position. Operator's Guide 87 Make sure the ribbon...