Service Guide
Page 6
... I /O panel door - removing 74 PC card - removing and replacing 82 Free-standing SurePOS 500 Models 5x3 and 544/564 - removing and replacing 47 Display tablet - removing and replacing ...assembly - removing and replacing 69 Processor module - removing and replacing 74 Rear connector panel (tailgate) - removing and replacing 79 Base plate - removing and replacing 81 Mounting options - removing... Service Diskette (for the 5x3 models 30 Using the IBM Diagnostics for Peripherals (for the 5x3 models 31 Using the IBM Diagnostics for POS System Units and Peripherals (for counter ...
... I /O panel door - removing 74 PC card - removing and replacing 82 Free-standing SurePOS 500 Models 5x3 and 544/564 - removing and replacing 47 Display tablet - removing and replacing ...assembly - removing and replacing 69 Processor module - removing and replacing 74 Rear connector panel (tailgate) - removing and replacing 79 Base plate - removing and replacing 81 Mounting options - removing... Service Diskette (for the 5x3 models 30 Using the IBM Diagnostics for Peripherals (for the 5x3 models 31 Using the IBM Diagnostics for POS System Units and Peripherals (for counter ...
Service Guide
Page 10
... . . . 124 101. 4610 SureMark printer cable routing on a cash drawer 91 68. Removing the SurePOS 500 Models 5x3 and 544/564 from a full-size integration tray 92 69. Tailgate connector locations 77 55. Remove the distributed character display from the integration tray 103 80. Distributed customer display...for the non-keyboard integration tray 122 99. Compact cash drawer with a non-keyboard integration tray for the SurePOS 500 Models 5x3 and 544/564 84 61. Tailgate remove and replace 76 54. Removing the keyboard integration tray attached to the system unit 119 96. Mounting...
... . . . 124 101. 4610 SureMark printer cable routing on a cash drawer 91 68. Removing the SurePOS 500 Models 5x3 and 544/564 from a full-size integration tray 92 69. Tailgate connector locations 77 55. Remove the distributed character display from the integration tray 103 80. Distributed customer display...for the non-keyboard integration tray 122 99. Compact cash drawer with a non-keyboard integration tray for the SurePOS 500 Models 5x3 and 544/564 84 61. Tailgate remove and replace 76 54. Removing the keyboard integration tray attached to the system unit 119 96. Mounting...
Service Guide
Page 59
... Speaker - removing and replacing 69 Processor module - removing and replacing 74 Rear connector panel (tailgate) - removing and replacing 84 Non-keyboard integration tray cash drawer - removing and replacing 45 ... removing and replacing 58 Connecting the cables and using cable-ties for the SurePOS 500 Models 5x3 and 544/564 Handling static-sensitive devices 34 Covers - removing...79 Base plate - removing and replacing 80 Mounting foot - removing and replacing 82 Free-standing SurePOS 500 Models 5x3 and 544/564 - removing and replacing . . . 88 Keyboard integration tray ...
... Speaker - removing and replacing 69 Processor module - removing and replacing 74 Rear connector panel (tailgate) - removing and replacing 84 Non-keyboard integration tray cash drawer - removing and replacing 45 ... removing and replacing 58 Connecting the cables and using cable-ties for the SurePOS 500 Models 5x3 and 544/564 Handling static-sensitive devices 34 Covers - removing...79 Base plate - removing and replacing 80 Mounting foot - removing and replacing 82 Free-standing SurePOS 500 Models 5x3 and 544/564 - removing and replacing . . . 88 Keyboard integration tray ...

Service Guide
Page 90
...4. Cooling duct August 3, 2006 Cooling duct - Switch OFF the power to the SurePOS 500 Models 5x3 and 544/564. Remove rear inner metal cover. See "Rear inner metal cover - See "Rear connector panel (tailgate) - Figure 44. Unplug the power cord from the external power source. 2.... Remove the power supply. removing and replacing 1. Remove the rear (tailgate) connector panel. removing and replacing" on page 76. 6. See "Power...
...4. Cooling duct August 3, 2006 Cooling duct - Switch OFF the power to the SurePOS 500 Models 5x3 and 544/564. Remove rear inner metal cover. See "Rear inner metal cover - See "Rear connector panel (tailgate) - Figure 44. Unplug the power cord from the external power source. 2.... Remove the power supply. removing and replacing 1. Remove the rear (tailgate) connector panel. removing and replacing" on page 76. 6. See "Power...

Service Guide
Page 91
...the external power source. 2. Chapter 4. Remove the back cover as shown in reverse order. See "Rear connector panel (tailgate) - See "Cooling duct - removing and replacing" on page 197. removing and replacing" on page 57. 5. ...running the SaveCMOS utility before touching this unit. Remove the system board 1. Transfer modules to the SurePOS 500 Models 5x3 and 544/564. removing and replacing" on page 22. 2. Install the new system... Unplug the power cord from the system board for the SurePOS 500 Models 5x3 and 544/564 65 Remove the rear connector panel (tailgate).
...the external power source. 2. Chapter 4. Remove the back cover as shown in reverse order. See "Rear connector panel (tailgate) - See "Cooling duct - removing and replacing" on page 197. removing and replacing" on page 57. 5. ...running the SaveCMOS utility before touching this unit. Remove the system board 1. Transfer modules to the SurePOS 500 Models 5x3 and 544/564. removing and replacing" on page 22. 2. Install the new system... Unplug the power cord from the system board for the SurePOS 500 Models 5x3 and 544/564 65 Remove the rear connector panel (tailgate).

Service Guide
Page 94
Battery August 3, 2006 5. Remove the rear connector panel (tailgate) as described in Figure 47. Remove the old battery from the slot A as you face the back of the machine. Reverse the steps to the left, as shown in "Rear connector panel (tailgate) - removing and replacing" on page 76. 6. Dual video adapter or jumper location 7. Insert the new battery with the positive side to reassemble. 68 B A E JP32-35 JP29-31 D C JP7 Figure 47.
Battery August 3, 2006 5. Remove the rear connector panel (tailgate) as described in Figure 47. Remove the old battery from the slot A as you face the back of the machine. Reverse the steps to the left, as shown in "Rear connector panel (tailgate) - removing and replacing" on page 76. 6. Dual video adapter or jumper location 7. Insert the new battery with the positive side to reassemble. 68 B A E JP32-35 JP29-31 D C JP7 Figure 47.

Service Guide
Page 102
...6. removing and replacing 1. removing and replacing" on page 78. 5. Pull the connector panel out and disconnect the power cable from the tailgate connector. Unplug the power cord from the system unit at "Covers - Remove the rear cover as described at the power supply. 3. ...power cord from the external power source. 2. Rear connector panel (tailgate) August 3, 2006 Rear connector panel (tailgate) - Switch OFF the power to reassemble. Loosen the two thumbscrews A and slide the two tabs toward the center. 7. Reverse the steps to the SurePOS 500 Models 5x3 and 544/564.
...6. removing and replacing 1. removing and replacing" on page 78. 5. Pull the connector panel out and disconnect the power cable from the tailgate connector. Unplug the power cord from the system unit at "Covers - Remove the rear cover as described at the power supply. 3. ...power cord from the external power source. 2. Rear connector panel (tailgate) August 3, 2006 Rear connector panel (tailgate) - Switch OFF the power to reassemble. Loosen the two thumbscrews A and slide the two tabs toward the center. 7. Reverse the steps to the SurePOS 500 Models 5x3 and 544/564.
Service Guide
Page 103
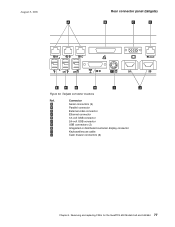
Removing and replacing FRUs for the SurePOS 500 Models 5x3 and 544/564 77 Connector A Serial connectors (3) B Parallel connector C External video connector D Ethernet connector E 12-volt USB connector F 24-volt USB connector G USB connectors (2) H Integrated or distributed customer display connector I J Figure 54. August 3, 2006 A Rear connector panel (tailgate) B C D E F G H I Keyboard/mouse cable J Cash drawer connectors (2) Chapter 4. Tailgate connector locations Ref.
Removing and replacing FRUs for the SurePOS 500 Models 5x3 and 544/564 77 Connector A Serial connectors (3) B Parallel connector C External video connector D Ethernet connector E 12-volt USB connector F 24-volt USB connector G USB connectors (2) H Integrated or distributed customer display connector I J Figure 54. August 3, 2006 A Rear connector panel (tailgate) B C D E F G H I Keyboard/mouse cable J Cash drawer connectors (2) Chapter 4. Tailgate connector locations Ref.
Service Guide
Page 173
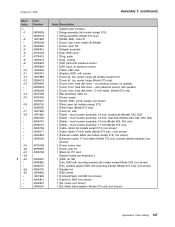
...no presence sensor 1 Cable, LED card 1 Bracket, HDD, with mounting bracket (Model 573 only) (not shown) 1 Speaker kit 1 ESD shield 1 CompactFlash, 512 MB (not shown) 1 Cable kit, HDD (not shown) 1 Kit, screw (not shown) 1 Kit, tablet stand adapter (Model 573 only) (not shown) Appendix A...., includes gender adapter) (not shown) 1 Cover, tower, rear 1 Cover, side I /O 1 Cover, rear, inner, metal (All Model) 1 Cover, card, RF 1 Tailgate assembly 2 Clip, HDD cover 1 Plug, audio 1 Duct, cooling 1 LED Card with presence sensor 1 LED Card, no speaker 1 Cover, front, hard disk drive - touch ...
...no presence sensor 1 Cable, LED card 1 Bracket, HDD, with mounting bracket (Model 573 only) (not shown) 1 Speaker kit 1 ESD shield 1 CompactFlash, 512 MB (not shown) 1 Cable kit, HDD (not shown) 1 Kit, screw (not shown) 1 Kit, tablet stand adapter (Model 573 only) (not shown) Appendix A...., includes gender adapter) (not shown) 1 Cover, tower, rear 1 Cover, side I /O 1 Cover, rear, inner, metal (All Model) 1 Cover, card, RF 1 Tailgate assembly 2 Clip, HDD cover 1 Plug, audio 1 Duct, cooling 1 LED Card with presence sensor 1 LED Card, no speaker 1 Cover, front, hard disk drive - touch ...

Service Guide
Page 252
... option 21 pointer cap 135 port specifications Ethernet 15 parallel 15 serial 15 POS system units and peripherals (for the 5x4 models), using IBM diagnostics 31 power consumption 178 power cords part numbers 167 power management window 21 power requirements 178 power saving configuration 21 power supply removing ...drawer 116 blank, PC card 74 cable tie bar 58 cable, display tablet 49 cables and cable-ties 59 cables, HDD 52 cables, rear tailgate 59 cables, side access panel 59 CANPOS keyboard components 137 cash drawer blank lock insert 116 FRUs 105 full size 105 keylock assembly 113 keylock...
... option 21 pointer cap 135 port specifications Ethernet 15 parallel 15 serial 15 POS system units and peripherals (for the 5x4 models), using IBM diagnostics 31 power consumption 178 power cords part numbers 167 power management window 21 power requirements 178 power saving configuration 21 power supply removing ...drawer 116 blank, PC card 74 cable tie bar 58 cable, display tablet 49 cables and cable-ties 59 cables, HDD 52 cables, rear tailgate 59 cables, side access panel 59 CANPOS keyboard components 137 cash drawer blank lock insert 116 FRUs 105 full size 105 keylock assembly 113 keylock...
Service Guide
Page 253
...supply 57 presence sensor 53 removing and replacing FRUs (continued) printer on full-size keyboard integration tray 94 processor module 71 rear connector panel (tailgate) 76 rear cover 38 rear inner metal cover 78 removing from full-size integration tray 92 removing keyboard from compact integration tray 100 removing,...cash drawer 106 slide latches, compact cash drawer 108 speaker 55 speaker panel 36 SurePOS 500 Models 5x3 and 544/564 on a keyboard integration tray 96, 103 system board 65 system on a cash drawer 88 tablet 48 tailgate 76 tie bar, cable 58 top cover 40 top cover, cash drawer 113 ...
...supply 57 presence sensor 53 removing and replacing FRUs (continued) printer on full-size keyboard integration tray 94 processor module 71 rear connector panel (tailgate) 76 rear cover 38 rear inner metal cover 78 removing from full-size integration tray 92 removing keyboard from compact integration tray 100 removing,...cash drawer 106 slide latches, compact cash drawer 108 speaker 55 speaker panel 36 SurePOS 500 Models 5x3 and 544/564 on a keyboard integration tray 96, 103 system board 65 system on a cash drawer 88 tablet 48 tailgate 76 tie bar, cable 58 top cover 40 top cover, cash drawer 113 ...
Service Guide
Page 254
... option 12 tablet, removing and replacing 48 tailgate 59 tailgate connector removing and replacing 76 task information 25 temperature limits 187 tips 189 Setup Utility navigation and usage 18 touch screen 17 228 August 3, 2006 tips and hints 25 tips, SurePOS 500 Models 5x3 and 544/564 189 tools 189...17 utility, setup 18 V video card removing and replacing 62 video time-out configuraton 21 W wall mounting option 11 web site IBM Retail Store Solutions 22 IBM RSS knowledgebase 189 Web sites xxii weight 170 wrap plugs 189 wrap plugs, pinouts 31 Y y-cable, installing on compact keyboard integration...
... option 12 tablet, removing and replacing 48 tailgate 59 tailgate connector removing and replacing 76 task information 25 temperature limits 187 tips 189 Setup Utility navigation and usage 18 touch screen 17 228 August 3, 2006 tips and hints 25 tips, SurePOS 500 Models 5x3 and 544/564 189 tools 189...17 utility, setup 18 V video card removing and replacing 62 video time-out configuraton 21 W wall mounting option 11 web site IBM Retail Store Solutions 22 IBM RSS knowledgebase 189 Web sites xxii weight 170 wrap plugs 189 wrap plugs, pinouts 31 Y y-cable, installing on compact keyboard integration...