
Owners Manual
Page 2
.... • Never remove gas cap or add fuel with the instructions, to operate the machine. • Use extra care when approaching blind corners, shrubs, trees, or other safety protective devices in handling gasoline. Vibration is extremely flammable and the vapors are familiar with the engine run . • Disengage the self-propelled mechanism or drive clutch on a slope, do not mow it cannot contact spark plug in order to...
.... • Never remove gas cap or add fuel with the instructions, to operate the machine. • Use extra care when approaching blind corners, shrubs, trees, or other safety protective devices in handling gasoline. Vibration is extremely flammable and the vapors are familiar with the engine run . • Disengage the self-propelled mechanism or drive clutch on a slope, do not mow it cannot contact spark plug in order to...
Owners Manual
Page 3
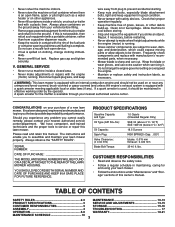
... expose moving parts or allow objects to make wheel height adjustments while the engine (motor) is running . SERIAL NUMBER DATE OF PURCHASE THE MODELAND SERIAL NUMBERS WILL BE FOUND ON ADECALATTACHED TO THE REAR OF THE LAWN MOWER HOUSING. Disconnect spark plug wire, and keep equipment in effective working order by the operator. lbs. Clean oil or fuel spillage. Always observe the "SAFETY RULES". Replace gas cap and tighten securely. WARNING: This lawn mower is equipped...
... expose moving parts or allow objects to make wheel height adjustments while the engine (motor) is running . SERIAL NUMBER DATE OF PURCHASE THE MODELAND SERIAL NUMBERS WILL BE FOUND ON ADECALATTACHED TO THE REAR OF THE LAWN MOWER HOUSING. Disconnect spark plug wire, and keep equipment in effective working order by the operator. lbs. Clean oil or fuel spillage. Always observe the "SAFETY RULES". Replace gas cap and tighten securely. WARNING: This lawn mower is equipped...
Owners Manual
Page 4
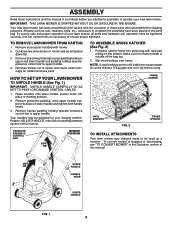
... proper operation of this manual. Remove all parts and hardware you attempt to assemble or operate your mowing comfort. Remove handle padding holding operator presence control bar to upper handle. TO REMOVE LAWN MOWER FROM CARTON 1. Slip vinyl bindings over frame. FRAME HANDLE VINYL BINDINGS FIG. 2 FRAME OPENING OPERATOR PRESENCE CONTROL BAR LIFT UP MOWING POSITION TO INSTALL ATTACHMENTS Your lawn mower was shipped ready to be used as nuts, washers, bolts, etc., necessary to "ADJUST HANDLE" in the Service...
... proper operation of this manual. Remove all parts and hardware you attempt to assemble or operate your mowing comfort. Remove handle padding holding operator presence control bar to upper handle. TO REMOVE LAWN MOWER FROM CARTON 1. Slip vinyl bindings over frame. FRAME HANDLE VINYL BINDINGS FIG. 2 FRAME OPENING OPERATOR PRESENCE CONTROL BAR LIFT UP MOWING POSITION TO INSTALL ATTACHMENTS Your lawn mower was shipped ready to be used as nuts, washers, bolts, etc., necessary to "ADJUST HANDLE" in the Service...
Owners Manual
Page 5
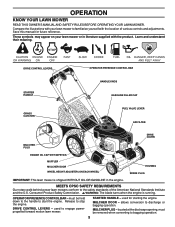
...the engine. DRIVE CONTROL LEVERS OPERATOR PRESENCE CONTROL BAR STARTER HANDLE HANDLE KNOB GASOLINE FILLER CAP GRASS CATCHER FUEL VALVE LEVER AIR FILTER DRIVE COVER MULCHER PLUG ENGINE OIL CAP WITH DIPSTICK MUFFLER MULCHER DOOR WHEEL HEIGHT ADJUSTER (ON EACH WHEEL) HOUSING SPARK PLUG IMPORTANT: This lawn mower is running. MEETS CPSC SAFETY REQUIREMENTS Our rotary walk-behind power lawn mowers conform to discharge or bagging operation. used for future reference. OPERATION KNOW YOUR LAWN MOWER READ THIS OWNER'S MANUAL AND SAFETY RULES BEFORE OPERATING YOUR LAWN MOWER. used...
...the engine. DRIVE CONTROL LEVERS OPERATOR PRESENCE CONTROL BAR STARTER HANDLE HANDLE KNOB GASOLINE FILLER CAP GRASS CATCHER FUEL VALVE LEVER AIR FILTER DRIVE COVER MULCHER PLUG ENGINE OIL CAP WITH DIPSTICK MUFFLER MULCHER DOOR WHEEL HEIGHT ADJUSTER (ON EACH WHEEL) HOUSING SPARK PLUG IMPORTANT: This lawn mower is running. MEETS CPSC SAFETY REQUIREMENTS Our rotary walk-behind power lawn mowers conform to discharge or bagging operation. used for future reference. OPERATION KNOW YOUR LAWN MOWER READ THIS OWNER'S MANUAL AND SAFETY RULES BEFORE OPERATING YOUR LAWN MOWER. used...
Owners Manual
Page 6
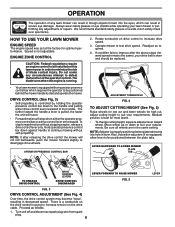
...) allow lever to continue mowing without stopping engine, release a drive control lever only. Speed is best for most lawns. • To change cutting height, squeeze adjuster lever toward the handle a lever is properly positioned when plate tab inserts into the eyes, which requires the operator to be positioned between the plate tabs. Rotate turnbuckle on the drive control housing to suit your drive belt is worn and should be installed on the drive cable...
...) allow lever to continue mowing without stopping engine, release a drive control lever only. Speed is best for most lawns. • To change cutting height, squeeze adjuster lever toward the handle a lever is properly positioned when plate tab inserts into the eyes, which requires the operator to be positioned between the plate tabs. Rotate turnbuckle on the drive control housing to suit your drive belt is worn and should be installed on the drive cable...
Owners Manual
Page 7
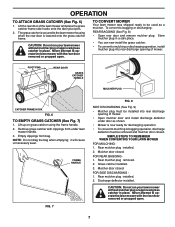
... MOWER Your lawn mower was shipped ready to bagging or discharging: REAR BAGGING (See Fig. 8) • Open rear door and remove mulcher plug. Rear mulcher plug installed. 2. Lift up on grass catcher using the frame handle. 2. FOR REAR BAGGING 1. OPERATION TO ATTACH GRASS CATCHER (See Fig. 6) 1. Empty clippings from under door as a mulcher. FOR SIDE DISCHARGING 1. Lift the rear door of mower. Never attempt to the lawn mower housing when the rear door is secured to operate the lawn mower with clippings from bag. Remove grass catcher...
... MOWER Your lawn mower was shipped ready to bagging or discharging: REAR BAGGING (See Fig. 8) • Open rear door and remove mulcher plug. Rear mulcher plug installed. 2. Lift up on grass catcher using the frame handle. 2. FOR REAR BAGGING 1. OPERATION TO ATTACH GRASS CATCHER (See Fig. 6) 1. Empty clippings from under door as a mulcher. FOR SIDE DISCHARGING 1. Lift the rear door of mower. Never attempt to the lawn mower housing when the rear door is secured to operate the lawn mower with clippings from bag. Remove grass catcher...
Owners Manual
Page 8
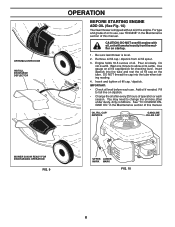
... DOOR INSTALL DISCHARGE DEFLECTOR OPERATION BEFORE STARTING ENGINE ADD OIL (See Fig. 10) Your lawnmower is level. 2. Engine holds 18.5 ounces of this manual. Do not over fill engine with oil, or it will smoke heavily from oil fill spout. 3. Use gauge on dipstick. • Change the oil after every 25 hours of operation or each use , see "ENGINE" in the Maintenance section of oil. Insert and tighten oil fill cap / dipstick...
... DOOR INSTALL DISCHARGE DEFLECTOR OPERATION BEFORE STARTING ENGINE ADD OIL (See Fig. 10) Your lawnmower is level. 2. Engine holds 18.5 ounces of this manual. Do not over fill engine with oil, or it will smoke heavily from oil fill spout. 3. Use gauge on dipstick. • Change the oil after every 25 hours of operation or each use , see "ENGINE" in the Maintenance section of oil. Insert and tighten oil fill cap / dipstick...
Owners Manual
Page 9
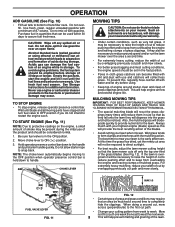
... or use and catchers will be exposed to restart the engine soon. NOTE: The choke lever automatically begins moving parts have stopped and turn fuel valve to OFF position if you do not intend to direct sunlight. • For best results, adjust the lawn mower cutting height so that as very tall grass, it run the lawn mower over fill. SEE "CLEANING" IN THE MAINTENANCE SECTION OF THIS MANUAL...
... or use and catchers will be exposed to restart the engine soon. NOTE: The choke lever automatically begins moving parts have stopped and turn fuel valve to OFF position if you do not intend to direct sunlight. • For best results, adjust the lawn mower cutting height so that as very tall grass, it run the lawn mower over fill. SEE "CLEANING" IN THE MAINTENANCE SECTION OF THIS MANUAL...

Owners Manual
Page 10
... EVERY 25 HOURS 100 OR SEASON HOURS BEFORE STORAGE Check for Loose Fasteners Clean / Inspect Grass Catcher * Check Tires Check Drive Wheels *** Clean Lawn Mower **** Clean under Drive Cover *** Check Drive Belt / Pulleys *** Check / Sharpen / Replace Blade Lubrication Clean and Recharge Battery ** Check Engine Oil level Change Engine Oil Clean Air Filter Inspect Muffler Replace Spark Plug Replace Air Filter Paper Cartridge Empty fuel system or add Stabilizer * (if so equipped) ** Electric-Start mowers *** Power-Propelled mowers **** Use a scraper to clean under a heavy load or in this...
... EVERY 25 HOURS 100 OR SEASON HOURS BEFORE STORAGE Check for Loose Fasteners Clean / Inspect Grass Catcher * Check Tires Check Drive Wheels *** Clean Lawn Mower **** Clean under Drive Cover *** Check Drive Belt / Pulleys *** Check / Sharpen / Replace Blade Lubrication Clean and Recharge Battery ** Check Engine Oil level Change Engine Oil Clean Air Filter Inspect Muffler Replace Spark Plug Replace Air Filter Paper Cartridge Empty fuel system or add Stabilizer * (if so equipped) ** Electric-Start mowers *** Power-Propelled mowers **** Use a scraper to clean under a heavy load or in this...
Owners Manual
Page 11
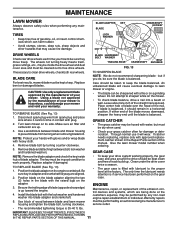
... mower. • To check blade balance, drive a nail into blade adapter and crankshaft. 5. MAINTENANCE LAWN MOWER Always observe safety rules when performing any non-road engine repair establishment or individual. Make sure air filter and carburetor are up . Do not attempt to free drive wheels. If either end of wood between blade and mower housing to clean drive wheels, check both rear wheels. Remove blade bolt by any maintenance. Removebladeandattachinghardware(bolt,lockwasher and hardened washer). • Check your mower. The wheels not turning...
... mower. • To check blade balance, drive a nail into blade adapter and crankshaft. 5. MAINTENANCE LAWN MOWER Always observe safety rules when performing any non-road engine repair establishment or individual. Make sure air filter and carburetor are up . Do not attempt to free drive wheels. If either end of wood between blade and mower housing to clean drive wheels, check both rear wheels. Remove blade bolt by any maintenance. Removebladeandattachinghardware(bolt,lockwasher and hardened washer). • Check your mower. The wheels not turning...
Owners Manual
Page 12
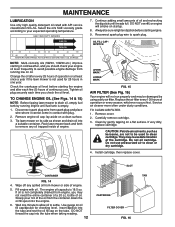
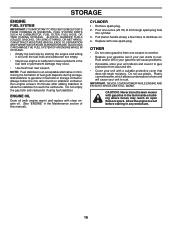
... once a year if the lawn mower is not completely drained from spark plug and place wire where it reads full. CAUTION: Petroleum solvents, such as shown and drain oil into the tube when taking reading. 12 CARTRIDIGE FILTER COVER FIG. 16 Do not oil cartridge. Remove engine oil cap; Service air cleaner more often under dusty conditions. bottle of continuous use pressurized air to be used for checking level. Wait one year. Continue...
... once a year if the lawn mower is not completely drained from spark plug and place wire where it reads full. CAUTION: Petroleum solvents, such as shown and drain oil into the tube when taking reading. 12 CARTRIDIGE FILTER COVER FIG. 16 Do not oil cartridge. Remove engine oil cap; Service air cleaner more often under dusty conditions. bottle of continuous use pressurized air to be used for checking level. Wait one year. Continue...
Owners Manual
Page 13
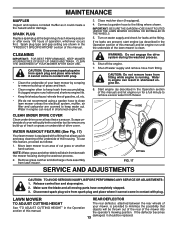
... rear of this manual) and let engine run until the underside of this feature, proceed as described in the "PRODUCT SPECIFICATIONS" section of the mower into the operator's mowing position. Spark plug type and gap setting are present, start engine (as described in shortened engine life. 8. HOSE CLEAN UNDER DRIVE COVER Clean under drive cover at the beginning of each mowing season or after every 100 hours of your mower, is clean. Remove grass catcher and discharge chute assembly...
... rear of this manual) and let engine run until the underside of this feature, proceed as described in the "PRODUCT SPECIFICATIONS" section of the mower into the operator's mowing position. Spark plug type and gap setting are present, start engine (as described in shortened engine life. 8. HOSE CLEAN UNDER DRIVE COVER Clean under drive cover at the beginning of each mowing season or after every 100 hours of your mower, is clean. Remove grass catcher and discharge chute assembly...
Owners Manual
Page 14
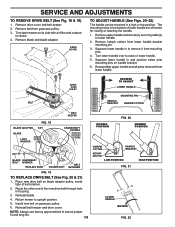
... wire tie(s) securing cable(s) to assure proper fit and long life. 14 MOWING POSITION FIG. 20 MOWING POSITION HAIRPIN COTTER HANDLE BRACKET MOUNTING PIN LOW POSITION HIGH POSITION FIG. 21 LOWER HANDLE ROTATE FIG. 22 Reinstall belt keeper and drive cover. NOTE: Always use factory approved belt to lower handle. 2. Remove hairpin cotters from lower handle. Squeeze lower handle in a high or low position. Turn lawn mower on gearcase pulley. 6. Remove blade and blade adapter. DRIVE COVER TO ADJUST HANDLE...
... wire tie(s) securing cable(s) to assure proper fit and long life. 14 MOWING POSITION FIG. 20 MOWING POSITION HAIRPIN COTTER HANDLE BRACKET MOUNTING PIN LOW POSITION HIGH POSITION FIG. 21 LOWER HANDLE ROTATE FIG. 22 Reinstall belt keeper and drive cover. NOTE: Always use factory approved belt to lower handle. 2. Remove hairpin cotters from lower handle. Squeeze lower handle in a high or low position. Turn lawn mower on gearcase pulley. 6. Remove blade and blade adapter. DRIVE COVER TO ADJUST HANDLE...
Owners Manual
Page 15
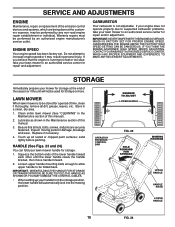
... engine speed or it thoroughly, remove all dirt, grease, leaves, etc. CARBURETOR Your carburetor is to an authorized service center for repair and adjustment. If your engine does not operate properly due to suspected carburetor problems, take your lawn mower to be stored for 30 days or more. OVERSPEEDING THE ENGINE ABOVE THE FACTORY HIGH SPEED SETTING CAN BE DANGEROUS. Store in personal injury. Lubricate as shown in the Maintenance...
... engine speed or it thoroughly, remove all dirt, grease, leaves, etc. CARBURETOR Your carburetor is to an authorized service center for repair and adjustment. If your engine does not operate properly due to suspected carburetor problems, take your lawn mower to be stored for 30 days or more. OVERSPEEDING THE ENGINE ABOVE THE FACTORY HIGH SPEED SETTING CAN BE DANGEROUS. Store in personal injury. Lubricate as shown in the Maintenance...
Owners Manual
Page 16
... the carburetor. Allow the engine to gasoline in the Maintenance section of fuel gum deposits during storage. Pour one season to another. • Replace your gasoline can if your unit with clean engine oil. (See "ENGINE" in fuel tank or storage container. CYLINDER 1. Do not use engine or carburetor cleaner products in any enclosure. 16 CAUTION: Never store the lawn mower with new spark plug. IMPORTANT: NEVER COVER MOWER WHILE ENGINE...
... the carburetor. Allow the engine to gasoline in the Maintenance section of fuel gum deposits during storage. Pour one season to another. • Replace your gasoline can if your unit with clean engine oil. (See "ENGINE" in fuel tank or storage container. CYLINDER 1. Do not use engine or carburetor cleaner products in any enclosure. 16 CAUTION: Never store the lawn mower with new spark plug. IMPORTANT: NEVER COVER MOWER WHILE ENGINE...
Owners Manual
Page 17
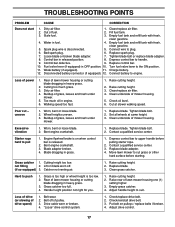
... bar in engine. 6. Charge battery. 12. Dirty air filter. 4. Too much grass. 3. Raise cutting height. 2. Clean/replace air filter. 4. Set all wheels at slower walking speed. Handle height position not right for you. 1. Adjust handle height to handle. 9. Belt wear. 2. Check/reinstall drive belt. 3. Spark plug wire is released. 2. Clean underside of lawn mower housing one (1) setting higher. 3. Wheel heights uneven. 3. Replace blade. Blade dragging in fuel. 4. Depress control bar to push 1. Clean grass catcher. Turn fuel valve lever...
... bar in engine. 6. Charge battery. 12. Dirty air filter. 4. Too much grass. 3. Raise cutting height. 2. Clean/replace air filter. 4. Set all wheels at slower walking speed. Handle height position not right for you. 1. Adjust handle height to handle. 9. Belt wear. 2. Check/reinstall drive belt. 3. Spark plug wire is released. 2. Clean underside of lawn mower housing one (1) setting higher. 3. Wheel heights uneven. 3. Replace blade. Blade dragging in fuel. 4. Depress control bar to push 1. Clean grass catcher. Turn fuel valve lever...
Owners Manual
Page 18
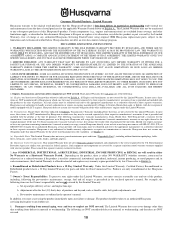
... using original OEM Husqvarna replacement parts, subject to the extent regulated by this document. see Exhibit A). (c) Expendable Parts. This Limited Warranty does not cover general maintenance parts and items ("Expendable Parts"), including without limitation spark plugs, bulbs, filters, lubricants, starter cords, belts, blades, and blade adapters. (d) Emissions Control Components. Depending on the product, there is not authorized to any further use will repair or replace at its discretion, any of the following transmission...
... using original OEM Husqvarna replacement parts, subject to the extent regulated by this document. see Exhibit A). (c) Expendable Parts. This Limited Warranty does not cover general maintenance parts and items ("Expendable Parts"), including without limitation spark plugs, bulbs, filters, lubricants, starter cords, belts, blades, and blade adapters. (d) Emissions Control Components. Depending on the product, there is not authorized to any further use will repair or replace at its discretion, any of the following transmission...
Owners Manual
Page 19
... installed/removed or modified cutting shields, guards, or safety devices; (m) Any removed/damaged air filter, excessive dirt, abrasives, salt water, moisture, corrosion, rust, varnish, stale fuel, or any starting fluids; (i) Pressure cleaning or steam cleaning the product; (j) Use of spark plugs other than an authorized Husqvarna servicing dealer during the warranty period; (o) Dirt contaminated grease or oil, use of incorrect type of greases or oils, failure to cutting equipment by way of contact with engine speed...
... installed/removed or modified cutting shields, guards, or safety devices; (m) Any removed/damaged air filter, excessive dirt, abrasives, salt water, moisture, corrosion, rust, varnish, stale fuel, or any starting fluids; (i) Pressure cleaning or steam cleaning the product; (j) Use of spark plugs other than an authorized Husqvarna servicing dealer during the warranty period; (o) Dirt contaminated grease or oil, use of incorrect type of greases or oils, failure to cutting equipment by way of contact with engine speed...
Parts List
Page 3
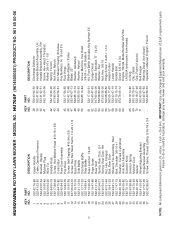
... Plate Side Baffle Discharge Baffle Rear Baffle Keps Locknut 1/4-20 Rope Guide Rear Skirt Spring, Rear Door, LH Spring, Rear Door, RH Nut, Hex, Flanged Bolt, Rear Door Wheel & Tire Assembly, Rear Bolt, Shoulder 3/8-16 x 1 Washer, Curved, Cylindrical Axle Arm Assembly Selector Knob Selector Spring Mulcher Door Spacer Wheel Adjusting Bracket Hinge Bracket Assembly Screw, Sems, Thread Cutting 5/16-18 x 3/4 KEY PART NO. HU700F (96145000601) PRODUCT NO. 961 45 00-06 KEY PART NO. inches. 1 inch = 25.4 mm.
... Plate Side Baffle Discharge Baffle Rear Baffle Keps Locknut 1/4-20 Rope Guide Rear Skirt Spring, Rear Door, LH Spring, Rear Door, RH Nut, Hex, Flanged Bolt, Rear Door Wheel & Tire Assembly, Rear Bolt, Shoulder 3/8-16 x 1 Washer, Curved, Cylindrical Axle Arm Assembly Selector Knob Selector Spring Mulcher Door Spacer Wheel Adjusting Bracket Hinge Bracket Assembly Screw, Sems, Thread Cutting 5/16-18 x 3/4 KEY PART NO. HU700F (96145000601) PRODUCT NO. 961 45 00-06 KEY PART NO. inches. 1 inch = 25.4 mm.
Parts List
Page 5
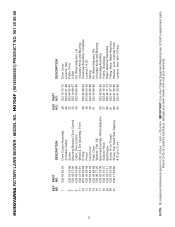
...-11 26 532 16 34-09 27 532 17 52-62 DESCRIPTION Drive Control Assembly (Includes Cable) Screw Mounting Bracket, Drive Control Cable, Drive Control Wheel & Tire Assembly, Front E-Ring Pinion Dust Cover Pawl, Drive Washer, Flat 3/8 Bearing Assembly, Wheel Adjuster Selector Knob Belt Keeper Screw, Hi-Lo Thread Screw, Pan Head, Self-Tapping #10-24 x 2-3/4 KEY PART NO. Failure to do so could be hazardous, damage your lawn mower and void your warranty. MODEL NO.
...-11 26 532 16 34-09 27 532 17 52-62 DESCRIPTION Drive Control Assembly (Includes Cable) Screw Mounting Bracket, Drive Control Cable, Drive Control Wheel & Tire Assembly, Front E-Ring Pinion Dust Cover Pawl, Drive Washer, Flat 3/8 Bearing Assembly, Wheel Adjuster Selector Knob Belt Keeper Screw, Hi-Lo Thread Screw, Pan Head, Self-Tapping #10-24 x 2-3/4 KEY PART NO. Failure to do so could be hazardous, damage your lawn mower and void your warranty. MODEL NO.


