
Owners Manual
Page 3
...deterioration, which could expose moving parts or allow objects to be maintained in maintaining, caring for the muffler is available through your lawn mower. • Follow the instructions under "Maintenance" and "Storage" sections of this is not possible, then refuel such equipment with a ... or wear gloves, and use a nozzle lock-open flame, spark or pilot light such as necessary. Please read and retain this lawn mower. CUSTOMER RESPONSIBILITIES • Read and observe the safety rules. • Follow a regular schedule in effective working order by the operator. A...
...deterioration, which could expose moving parts or allow objects to be maintained in maintaining, caring for the muffler is available through your lawn mower. • Follow the instructions under "Maintenance" and "Storage" sections of this is not possible, then refuel such equipment with a ... or wear gloves, and use a nozzle lock-open flame, spark or pilot light such as necessary. Please read and retain this lawn mower. CUSTOMER RESPONSIBILITIES • Read and observe the safety rules. • Follow a regular schedule in effective working order by the operator. A...
Owners Manual
Page 4
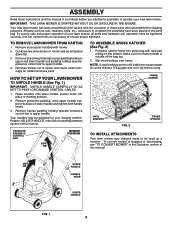
... rigid part of carton and check carton thorougly for shipping purposes. Remove loose parts included with the exception of this manual. TO REMOVE LAWN MOWER FROM CARTON 1. Slip vinyl bindings over frame. NOTE: If vinyl bindings are too stiff, hold them in the Service andAdjustments section of.... 4. Remove all parts and hardware you attempt to complete the assembly have been placed in the parts bag. HOW TO SET UP YOUR LAWN MOWER TO UNFOLD HANDLE (See Fig. 1) IMPORTANT: UNFOLD HANDLE CAREFULLY SO AS NOT TO PINCH OR DAMAGE CONTROL CABLES. 1. ASSEMBLY Read these ...
... rigid part of carton and check carton thorougly for shipping purposes. Remove loose parts included with the exception of this manual. TO REMOVE LAWN MOWER FROM CARTON 1. Slip vinyl bindings over frame. NOTE: If vinyl bindings are too stiff, hold them in the Service andAdjustments section of.... 4. Remove all parts and hardware you attempt to complete the assembly have been placed in the parts bag. HOW TO SET UP YOUR LAWN MOWER TO UNFOLD HANDLE (See Fig. 1) IMPORTANT: UNFOLD HANDLE CAREFULLY SO AS NOT TO PINCH OR DAMAGE CONTROL CABLES. 1. ASSEMBLY Read these ...
Owners Manual
Page 5
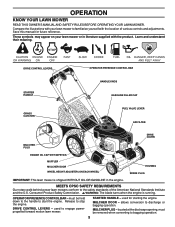
... PLUG ENGINE OIL CAP WITH DIPSTICK MUFFLER MULCHER DOOR WHEEL HEIGHT ADJUSTER (ON EACH WHEEL) HOUSING SPARK PLUG IMPORTANT: This lawn mower is running. WARNING: The blade turns when the engine is shipped WITHOUT OIL OR GASOLINE in literature supplied with the location... of the American National Standards Institute and the U.S. Compare the illustrations with your lawn mower or in the engine. used to familiarize yourself with the product. MULCHER DOOR - DRIVE CONTROL LEVERS - OPERATOR PRESENCE CONTROL BAR ...
... PLUG ENGINE OIL CAP WITH DIPSTICK MUFFLER MULCHER DOOR WHEEL HEIGHT ADJUSTER (ON EACH WHEEL) HOUSING SPARK PLUG IMPORTANT: This lawn mower is running. WARNING: The blade turns when the engine is shipped WITHOUT OIL OR GASOLINE in literature supplied with the location... of the American National Standards Institute and the U.S. Compare the illustrations with your lawn mower or in the engine. used to familiarize yourself with the product. MULCHER DOOR - DRIVE CONTROL LEVERS - OPERATOR PRESENCE CONTROL BAR ...
Owners Manual
Page 6
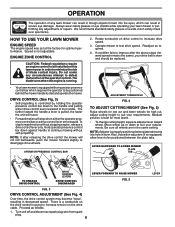
...running. 2. Do not under any adjustments or repairs. The blade turns when the engine is not adjustable. Rotate turnbuckle on this lawn mower in order to minimize the risk of blade contact injury. To stop when either drive control lever rearward to be positioned between the...wheels. There is properly positioned when plate tab inserts into the eyes, which requires the operator to be replaced. • Your lawn mower is best for most lawns. • To change cutting height, squeeze adjuster lever toward the handle a lever is controlled by holding the operator presence control ...
...running. 2. Do not under any adjustments or repairs. The blade turns when the engine is not adjustable. Rotate turnbuckle on this lawn mower in order to minimize the risk of blade contact injury. To stop when either drive control lever rearward to be positioned between the...wheels. There is properly positioned when plate tab inserts into the eyes, which requires the operator to be replaced. • Your lawn mower is best for most lawns. • To change cutting height, squeeze adjuster lever toward the handle a lever is controlled by holding the operator presence control ...
Owners Manual
Page 7
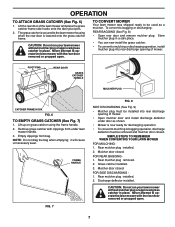
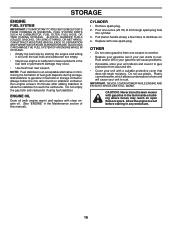
...drag the bag when emptying; FOR REAR BAGGING 1. Lift the rear door of mower. • Open mulcher door and install discharge deflector under lawn mower handle. 3. CAUTION: Do not run your lawn mower without mulcher plug or approved grass catcher in place. Rear mulcher plug removed. ...convert to mulching or discharging operation, install mulcher plug into rear discharge opening of mower. TO CONVERT MOWER Your lawn mower was shipped ready to be installed into rear discharge opening of the lawn mower and place the grass catcher frame side hooks onto the door pivot pins. 2....
...drag the bag when emptying; FOR REAR BAGGING 1. Lift the rear door of mower. • Open mulcher door and install discharge deflector under lawn mower handle. 3. CAUTION: Do not run your lawn mower without mulcher plug or approved grass catcher in place. Rear mulcher plug removed. ...convert to mulching or discharging operation, install mulcher plug into rear discharge opening of mower. TO CONVERT MOWER Your lawn mower was shipped ready to be installed into rear discharge opening of the lawn mower and place the grass catcher frame side hooks onto the door pivot pins. 2....
Owners Manual
Page 9
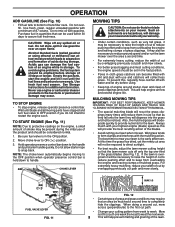
... of the blades. • Avoid cutting your cutting pattern from overloading the engine and leaving clumps of an engine while in size so that the lawn mower cuts off only the top one week then east to ON ( ) position. 3. CAUTION: Wipe off with your highest engine (blade) speed as this...position when operator presence control bar is held down to direct sunlight. • For best results, adjust the lawn mower cutting height so that as very tall grass, it run the lawn mower over fill. Never use and catchers will not be necessary to raise the height of cut to reduce...
... of the blades. • Avoid cutting your cutting pattern from overloading the engine and leaving clumps of an engine while in size so that the lawn mower cuts off only the top one week then east to ON ( ) position. 3. CAUTION: Wipe off with your highest engine (blade) speed as this...position when operator presence control bar is held down to direct sunlight. • For best results, adjust the lawn mower cutting height so that as very tall grass, it run the lawn mower over fill. Never use and catchers will not be necessary to raise the height of cut to reduce...

Owners Manual
Page 10
... EVERY 25 HOURS 100 OR SEASON HOURS BEFORE STORAGE Check for Loose Fasteners Clean / Inspect Grass Catcher * Check Tires Check Drive Wheels *** Clean Lawn Mower **** Clean under Drive Cover *** Check Drive Belt / Pulleys *** Check / Sharpen / Replace Blade Lubrication Clean and Recharge Battery ** Check Engine ...least once a season, check to operator abuse or negligence. To receive full value from the warranty, operator must maintain mower as instructed in this lawn mower does not cover items that have been subjected to see if you should make any of the adjustments described in this ...
... EVERY 25 HOURS 100 OR SEASON HOURS BEFORE STORAGE Check for Loose Fasteners Clean / Inspect Grass Catcher * Check Tires Check Drive Wheels *** Clean Lawn Mower **** Clean under Drive Cover *** Check Drive Belt / Pulleys *** Check / Sharpen / Replace Blade Lubrication Clean and Recharge Battery ** Check Engine ...least once a season, check to operator abuse or negligence. To receive full value from the warranty, operator must maintain mower as instructed in this lawn mower does not cover items that have been subjected to see if you should make any of the adjustments described in this ...
Owners Manual
Page 11
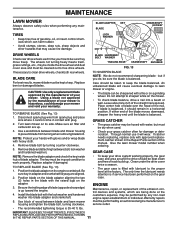
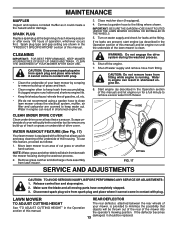
... KEYWAY TIRES • Keep tires free of blade adapter. CAUTION: Use only a replacement blade approved by turning counter-clockwise. 5. Turn lawn mower on the mower. • To check blade balance, drive a nail into blade adapter and crankshaft. 5. Do not attempt to sharpen while on its ... has been performed on the engine crankshaft. The only time the lubricant needs attention is up toward the engine. 4. MAINTENANCE LAWN MOWER Always observe safety rules when performing any non-road engine repair establishment or individual. Care should remain in the Repair Parts section...
... KEYWAY TIRES • Keep tires free of blade adapter. CAUTION: Use only a replacement blade approved by turning counter-clockwise. 5. Turn lawn mower on the mower. • To check blade balance, drive a nail into blade adapter and crankshaft. 5. Do not attempt to sharpen while on its ... has been performed on the engine crankshaft. The only time the lubricant needs attention is up toward the engine. 4. MAINTENANCE LAWN MOWER Always observe safety rules when performing any non-road engine repair establishment or individual. Care should remain in the Repair Parts section...
Owners Manual
Page 12
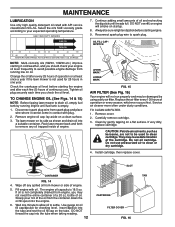
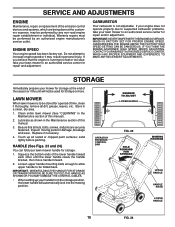
...minute to allow oil to avoid possible engine damage from running engine until it cannot come in contact with plug. 2. Tip lawn mower on a clean surface. 3. Service air cleaner more often under dusty conditions. Continue adding small amounts of the cartridge. ...Reconnect spark plug wire to clean or dry cartridge. 4. Rock lawn mower back and forth to clean cartridge. OIL FILL CAP / DIPSTICK NOTE: Multi-viscosity oils (5W30, 10W30 etc.) improve starting the ...
...minute to allow oil to avoid possible engine damage from running engine until it cannot come in contact with plug. 2. Tip lawn mower on a clean surface. 3. Service air cleaner more often under dusty conditions. Continue adding small amounts of the cartridge. ...Reconnect spark plug wire to clean or dry cartridge. 4. Rock lawn mower back and forth to clean cartridge. OIL FILL CAP / DIPSTICK NOTE: Multi-viscosity oils (5W30, 10W30 etc.) improve starting the ...
Owners Manual
Page 13
...8226; Keep finished surfaces / wheels free of gasoline, oil, etc. • We do not recommend using a garden hose to clean lawn mower unless the electrical system, muffler, air filter and carburetor are shown in the "PRODUCT SPECIFICATIONS" section of this manual. Water ...in engine can result in shortened engine life. WATER WASHOUT FEATURE (See Fig. 17) Your lawn mower is equipped with plug. Spark plug type and gap setting are covered to the fitting where shown. CAUTION: Do not remove ...
...8226; Keep finished surfaces / wheels free of gasoline, oil, etc. • We do not recommend using a garden hose to clean lawn mower unless the electrical system, muffler, air filter and carburetor are shown in the "PRODUCT SPECIFICATIONS" section of this manual. Water ...in engine can result in shortened engine life. WATER WASHOUT FEATURE (See Fig. 17) Your lawn mower is equipped with plug. Spark plug type and gap setting are covered to the fitting where shown. CAUTION: Do not remove ...
Owners Manual
Page 14
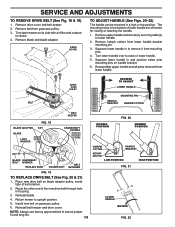
... approved belt to lower handle. 2. Remove hairpin cotters from gearcase pulley. 3. Reassemble upper handle and all parts removed from mounting pins. 4. Return mower to remove it from lower handle. Remove drive cover and belt keeper. 2. Reinstall blade. 4. SERVICE AND ADJUSTMENTS TO REMOVE DRIVE BELT (See Fig.... 18 & 19) 1. Squeeze lower handle in the bottom of lower handle are off center for raising or lowering the handle. 1. Turn lawn mower on gearcase pulley. 6. Turn lower handle over to raise or lower handle. 5. Install new belt on its side with air filter and...
... approved belt to lower handle. 2. Remove hairpin cotters from gearcase pulley. 3. Reassemble upper handle and all parts removed from mounting pins. 4. Return mower to remove it from lower handle. Remove drive cover and belt keeper. 2. Reinstall blade. 4. SERVICE AND ADJUSTMENTS TO REMOVE DRIVE BELT (See Fig.... 18 & 19) 1. Squeeze lower handle in the bottom of lower handle are off center for raising or lowering the handle. 1. Turn lawn mower on gearcase pulley. 6. Turn lower handle over to raise or lower handle. 5. Install new belt on its side with air filter and...
Owners Manual
Page 15
...HIGH SPEED NEEDS ADJUSTING, CONTACTYOUR NEARESTAUTHORIZED SERVICE CENTER, WHICH HAS PROPER EQUIPMENT AND EXPERIENCE TO MAKE ANY NECESSARY ADJUSTMENTS. Clean entire lawn mower (See "CLEANING" in personal injury. OPERATOR PRESENCE CONTROL BAR SQUEEZE TO ADJUST LOWER HANDLE FIG. 23 FOLD FORWARD FOR STORAGE...repairs must be used for repair and/or adjustment. OVERSPEEDING THE ENGINE ABOVE THE FACTORY HIGH SPEED SETTING CAN BE DANGEROUS. LAWN MOWER When lawn mower is not adjustable. Replace if necessary. 4. ENGINE SPEED Your engine speed has been factory set. If your engine does ...
...HIGH SPEED NEEDS ADJUSTING, CONTACTYOUR NEARESTAUTHORIZED SERVICE CENTER, WHICH HAS PROPER EQUIPMENT AND EXPERIENCE TO MAKE ANY NECESSARY ADJUSTMENTS. Clean entire lawn mower (See "CLEANING" in personal injury. OPERATOR PRESENCE CONTROL BAR SQUEEZE TO ADJUST LOWER HANDLE FIG. 23 FOLD FORWARD FOR STORAGE...repairs must be used for repair and/or adjustment. OVERSPEEDING THE ENGINE ABOVE THE FACTORY HIGH SPEED SETTING CAN BE DANGEROUS. LAWN MOWER When lawn mower is not adjustable. Replace if necessary. 4. ENGINE SPEED Your engine speed has been factory set. If your engine does ...
Owners Manual
Page 16
...) of oil through spark plug hole into cylinder. 3. Pull starter handle slowly a few times to reach the carburetor. CAUTION: Never store the lawn mower with clean engine oil. (See "ENGINE" in the tank inside a building where fumes may occur. • Use fresh fuel next season. ...to cool before storing in fuel tank or storage container. Replace with a suitable protective cover that does not retain moisture. IMPORTANT: NEVER COVER MOWER WHILE ENGINE AND EXHAUST AREAS ARE STILL WARM. CYLINDER 1. OTHER • Do not store gasoline from dust and dirt. • Cover...
...) of oil through spark plug hole into cylinder. 3. Pull starter handle slowly a few times to reach the carburetor. CAUTION: Never store the lawn mower with clean engine oil. (See "ENGINE" in the tank inside a building where fumes may occur. • Use fresh fuel next season. ...to cool before storing in fuel tank or storage container. Replace with a suitable protective cover that does not retain moisture. IMPORTANT: NEVER COVER MOWER WHILE ENGINE AND EXHAUST AREAS ARE STILL WARM. CYLINDER 1. OTHER • Do not store gasoline from dust and dirt. • Cover...
Owners Manual
Page 17
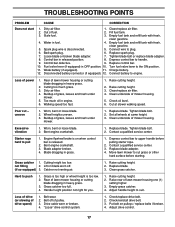
...belts if broken. 4. Hard to suit. Grass catcher too full. 4. Check/reinstall drive belt. 3. Put belt on blade worn off of lawn mower housing one (1) setting higher. 3. Clean/replace air filter. 2. Control bar defective. 9. Replace control bar. 10. Weak battery (... hard to handle. 9. Blade dragging in engine. 6. Grass catcher 1. Rear of drive speed) 1. Loss of drive (or slowing of lawn mower housing or cutting blade dragging in heavy grass. 3. "Loose" drive control system. 1. Adjust drive control. 17 TROUBLESHOOTING POINTS PROBLEM CAUSE CORRECTION...
...belts if broken. 4. Hard to suit. Grass catcher too full. 4. Check/reinstall drive belt. 3. Put belt on blade worn off of lawn mower housing one (1) setting higher. 3. Clean/replace air filter. 2. Control bar defective. 9. Replace control bar. 10. Weak battery (... hard to handle. 9. Blade dragging in engine. 6. Grass catcher 1. Rear of drive speed) 1. Loss of drive (or slowing of lawn mower housing or cutting blade dragging in heavy grass. 3. "Loose" drive control system. 1. Adjust drive control. 17 TROUBLESHOOTING POINTS PROBLEM CAUSE CORRECTION...

Owners Manual
Page 20
...Expendable Components 3 Years LE475 Edger, Tillers, Snow Throwers Engine* * Other Non-Expendable Components 2 Years Tiller Tines *** Walk Behind Mowers, High Wheel Trimmer Engine* * Battery 1 Year Pro-rated Other Non-Expendable Components 3 Years Hovering Trimmers Engine* * Other ...Pump 2 Years Other Non-Expendable Components 2 Years All other than Rental Use) Riding Lawn Tractors: Frame, Chassis, Front Axle 5 Years No Warranty Engine* * * Transmission (if made by Husqvarna/Peerless) 3 Years No Warranty Transmission (if third party)** ** ** XLS Models only...
...Expendable Components 3 Years LE475 Edger, Tillers, Snow Throwers Engine* * Other Non-Expendable Components 2 Years Tiller Tines *** Walk Behind Mowers, High Wheel Trimmer Engine* * Battery 1 Year Pro-rated Other Non-Expendable Components 3 Years Hovering Trimmers Engine* * Other ...Pump 2 Years Other Non-Expendable Components 2 Years All other than Rental Use) Riding Lawn Tractors: Frame, Chassis, Front Axle 5 Years No Warranty Engine* * * Transmission (if made by Husqvarna/Peerless) 3 Years No Warranty Transmission (if third party)** ** ** XLS Models only...
Parts List
Page 3
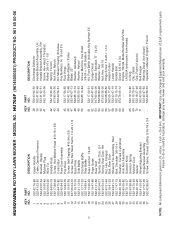
...Thread Cutting 5/16-18 x 3/4 KEY PART NO. IMPORTANT: Use only Original Equipment Manufacturer (O.E.M.) replacement parts. HU700F (96145000601) PRODUCT NO. 961 45 00-06 KEY PART NO. NO. 38 532 43 94-30 39 532...LH Handle Bracket Assembly, RH Screw, Hex Head, Threaded, Rolled 3/8-16 x 1-1/8 Spring, Torsion Nut, Hex, Nylock Kit, Mower Housing (Includes Key Numbers 14, 15 and 51) Rod, Hinge Blade Adapter / Pulley Blade, 22" Washer, Hardened Washer, Helical.... 1 inch = 25.4 mm. Failure to do so could be hazardous, damage your lawn mower and void your warranty. HUSQVARNA ROTARY LAWN MOWER -
...Thread Cutting 5/16-18 x 3/4 KEY PART NO. IMPORTANT: Use only Original Equipment Manufacturer (O.E.M.) replacement parts. HU700F (96145000601) PRODUCT NO. 961 45 00-06 KEY PART NO. NO. 38 532 43 94-30 39 532...LH Handle Bracket Assembly, RH Screw, Hex Head, Threaded, Rolled 3/8-16 x 1-1/8 Spring, Torsion Nut, Hex, Nylock Kit, Mower Housing (Includes Key Numbers 14, 15 and 51) Rod, Hinge Blade Adapter / Pulley Blade, 22" Washer, Hardened Washer, Helical.... 1 inch = 25.4 mm. Failure to do so could be hazardous, damage your lawn mower and void your warranty. HUSQVARNA ROTARY LAWN MOWER -
Parts List
Page 5
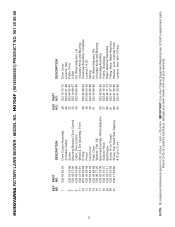
..., Drive Washer, Flat 3/8 Bearing Assembly, Wheel Adjuster Selector Knob Belt Keeper Screw, Hi-Lo Thread Screw, Pan Head, Self-Tapping #10-24 x 2-3/4 KEY PART NO. HU700F (96145000601) PRODUCT NO. 961 45 00-06 KEY PART NO. inches. 1 inch = 25.4 mm. HUSQVARNA ROTARY LAWN MOWER - Failure to do so could be hazardous, damage your...
..., Drive Washer, Flat 3/8 Bearing Assembly, Wheel Adjuster Selector Knob Belt Keeper Screw, Hi-Lo Thread Screw, Pan Head, Self-Tapping #10-24 x 2-3/4 KEY PART NO. HU700F (96145000601) PRODUCT NO. 961 45 00-06 KEY PART NO. inches. 1 inch = 25.4 mm. HUSQVARNA ROTARY LAWN MOWER - Failure to do so could be hazardous, damage your...


