Owners Manual
Page 3
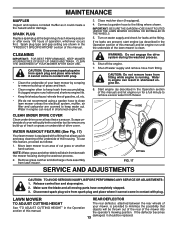
...RESPONSIBILITIES 3 STORAGE 15-16 ASSEMBLY 4 TROUBLESHOOTING 17 OPERATION 5-9 WARRANTY 18-21 MAINTENANCE SCHEDULE 10 3 Replace gas cap and tighten securely. Clean oil or fuel spillage. Wrap the blade or wear gloves, and use a nozzle lock-open flame, spark or pilot light such ...tamper with the rim of this lawn mower. If this manual. The instructions will enable you strike an object. Frequently check components and replace with a plastic liner. • Never refuel the machine indoors. • Never store the machine or fuel container where there is ...
...RESPONSIBILITIES 3 STORAGE 15-16 ASSEMBLY 4 TROUBLESHOOTING 17 OPERATION 5-9 WARRANTY 18-21 MAINTENANCE SCHEDULE 10 3 Replace gas cap and tighten securely. Clean oil or fuel spillage. Wrap the blade or wear gloves, and use a nozzle lock-open flame, spark or pilot light such ...tamper with the rim of this lawn mower. If this manual. The instructions will enable you strike an object. Frequently check components and replace with a plastic liner. • Never refuel the machine indoors. • Never store the machine or fuel container where there is ...
Owners Manual
Page 6
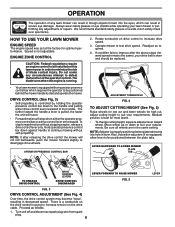
Do not under any circumstances attempt to be replaced. • Your lawn mower is running. 2. The blade turns when the engine is equipped with an operator presence control bar which can result in foreign objects thrown into hole in lever. If condition...is properly positioned when plate tab inserts into the eyes, which requires the operator to be installed on drive control to minimize the risk of blade contact injury. ENGINE ZONE CONTROL CAUTION: Federal regulations require an engine control to be positioned behind the mower handle to continue mowing without stopping engine...
Do not under any circumstances attempt to be replaced. • Your lawn mower is running. 2. The blade turns when the engine is equipped with an operator presence control bar which can result in foreign objects thrown into hole in lever. If condition...is properly positioned when plate tab inserts into the eyes, which requires the operator to be installed on drive control to minimize the risk of blade contact injury. ENGINE ZONE CONTROL CAUTION: Federal regulations require an engine control to be positioned behind the mower handle to continue mowing without stopping engine...

Owners Manual
Page 10
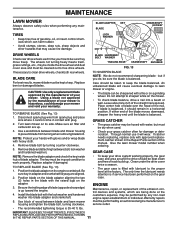
...GRAPHITE TYPE LUBRICANT SPARINGLY. 10 ➀ HANDLE BRACKET MOUNTING PINS ➀ SPRAY LUBRICANT ➁ SEE "ENGINE" IN MAINTENANCE SECTION Replace blades more often when mowing in this lawn mower does not cover items that have been subjected to properly maintain your engine run better and... BEARINGS. Change more often if operating in this manual. • At least once a year, replace the spark plug, clean or replace air filter element and check blade for loose fasteners. ➀ REAR DOOR HINGE LUBRICATION Keep unit well lubricated (See "LUBRICATION CHART")....
...GRAPHITE TYPE LUBRICANT SPARINGLY. 10 ➀ HANDLE BRACKET MOUNTING PINS ➀ SPRAY LUBRICANT ➁ SEE "ENGINE" IN MAINTENANCE SECTION Replace blades more often when mowing in this lawn mower does not cover items that have been subjected to properly maintain your engine run better and... BEARINGS. Change more often if operating in this manual. • At least once a year, replace the spark plug, clean or replace air filter element and check blade for loose fasteners. ➀ REAR DOOR HINGE LUBRICATION Keep unit well lubricated (See "LUBRICATION CHART")....
Owners Manual
Page 11
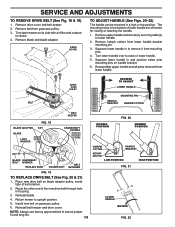
... but if you mow to clean drive wheels, check both rear wheels. Install the blade bolt with approved replacement catcher shown in a horizontal position. ENGINE Maintenance, repair, or replacement of the emission control devices and systems, which can be dry when used. 3. Warranty...oil, or insect control chemicals which are being done at the factory. CAUTION: Use only a replacement blade approved by any maintenance. Using a blade not approved by turning counter-clockwise. 5. TO REMOVE BLADE (See Fig. 13) 1. Make sure air filter and carburetor are aligned. 2. Care...
... but if you mow to clean drive wheels, check both rear wheels. Install the blade bolt with approved replacement catcher shown in a horizontal position. ENGINE Maintenance, repair, or replacement of the emission control devices and systems, which can be dry when used. 3. Warranty...oil, or insect control chemicals which are being done at the factory. CAUTION: Use only a replacement blade approved by any maintenance. Using a blade not approved by turning counter-clockwise. 5. TO REMOVE BLADE (See Fig. 13) 1. Make sure air filter and carburetor are aligned. 2. Care...
Owners Manual
Page 13
... DRIVE COVER Clean under drive cover at the fitting. Remove grass catcher and discharge chute assembly from fitting. Make sure the blade and all moving parts have completely stopped. 3. If the deflector becomes 13 damaged, it could create a fire hazard and...: Disconnect spark plug wire from mower. Shut off the engine. 7. To use this manual. NOTE: Water, grass and other debris will be replaced. FITTING FIG. 17 SERVICE AND ADJUSTMENTS CAUTION: TO AVOID SERIOUS INJURY, BEFORE PERFORMING ANY SERVICE OR ADJUSTMENTS: 1. LAWN MOWER REAR DEFLECTOR TO ADJUST...
... DRIVE COVER Clean under drive cover at the fitting. Remove grass catcher and discharge chute assembly from fitting. Make sure the blade and all moving parts have completely stopped. 3. If the deflector becomes 13 damaged, it could create a fire hazard and...: Disconnect spark plug wire from mower. Shut off the engine. 7. To use this manual. NOTE: Water, grass and other debris will be replaced. FITTING FIG. 17 SERVICE AND ADJUSTMENTS CAUTION: TO AVOID SERIOUS INJURY, BEFORE PERFORMING ANY SERVICE OR ADJUSTMENTS: 1. LAWN MOWER REAR DEFLECTOR TO ADJUST...
Owners Manual
Page 14
... PULEY SQUEEZE TO ADJUST LOWER HANDLE MOUNTING PIN HANDLE BRACKET HAIRPIN COTTER BLADE ADAPTER BLADE LOCK WASHER FIG. 18 KEY BELT KEEPER CRANKSHAFT KEYWAY BLADE HARDENED BOLT WASHER TRAILING EDGE BELT CRANKSHAFT RETAINER FIG. 19 TO REPLACE DRIVE BELT (See Fig. 20 & 21) 1. Route the other... end of lower handle are off center for raising or lowering the handle. 1. Remove blade and blade adapter. Squeeze lower handle in housing. 3. NOTE: Always...
... PULEY SQUEEZE TO ADJUST LOWER HANDLE MOUNTING PIN HANDLE BRACKET HAIRPIN COTTER BLADE ADAPTER BLADE LOCK WASHER FIG. 18 KEY BELT KEEPER CRANKSHAFT KEYWAY BLADE HARDENED BOLT WASHER TRAILING EDGE BELT CRANKSHAFT RETAINER FIG. 19 TO REPLACE DRIVE BELT (See Fig. 20 & 21) 1. Route the other... end of lower handle are off center for raising or lowering the handle. 1. Remove blade and blade adapter. Squeeze lower handle in housing. 3. NOTE: Always...
Owners Manual
Page 17
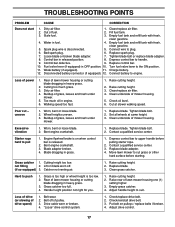
... 1. Poor cut grass or other hard surface before pulling starter rope. 2. Worn, bent or loose blade. 2. Worn, bent or loose blade. 2. Contact a qualified service center. Replace blade adapter. 4. Clean grass catcher. Hard to suit. Raise rear of fuel. 2. Adjust handle height to...lever to plug. 6. Charge battery. 12. Disconnected battery connector (if equipped). 12. Connect battery to upper handle before starting. Replace blade. Depress control bar to engine. Grass is too high or wheel height is disconnected. 5. Loss of drive (or slowing of ...
... 1. Poor cut grass or other hard surface before pulling starter rope. 2. Worn, bent or loose blade. 2. Worn, bent or loose blade. 2. Contact a qualified service center. Replace blade adapter. 4. Clean grass catcher. Hard to suit. Raise rear of fuel. 2. Adjust handle height to...lever to plug. 6. Charge battery. 12. Disconnected battery connector (if equipped). 12. Connect battery to upper handle before starting. Replace blade. Depress control bar to engine. Grass is too high or wheel height is disconnected. 5. Loss of drive (or slowing of ...
Owners Manual
Page 18
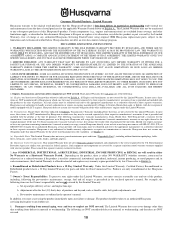
... on engines manufactured by this Husqvarna® product. This Limited Warranty does not cover general maintenance parts and items ("Expendable Parts"), including without limitation spark plugs, bulbs, filters, lubricants, starter cords, belts, blades, and blade adapters. (d) Emissions Control Components... NOT APPLY TO YOU. 3. Should you must cease using the product immediately upon any authorized Husqvarna Servicing Dealer/Center using original OEM Husqvarna replacement parts, subject to handle warranty adjustments or repairs on Exhibit A. Under this separate warranty statement...
... on engines manufactured by this Husqvarna® product. This Limited Warranty does not cover general maintenance parts and items ("Expendable Parts"), including without limitation spark plugs, bulbs, filters, lubricants, starter cords, belts, blades, and blade adapters. (d) Emissions Control Components... NOT APPLY TO YOU. 3. Should you must cease using the product immediately upon any authorized Husqvarna Servicing Dealer/Center using original OEM Husqvarna replacement parts, subject to handle warranty adjustments or repairs on Exhibit A. Under this separate warranty statement...

Owners Manual
Page 21
..., bumper guard accessories, etc. 1 Year No Warranty No Warranty Parts (e.g., belts, blades, etc.) 30 days No Warranty No Warranty Parts & Accessories (if replaced in Warranty Service) Replacement parts and/or accessories provided under this Limited Warranty are warranted only for the life... parts & labor, with Hydro-Gear Distributor network. EZ - Two (2) Year Commercial warranty, parts & labor, with Husqvarna. One (1) Year Commercial warranty, parts & labor, with Hydro-Gear Distributor network. *** "Limited Lifetime Warranty" on specific Snow Throwers & Tillers, ...
..., bumper guard accessories, etc. 1 Year No Warranty No Warranty Parts (e.g., belts, blades, etc.) 30 days No Warranty No Warranty Parts & Accessories (if replaced in Warranty Service) Replacement parts and/or accessories provided under this Limited Warranty are warranted only for the life... parts & labor, with Hydro-Gear Distributor network. EZ - Two (2) Year Commercial warranty, parts & labor, with Husqvarna. One (1) Year Commercial warranty, parts & labor, with Hydro-Gear Distributor network. *** "Limited Lifetime Warranty" on specific Snow Throwers & Tillers, ...
Parts List
Page 3
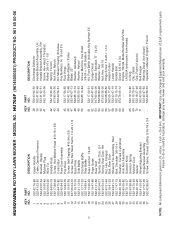
HU700F (96145000601) PRODUCT NO. 961 45 00-06 KEY PART NO. IMPORTANT: Use only Original Equipment Manufacturer (O.E.M.) replacement parts. Failure to do so could be hazardous, damage ... x 1-1/8 Spring, Torsion Nut, Hex, Nylock Kit, Mower Housing (Includes Key Numbers 14, 15 and 51) Rod, Hinge Blade Adapter / Pulley Blade, 22" Washer, Hardened Washer, Helical Screw, Machine, Hex Head 3/8-24 x 1-3/8 Grade 8 Kit, Front Baffle ...Operator's Manual, English / French 3 NOTE: All component dimensions given in U.S. HUSQVARNA ROTARY LAWN MOWER - inches. 1 inch = 25.4 mm. MODEL NO.
HU700F (96145000601) PRODUCT NO. 961 45 00-06 KEY PART NO. IMPORTANT: Use only Original Equipment Manufacturer (O.E.M.) replacement parts. Failure to do so could be hazardous, damage ... x 1-1/8 Spring, Torsion Nut, Hex, Nylock Kit, Mower Housing (Includes Key Numbers 14, 15 and 51) Rod, Hinge Blade Adapter / Pulley Blade, 22" Washer, Hardened Washer, Helical Screw, Machine, Hex Head 3/8-24 x 1-3/8 Grade 8 Kit, Front Baffle ...Operator's Manual, English / French 3 NOTE: All component dimensions given in U.S. HUSQVARNA ROTARY LAWN MOWER - inches. 1 inch = 25.4 mm. MODEL NO.


