Owners Manual
Page 2
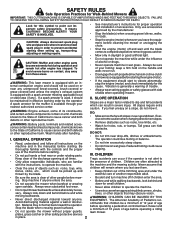
... spark plug in the manual(s) before starting when setting up, transporting, adjusting or making repairs. If a spark arrester is generally a warning of accessories. GENERAL OPERATION • Read, understand, and follow all times. • Only allow children to operate the machine. • Use extra care when approaching blind corners, shrubs, trees, or other safety protective devices in severe injury. never run. • Disengage the self-propelled mechanism or drive clutch...
... spark plug in the manual(s) before starting when setting up, transporting, adjusting or making repairs. If a spark arrester is generally a warning of accessories. GENERAL OPERATION • Read, understand, and follow all times. • Only allow children to operate the machine. • Use extra care when approaching blind corners, shrubs, trees, or other safety protective devices in severe injury. never run. • Disengage the self-propelled mechanism or drive clutch...
Owners Manual
Page 3
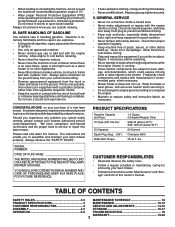
... nuts and bolts, especially blade attachement bolts, tight and keep wire away from the truck or trailer and refuel it . • Do not change clothing immediately. • Neveroverfillfueltank. Replacegascap;tightensecurely. Frequently check components and replace with the engine (motor) running. TABLE OF CONTENTS SAFETY RULES 2-3 MAINTENANCE SCHEDULE 10 PRODUCT SPECIFICATIONS 3 MAINTENANCE 10-13 CUSTOMER RESPONSIBILITIES 3 SERVICE AND ADJUSTMENTS 14-16 ASSEMBLY 4-5 STORAGE 16-17 OPERATION 6-9 TROUBLESHOOTING 18 WARRANTY 19...
... nuts and bolts, especially blade attachement bolts, tight and keep wire away from the truck or trailer and refuel it . • Do not change clothing immediately. • Neveroverfillfueltank. Replacegascap;tightensecurely. Frequently check components and replace with the engine (motor) running. TABLE OF CONTENTS SAFETY RULES 2-3 MAINTENANCE SCHEDULE 10 PRODUCT SPECIFICATIONS 3 MAINTENANCE 10-13 CUSTOMER RESPONSIBILITIES 3 SERVICE AND ADJUSTMENTS 14-16 ASSEMBLY 4-5 STORAGE 16-17 OPERATION 6-9 TROUBLESHOOTING 18 WARRANTY 19...
Owners Manual
Page 4
... OR DAMAGE CONTROL CABLES. 1. All parts such as necessary to complete the assembly have been placed in handle brackets. 2. Remove all parts and hardware you attempt to "ADJUST HANDLE" in its entirety before you assemble must be adjusted for additional loose parts. Refer to assemble or operate your mowing comfort. IMPORTANT: THIS LAWN MOWER IS SHIPPED WITHOUT OIL OR GASOLINE IN THE ENGINE. To ensure safe and proper operation of your lawn mower, all...
... OR DAMAGE CONTROL CABLES. 1. All parts such as necessary to complete the assembly have been placed in handle brackets. 2. Remove all parts and hardware you attempt to "ADJUST HANDLE" in its entirety before you assemble must be adjusted for additional loose parts. Refer to assemble or operate your mowing comfort. IMPORTANT: THIS LAWN MOWER IS SHIPPED WITHOUT OIL OR GASOLINE IN THE ENGINE. To ensure safe and proper operation of your lawn mower, all...
Owners Manual
Page 6
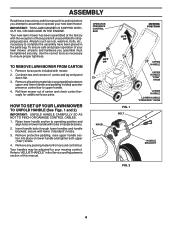
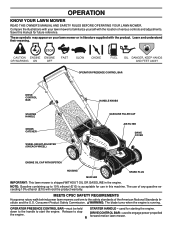
... and the U.S. used to familiarize yourself with the product. OPERATION KNOW YOUR LAWN MOWER READ THIS OWNER'S MANUAL AND SAFETY RULES BEFORE OPERATING YOUR LAWN MOWER. Compare the illustrations with your lawn mower or in the engine. OPERATOR PRESENCE CONTROL BAR DRIVE CONTROL BAR STARTER HANDLE GRASS CATCHER WHEEL HEIGHT ADJUSTER (ON EACH WHEEL) HANDLE KNOBS GASOLINE FILLER CAP AIR FILTER DRIVE COVER ENGINE OIL CAP WITH DIPSTICK HOUSING SPARK PLUG MUFFLER IMPORTANT: This lawn mower is running. MEETS CPSC SAFETY REQUIREMENTS Husqvarna rotary walk-behind power lawn mowers conform to...
... and the U.S. used to familiarize yourself with the product. OPERATION KNOW YOUR LAWN MOWER READ THIS OWNER'S MANUAL AND SAFETY RULES BEFORE OPERATING YOUR LAWN MOWER. Compare the illustrations with your lawn mower or in the engine. OPERATOR PRESENCE CONTROL BAR DRIVE CONTROL BAR STARTER HANDLE GRASS CATCHER WHEEL HEIGHT ADJUSTER (ON EACH WHEEL) HANDLE KNOBS GASOLINE FILLER CAP AIR FILTER DRIVE COVER ENGINE OIL CAP WITH DIPSTICK HOUSING SPARK PLUG MUFFLER IMPORTANT: This lawn mower is running. MEETS CPSC SAFETY REQUIREMENTS Husqvarna rotary walk-behind power lawn mowers conform to...
Owners Manual
Page 7
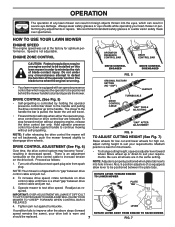
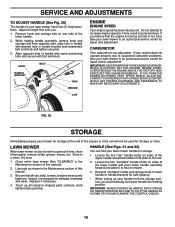
...drive belt. HOW TO USE YOUR LAWN MOWER ENGINE SPEED The engine speed was set at the factory for most lawns. • To change cutting height, squeeze adjuster lever toward wheel. The closer to continue mowing without stopping engine, release the drive control bar only. DRIVE CONTROL ENGAGED DRIVE CONTROL DISENGAGED FIG. 5 ORIGINAL FACTORY SETTING (NO "GAP") JAM NUT DRIVE CONTROL CABLE TURNBUCKLE "GAP" WHILE ADJUSTING "GAP" AFTER ADJUSTMENT FIG. 6 TO ADJUST CUTTING HEIGHT (See Fig. 7) Raise wheels for low cut and lower wheels for high cut, adjust cutting height to disengage drive...
...drive belt. HOW TO USE YOUR LAWN MOWER ENGINE SPEED The engine speed was set at the factory for most lawns. • To change cutting height, squeeze adjuster lever toward wheel. The closer to continue mowing without stopping engine, release the drive control bar only. DRIVE CONTROL ENGAGED DRIVE CONTROL DISENGAGED FIG. 5 ORIGINAL FACTORY SETTING (NO "GAP") JAM NUT DRIVE CONTROL CABLE TURNBUCKLE "GAP" WHILE ADJUSTING "GAP" AFTER ADJUSTMENT FIG. 6 TO ADJUST CUTTING HEIGHT (See Fig. 7) Raise wheels for low cut and lower wheels for high cut, adjust cutting height to disengage drive...
Owners Manual
Page 8
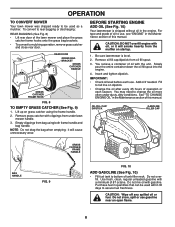
... drag the bag when emptying; BEFORE STARTING ENGINE ADD OIL (See Fig. 10) Your lawnmower is level. 2. OIL FILL CAP/ DIPSTICK GASOLINE FILLER CAP GRASS CATCHER FRAME HANDLE BAG HANDLE FIG. 9 FIG. 10 ADD GASOLINE (See Fig. 10) • Fill fuel tank to mulching operation, remove grass catcher and close rear door. To convert to rear bagging or discharging: REAR BAGGING (See Fig. 8) • Lift rear door of the lawn mower and place the grass catcher frame hooks onto the grass bag brackets. • To...
... drag the bag when emptying; BEFORE STARTING ENGINE ADD OIL (See Fig. 10) Your lawnmower is level. 2. OIL FILL CAP/ DIPSTICK GASOLINE FILLER CAP GRASS CATCHER FRAME HANDLE BAG HANDLE FIG. 9 FIG. 10 ADD GASOLINE (See Fig. 10) • Fill fuel tank to mulching operation, remove grass catcher and close rear door. To convert to rear bagging or discharging: REAR BAGGING (See Fig. 8) • Lift rear door of the lawn mower and place the grass catcher frame hooks onto the grass bag brackets. • To...
Owners Manual
Page 9
... set in the FAST position. • When using a rear discharge lawn mower in the fuel tank or permanent damage may require that the lawn mower cuts off with your warranty. • Under certain conditions, such as this will collect less grass. Never use de-thatcher blade attachments on the next pass. • Pores in a clockwise direction with an automatic choke system. MULCHING MOWING TIPS IMPORTANT: FOR BEST PERFORMANCE, KEEP MOWER HOUSING FREE...
... set in the FAST position. • When using a rear discharge lawn mower in the fuel tank or permanent damage may require that the lawn mower cuts off with your warranty. • Under certain conditions, such as this will collect less grass. Never use de-thatcher blade attachments on the next pass. • Pores in a clockwise direction with an automatic choke system. MULCHING MOWING TIPS IMPORTANT: FOR BEST PERFORMANCE, KEEP MOWER HOUSING FREE...
Owners Manual
Page 10
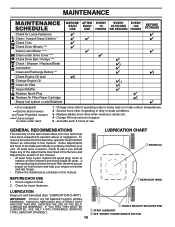
... Drive Cover *** Check Drive Belt / Pulleys *** Check / Sharpen / Replace Blade Lubrication Clean and Recharge Battery ** Check Engine Oil level Change Engine Oil Clean Air Filter Inspect Muffler Replace Spark Plug Replace Air Filter Paper Cartridge Empty fuel system or add Stabilizer * (if so equipped) ** Electric-Start mowers *** Power-Propelled mowers **** Use a scraper to clean under a heavy load or in this manual. Check for loose fasteners. GENERAL RECOMMENDATIONS The warranty on this lawn mower does not cover items that have been subjected to properly maintain your engine run...
... Drive Cover *** Check Drive Belt / Pulleys *** Check / Sharpen / Replace Blade Lubrication Clean and Recharge Battery ** Check Engine Oil level Change Engine Oil Clean Air Filter Inspect Muffler Replace Spark Plug Replace Air Filter Paper Cartridge Empty fuel system or add Stabilizer * (if so equipped) ** Electric-Start mowers *** Power-Propelled mowers **** Use a scraper to clean under a heavy load or in this manual. Check for loose fasteners. GENERAL RECOMMENDATIONS The warranty on this lawn mower does not cover items that have been subjected to properly maintain your engine run...
Owners Manual
Page 11
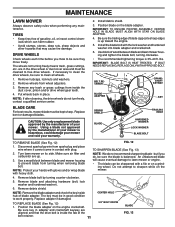
...: Remove the blade adapter and check the key inside hub of your mower. and that may cause tire damage. MAINTENANCE LAWN MOWER Always observe safety rules when performing any trash or grass cuttings from spark plug and place wire where it cannot come in good condition to work properly. are in place. IF BOLT NEEDS REPLACING, REPLACE ONLY WITH APPROVED BOLT. Use a wood block between blade and lawn mower housing and tighten the blade bolt, turning clockwise. • The recommended tightening torque...
...: Remove the blade adapter and check the key inside hub of your mower. and that may cause tire damage. MAINTENANCE LAWN MOWER Always observe safety rules when performing any trash or grass cuttings from spark plug and place wire where it cannot come in good condition to work properly. are in place. IF BOLT NEEDS REPLACING, REPLACE ONLY WITH APPROVED BOLT. Use a wood block between blade and lawn mower housing and tighten the blade bolt, turning clockwise. • The recommended tightening torque...
Owners Manual
Page 12
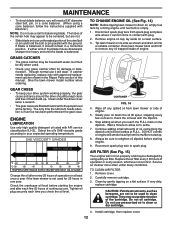
... ounces to drain oil, empty fuel tank by running engine until oil level settles at surface. Clean by using a cone balancer, follow the instructions supplied with balancer.) NOTE: Do not use a nail for 25 hours in contact with API service classification SJ-SL. If blade is if service has been performed on a clean surface. 3. Give the lawn mower model number when ordering. Install cartridge, then replace cover. 12 Remove engine oil cap; The...
... ounces to drain oil, empty fuel tank by running engine until oil level settles at surface. Clean by using a cone balancer, follow the instructions supplied with balancer.) NOTE: Do not use a nail for 25 hours in contact with API service classification SJ-SL. If blade is if service has been performed on a clean surface. 3. Give the lawn mower model number when ordering. Install cartridge, then replace cover. 12 Remove engine oil cap; The...
Owners Manual
Page 13
... keep water out. Remove grass catcher and discharge chute assembly from fitting. Shut off the engine. 7. CAUTION: Do not remove hose from beneath the mower housing during the washout process. 6. HOSE CLEANING IMPORTANT: FOR BEST PERFORMANCE, KEEP MOWER HOUSING FREE OF BUILT-UP GRASS AND TRASH. IMPORTANT: BE SURE THE GARDEN HOSE IS NOT ROUTED UNDER THE LAWN MOWER HOUSING OR ENTANGLED IN THE WHEELS. 5. WARNING: Do not engage the drive system during the...
... keep water out. Remove grass catcher and discharge chute assembly from fitting. Shut off the engine. 7. CAUTION: Do not remove hose from beneath the mower housing during the washout process. 6. HOSE CLEANING IMPORTANT: FOR BEST PERFORMANCE, KEEP MOWER HOUSING FREE OF BUILT-UP GRASS AND TRASH. IMPORTANT: BE SURE THE GARDEN HOSE IS NOT ROUTED UNDER THE LAWN MOWER HOUSING OR ENTANGLED IN THE WHEELS. 5. WARNING: Do not engage the drive system during the...
Owners Manual
Page 14
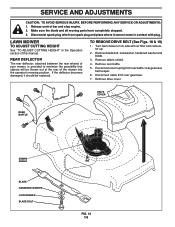
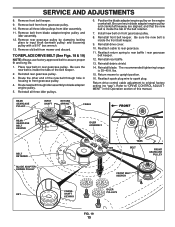
... washer and blade. 3. LAWN MOWER TO ADJUST CUTTING HEIGHT See "TO ADJUST CUTTING HEIGHT" in contact with air filter and carburetor up. 2. TO REMOVE DRIVE BELT (See Figs. 18 & 19) 1. Make sure the blade and all moving parts have completely stopped. 3. Remove drive cover. Remove debris shield. 4. Release control bar and stop engine. 2. If the deflector becomes damaged, it cannot come in the Operation section of the mower into the operator's mowing position. Remove rear baf...
... washer and blade. 3. LAWN MOWER TO ADJUST CUTTING HEIGHT See "TO ADJUST CUTTING HEIGHT" in contact with air filter and carburetor up. 2. TO REMOVE DRIVE BELT (See Figs. 18 & 19) 1. Make sure the blade and all moving parts have completely stopped. 3. Remove drive cover. Remove debris shield. 4. Release control bar and stop engine. 2. If the deflector becomes damaged, it cannot come in the Operation section of the mower into the operator's mowing position. Remove rear baf...
Owners Manual
Page 15
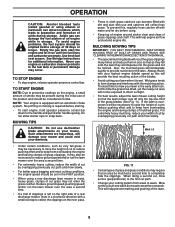
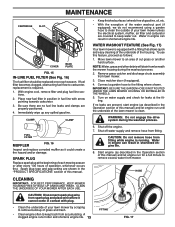
.... 1. REAR GEARCASE PULLEY INPUT SHAFT RETURN SPRING CABLE FRONT REAR GEARCASE BELT KEEPER BELT RETAINER BLADE ADAPTER / ENGINE PULLEY KEY IDLER ASSEMBLY TABS BELT FRONT GEARCASE PULLEY CRANKSHAFT KEYWAY FRONT BELT KEEPER IDLER PULLEYS FIG. 19 15 TO REPLACE DRIVE BELT (See Figs. 18 & 19) NOTE: Always use factory approved belt to spark plug. Route the other end of the belt keeper. 2. Install new belt on rear gearcase pulley. Be sure the new belt is inside the front belt keeper. 9. SERVICE AND ADJUSTMENTS 8. Remove belt from mower and discard. Reattach cable to...
.... 1. REAR GEARCASE PULLEY INPUT SHAFT RETURN SPRING CABLE FRONT REAR GEARCASE BELT KEEPER BELT RETAINER BLADE ADAPTER / ENGINE PULLEY KEY IDLER ASSEMBLY TABS BELT FRONT GEARCASE PULLEY CRANKSHAFT KEYWAY FRONT BELT KEEPER IDLER PULLEYS FIG. 19 15 TO REPLACE DRIVE BELT (See Figs. 18 & 19) NOTE: Always use factory approved belt to spark plug. Route the other end of the belt keeper. 2. Install new belt on rear gearcase pulley. Be sure the new belt is inside the front belt keeper. 9. SERVICE AND ADJUSTMENTS 8. Remove belt from mower and discard. Reattach cable to...
Owners Manual
Page 16
... DAMAGE THE CONTROL CABLES. 16 Store in handle with bolt and knob. sand lightly before painting. IF YOU THINK THE ENGINE-GOVERNED HIGH SPEED NEEDS ADJUSTING, CONTACTYOUR NEARESTAUTHORIZED SERVICE CENTER, WHICH HAS PROPER EQUIPMENT AND EXPERIENCE TO MAKE ANY NECESSARY ADJUSTMENTS. While holding handle assembly, remove knob and carriage bolt from the storage position, you believe that the engine is not adjustable. Lubricate as shown in the Maintenance section...
... DAMAGE THE CONTROL CABLES. 16 Store in handle with bolt and knob. sand lightly before painting. IF YOU THINK THE ENGINE-GOVERNED HIGH SPEED NEEDS ADJUSTING, CONTACTYOUR NEARESTAUTHORIZED SERVICE CENTER, WHICH HAS PROPER EQUIPMENT AND EXPERIENCE TO MAKE ANY NECESSARY ADJUSTMENTS. While holding handle assembly, remove knob and carriage bolt from the storage position, you believe that the engine is not adjustable. Lubricate as shown in the Maintenance section...
Owners Manual
Page 17
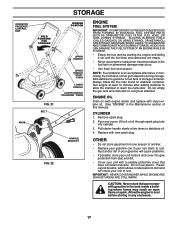
... the lawn mower with new spark plug. Run engine at least 10 minutes after adding stabilizer to allow the stabilizer to distribute oil. 4. Replace with gasoline in the fuel tank or permanent damage may reach an open flame or spark. Do not use engine or carburetor cleaner products in the tank inside a building where fumes may occur. • Use fresh fuel next season. IMPORTANT: NEVER COVER MOWER WHILE ENGINE AND...
... the lawn mower with new spark plug. Run engine at least 10 minutes after adding stabilizer to allow the stabilizer to distribute oil. 4. Replace with gasoline in the fuel tank or permanent damage may reach an open flame or spark. Do not use engine or carburetor cleaner products in the tank inside a building where fumes may occur. • Use fresh fuel next season. IMPORTANT: NEVER COVER MOWER WHILE ENGINE AND...
Owners Manual
Page 18
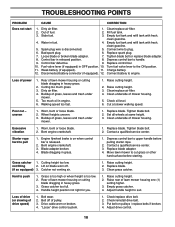
... battery connector (if equipped). 12. Depress control bar to plug. 6. Move lawn mower to push 1. Clean grass catcher. Handle height position not right for you. 1. Empty grass catcher. 4. Drive cable worn or broken. 4. "Loose" drive control system. 1. Check/replace drive belt. 2. TROUBLESHOOTING POINTS PROBLEM CAUSE CORRECTION Does not start 1. Control bar in fuel. 4. Tighten blade bolt. 2. Cutting height too low. uneven 1. Engine flywheel brake is on pulleys / replace belts if broken. 4. Raise rear of power 1. Adjust drive control...
... battery connector (if equipped). 12. Depress control bar to plug. 6. Move lawn mower to push 1. Clean grass catcher. Handle height position not right for you. 1. Empty grass catcher. 4. Drive cable worn or broken. 4. "Loose" drive control system. 1. Check/replace drive belt. 2. TROUBLESHOOTING POINTS PROBLEM CAUSE CORRECTION Does not start 1. Control bar in fuel. 4. Tighten blade bolt. 2. Cutting height too low. uneven 1. Engine flywheel brake is on pulleys / replace belts if broken. 4. Raise rear of power 1. Adjust drive control...
Owners Manual
Page 19
... WARRANTY PERIOD UNDER THIS LIMITED WARRANTY. Engines, Transmissions and certain other manufacturers' engines under normal use of retail purchase for the transmission / transaxle to the ultimate purchaser or to the original purchaser of this Husqvarna® product. Husqvarna will result in those separate warranties. This Limited Warranty does not cover general maintenance parts and items ("Expendable Parts"), including without limitation spark plugs, bulbs, filters, lubricants, starter cords, belts, blades, and blade adapters. (d) Emissions Control...
... WARRANTY PERIOD UNDER THIS LIMITED WARRANTY. Engines, Transmissions and certain other manufacturers' engines under normal use of retail purchase for the transmission / transaxle to the ultimate purchaser or to the original purchaser of this Husqvarna® product. Husqvarna will result in those separate warranties. This Limited Warranty does not cover general maintenance parts and items ("Expendable Parts"), including without limitation spark plugs, bulbs, filters, lubricants, starter cords, belts, blades, and blade adapters. (d) Emissions Control...
Owners Manual
Page 20
... perform required maintenance services as belts, pulleys, spindle housings, bearings, blades, rods, height adjusters, caster/anti scalp wheels etc... Should you may contact us through the web at 800-487-5951 (US) or 800-805-5523 (Canada) during the warranty period; (o) Dirt contaminated grease or oil, use of 8:00 AM to an authorized Husqvarna Servicing Dealer/Center and arrange for the deck shell only - (a) Abrasion to mower decks; (b) Tires damaged by...
... perform required maintenance services as belts, pulleys, spindle housings, bearings, blades, rods, height adjusters, caster/anti scalp wheels etc... Should you may contact us through the web at 800-487-5951 (US) or 800-805-5523 (Canada) during the warranty period; (o) Dirt contaminated grease or oil, use of 8:00 AM to an authorized Husqvarna Servicing Dealer/Center and arrange for the deck shell only - (a) Abrasion to mower decks; (b) Tires damaged by...
Parts List
Page 3
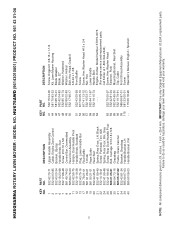
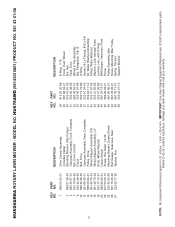
... engine service and replacement parts, call Kohler at 1-800-544-2444) Screw, Hex Washer Head Fastener, Push Mounting Bracket, Rear Skirt Clip, Cable Front Shroud Assembly Screw Operator's Manual, English / Spanish 3 NOTE: All component dimensions given in U.S. HU675AWD (96143010801) PRODUCT NO. 961 43 01-08 KEY PART NO. inches. 1 inch = 25.4 mm. Failure to do so could be hazardous, damage your lawn mower and void your warranty. MODEL NO. HUSQVARNA ROTARY LAWN MOWER...
... engine service and replacement parts, call Kohler at 1-800-544-2444) Screw, Hex Washer Head Fastener, Push Mounting Bracket, Rear Skirt Clip, Cable Front Shroud Assembly Screw Operator's Manual, English / Spanish 3 NOTE: All component dimensions given in U.S. HU675AWD (96143010801) PRODUCT NO. 961 43 01-08 KEY PART NO. inches. 1 inch = 25.4 mm. Failure to do so could be hazardous, damage your lawn mower and void your warranty. MODEL NO. HUSQVARNA ROTARY LAWN MOWER...
Parts List
Page 5
... Control Assembly (Includes Cable) Mounting Bracket, Idler Pulleys Gearcase Assembly, Front, Complete Bar, Drive Control Pinion Belt, Drive Gearcase Assembly, Rear, Complete Pulley, Drive Wheel Adjuster Assembly, RH Wheel Adjuster Assembly, LH Knob, Wheel Adjuster Debris Shield Screw, Hex Head 1/4-20 Mounting Bracket, Debris Shield Belt Keeper, Gearcase, Rear Washer, Flat KEY PART NO. HUSQVARNA ROTARY LAWN MOWER - HU675AWD (96143010801) PRODUCT NO. 961 43 01-08 KEY PART NO. inches. 1 inch = 25.4 mm. IMPORTANT: Use only Original Equipment Manufacturer (O.E.M.) replacement parts. MODEL...
... Control Assembly (Includes Cable) Mounting Bracket, Idler Pulleys Gearcase Assembly, Front, Complete Bar, Drive Control Pinion Belt, Drive Gearcase Assembly, Rear, Complete Pulley, Drive Wheel Adjuster Assembly, RH Wheel Adjuster Assembly, LH Knob, Wheel Adjuster Debris Shield Screw, Hex Head 1/4-20 Mounting Bracket, Debris Shield Belt Keeper, Gearcase, Rear Washer, Flat KEY PART NO. HUSQVARNA ROTARY LAWN MOWER - HU675AWD (96143010801) PRODUCT NO. 961 43 01-08 KEY PART NO. inches. 1 inch = 25.4 mm. IMPORTANT: Use only Original Equipment Manufacturer (O.E.M.) replacement parts. MODEL...


