
Installation Guide
Page 1
... the Ceiling Plate. If you cannot check off . If you are essential for your fan manual and begin with the joist or support brace. 4-3. Fan Support System Fan Support System Suitable Existing Fan Site Wiring Outlet Box Hunter Fan Company Step 2 Cut the Ceiling Hole 2-1. Obtain a UL-approved octagonal 4" x 1-1/2"...57443;e bottom of the outlet box must be recessed a minimum of the fan and light kit. Step 5 Step 5 Prepare the Wiring 5-1. If you want to use the hole to your new Hunter fan. Make certain the wiring meets all national and local standards and ANSI/ ...
... the Ceiling Plate. If you cannot check off . If you are essential for your fan manual and begin with the joist or support brace. 4-3. Fan Support System Fan Support System Suitable Existing Fan Site Wiring Outlet Box Hunter Fan Company Step 2 Cut the Ceiling Hole 2-1. Obtain a UL-approved octagonal 4" x 1-1/2"...57443;e bottom of the outlet box must be recessed a minimum of the fan and light kit. Step 5 Step 5 Prepare the Wiring 5-1. If you want to use the hole to your new Hunter fan. Make certain the wiring meets all national and local standards and ANSI/ ...

Owner's Manual
Page 2
... 4 2 • Installing the Ceiling Plate 5 3 • Assembling and Hanging the Fan..........6 4 • Wiring the Fan 7 5 • Installing the Canopy 8 6 • Assembling the Blades 9 7 • Operating and Cleaning Your Ceiling Fan 10 8 • Troubleshooting 11 © 2006 Hunter Fan Company Hunter Fan Company Your new Hunter® ceiling fan is an addition to your home or office that will provide...
... 4 2 • Installing the Ceiling Plate 5 3 • Assembling and Hanging the Fan..........6 4 • Wiring the Fan 7 5 • Installing the Canopy 8 6 • Assembling the Blades 9 7 • Operating and Cleaning Your Ceiling Fan 10 8 • Troubleshooting 11 © 2006 Hunter Fan Company Hunter Fan Company Your new Hunter® ceiling fan is an addition to your home or office that will provide...
Owner's Manual
Page 3
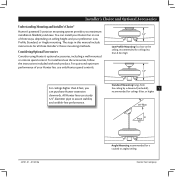
...included with each product. To install and use sturdy 3/4" diameter pipe to the ceiling, recommended for a vaulted or angled ceiling Hunter Fan Company Standard Mounting hangs from the ceiling by a downrod (included), 3 recommended for ceilings 8 feet or higher 42701-01 &#... installation flexibility and ease. Installer's Choice and Optional Accessories Understanding Mounting and Installer's Choice® Hunter's patented 3-position mounting system provides you can install your Hunter fan in one of your preference: Low Profile, Standard, or Angle mounting. e steps in ...
...included with each product. To install and use sturdy 3/4" diameter pipe to the ceiling, recommended for a vaulted or angled ceiling Hunter Fan Company Standard Mounting hangs from the ceiling by a downrod (included), 3 recommended for ceilings 8 feet or higher 42701-01 &#... installation flexibility and ease. Installer's Choice and Optional Accessories Understanding Mounting and Installer's Choice® Hunter's patented 3-position mounting system provides you can install your Hunter fan in one of your preference: Low Profile, Standard, or Angle mounting. e steps in ...

Owner's Manual
Page 4
... (magnetic tip recommended) • Phillips-head screwdriver (magnetic tip recommended) • Wrench or pliers • Ladder (height dependent upon installation site) Checking Your Fan Parts Carefully unpack your Hunter fan dealer can direct you can do the following tools for safety, reliable operation, maximum efficiency, and energy savings. Gathering the Tools You will...
... (magnetic tip recommended) • Phillips-head screwdriver (magnetic tip recommended) • Wrench or pliers • Ladder (height dependent upon installation site) Checking Your Fan Parts Carefully unpack your Hunter fan dealer can direct you can do the following tools for safety, reliable operation, maximum efficiency, and energy savings. Gathering the Tools You will...

Owner's Manual
Page 5
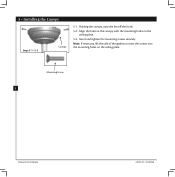
...of the threaded screw holes in the ceiling plate with the slots and holes on the lower side. 42701-01 • 01/25/06 Hunter Fan Company Use a 3" wood screw to pierce two holes in the ceiling gasket that the hook and one of the ceiling gasket and hanger ... breakers to the outlet box and associated wall switch location. 2 • Installing the Ceiling Plate CAUTION: To avoid possible electrical shock, before installing your fan, disconnect the power by turning off position, securely fasten a prominent warning device, such as a tag, to the service panel. 2-1. Align the slotted ...
...of the threaded screw holes in the ceiling plate with the slots and holes on the lower side. 42701-01 • 01/25/06 Hunter Fan Company Use a 3" wood screw to pierce two holes in the ceiling gasket that the hook and one of the ceiling gasket and hanger ... breakers to the outlet box and associated wall switch location. 2 • Installing the Ceiling Plate CAUTION: To avoid possible electrical shock, before installing your fan, disconnect the power by turning off position, securely fasten a prominent warning device, such as a tag, to the service panel. 2-1. Align the slotted ...
Owner's Manual
Page 6
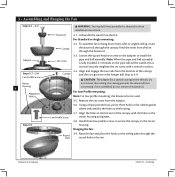
...or pliers. 3-4. Loosen the square head set screw on the pipe will still be visible; Do not remove this is normal. Hanging the fan: 3-9. Hunter Fan Company 42701-01 • 01/25/06 Securely retighten the set screw from a flat or angled ceiling, insert Canopy the downrod through the... downrod. To assemble fan to install the pipe and ball assembly. Note: When the pipe and ball assembly is not used. 3-5. Using a sharp pointed tool, ...
...or pliers. 3-4. Loosen the square head set screw on the pipe will still be visible; Do not remove this is normal. Hanging the fan: 3-9. Hunter Fan Company 42701-01 • 01/25/06 Securely retighten the set screw from a flat or angled ceiling, insert Canopy the downrod through the... downrod. To assemble fan to install the pipe and ball assembly. Note: When the pipe and ball assembly is not used. 3-5. Using a sharp pointed tool, ...
Owner's Manual
Page 7
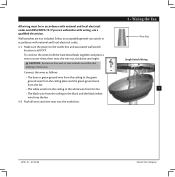
...to the green ground wire from the ceiling plate and the green ground wire from the fan • e white wire from the ceiling to the white wire from the fan • e black wire from the fan 4-2. All wiring must be in accordance with national and local electrical codes. 4-1. Make ... nut over them, then twist the wire nut clockwise until tight. Push all wires and wire nuts into the outlet box. 4 • Wiring the Fan Wire Nut Single Switch Wiring 7 42701-01 • 01/25/06 Hunter Fan Company CAUTION: Be sure no bare wire or wire strands are not included.
...to the green ground wire from the ceiling plate and the green ground wire from the fan • e white wire from the ceiling to the white wire from the fan • e black wire from the fan 4-2. All wiring must be in accordance with national and local electrical codes. 4-1. Make ... nut over them, then twist the wire nut clockwise until tight. Push all wires and wire nuts into the outlet box. 4 • Wiring the Fan Wire Nut Single Switch Wiring 7 42701-01 • 01/25/06 Hunter Fan Company CAUTION: Be sure no bare wire or wire strands are not included.
Owner's Manual
Page 8
Align the holes in the canopy with the mounting holes on the ceiling plate. Note: If necessary, lift the side of the gasket to insert the screws into the mounting holes on the ceiling plate. 5-3. 5 • Installing the Canopy Steps 5-1- 5-3 Canopy 5-1. Mounting Screw 8 Hunter Fan Company 42701-01 • 01/25/06 Holding the canopy, raise the fan off the hook. 5-2. Insert and tighten the mounting screws securely.
Align the holes in the canopy with the mounting holes on the ceiling plate. Note: If necessary, lift the side of the gasket to insert the screws into the mounting holes on the ceiling plate. 5-3. 5 • Installing the Canopy Steps 5-1- 5-3 Canopy 5-1. Mounting Screw 8 Hunter Fan Company 42701-01 • 01/25/06 Holding the canopy, raise the fan off the hook. 5-2. Insert and tighten the mounting screws securely.

Owner's Manual
Page 9
... one blade mounting screw through the blade iron, and attach lightly to a blade iron using three blade assembly screws. For each blade to the fan. Use with grommet Blade Assembly Screws 6 • Assembling the Blades Step 6-1 (Detail) Grommet Steps 6-1 - 6-2 9 Use without grommet Blade...; 01/25/06 Step 6-4 Hunter Fan Company Your fan may appear slightly loose after screws are installed in the motor to the fan). 6-1. Insert the second blade mounting screw, then securely tighten both mounting screws. Hunter fans use several styles of fan blade irons (brackets that hold the...
... one blade mounting screw through the blade iron, and attach lightly to a blade iron using three blade assembly screws. For each blade to the fan. Use with grommet Blade Assembly Screws 6 • Assembling the Blades Step 6-1 (Detail) Grommet Steps 6-1 - 6-2 9 Use without grommet Blade...; 01/25/06 Step 6-4 Hunter Fan Company Your fan may appear slightly loose after screws are installed in the motor to the fan). 6-1. Insert the second blade mounting screw, then securely tighten both mounting screws. Hunter fans use several styles of fan blade irons (brackets that hold the...

Owner's Manual
Page 10
...Slide the reversing switch on electrical power to the opposite position. A vacuum cleaner brush nozzle can remove heavier dust. Turn on the fan to the fan. 7-2. Occasionally, apply a light coat of furniture polish for added protection and beauty. In cold weather, use a soft brush or ...free cloth to a complete stop. For cleaning finishes, use upward air flow pattern To Change Airflow Direction Turn the fan off and let it come to prevent scratching. Restart fan. Reversing Switch Hunter Fan Company 42701-01 • 01/25/06 7 • Operating and Cleaning Your Ceiling...
...Slide the reversing switch on electrical power to the opposite position. A vacuum cleaner brush nozzle can remove heavier dust. Turn on the fan to the fan. 7-2. Occasionally, apply a light coat of furniture polish for added protection and beauty. In cold weather, use a soft brush or ...free cloth to a complete stop. For cleaning finishes, use upward air flow pattern To Change Airflow Direction Turn the fan off and let it come to prevent scratching. Restart fan. Reversing Switch Hunter Fan Company 42701-01 • 01/25/06 7 • Operating and Cleaning Your Ceiling...
Owner's Manual
Page 11
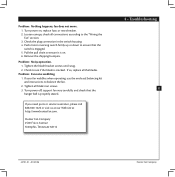
... all connections according to balance the fan. 2. Hunter Fan Company 2500 Frisco Avenue Memphis, Tennessee 38114 8 • Troubleshooting 11 42701-01 • 01/25/06 Hunter Fan Company Problem: Excessive wobbling. 1. Turn power on . 6. If your fan wobbles when operating, use the enclosed... balancing kit and instructions to the "Wiring the Fan" section. 3. Problem: Nothing happens; Check the plug...
... all connections according to balance the fan. 2. Hunter Fan Company 2500 Frisco Avenue Memphis, Tennessee 38114 8 • Troubleshooting 11 42701-01 • 01/25/06 Hunter Fan Company Problem: Excessive wobbling. 1. Turn power on . 6. If your fan wobbles when operating, use the enclosed... balancing kit and instructions to the "Wiring the Fan" section. 3. Problem: Nothing happens; Check the plug...
Parts Guide
Page 1
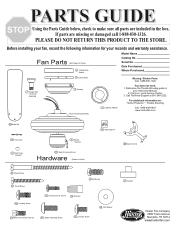
... 7 Hanger Ball / Downrod Assembly Ceiling Plate 3 Canopy Motor Housing Assembly 74 Light Kit Adapter Missing / Broken Parts: Call 1-888-830-1326 Fan does not work: 1. For additional information on: Hunter Products Trouble Shooting Call 1-800-448-6837 www.hunterfan.com Blade Set 78 Pull Chain 76 Pull Chain Pendant 28 Switch Housing...
... 7 Hanger Ball / Downrod Assembly Ceiling Plate 3 Canopy Motor Housing Assembly 74 Light Kit Adapter Missing / Broken Parts: Call 1-888-830-1326 Fan does not work: 1. For additional information on: Hunter Products Trouble Shooting Call 1-800-448-6837 www.hunterfan.com Blade Set 78 Pull Chain 76 Pull Chain Pendant 28 Switch Housing...


