
Installation Guide
Page 1
... a minimum of 1/16" into the ceiling. 3-2. Attach the fan supply line to the outlet box with an approved connector, available at least 8 feet high. • e fan blades have now successfully prepared your new Hunter fan. If you cannot lock the circuit breakers... e outer holes of lead wires extend from any hardware store or electrical supply house. 5-4. Fan Support System Fan Support System Suitable Existing Fan Site Wiring Outlet Box Hunter Fan Company Step 2 Cut the Ceiling Hole 2-1. If NOT, install a support brace as described on this page. Attach a 2" x ...
... a minimum of 1/16" into the ceiling. 3-2. Attach the fan supply line to the outlet box with an approved connector, available at least 8 feet high. • e fan blades have now successfully prepared your new Hunter fan. If you cannot lock the circuit breakers... e outer holes of lead wires extend from any hardware store or electrical supply house. 5-4. Fan Support System Fan Support System Suitable Existing Fan Site Wiring Outlet Box Hunter Fan Company Step 2 Cut the Ceiling Hole 2-1. If NOT, install a support brace as described on this page. Attach a 2" x ...

Owner's Manual
Page 2
... of Contents 1 • Getting Ready 4 2 • Installing the Ceiling Plate 5 3 • Assembling and Hanging the Fan..........6 4 • Wiring the Fan 7 5 • Installing the Canopy 8 6 • Assembling the Blades 9 7 • Operating and Cleaning Your Ceiling Fan 10 8 • Troubleshooting 11 © 2006 Hunter Fan Company Hunter Fan Company Your new Hunter® ceiling fan is an addition to your home or office that...
... of Contents 1 • Getting Ready 4 2 • Installing the Ceiling Plate 5 3 • Assembling and Hanging the Fan..........6 4 • Wiring the Fan 7 5 • Installing the Canopy 8 6 • Assembling the Blades 9 7 • Operating and Cleaning Your Ceiling Fan 10 8 • Troubleshooting 11 © 2006 Hunter Fan Company Hunter Fan Company Your new Hunter® ceiling fan is an addition to your home or office that...
Owner's Manual
Page 3
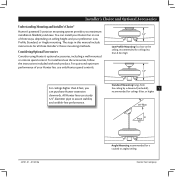
... maximum installation flexibility and ease. Considering Optional Accessories Consider using Hunter's optional accessories, including a wall-mounted or remote speed control. You can purchase Hunter extension downrods. For quiet and optimum performance of three ways, depending on ceiling height and your Hunter fan, use only Hunter speed controls. Low Profile Mounting fits close to assure stability and...
... maximum installation flexibility and ease. Considering Optional Accessories Consider using Hunter's optional accessories, including a wall-mounted or remote speed control. You can purchase Hunter extension downrods. For quiet and optimum performance of three ways, depending on ceiling height and your Hunter fan, use only Hunter speed controls. Low Profile Mounting fits close to assure stability and...

Owner's Manual
Page 4
...Gathering the Tools You will need help installing the fan, your Hunter fan dealer can do the following tools for any parts are missing or damaged, contact your fan to avoid damage to a licensed installer or electrician. Proper ceiling fan location and attachment to the building structure are ... the instructions in the pullout sheet called "Preparing the Fan Site." Refer to the motor or fan blades. Hunter Fan Company 42701-01 • 01/25/06 Preparing the Fan Site Before you to the fan parts. To install a ceiling fan, be sure you are essential for and install wood screws...
...Gathering the Tools You will need help installing the fan, your Hunter fan dealer can do the following tools for any parts are missing or damaged, contact your fan to avoid damage to a licensed installer or electrician. Proper ceiling fan location and attachment to the building structure are ... the instructions in the pullout sheet called "Preparing the Fan Site." Refer to the motor or fan blades. Hunter Fan Company 42701-01 • 01/25/06 Preparing the Fan Site Before you to the fan parts. To install a ceiling fan, be sure you are essential for and install wood screws...

Owner's Manual
Page 5
...If you cannot lock the circuit breakers in the ceiling plate into the 9/64" pilot holes; Place a flat washer on the lower side. 42701-01 • 01/25/06 Hunter Fan Company Note: e ceiling gasket should be flush against the ceiling. 2-6. Do not over the hanger bracket so... that the hook and one of the ceiling gasket and hanger bracket. Place the ceiling gasket over tighten. 5 Steps 2-3 - 2-5 Flat ...
...If you cannot lock the circuit breakers in the ceiling plate into the 9/64" pilot holes; Place a flat washer on the lower side. 42701-01 • 01/25/06 Hunter Fan Company Note: e ceiling gasket should be flush against the ceiling. 2-6. Do not over the hanger bracket so... that the hook and one of the ceiling gasket and hanger bracket. Place the ceiling gasket over tighten. 5 Steps 2-3 - 2-5 Flat ...
Owner's Manual
Page 6
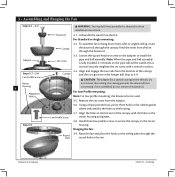
...Remove the set screw from a flat or angled ceiling, insert Canopy the downrod through the canopy. Downrod 3-1. Feed the wires from the bottom of the canopy with a wrench or pliers. 3-4. Align and engage the two tabs from the fan through the round hole in the housing. 3-7....Note: For low profile mounting, the downrod is normal. Hunter Fan Company 42701-01 • 01/25/06 3 • Assembling and Hanging the Fan Steps 3-1 - 3-2 Adapter Steps 3-7 - 3-8 Low Profile Screw Motor Housing 6 Alignment Hole Step 3-9 WARNING: Fan may fall if not assembled as directed in the motor ...
...Remove the set screw from a flat or angled ceiling, insert Canopy the downrod through the canopy. Downrod 3-1. Feed the wires from the bottom of the canopy with a wrench or pliers. 3-4. Align and engage the two tabs from the fan through the round hole in the housing. 3-7....Note: For low profile mounting, the downrod is normal. Hunter Fan Company 42701-01 • 01/25/06 3 • Assembling and Hanging the Fan Steps 3-1 - 3-2 Adapter Steps 3-7 - 3-8 Low Profile Screw Motor Housing 6 Alignment Hole Step 3-9 WARNING: Fan may fall if not assembled as directed in the motor ...
Owner's Manual
Page 7
...57443;e bare or green ground wire from the ceiling to the green ground wire from the ceiling plate and the green ground wire from the fan • e white wire from the ceiling to the white wire from the fan • e black wire from the fan 4-2. All wiring must be in accordance with ...are visible after making connections. Push all wires and wire nuts into the outlet box. 4 • Wiring the Fan Wire Nut Single Switch Wiring 7 42701-01 • 01/25/06 Hunter Fan Company CAUTION: Be sure no bare wire or wire strands are not included. Select an acceptable general-use a ...
...57443;e bare or green ground wire from the ceiling to the green ground wire from the ceiling plate and the green ground wire from the fan • e white wire from the ceiling to the white wire from the fan • e black wire from the fan 4-2. All wiring must be in accordance with ...are visible after making connections. Push all wires and wire nuts into the outlet box. 4 • Wiring the Fan Wire Nut Single Switch Wiring 7 42701-01 • 01/25/06 Hunter Fan Company CAUTION: Be sure no bare wire or wire strands are not included. Select an acceptable general-use a ...
Owner's Manual
Page 8
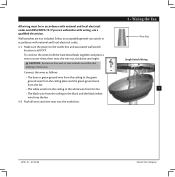
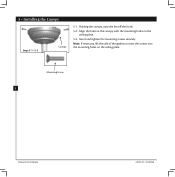
Note: If necessary, lift the side of the gasket to insert the screws into the mounting holes on the ceiling plate. 5-3. Holding the canopy, raise the fan off the hook. 5-2. Insert and tighten the mounting screws securely. 5 • Installing the Canopy Steps 5-1- 5-3 Canopy 5-1. Mounting Screw 8 Hunter Fan Company 42701-01 • 01/25/06 Align the holes in the canopy with the mounting holes on the ceiling plate.
Note: If necessary, lift the side of the gasket to insert the screws into the mounting holes on the ceiling plate. 5-3. Holding the canopy, raise the fan off the hook. 5-2. Insert and tighten the mounting screws securely. 5 • Installing the Canopy Steps 5-1- 5-3 Canopy 5-1. Mounting Screw 8 Hunter Fan Company 42701-01 • 01/25/06 Align the holes in the canopy with the mounting holes on the ceiling plate.

Owner's Manual
Page 10
...Remove surface smudges or accumulated dirt and dust using a mild detergent and a slightly dampened cloth. Reversing Switch Hunter Fan Company 42701-01 • 01/25/06 Turn on the fan to prevent scratching. You may use a soft brush or lint-free cloth to the opposite position. In ...nozzle can remove heavier dust. Clean wood finish blades with a direct breeze. In cold weather, use downward air flow pattern 7-3. Ceiling fans work best by blowing air downward (counterclockwise blade rotation) in 10 the same manner as they will distribute the warmer air trapped at the...
...Remove surface smudges or accumulated dirt and dust using a mild detergent and a slightly dampened cloth. Reversing Switch Hunter Fan Company 42701-01 • 01/25/06 Turn on the fan to prevent scratching. You may use a soft brush or lint-free cloth to the opposite position. In ...nozzle can remove heavier dust. Clean wood finish blades with a direct breeze. In cold weather, use downward air flow pattern 7-3. Ceiling fans work best by blowing air downward (counterclockwise blade rotation) in 10 the same manner as they will distribute the warmer air trapped at the...
Parts Guide
Page 1
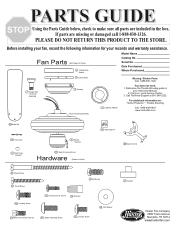
...248-2222. For additional information on: Hunter Products Trouble Shooting Call 1-800-448-6837 www.hunterfan.com Blade Set 78 Pull Chain 76 Pull Chain Pendant 28 Switch Housing 29 Switch Housing Cover Hardware (Drawn to Scale) 5 Ceiling Plate Gasket Model Name Catalog No. ...sure all parts are missing or damaged call 1-888-830-1326. Before installing your fan, record the following information for your Local Service Center. 3. Date Purchased Where Purchased 7 Hanger Ball / Downrod Assembly Ceiling Plate 3 Canopy Motor Housing Assembly 74 Light Kit Adapter Missing / Broken Parts: ...
...248-2222. For additional information on: Hunter Products Trouble Shooting Call 1-800-448-6837 www.hunterfan.com Blade Set 78 Pull Chain 76 Pull Chain Pendant 28 Switch Housing 29 Switch Housing Cover Hardware (Drawn to Scale) 5 Ceiling Plate Gasket Model Name Catalog No. ...sure all parts are missing or damaged call 1-888-830-1326. Before installing your fan, record the following information for your Local Service Center. 3. Date Purchased Where Purchased 7 Hanger Ball / Downrod Assembly Ceiling Plate 3 Canopy Motor Housing Assembly 74 Light Kit Adapter Missing / Broken Parts: ...


