

User Manual
Page 2
... to make the user aware of possible problems and information of electric shock, do not remove cover (or back). No user serviceable parts inside the product that indicate hazardous situations. Note Indicates additional information to help understand, use and maintain the product at maximum performance. The information in this user's manual next to qualified service personnel. Notice English Thank you for future reference. Keep this user's manual...
... to make the user aware of possible problems and information of electric shock, do not remove cover (or back). No user serviceable parts inside the product that indicate hazardous situations. Note Indicates additional information to help understand, use and maintain the product at maximum performance. The information in this user's manual next to qualified service personnel. Notice English Thank you for future reference. Keep this user's manual...

User Manual
Page 4
...and Rewinding Live TV (TSR) Using Video List Using Music List Using Photo List Preferences Parental Control Language Setting Setting Power On/Off Timer Video Setting Audio Setting Screen Display 1 Installation NTV+ Auto Search 4 Search Channels 4 Software Update (OTA) 4 Factory Default 8 11 System 12 System Information Signal Detection 13 Power Management 13 Conditional Access 13 Data Storage 14 15 Appendix 16 Specification 16 Safety Warning 17 Trouble Shooting Error Message 18 Glossary 18 Remote Control Code List 19 OPEN SOURCE SOFTWARE NOTICE 20 20 22 24...
...and Rewinding Live TV (TSR) Using Video List Using Music List Using Photo List Preferences Parental Control Language Setting Setting Power On/Off Timer Video Setting Audio Setting Screen Display 1 Installation NTV+ Auto Search 4 Search Channels 4 Software Update (OTA) 4 Factory Default 8 11 System 12 System Information Signal Detection 13 Power Management 13 Conditional Access 13 Data Storage 14 15 Appendix 16 Specification 16 Safety Warning 17 Trouble Shooting Error Message 18 Glossary 18 Remote Control Code List 19 OPEN SOURCE SOFTWARE NOTICE 20 20 22 24...

User Manual
Page 8
LIST Displays the channel list. TEXT Enters the digital text service. Close the cover. SUBTITLE Displays the subtitle language list. SOURCE Switches between TV and radio modes. WIDE Sets the display format. OPT+ Displays the channels attributes. AUDIO Displays the audio list. V-FORMAT Sets the resolution of video. Playback ݥControl Buttons Add Bookmark, Bookmark List, Slow Inserting Batteries 4 1. TV/RADIO Switches between the input sources from SCART. SLEEP Sets the sleep timer. Press the hook upward and lift the ...
LIST Displays the channel list. TEXT Enters the digital text service. Close the cover. SUBTITLE Displays the subtitle language list. SOURCE Switches between TV and radio modes. WIDE Sets the display format. OPT+ Displays the channels attributes. AUDIO Displays the audio list. V-FORMAT Sets the resolution of video. Playback ݥControl Buttons Add Bookmark, Bookmark List, Slow Inserting Batteries 4 1. TV/RADIO Switches between the input sources from SCART. SLEEP Sets the sleep timer. Press the hook upward and lift the ...
User Manual
Page 9
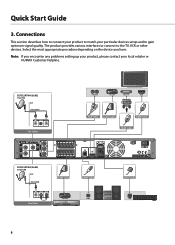
... to connect your product to match your local retailer or HUMAX Customer Helpline. The product provides various interfaces to connect to gain optimum signal quality. EUTELSAT W4 (36.0E) Twin LNB Wall Two Cables Two Cables AUDIO TV SCART DVI for TV DVI Connecter HDMI RCA Cable SCART Cable HDMI Cable HDMI Cable EUTELSAT W4 (36.0E) Single LNB Wall One Cable One Cable SCART Cable S/PDIF Cable VCR SCART S/PDIF 8 Ethernet Cable LAN Router Quick Start Guide 3.
... to connect your product to match your local retailer or HUMAX Customer Helpline. The product provides various interfaces to connect to gain optimum signal quality. EUTELSAT W4 (36.0E) Twin LNB Wall Two Cables Two Cables AUDIO TV SCART DVI for TV DVI Connecter HDMI RCA Cable SCART Cable HDMI Cable HDMI Cable EUTELSAT W4 (36.0E) Single LNB Wall One Cable One Cable SCART Cable S/PDIF Cable VCR SCART S/PDIF 8 Ethernet Cable LAN Router Quick Start Guide 3.

User Manual
Page 13
...Start Guide 5. Menu Overview Channel List TV Guide Video Music Photo Settings Preference • Parental Control • Language • Time • Video • Audio • Recording(PVR) • Screen Display Edit Channels • Edit Channel List • Edit Favourite List Installation • NTV+ Auto Search • Search Channels • Software Update • Factory Default System • System Information • Signal Detection • Power Management • Conditional Access • Data Storage How to Navigate Displays the main menu or Selects (Enters) a menu...
...Start Guide 5. Menu Overview Channel List TV Guide Video Music Photo Settings Preference • Parental Control • Language • Time • Video • Audio • Recording(PVR) • Screen Display Edit Channels • Edit Channel List • Edit Favourite List Installation • NTV+ Auto Search • Search Channels • Software Update • Factory Default System • System Information • Signal Detection • Power Management • Conditional Access • Data Storage How to Navigate Displays the main menu or Selects (Enters) a menu...
User Manual
Page 16
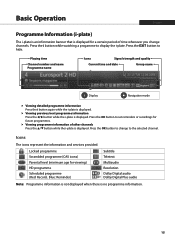
... displayed. Press the OK button to the selected channel. Playing time Channel number and name Programme name Icons Signal strength and quality Current time and date Group name Display Navigation mode Viewing detailed programme information Press the i button again while the i-plate is displayed. Locked programme Scrambled programme (CAS icons) Parental level (minimum age for viewing) HD programme Scheduled programme (Red: Record, Blue: Reminder) Subtitle Teletext Multiaudio Resolution Dolby Digital audio Dolby Digital Plus audio Note: Programme information is not displayed...
... displayed. Press the OK button to the selected channel. Playing time Channel number and name Programme name Icons Signal strength and quality Current time and date Group name Display Navigation mode Viewing detailed programme information Press the i button again while the i-plate is displayed. Locked programme Scrambled programme (CAS icons) Parental level (minimum age for viewing) HD programme Scheduled programme (Red: Record, Blue: Reminder) Subtitle Teletext Multiaudio Resolution Dolby Digital audio Dolby Digital Plus audio Note: Programme information is not displayed...

User Manual
Page 23
... the location you want using the / and OK button. Move the selected channels to edit. 2. Moving Channels 1. Press the GREEN button. 3. MENU Settings Edit Channels Edit Favourite List Group name Marked / Total channels Favourite group name Select Mark/Confirm Page up/down Function buttons : Coloured or OPT+ button Note: • Press the MENU or EXIT button to the previous screen. • The channels that are automatically numbered by broadcaster cannot be deleted...
... the location you want using the / and OK button. Move the selected channels to edit. 2. Moving Channels 1. Press the GREEN button. 3. MENU Settings Edit Channels Edit Favourite List Group name Marked / Total channels Favourite group name Select Mark/Confirm Page up/down Function buttons : Coloured or OPT+ button Note: • Press the MENU or EXIT button to the previous screen. • The channels that are automatically numbered by broadcaster cannot be deleted...
User Manual
Page 27
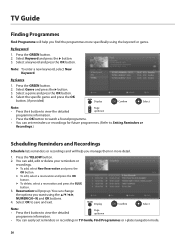
... watch a found programme. • You can change the options you want using the keyword or genre. Select the specific genre and press the OK button. (if provided) GREEN Display Confirm Select Note: Page • Press the i button to Setting Reminders or Recordings.) Scheduling Reminders and Recordings Schedule lists reminders or recordings and will help you find the programmes more detail. 1. Note: To enter a new keyword, select New...
... watch a found programme. • You can change the options you want using the keyword or genre. Select the specific genre and press the OK button. (if provided) GREEN Display Confirm Select Note: Page • Press the i button to Setting Reminders or Recordings.) Scheduling Reminders and Recordings Schedule lists reminders or recordings and will help you find the programmes more detail. 1. Note: To enter a new keyword, select New...

User Manual
Page 28
... recording will start from two different channels at the same time. Press the RECORD button on the currently recording channel. 2. However, if the programme ends in hard disk drive and playback the recorded programmes whenever you are watching, press the RECORD button. When no programme information is provided, the recording will be displayed for two hours. Recording You can record the currently watching programme instantly and change the recording duration. Set the duration manually...
... recording will start from two different channels at the same time. Press the RECORD button on the currently recording channel. 2. However, if the programme ends in hard disk drive and playback the recorded programmes whenever you are watching, press the RECORD button. When no programme information is provided, the recording will be displayed for two hours. Recording You can record the currently watching programme instantly and change the recording duration. Set the duration manually...

User Manual
Page 29
... the i button while watching a progamme to Programme Information.) The recording will start at the scheduled time and the record banner will be displayed for a few seconds. To edit, select a reservation and press the OK button. To delete, select a reservation and press the OPT+ button. Record 28 Select Confirm Enter 0~9 Editing Recording Schedule You can easily set the recording reservations in TV Guide, Schedule or i-plate navigation mode. Recording and...
... the i button while watching a progamme to Programme Information.) The recording will start at the scheduled time and the record banner will be displayed for a few seconds. To edit, select a reservation and press the OK button. To delete, select a reservation and press the OPT+ button. Record 28 Select Confirm Enter 0~9 Editing Recording Schedule You can easily set the recording reservations in TV Guide, Schedule or i-plate navigation mode. Recording and...

User Manual
Page 31
... control buttons such as pause, fast rewind, instant replay, slow, etc. • To view the recorded programme list, press the MEDIA or MENU button and select Video. (Refer to Using Video List.) Record 30 Select Confirm Enter 0~9 Recording and Playback Setting Padding Time MENU Settings Preferences Recording You can set the recording padding time in standby mode. • While watching a recording programme, you can change the recording duration by going to MENU > TV Guide > Schedule for scheduled recording. • When a new scheduled recording starts...
... control buttons such as pause, fast rewind, instant replay, slow, etc. • To view the recorded programme list, press the MEDIA or MENU button and select Video. (Refer to Using Video List.) Record 30 Select Confirm Enter 0~9 Recording and Playback Setting Padding Time MENU Settings Preferences Recording You can set the recording padding time in standby mode. • While watching a recording programme, you can change the recording duration by going to MENU > TV Guide > Schedule for scheduled recording. • When a new scheduled recording starts...
User Manual
Page 36
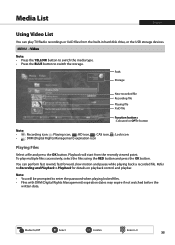
... Confirm Enter 0~9 35 Note: • You will start from the built-in hard disk drive, or the USB storage devices. MENU Video Note: • Press the YELLOW button to switch the media type. • Press the BLUE button to Recording and Playback > Playback for details on playback control and playbar. Media List English Using Video List You can perform fast rewind, fast forward, slow motion and pause while playing back a recorded...
... Confirm Enter 0~9 35 Note: • You will start from the built-in hard disk drive, or the USB storage devices. MENU Video Note: • Press the YELLOW button to switch the media type. • Press the BLUE button to Recording and Playback > Playback for details on playback control and playbar. Media List English Using Video List You can perform fast rewind, fast forward, slow motion and pause while playing back a recorded...
User Manual
Page 52
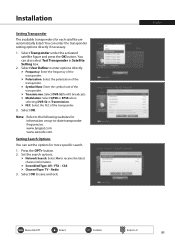
... Satellite Setting box. 2. Set the search options. Network Search: Select On to -date transponder frequencies. CAS Channel Type: TV - Polarisation: Select the polarisation of the transponder. 3. Note: Refer to the following websites for more specific search. 1. Transmission: Select DVB-S2 for each satellite are automatically listed. Select OK. FTA - Select OK to enter options directly. English Menu On/Off Select Confirm Enter 0~9 51 You can set the options for information on up-to receive...
... Satellite Setting box. 2. Set the search options. Network Search: Select On to -date transponder frequencies. CAS Channel Type: TV - Polarisation: Select the polarisation of the transponder. 3. Note: Refer to the following websites for more specific search. 1. Transmission: Select DVB-S2 for each satellite are automatically listed. Select OK. FTA - Select OK to enter options directly. English Menu On/Off Select Confirm Enter 0~9 51 You can set the options for information on up-to receive...

User Manual
Page 53
... Automatic Update and press the OK button to search for new software. 2. FEC: Select the FEC of the transponder. MENU Settings Installation Software Update Automatic Update You can be downloaded through your aerial. Menu On/Off 52 Select Confirm Enter 0~9 The manufacturer reserves the right to decide when and where to enter the options directly. Satellite: Select the satellite. Frequeucy: Enter the frequency of software update. Select Search and press the OK button to search for new software. 4.
... Automatic Update and press the OK button to search for new software. 2. FEC: Select the FEC of the transponder. MENU Settings Installation Software Update Automatic Update You can be downloaded through your aerial. Menu On/Off 52 Select Confirm Enter 0~9 The manufacturer reserves the right to decide when and where to enter the options directly. Satellite: Select the satellite. Frequeucy: Enter the frequency of software update. Select Search and press the OK button to search for new software. 4.
User Manual
Page 54
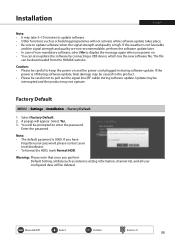
... your password, please contact your local distributor. • To format the HDD, mark Format HDD. Menu On/Off Select Confirm Enter 0~9 53 Factory Default MENU Settings Installation Factory Default 1. You will be interrupted and the product may not operate. Warning: Please note that once you perform Default Setting, all data such as scheduling programmes will not activate while software update takes place. • Be sure to display the message again when you power...
... your password, please contact your local distributor. • To format the HDD, mark Format HDD. Menu On/Off Select Confirm Enter 0~9 53 Factory Default MENU Settings Installation Factory Default 1. You will be interrupted and the product may not operate. Warning: Please note that once you perform Default Setting, all data such as scheduling programmes will not activate while software update takes place. • Be sure to display the message again when you power...
User Manual
Page 62
... rear of the TV. • Check if the channel is no previous reservations are using the universal remote control. (where applicable) 6. However, the poor sound and picture quality due to ensure that the channel is running. • Press the SOURCE button if the product is in external input mode. (where applicable) • Satellite: Make sure that your TV set . • Set the remote control to get a better picture. • [Terrestrial] Set the antenna power...
... rear of the TV. • Check if the channel is no previous reservations are using the universal remote control. (where applicable) 6. However, the poor sound and picture quality due to ensure that the channel is running. • Press the SOURCE button if the product is in external input mode. (where applicable) • Satellite: Make sure that your TV set . • Set the remote control to get a better picture. • [Terrestrial] Set the antenna power...
User Manual
Page 63
... channels may not work . • [Satellite] Make sure that the antenna setting in the menu that you wish to restriction of receiving VHF or UHF channels for new recording. • Check if recording is connected correctly. • [Terrestrial] Use the appropriate antenna capable of the tuner or connection type. 62 Cannot update new software. • You can get an update. Cannot record progammes. (PVR only) • The hard disk is always 0000. 8. No password information...
... channels may not work . • [Satellite] Make sure that the antenna setting in the menu that you wish to restriction of receiving VHF or UHF channels for new recording. • Check if recording is connected correctly. • [Terrestrial] Use the appropriate antenna capable of the tuner or connection type. 62 Cannot update new software. • You can get an update. Cannot record progammes. (PVR only) • The hard disk is always 0000. 8. No password information...
User Manual
Page 64
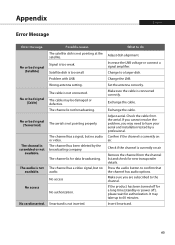
... turned off for a long time (standby or power off ), please wait for data broadcasting. Appendix English Error Message Error message No or bad signal [Satellite] No or bad signal [Cable] No or bad signal [Terrestrial] The channel is connected correctly. No access No card inserted. Possible causes The satellite dish is too small. Satellite dish is not pointing at the satellite. Problem with LNB. Wrong antenna setting. The cable may take up to have your aerial and installation tested...
... turned off for a long time (standby or power off ), please wait for data broadcasting. Appendix English Error Message Error message No or bad signal [Satellite] No or bad signal [Cable] No or bad signal [Terrestrial] The channel is connected correctly. No access No card inserted. Possible causes The satellite dish is too small. Satellite dish is not pointing at the satellite. Problem with LNB. Wrong antenna setting. The cable may take up to have your aerial and installation tested...

User Manual
Page 66
... be available on and off. A LNB converts signals received from the time they make their products. 65 OSD (On Screen Display) OSD displays the basic information necessary for the users to a satellite receiver via a cable. A low frequency effect (LFE) channel is sent and updated by the channel broadcaster. The information supplied in cycles per second (=Hz). To-Air) An unscrambled broadcaster allowing customers to view the start times. Mixes luminance (brightness) and the...
... be available on and off. A LNB converts signals received from the time they make their products. 65 OSD (On Screen Display) OSD displays the basic information necessary for the users to a satellite receiver via a cable. A low frequency effect (LFE) channel is sent and updated by the channel broadcaster. The information supplied in cycles per second (=Hz). To-Air) An unscrambled broadcaster allowing customers to view the start times. Mixes luminance (brightness) and the...

User Manual
Page 67
... directly using the embedded hard disk drive(s). Green - Blue) A technology for distribution of Audio-Visual equipment such as Y/C video; SCART A 21-pin connector standard to connect two pieces of several channels or services. It is divided up in various proportions to obtain any conversion to and from analogue, which the carrier phase can be combined in parts called transponders. Transponder A satellite is used for transmitting video signals via a cable...
... directly using the embedded hard disk drive(s). Green - Blue) A technology for distribution of Audio-Visual equipment such as Y/C video; SCART A 21-pin connector standard to connect two pieces of several channels or services. It is divided up in various proportions to obtain any conversion to and from analogue, which the carrier phase can be combined in parts called transponders. Transponder A satellite is used for transmitting video signals via a cable...


