
User Manual
Page 5
...outlet and disconnect the antenna during a thunderstorm or when left uncovered to do so can damage the aerial. 8. GB4 User's Manual CONNECTION TO THE AERIAL • Disconnect the product from the mains before you have followed the manufacturer's instructions for long periods of the ... the following safety precautions carefully. Failure to electromagnetic influences, such as this product only from the aerial. A falling product can fall. CONNECTION TO THE TV • Disconnect the product from the mains before cleaning. • Use a light damp cloth (no objects filled with...
...outlet and disconnect the antenna during a thunderstorm or when left uncovered to do so can damage the aerial. 8. GB4 User's Manual CONNECTION TO THE AERIAL • Disconnect the product from the mains before you have followed the manufacturer's instructions for long periods of the ... the following safety precautions carefully. Failure to electromagnetic influences, such as this product only from the aerial. A falling product can fall. CONNECTION TO THE TV • Disconnect the product from the mains before cleaning. • Use a light damp cloth (no objects filled with...
User Manual
Page 7
PVR GB29 5.1 Time Shifted Recording (TSR GB29 5.2 Recording GB31 5.3 Programme Playback in -Picture) Screen GB27 4.8 Game GB28 5. Record GB39 7.1 Recorded Programme GB39 7.2 Recording Schedule GB42 7.3 HDD Control GB45 7.4 Recording's Start/End Time GB45 GB6 User's Manual Contents 1. Setup GB15 2.1 Connecting the Antenna GB15 2.2 Connecting the TV GB16 2.3 Connecting the TV and VCR GB17 2.4 Powering On...
PVR GB29 5.1 Time Shifted Recording (TSR GB29 5.2 Recording GB31 5.3 Programme Playback in -Picture) Screen GB27 4.8 Game GB28 5. Record GB39 7.1 Recorded Programme GB39 7.2 Recording Schedule GB42 7.3 HDD Control GB45 7.4 Recording's Start/End Time GB45 GB6 User's Manual Contents 1. Setup GB15 2.1 Connecting the Antenna GB15 2.2 Connecting the TV GB16 2.3 Connecting the TV and VCR GB17 2.4 Powering On...
User Manual
Page 12
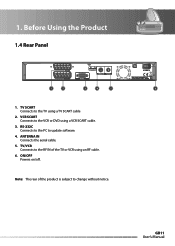
RS-232C Connects to the PC to change without notice. Note: The rear of the TV or VCR using a TV SCART cable 2. TV SCART Connects to the VCR or DVD using a VCR SCART cable. 3. GB11 User's Manual 1. VCR SCART Connects to the TV using an RF cable. 6. ANTENNA IN Connects the aerial cable. 5. TV/VCR Connects to the RF IN of the product is subject to update software. 4. Before Using the Product 1.4 Rear Panel 1 2 3 4 5 6 1. ON/OFF Powers on/off.
RS-232C Connects to the PC to change without notice. Note: The rear of the TV or VCR using a TV SCART cable 2. TV SCART Connects to the VCR or DVD using a VCR SCART cable. 3. GB11 User's Manual 1. VCR SCART Connects to the TV using an RF cable. 6. ANTENNA IN Connects the aerial cable. 5. TV/VCR Connects to the RF IN of the product is subject to update software. 4. Before Using the Product 1.4 Rear Panel 1 2 3 4 5 6 1. ON/OFF Powers on/off.

User Manual
Page 16
...GB15 User's Manual Note: If you have. The product provides various interfaces to connect to the TV with the particular equipments for gaining optimum signal quality. Setup This chapter describes how to connect the product to the TV, VCR or other devices. Select the most appropriate ...procedure depending on the equipment you encounter any problems setting up your product, please contact your local product distributor. 2.1 Connecting the Antenna Connect your aerial to watch analogue channels. Note: Connect the product and the TV using an RF cable to the ANTENNA IN. 2.
...GB15 User's Manual Note: If you have. The product provides various interfaces to connect to the TV with the particular equipments for gaining optimum signal quality. Setup This chapter describes how to connect the product to the TV, VCR or other devices. Select the most appropriate ...procedure depending on the equipment you encounter any problems setting up your product, please contact your local product distributor. 2.1 Connecting the Antenna Connect your aerial to watch analogue channels. Note: Connect the product and the TV using an RF cable to the ANTENNA IN. 2.

User Manual
Page 17
Setup 2.2 Connecting the TV 1. Using SCART Cable Connect the product and the TV using a SCART cable. SCART Cable TV SCART GB16 User's Manual 2.
Setup 2.2 Connecting the TV 1. Using SCART Cable Connect the product and the TV using a SCART cable. SCART Cable TV SCART GB16 User's Manual 2.
User Manual
Page 18
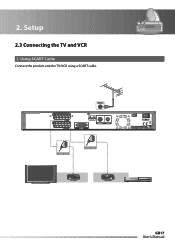
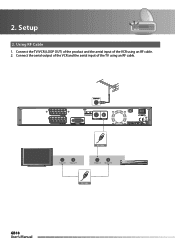
2. SCART Cable SCART Cable TV SCART VCR SCART GB17 User's Manual Using SCART Cable Connect the product and the TV/VCR using a SCART cable. Setup 2.3 Connecting the TV and VCR 1.
2. SCART Cable SCART Cable TV SCART VCR SCART GB17 User's Manual Using SCART Cable Connect the product and the TV/VCR using a SCART cable. Setup 2.3 Connecting the TV and VCR 1.
User Manual
Page 19
Connect the TV/VCR (LOOP OUT) of the product and the aerial input of the TV using an RF cable. 2. Using RF Cable 1. TV Antenna IN TV Antenna OUT RF Cable VCR Antenna IN VCR Antenna OUT RF Cable GB18 User's Manual Setup 2. Connect the aerial output of the VCR and the aerial input of the VCR using an RF cable. 2.
Connect the TV/VCR (LOOP OUT) of the product and the aerial input of the TV using an RF cable. 2. Using RF Cable 1. TV Antenna IN TV Antenna OUT RF Cable VCR Antenna IN VCR Antenna OUT RF Cable GB18 User's Manual Setup 2. Connect the aerial output of the VCR and the aerial input of the VCR using an RF cable. 2.
User Manual
Page 20
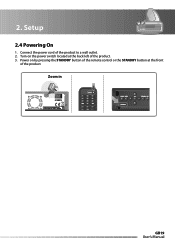
Turn on by pressing the STANDBY button of the remote control or the STANDBY button at the back left of the product to a wall outlet. 2. Setup 2.4 Powering On 1. Power on the power switch located at the front of the product. 2. Zoom in 1 4 7 MENU STANDBY 2 3 5 6 8 9 0 TEXT GB19 User's Manual Connect the power cord of the product. 3.
Turn on by pressing the STANDBY button of the remote control or the STANDBY button at the back left of the product to a wall outlet. 2. Setup 2.4 Powering On 1. Power on the power switch located at the front of the product. 2. Zoom in 1 4 7 MENU STANDBY 2 3 5 6 8 9 0 TEXT GB19 User's Manual Connect the power cord of the product. 3.
User Manual
Page 21
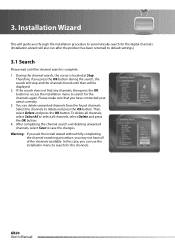
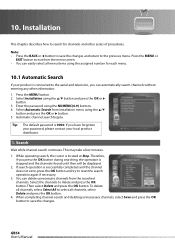
... of the channels available. To delete all channels, select Select All to automatically search for the channels again. 3. In this case, you may not have connected your aerial correctly. 3. Warning: If you exit the install wizard without fully completing the channel searching procedure, you can delete unwanted channels from the found...
... of the channels available. To delete all channels, select Select All to automatically search for the channels again. 3. In this case, you may not have connected your aerial correctly. 3. Warning: If you exit the install wizard without fully completing the channel searching procedure, you can delete unwanted channels from the found...
User Manual
Page 25
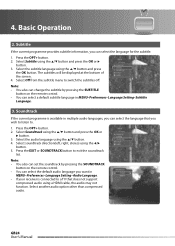
... language using the / button. 5. Select soundtrack direction(left, right, stereo) using the / button. 4. 4. Basic Operation 2. Press the OPT+ button. 2. Soundtrack If the current programme is connected to . 1. GB24 User's Manual Select Subtitle using a HDMI cable, the audio may not function. Subtitle If the current programme provides subtitle information, you wish to...
... language using the / button. 5. Select soundtrack direction(left, right, stereo) using the / button. 4. 4. Basic Operation 2. Press the OPT+ button. 2. Soundtrack If the current programme is connected to . 1. GB24 User's Manual Select Subtitle using a HDMI cable, the audio may not function. Subtitle If the current programme provides subtitle information, you wish to...
User Manual
Page 55
... the assigned number for channels and other information. 1. Search Wait while channel search continues. While operating search, the cursor is 0000. If search operation is connected to select all menu items using the / button and press the OK or button. 3. Then select Delete and press the OK button.
... the assigned number for channels and other information. 1. Search Wait while channel search continues. While operating search, the cursor is 0000. If search operation is connected to select all menu items using the / button and press the OK or button. 3. Then select Delete and press the OK button.
User Manual
Page 57
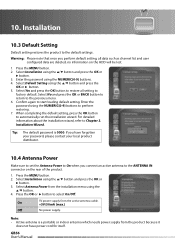
.../Off. Warning: Please note that once you perform default setting, all setting to start loading default setting. Enter the password using the / button. 4. If you connect an active antenna to perform restoring. 7. GB56 User's Manual Press the MENU button. 2. When completing the default setting, press the OK button to automatically run...
.../Off. Warning: Please note that once you perform default setting, all setting to start loading default setting. Enter the password using the / button. 4. If you connect an active antenna to perform restoring. 7. GB56 User's Manual Press the MENU button. 2. When completing the default setting, press the OK button to automatically run...
User Manual
Page 61
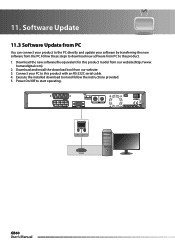
... to this product with an RS-232C serial cable. 4. humaxdigital.com). 2. Software Update 11.3 Software Update from PC to this product model from our website. 3. Connect your software by transferring the new software from the PC.Follow these steps to download new software from PC You can...
... to this product with an RS-232C serial cable. 4. humaxdigital.com). 2. Software Update 11.3 Software Update from PC to this product model from our website. 3. Connect your software by transferring the new software from the PC.Follow these steps to download new software from PC You can...
User Manual
Page 64
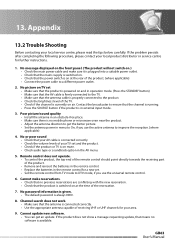
...receiving VHF or UHF channels for further instructions. 1. If the product does not show a message requesting update, that your AV cable is connected correctly. • Check the volume levels of the product. • Remove and reinsert the batteries in the remote control. • ...Replace the batteries in operation mode. (Press the STANDBY button) • Make sure that the AV cable is firmly connected to improve the reception. (where applicable) 4. Appendix 13.2 Trouble Shooting Before contacting your local product distributor or service centre for your TV set...
...receiving VHF or UHF channels for further instructions. 1. If the product does not show a message requesting update, that your AV cable is connected correctly. • Check the volume levels of the product. • Remove and reinsert the batteries in the remote control. • ...Replace the batteries in operation mode. (Press the STANDBY button) • Make sure that the AV cable is firmly connected to improve the reception. (where applicable) 4. Appendix 13.2 Trouble Shooting Before contacting your local product distributor or service centre for your TV set...
User Manual
Page 65
... 13. You will then restart and search for new recording. • Check if recording is overlapped with another channel. Make sure that the PVR and the TV are available. 13. Stop the current recording or wait until the recording is finished. • Delete unnecessary programmes and make space...17. Enter your password (Default = 0000) Note: The receiver will need to carry out a Default Setting in the menu that the CI-Module is connected to view. • Contact your manual. Reinsert the CI-Module and make sure it has been a long time since you carry out a Default setting...
... 13. You will then restart and search for new recording. • Check if recording is overlapped with another channel. Make sure that the PVR and the TV are available. 13. Stop the current recording or wait until the recording is finished. • Delete unnecessary programmes and make space...17. Enter your password (Default = 0000) Note: The receiver will need to carry out a Default Setting in the menu that the CI-Module is connected to view. • Contact your manual. Reinsert the CI-Module and make sure it has been a long time since you carry out a Default setting...
User Manual
Page 66
... an issue from the transmitter as the time is detected from the rear ON/OFF switch for Humax connectionˇą on your TV set. • If the problem is experienced when the PVR-9150T is connected I change to the channel you switch on the channel you are several minutes incorrect then this ... I receive the E-AC error message. • This error is still no longer have a RF (coaxial) cable connected from the rear ON/OFF switch. 22. You will not start -up. When I switch my PVR on the remote control, then use these buttons press the PAUSE button on I am unable to use the...
... an issue from the transmitter as the time is detected from the rear ON/OFF switch for Humax connectionˇą on your TV set. • If the problem is experienced when the PVR-9150T is connected I change to the channel you switch on the channel you are several minutes incorrect then this ... I receive the E-AC error message. • This error is still no longer have a RF (coaxial) cable connected from the rear ON/OFF switch. 22. You will not start -up. When I switch my PVR on the remote control, then use these buttons press the PAUSE button on I am unable to use the...
User Manual
Page 71
...tuning, RGB adjustment, and screen size and position 9. PVR (Personal Video Recorder) Video recorder that informs the Product about all available services in cycles per second (=Hz). 4. Each device will have a 21-pin female connection; Trick-Play Pause, Fast Forward/Fast Rewind, Slow ... for the transmission of channels/services that can record and play . a cable with a ferromagnetic material 6. Network The collection of software for connecting the devices. 14. 13. Coaxial cable A specially designed and shields cable that a programme provider/operator offer. SCART A 21-pin connector...
...tuning, RGB adjustment, and screen size and position 9. PVR (Personal Video Recorder) Video recorder that informs the Product about all available services in cycles per second (=Hz). 4. Each device will have a 21-pin female connection; Trick-Play Pause, Fast Forward/Fast Rewind, Slow ... for the transmission of channels/services that can record and play . a cable with a ferromagnetic material 6. Network The collection of software for connecting the devices. 14. 13. Coaxial cable A specially designed and shields cable that a programme provider/operator offer. SCART A 21-pin connector...


