

User Manual
Page 2
... © 2001 HUMAX Corporation) Not to be able to your receiver for purchasing a HUMAX digital terrestrial receiver and personal video recorder. All rights reserved. ** Warranty The information in part or whole without ...works. Nagravision is a trademark of the information contained in this user manual carefully, to be copied, used or translated in this user manual next to your offer or use and maintain the receiver at maximum performance. GB 1 HUMAX does not have any responsibility for direct, indirect, accidental, necessary and other damage due to safely install, use...
... © 2001 HUMAX Corporation) Not to be able to your receiver for purchasing a HUMAX digital terrestrial receiver and personal video recorder. All rights reserved. ** Warranty The information in part or whole without ...works. Nagravision is a trademark of the information contained in this user manual carefully, to be copied, used or translated in this user manual next to your offer or use and maintain the receiver at maximum performance. GB 1 HUMAX does not have any responsibility for direct, indirect, accidental, necessary and other damage due to safely install, use...

User Manual
Page 4
...you start any liquids such as this product only from the aerial. VENTILATION ** The slots on top of power supply indicated on soft furnishings or carpets. Please read the following safety precautions carefully. ** Safety Instructions ...connecting or disconnecting the cable from the type of the product must be left uncovered to allow proper airflow to the unit. In addition, no solvents) to dust the product. ** 5. Safety and Warning ** This receiver has been manufactured to comply with SABS 061. ** GB 3 OVERLOADING ** Do not overload a wall outlet, extension cord or adapter...
...you start any liquids such as this product only from the aerial. VENTILATION ** The slots on top of power supply indicated on soft furnishings or carpets. Please read the following safety precautions carefully. ** Safety Instructions ...connecting or disconnecting the cable from the type of the product must be left uncovered to allow proper airflow to the unit. In addition, no solvents) to dust the product. ** 5. Safety and Warning ** This receiver has been manufactured to comply with SABS 061. ** GB 3 OVERLOADING ** Do not overload a wall outlet, extension cord or adapter...
User Manual
Page 12
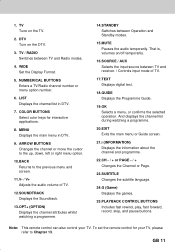
... main menu or Guide screen. ** 21.i (INFORMATION) ** Displays the information about the channel and programme. ** 22.CH - / + or PAGE - / + ** Changes the Channel or Page. ** 23.SUBTITLE ** Changes the subtitle language. ** 24.G (Game) ** Displays the games. ** 25.PLAYBACK CONTROL BUTTONS ** Includes fast rewind, play, fast forward, record, stop, and pause buttons. ** Note: This remote control can also control your TV, please refer to the previous menu and screen. ** 11.V- / V+ ** Adjusts the audio volume...
... main menu or Guide screen. ** 21.i (INFORMATION) ** Displays the information about the channel and programme. ** 22.CH - / + or PAGE - / + ** Changes the Channel or Page. ** 23.SUBTITLE ** Changes the subtitle language. ** 24.G (Game) ** Displays the games. ** 25.PLAYBACK CONTROL BUTTONS ** Includes fast rewind, play, fast forward, record, stop, and pause buttons. ** Note: This remote control can also control your TV, please refer to the previous menu and screen. ** 11.V- / V+ ** Adjusts the audio volume...
User Manual
Page 17
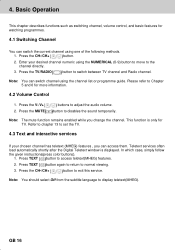
... such as switching channel, volume control, and basic features for TV. Teletext services often load automatically shortly after the Digital Teletext window is only for watching programmes. 4.1 Switching Channel You can switch channel using the channel list or programme guide. Press TEXT button again to return to disables the sound temporarily. Press the V-/V+ 2. In which case, simply follow the given instructions(press color buttons). 1. Enter your chosen...
... such as switching channel, volume control, and basic features for TV. Teletext services often load automatically shortly after the Digital Teletext window is only for watching programmes. 4.1 Switching Channel You can switch channel using the channel list or programme guide. Press TEXT button again to return to disables the sound temporarily. Press the V-/V+ 2. In which case, simply follow the given instructions(press color buttons). 1. Enter your chosen...

User Manual
Page 18
... select a default subtitle language by selecting MENU - button to display 2. Language Setting - button to display the subtitle 2. Select Audio Direction(left, right, stereo) using the button and OK button to . 1. GB 17 Preferences - Subtitle Language. 4.5 Change a Audio Language If the current programme is available in the selected language at the bottom of the screen. 3. Select your desired subtitle language using the button, and press the OK button. Preferences Language Setting -Audio Language. Press the SOUNDTRACK soundtrack list. Press...
... select a default subtitle language by selecting MENU - button to display 2. Language Setting - button to display the subtitle 2. Select Audio Direction(left, right, stereo) using the button and OK button to . 1. GB 17 Preferences - Subtitle Language. 4.5 Change a Audio Language If the current programme is available in the selected language at the bottom of the screen. 3. Select your desired subtitle language using the button, and press the OK button. Preferences Language Setting -Audio Language. Press the SOUNDTRACK soundtrack list. Press...
User Manual
Page 20
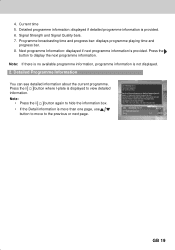
... about the current programme. GB 19 Note: • Press the i button again to the previous or next page. Signal Strength and Signal Quality bars. 7. Next programme Information: displayed if next programme information is more than one page, use button to move to hide the information box. • If the Detail information is provided. Note: If there is...
... about the current programme. GB 19 Note: • Press the i button again to the previous or next page. Signal Strength and Signal Quality bars. 7. Next programme Information: displayed if next programme information is more than one page, use button to move to hide the information box. • If the Detail information is provided. Note: If there is...
User Manual
Page 23
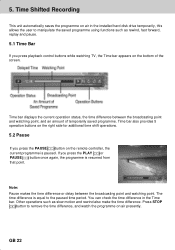
...screen. ** ** Time bar displays the current operation status, the time difference between the broadcasting point and watching point. The time difference is paused. Other operations such as rewind, fast forward, replay and pause. 5.1 Time Bar If you press playback control buttons while watching TV, the Time bar appears on the remote controller.... You can check the time difference in the installed hard disk drive temporarily, this allows the user to the paused time period. 5. GB 22 Time Shifted Recording ** This unit automatically saves the programme on air presently.
...screen. ** ** Time bar displays the current operation status, the time difference between the broadcasting point and watching point. The time difference is paused. Other operations such as rewind, fast forward, replay and pause. 5.1 Time Bar If you press playback control buttons while watching TV, the Time bar appears on the remote controller.... You can check the time difference in the installed hard disk drive temporarily, this allows the user to the paused time period. 5. GB 22 Time Shifted Recording ** This unit automatically saves the programme on air presently.

User Manual
Page 24
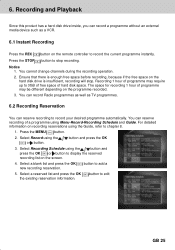
... the current channel. GB 23 Note: You can playback the recorded programme at normal speed. 5.5 Recording Press the REC button on the remote controller to start point during rewinding, the programme will play at normal speed from the point. 5.4 Fast Forward to fast forward the programme. For more information about recording, refer to Chapter 6. 5.6 Additional Time Shift Operations Using Time...
... the current channel. GB 23 Note: You can playback the recorded programme at normal speed. 5.5 Recording Press the REC button on the remote controller to start point during rewinding, the programme will play at normal speed from the point. 5.4 Fast Forward to fast forward the programme. For more information about recording, refer to Chapter 6. 5.6 Additional Time Shift Operations Using Time...
User Manual
Page 26
... STOP button to display the reserved recording list on the screen. 4. Select Recording Schedule using Menu-Record-Recording Schedule and Guide. Select a blank list and press the OK button to edit the existing reservation information. Notice 1. Ensure that there is insufficient, recording will stop recording. For detailed information on the remote controller to chapter 8. 1. Select Record using the Guide, refer to record the current programme instantly. The space for recording 1 hour of hard disk...
... STOP button to display the reserved recording list on the screen. 4. Select Recording Schedule using Menu-Record-Recording Schedule and Guide. Select a blank list and press the OK button to edit the existing reservation information. Notice 1. Ensure that there is insufficient, recording will stop recording. For detailed information on the remote controller to chapter 8. 1. Select Record using the Guide, refer to record the current programme instantly. The space for recording 1 hour of hard disk...
User Manual
Page 27
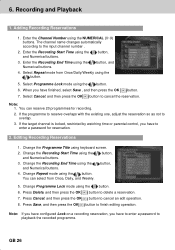
... Lock mode using the Numerical buttons. Press Delete, and then press the OK button to overlap. 3. button, and 4. Change the Programme Title using the and Numerical buttons. button, 4. When you have to enter a password to cancel the reservation. Change the Recording Start Time using keyboard screen. 2. Adding Recording Reservations 1. Enter the Recording Start Time using the button. 5. button, 3. Editing Recording Reservations 1. If the target channel is locked, restricted by watching time or parental control...
... Lock mode using the Numerical buttons. Press Delete, and then press the OK button to overlap. 3. button, and 4. Change the Programme Title using the and Numerical buttons. button, 4. When you have to enter a password to cancel the reservation. Change the Recording Start Time using keyboard screen. 2. Adding Recording Reservations 1. Enter the Recording Start Time using the button. 5. button, 3. Editing Recording Reservations 1. If the target channel is locked, restricted by watching time or parental control...
User Manual
Page 28
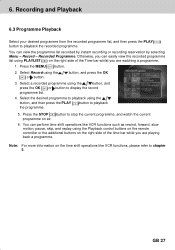
... replay using the Playback control buttons on the remote controller or the additional buttons on the right side of the Time bar whilst you are watching a programme. 1. 6. Recording and Playback ** 6.3 Programme Playback Select your desired programme from the recorded programme list, and then press the PLAY button to display the record programme list. 4. button, and press the OK 3. You can easily view the recorded programme list using the button...
... replay using the Playback control buttons on the remote controller or the additional buttons on the right side of the Time bar whilst you are watching a programme. 1. 6. Recording and Playback ** 6.3 Programme Playback Select your desired programme from the recorded programme list, and then press the PLAY button to display the record programme list. 4. button, and press the OK 3. You can easily view the recorded programme list using the button...

User Manual
Page 35
... channel or Favourite channel list. 1. Press the MENU - 3 - 2 in order on the remote controller to the previous menu. GB 34 Channel List ** 7.4 Edit Favourite Channels You can easily navigate all the selected channels. button, Note: • Press the BACK or button to save the changes and return to select the Edit Favourite Channels menu. ** The buttons for editing the Favourite channel list are described in the following table. ** ** Add Adds Favourite channel...
... channel or Favourite channel list. 1. Press the MENU - 3 - 2 in order on the remote controller to the previous menu. GB 34 Channel List ** 7.4 Edit Favourite Channels You can easily navigate all the selected channels. button, Note: • Press the BACK or button to save the changes and return to select the Edit Favourite Channels menu. ** The buttons for editing the Favourite channel list are described in the following table. ** ** Add Adds Favourite channel...

User Manual
Page 46
... the OK button. Enter New Password using the press the OK or button. Change Password You can change the current password into new one. 1. Select Change Password using the button, and press the OK button. ** ** 3. Enter the New Password again to display the available Language LIst. 3. Note: The Default Password is English. 1. Press the MENU button. 2. button, and press the 3. button, and 1. Default language is 0000. Select your local product distributor. 9.2 Language Setting You can set Language for Audio and...
... the OK button. Enter New Password using the press the OK or button. Change Password You can change the current password into new one. 1. Select Change Password using the button, and press the OK button. ** ** 3. Enter the New Password again to display the available Language LIst. 3. Note: The Default Password is English. 1. Press the MENU button. 2. button, and press the 3. button, and 1. Default language is 0000. Select your local product distributor. 9.2 Language Setting You can set Language for Audio and...

User Manual
Page 47
... listen sound in the selected language. Fixed Uses the fixed Subtitle Font. 9. Audio Priority You can watch programme in Dolby Digital mode. Select your desired option using the OK or button. ** Auto Subtitles are displayed in the predefined subtitle language. Select your desired option using the button. 2. Subtitle Display You can select whether or not to display the Language or Dolby Digital. 3. Setting Preferences ** 2. Manual Subtitles are displayed automatically in the language when...
... listen sound in the selected language. Fixed Uses the fixed Subtitle Font. 9. Audio Priority You can watch programme in Dolby Digital mode. Select your desired option using the OK or button. ** Auto Subtitles are displayed in the predefined subtitle language. Select your desired option using the button. 2. Subtitle Display You can select whether or not to display the Language or Dolby Digital. 3. Setting Preferences ** 2. Manual Subtitles are displayed automatically in the language when...

User Manual
Page 54
... information. 1. Frequency Enter the desired frequency to search. Select MENU button. 2. Select Manual Search from Installation menu using the OK or button. ** ** 10.2 Manual Search You can search channels manually by searching parameters, if you know the value, please select Auto. button, and press the 3. When entering frequency channel value, the appropriate frequency value is automatically displayed on Channel. Select among Auto, 1/4, 1/8, 1/16 and 1/32 using the button, press the OK button. 2. If...
... information. 1. Frequency Enter the desired frequency to search. Select MENU button. 2. Select Manual Search from Installation menu using the OK or button. ** ** 10.2 Manual Search You can search channels manually by searching parameters, if you know the value, please select Auto. button, and press the 3. When entering frequency channel value, the appropriate frequency value is automatically displayed on Channel. Select among Auto, 1/4, 1/8, 1/16 and 1/32 using the button, press the OK button. 2. If...

User Manual
Page 55
... OK or BACK button to return to the default settings. button, press the 5. Confirm again to perform restoring. 7. Press the MENU button. 2. Enter Password using the NUMERICAL (0~9) button to start loading default setting. Installation ** 5. Select Installation using the OK or button. When default setting is completed, Installation Wizard is also searched. For detailed information about Installation Wizard, refer to Factory Default. Network Search If specified frequency channel information and other frequency channel, is automatically displayed, which belongs to...
... OK or BACK button to return to the default settings. button, press the 5. Confirm again to perform restoring. 7. Press the MENU button. 2. Enter Password using the NUMERICAL (0~9) button to start loading default setting. Installation ** 5. Select Installation using the OK or button. When default setting is completed, Installation Wizard is also searched. For detailed information about Installation Wizard, refer to Factory Default. Network Search If specified frequency channel information and other frequency channel, is automatically displayed, which belongs to...

User Manual
Page 61
... numbers of TV. 2. 13. Point remote control towards the remote control receiving parts of TV code using the remote control provided by Humax. Keep pressing TV button for 3 seconds, then TV button LED turn on or off when the setting is completed. ** [Code for TV manufacturer. 3. TV power turns on . TV code setting Note: While you detach your TV using Remote Control ** You can manipulate TV using the NUMERICAL (0~9) button orderly. Manipulating your finger from the TV button...
... numbers of TV. 2. 13. Point remote control towards the remote control receiving parts of TV code using the remote control provided by Humax. Keep pressing TV button for 3 seconds, then TV button LED turn on or off when the setting is completed. ** [Code for TV manufacturer. 3. TV power turns on . TV code setting Note: While you detach your TV using Remote Control ** You can manipulate TV using the NUMERICAL (0~9) button orderly. Manipulating your finger from the TV button...
User Manual
Page 70
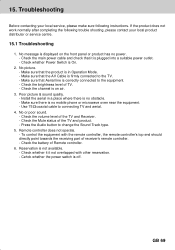
... product does not work normally after completing the following instructions. Make sure that the product is off. Use 75 coaxial cable to change the Sound Track type. 5. To control the equipment with other reservation. - No picture. - Poor picture & sound quality. - Make sure there is firmly connected to the equipment. - Check the volume level of receiver's remote controller. - Make sure that the AV Cable is no mobile...
... product does not work normally after completing the following instructions. Make sure that the product is off. Use 75 coaxial cable to change the Sound Track type. 5. To control the equipment with other reservation. - No picture. - Poor picture & sound quality. - Make sure there is firmly connected to the equipment. - Check the volume level of receiver's remote controller. - Make sure that the AV Cable is no mobile...

User Manual
Page 71
... the problem you may need to descramble the scrambled channels. Trouble Shooting ** 15.2 Error Message Error message No or bad signal The channel is not pointing properly. The channel is scrambled. 15. The channel is not deleted by a professional. The channel is for data broadcasting. Cannot watch the channel in usual way. This digital terrestrial receiver does not support the service that enables to have your aerial and installation tested...
... the problem you may need to descramble the scrambled channels. Trouble Shooting ** 15.2 Error Message Error message No or bad signal The channel is not pointing properly. The channel is scrambled. 15. The channel is not deleted by a professional. The channel is for data broadcasting. Cannot watch the channel in usual way. This digital terrestrial receiver does not support the service that enables to have your aerial and installation tested...

User Manual
Page 74
.../Philips Digital Interface format) Standard format for connection of hertz. ** FTA (Free- GB 73 It outputs audio signals directly as digital audio signals without changing into analog signals because conversion into analog signals can view without additional payments to a service provider. ** OSD (On Screen Display) The function that displays the information about the monitor that the user needs or has to know on . ** OTA (Over The Air) Means that software downloads where...
.../Philips Digital Interface format) Standard format for connection of hertz. ** FTA (Free- GB 73 It outputs audio signals directly as digital audio signals without changing into analog signals because conversion into analog signals can view without additional payments to a service provider. ** OSD (On Screen Display) The function that displays the information about the monitor that the user needs or has to know on . ** OTA (Over The Air) Means that software downloads where...


