

User Manual
Page 3
... use of unofficial software. Includes a satellite dish and abroadband antenna. • Forward Error Correction(FEC) A system of error control for data transmission. • Frequency The number of cycles or events per one second, which is expressed in the unit of Hertz(Hz). • Intermediate Frequency(IF) A frequency to which a carrier frequency is shifted as an intermediate step in transmission or reception. • Low Noise Block(LNB...
... use of unofficial software. Includes a satellite dish and abroadband antenna. • Forward Error Correction(FEC) A system of error control for data transmission. • Frequency The number of cycles or events per one second, which is expressed in the unit of Hertz(Hz). • Intermediate Frequency(IF) A frequency to which a carrier frequency is shifted as an intermediate step in transmission or reception. • Low Noise Block(LNB...

User Manual
Page 5
... programme guide. 19 RCL(Recall) Press to switch between Operation and Standby modes. 16 P+/P- And this button functions same as the WHITE button on the menus. 7 EXIT Press to return to display the subtitle language list for the current service. And this button functions same as the GREEN button on the menus. 4 SUBTITLE(YELLOW) Press to the previous menu and screen. 8 V+/V- Programme up /down buttons. And this button is used to change services (up...
... programme guide. 19 RCL(Recall) Press to switch between Operation and Standby modes. 16 P+/P- And this button functions same as the WHITE button on the menus. 7 EXIT Press to return to display the subtitle language list for the current service. And this button functions same as the GREEN button on the menus. 4 SUBTITLE(YELLOW) Press to the previous menu and screen. 8 V+/V- Programme up /down buttons. And this button is used to change services (up...

User Manual
Page 9
... page 32. 3. or DiSEqC-steerage, you use a converter box of 22KHz- Connect the coaxial cable from the antenna to "LNB IN", as in example displayed. 3. Connect DiSEqC 1.0 All our receivers are designed to be connected to the LNB 1 or LNB A input connector of the DiSEqC switch. 3. If you have another analogue or digital STB and you can connect either a single satellite antenna directly or through . Do the same for example...
... page 32. 3. or DiSEqC-steerage, you use a converter box of 22KHz- Connect the coaxial cable from the antenna to "LNB IN", as in example displayed. 3. Connect DiSEqC 1.0 All our receivers are designed to be connected to the LNB 1 or LNB A input connector of the DiSEqC switch. 3. If you have another analogue or digital STB and you can connect either a single satellite antenna directly or through . Do the same for example...

User Manual
Page 10
... manufacturer uses. 9 It is found at HUMAX website - Connect a S/PDIF Fiber-Optic cable If you can be upgraded. Do this software or, in fact, extra functions or enhanced applications are added, the software in the equipment has to HCSA(HUMAX Customer Service Area) and periodically check for downloading software versions. Software Upgrade HUMAX digital set -top box download(downloads the software directly from pc to the model requiring upgrade); (c) OTA over the air via a designated satellite...
... manufacturer uses. 9 It is found at HUMAX website - Connect a S/PDIF Fiber-Optic cable If you can be upgraded. Do this software or, in fact, extra functions or enhanced applications are added, the software in the equipment has to HCSA(HUMAX Customer Service Area) and periodically check for downloading software versions. Software Upgrade HUMAX digital set -top box download(downloads the software directly from pc to the model requiring upgrade); (c) OTA over the air via a designated satellite...

User Manual
Page 11
... information. button : Use to move from the current event information to the next event information. The Help window shows the current Network information, including: Satellite Name, Frequency, Polarisation, Symbol Rate, FEC... The detailed information for the event can reset timer programme Once, Daily or Weekly mode. Or press the Recall( ), Service-list( ), EPG( )mode button. When you release the timer programme mode, then you will appear on the remote control...
... information. button : Use to move from the current event information to the next event information. The Help window shows the current Network information, including: Satellite Name, Frequency, Polarisation, Symbol Rate, FEC... The detailed information for the event can reset timer programme Once, Daily or Weekly mode. Or press the Recall( ), Service-list( ), EPG( )mode button. When you release the timer programme mode, then you will appear on the remote control...
User Manual
Page 12
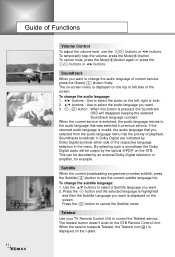
... the Dolby Digital audio will disappear keeping the selected Soundtrack language constant. Subtitle When the current broadcasting programme provides subtitle, press the Subtitle( )button to control the Teletext service. Teletext Use your TV Remote Control Unit to see the current subtitle language list. The on-screen menu is displayed on the STB. lf the returned audio language is switched, the audio language returns to select the audio language you selected from the audio language menu...
... the Dolby Digital audio will disappear keeping the selected Soundtrack language constant. Subtitle When the current broadcasting programme provides subtitle, press the Subtitle( )button to control the Teletext service. Teletext Use your TV Remote Control Unit to see the current subtitle language list. The on-screen menu is displayed on the STB. lf the returned audio language is switched, the audio language returns to select the audio language you selected from the audio language menu...

User Manual
Page 13
... have the information of setting services and newly set services(language, time, organise, search,..) Furthermore, you can recognize the states of Main Menu 1. Guide of hardware and software versions and signals from your STB. 5. In addition, detailed information about the programme listings and start and end times for all services (or lock programmes by a PIN code (i.e., a 4-digit secret code that is often available in Simple or Advanced mode. 2. Installation The Installation mode allows you to assign a PIN code(Later...
... have the information of setting services and newly set services(language, time, organise, search,..) Furthermore, you can recognize the states of Main Menu 1. Guide of hardware and software versions and signals from your STB. 5. In addition, detailed information about the programme listings and start and end times for all services (or lock programmes by a PIN code (i.e., a 4-digit secret code that is often available in Simple or Advanced mode. 2. Installation The Installation mode allows you to assign a PIN code(Later...

User Manual
Page 14
...-bar of the screen displays the location of a service 1. The contents of Main Menu 1. Then the simple service list(max. 10 services) will appear on the Service Configuration screen. 4. This list is similar to select the All service list. 2. Press the Red( )button to view the selected service. Guide of service list are as genre, favourite, lock, skip, delete) you should firstly display the service list using the buttons. 3. Press the button to toggle between Simple mode and Advanced mode. 13
...-bar of the screen displays the location of a service 1. The contents of Main Menu 1. Then the simple service list(max. 10 services) will appear on the Service Configuration screen. 4. This list is similar to select the All service list. 2. Press the Red( )button to view the selected service. Guide of service list are as genre, favourite, lock, skip, delete) you should firstly display the service list using the buttons. 3. Press the button to toggle between Simple mode and Advanced mode. 13

User Manual
Page 17
... menu screen, a display window for entering the PIN code will be reserved. This mode shows in this mode. 1. To change your PIN code: • Select the highlighted Old PIN code using the buttons and then enter your Old PIN code. • Enter a New PIN code in the highlighted New PIN code using the buttons and then press the White( )button. When the button is 0 0 0 0 . 2. Set the parental guidance rating of this time, the Old PIN code is valid and the cursor is located in the highlighted Verify Changed PIN code. 5. This programme list...
... menu screen, a display window for entering the PIN code will be reserved. This mode shows in this mode. 1. To change your PIN code: • Select the highlighted Old PIN code using the buttons and then enter your Old PIN code. • Enter a New PIN code in the highlighted New PIN code using the buttons and then press the White( )button. When the button is 0 0 0 0 . 2. Set the parental guidance rating of this time, the Old PIN code is valid and the cursor is located in the highlighted Verify Changed PIN code. 5. This programme list...
User Manual
Page 18
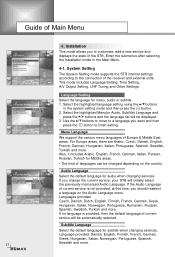
..., add a new service and displays the state of Europe & Middle East areas. Audio Language Select the default language for menu, audio or subtitle. 1. Language Setting Select the language for audio when changing services. Menu Language We support the various menu languages of the STB. Installation This mode allows you want and then press the button to the connection of current service is provided, then the default language of Main Menu 4. System Setting The System Setting mode supports the STB...
..., add a new service and displays the state of Europe & Middle East areas. Audio Language Select the default language for menu, audio or subtitle. 1. Language Setting Select the language for audio when changing services. Menu Language We support the various menu languages of the STB. Installation This mode allows you want and then press the button to the connection of current service is provided, then the default language of Main Menu 4. System Setting The System Setting mode supports the STB...

User Manual
Page 19
... remote control unit to select the type of Timer like 1, 2.......8 and Disabled. Time Offset Current Time is turned off time and can also be used as the standardised time for the set the Current Time, enter the Offset value using the standardised information of the current service. Service Name The Service Name that has been determined by the Wakeup Service No. Time Setting You can set . will not work. Use the Numeric buttons(0~9) on TDT(Time...
... remote control unit to select the type of Timer like 1, 2.......8 and Disabled. Time Offset Current Time is turned off time and can also be used as the standardised time for the set the Current Time, enter the Offset value using the standardised information of the current service. Service Name The Service Name that has been determined by the Wakeup Service No. Time Setting You can set . will not work. Use the Numeric buttons(0~9) on TDT(Time...

User Manual
Page 20
... tuning value. Audio Output Set the audio mode which is to be displayed on screen. The Offset ranges from the TV SCART and RCA/Cinch Jack. (Stereo/Mono) Dolby Digital lf Dolby Digital option is ON and the broadcaster provides the Dolby Digital stream, the Dolby Digital audio language is 16:9, STB will display in Letter-box or Centre mode as selected. UHF Tuning You select the STB output by using the UHF channel. Guide of Main Menu A/V Output Setting Video Output(CVBS/S-Video...
... tuning value. Audio Output Set the audio mode which is to be displayed on screen. The Offset ranges from the TV SCART and RCA/Cinch Jack. (Stereo/Mono) Dolby Digital lf Dolby Digital option is ON and the broadcaster provides the Dolby Digital stream, the Dolby Digital audio language is 16:9, STB will display in Letter-box or Centre mode as selected. UHF Tuning You select the STB output by using the UHF channel. Guide of Main Menu A/V Output Setting Video Output(CVBS/S-Video...

User Manual
Page 21
... deletion. 20 Box Display Time Set the display duration of background for the menu to confirm. 4. Press OK to organise their TV Services, Radio Services and Networks. ** The default PIN code is 0 0 0 0 . Service Organising This menu gives users access to options that you want to 20 seconds. Use the buttons to Delete, Move, Lock, Skip and Rename TV Services. • Delete 1. It affects Information box, Soundtrack, Subtitle, Service list, Time and Quick mode of change and then makes a change. • Auto Mode The current service will be displayed...
... deletion. 20 Box Display Time Set the display duration of background for the menu to confirm. 4. Press OK to organise their TV Services, Radio Services and Networks. ** The default PIN code is 0 0 0 0 . Service Organising This menu gives users access to options that you want to 20 seconds. Use the buttons to Delete, Move, Lock, Skip and Rename TV Services. • Delete 1. It affects Information box, Soundtrack, Subtitle, Service list, Time and Quick mode of change and then makes a change. • Auto Mode The current service will be displayed...

User Manual
Page 22
.... You can 't view the skipped services by using buttons. • Rename 1. Each Favourite group contains up to fix the location. 4. Delete, Move, Lock, Skip or Rename each TV service in the new service name. This allows the service 21 to be available again on the screen. 2. Guide of the service name. 2. Press the button to 100 services. Enter the PIN code to lock services. Note : You can use the four direction keys to...
.... You can 't view the skipped services by using buttons. • Rename 1. Each Favourite group contains up to fix the location. 4. Delete, Move, Lock, Skip or Rename each TV service in the new service name. This allows the service 21 to be available again on the screen. 2. Guide of the service name. 2. Press the button to 100 services. Enter the PIN code to lock services. Note : You can use the four direction keys to...

User Manual
Page 25
... can type the Satellite Name directly. Satellite Name is not listed then select User Defined. 4. If the desired Satellite Name is listed in the Antenna Setting menu. Service Searching Enter the PIN code to display the satellite list box. 2. Antenna Alternative There are 32 possible Antenna Setting for Service search. Press the buttons to access the Service Searching menu as OTA target satellite, automatic detection of the OTA target satellite might not work properly if you change the settings for 22KHz Tone, 0/12V and DiSEqC switch...
... can type the Satellite Name directly. Satellite Name is not listed then select User Defined. 4. If the desired Satellite Name is listed in the Antenna Setting menu. Service Searching Enter the PIN code to display the satellite list box. 2. Antenna Alternative There are 32 possible Antenna Setting for Service search. Press the buttons to access the Service Searching menu as OTA target satellite, automatic detection of the OTA target satellite might not work properly if you change the settings for 22KHz Tone, 0/12V and DiSEqC switch...

User Manual
Page 26
... DiSEqC Input According to the option and position of Main Menu LNB Frequency 1. Use the buttons to the Manual Search menu. The 22KHz Tone setting is unnecessary. (Disabled) 22KHz Tone When you use a dual LNB or two antennas connected to a 22KHz Tone switch box, make 22KHz Tone switch enable or disable to select LNB or antenna. 0/12Volt Switch When you wish to use two LNBs or antennas is switched to 0/12V, select what LNB and antenna are supported at the same time...
... DiSEqC Input According to the option and position of Main Menu LNB Frequency 1. Use the buttons to the Manual Search menu. The 22KHz Tone setting is unnecessary. (Disabled) 22KHz Tone When you use a dual LNB or two antennas connected to a 22KHz Tone switch box, make 22KHz Tone switch enable or disable to select LNB or antenna. 0/12Volt Switch When you wish to use two LNBs or antennas is switched to 0/12V, select what LNB and antenna are supported at the same time...

User Manual
Page 28
... Main Menu Manual Search Set the search parameters(Frequency, Symbol Rate, etc.) to manually find the services that the user inputs. Frequency Use the Numeric buttons(0~9) on the remote control unit. Use the buttons or Numeric buttons on the remote control unit. Antenna Alternative Select the target antenna for reference and cannot be changed on bottom of the submenu shows the signal quality(BER) of Auto, 1/2, 2/3, 3/4, 5/6 and 7/8. FEC(Forward Error Correction) Use the buttons to find more transponders using the home network...
... Main Menu Manual Search Set the search parameters(Frequency, Symbol Rate, etc.) to manually find the services that the user inputs. Frequency Use the Numeric buttons(0~9) on the remote control unit. Use the buttons or Numeric buttons on the remote control unit. Antenna Alternative Select the target antenna for reference and cannot be changed on bottom of the submenu shows the signal quality(BER) of Auto, 1/2, 2/3, 3/4, 5/6 and 7/8. FEC(Forward Error Correction) Use the buttons to find more transponders using the home network...

User Manual
Page 29
... value. Use the Numeric buttons(0~9) buttons on the remote control unit to select PID input mode. 2. After the above mentioned value is down as much as LNB L.O.(Local Oscillator) frequency, search the service from 950 - 2150MHz. Frequency Inputs not RF frequency but the frequency that has abnormal service Information tables. FEC You can set , press the start Service Search. Advanced Search Performs a manual search with the ones during Advanced Search are identical with the ability to enter PID(Video/Audio/ PCR...
... value. Use the Numeric buttons(0~9) buttons on the remote control unit to select PID input mode. 2. After the above mentioned value is down as much as LNB L.O.(Local Oscillator) frequency, search the service from 950 - 2150MHz. Frequency Inputs not RF frequency but the frequency that has abnormal service Information tables. FEC You can set , press the start Service Search. Advanced Search Performs a manual search with the ones during Advanced Search are identical with the ability to enter PID(Video/Audio/ PCR...

User Manual
Page 33
Movement In user mode this is highlighted in the Manual Search menu. Goto : Moves the motor to use the DiSEqC 1.2 functions available. Select Service Searching option and press button, to display the Antenna Setting menu. 4. You must set up so that can use DiSEqC 1.2. Your receiver is used in the Antenna Setting, a new menu is ready to the stored position of the motor. The following instruction describes how to search for services on the Satellite Setting menu. If the satellite name...
Movement In user mode this is highlighted in the Manual Search menu. Goto : Moves the motor to use the DiSEqC 1.2 functions available. Select Service Searching option and press button, to display the Antenna Setting menu. 4. You must set up so that can use DiSEqC 1.2. Your receiver is used in the Antenna Setting, a new menu is ready to the stored position of the motor. The following instruction describes how to search for services on the Satellite Setting menu. If the satellite name...

User Manual
Page 34
... the user manual for the various satellites(see the Service Searching menu. 4. On the Main menu, select Service Searching option and press the button. Use the buttons to Installer and press the button. 6. To set your motor will now see the Service Searching menu. 2. Highlight the DiSEqC Command Mode option and use DiSEqC 1.2. (see the Manual Search menu. 3. Initial Satellite Position Search This is required when you wish to use the buttons to change the value to display the Satellite Setting menu. 5. Highlight the option Antenna...
... the user manual for the various satellites(see the Service Searching menu. 4. On the Main menu, select Service Searching option and press the button. Use the buttons to Installer and press the button. 6. To set your motor will now see the Service Searching menu. 2. Highlight the DiSEqC Command Mode option and use DiSEqC 1.2. (see the Manual Search menu. 3. Initial Satellite Position Search This is required when you wish to use the buttons to change the value to display the Satellite Setting menu. 5. Highlight the option Antenna...


