

User Manual
Page 3
No user serviceable parts inside the product that presents a risk of electric shock or personal injury. ** This symbol indicates important instructions accompanying the product. GB 2 Refer servicing to help understand, use and maintain the installation. ** Meaning of Symbols To reduce the risk of electric shock, do not remove cover (or back). Notice ** Warnings, Cautions and Notes Throughout the...
No user serviceable parts inside the product that presents a risk of electric shock or personal injury. ** This symbol indicates important instructions accompanying the product. GB 2 Refer servicing to help understand, use and maintain the installation. ** Meaning of Symbols To reduce the risk of electric shock, do not remove cover (or back). Notice ** Warnings, Cautions and Notes Throughout the...

User Manual
Page 4
...• If you place the product on top of the product must be left uncovered to allow proper airflow into the unit. • Do not stand the product on soft furnishings or carpets. • Do not stack electronic equipments on the ... adequate ventilation and that you start any maintenance or installation procedures. ** 2. Please read the following safety precautions carefully. ** Safety Instructions and Precautions 1. CONNECTION TO THE AERIAL • Disconnect the product from the mains before connecting or disconnecting the cable from the type of power supply indicated on top of...
...• If you place the product on top of the product must be left uncovered to allow proper airflow into the unit. • Do not stand the product on soft furnishings or carpets. • Do not stack electronic equipments on the ... adequate ventilation and that you start any maintenance or installation procedures. ** 2. Please read the following safety precautions carefully. ** Safety Instructions and Precautions 1. CONNECTION TO THE AERIAL • Disconnect the product from the mains before connecting or disconnecting the cable from the type of power supply indicated on top of...
User Manual
Page 7
Edit Channels 46 9.1 Edit Channels 46 9.2 Edit Favourite List 48 10. Software Update 56 11.1 OTA (Over the Air 56 12. Glossary 62 16. Installation 50 10.1 Automatic Search 50 10.2 Regional Search 51 10.3 Manual Search 52 10.4 Software Update 53 10.5 Default Setting 55 11. Specification 61 15. Contents 9. Service and Support 64 GB 6 Menu Map 57 13. Trouble Shooting 58 13.1 Trouble Shooting 58 13.2 Error Message 60 14.
Edit Channels 46 9.1 Edit Channels 46 9.2 Edit Favourite List 48 10. Software Update 56 11.1 OTA (Over the Air 56 12. Glossary 62 16. Installation 50 10.1 Automatic Search 50 10.2 Regional Search 51 10.3 Manual Search 52 10.4 Software Update 53 10.5 Default Setting 55 11. Specification 61 15. Contents 9. Service and Support 64 GB 6 Menu Map 57 13. Trouble Shooting 58 13.1 Trouble Shooting 58 13.2 Error Message 60 14.

User Manual
Page 8
Always keep the battery inserted in the remote control. • Package contents may occur if the remote control is left without battery for a long time. 1. Before Using the Product This chapter provides detailed instructions on the product and its accessories. 1.1 Package Contents Please check all package contents before using your product. ** ** Remote Control ** HDMI-Cable User's Manual Batteries Warranty card ** Note: • Faults may vary according to area. GB 7 Before Using the Product 1.
Always keep the battery inserted in the remote control. • Package contents may occur if the remote control is left without battery for a long time. 1. Before Using the Product This chapter provides detailed instructions on the product and its accessories. 1.1 Package Contents Please check all package contents before using your product. ** ** Remote Control ** HDMI-Cable User's Manual Batteries Warranty card ** Note: • Faults may vary according to area. GB 7 Before Using the Product 1.
User Manual
Page 11
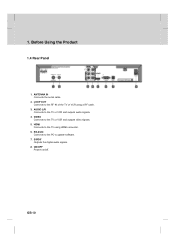
S/PDIF Outputs the digital audio signals. ** 8. Before Using the Product 1.4 Rear Panel ** 1. VIDEO Connects to update software. ** 7. RS-232C Connects to the PC to the TV or VCR and outputs video signals. ** 5. LOOP OUT Connects to the RF IN of the TV or VCR using HDMI connector. ** 6. AUDIO L/R Connects to the TV using a RF cable. ** 3. HDMI Connects to the TV or VCR and outputs audio signals. ** 4. 1. ANTENNA IN Connects the aerial cable. ** 2. ON/OFF Powers on/off. ** GB 10
S/PDIF Outputs the digital audio signals. ** 8. Before Using the Product 1.4 Rear Panel ** 1. VIDEO Connects to update software. ** 7. RS-232C Connects to the PC to the TV or VCR and outputs video signals. ** 5. LOOP OUT Connects to the RF IN of the TV or VCR using HDMI connector. ** 6. AUDIO L/R Connects to the TV using a RF cable. ** 3. HDMI Connects to the TV or VCR and outputs audio signals. ** 4. 1. ANTENNA IN Connects the aerial cable. ** 2. ON/OFF Powers on/off. ** GB 10

User Manual
Page 13
... modes. ** 11.LIST ** Displays the channel list. ** 12.WIDE ** Sets the display format. ** 13.STANDBY ** Switches between TV and radio modes. ** 3. TV/RADIO ** Switches between operation and standby modes. ** 14.OPT+ (OPTION) ** Displays the audio, teletext and subtitle language services. ** 15.LAST ** Returns to the previous menu and screen. ** 6. SOURCE ** (This function is not supported.) ** 2. NUMERIC(0-9) BUTTONS ** Enters a TV/radio channel number or menu option number. 4. EPG ** Displays the EPG (electronic programme guide). ** 5. 1. COLOUR BUTTONS...
... modes. ** 11.LIST ** Displays the channel list. ** 12.WIDE ** Sets the display format. ** 13.STANDBY ** Switches between TV and radio modes. ** 3. TV/RADIO ** Switches between operation and standby modes. ** 14.OPT+ (OPTION) ** Displays the audio, teletext and subtitle language services. ** 15.LAST ** Returns to the previous menu and screen. ** 6. SOURCE ** (This function is not supported.) ** 2. NUMERIC(0-9) BUTTONS ** Enters a TV/radio channel number or menu option number. 4. EPG ** Displays the EPG (electronic programme guide). ** 5. 1. COLOUR BUTTONS...

User Manual
Page 14
... problems setting up your product, please contact your product to the TV with the HDMI cable as follows. ** GB 13 In case the TV has a HDMI input connector, a special all-digital interface that provides the highest picture quality, connect the product to the TV, VCR or other devices. 2. Setup This chapter describes how to connect your local product distributor. 2.1 Using HDMI Cable The HDMI connection...
... problems setting up your product, please contact your product to the TV with the HDMI cable as follows. ** GB 13 In case the TV has a HDMI input connector, a special all-digital interface that provides the highest picture quality, connect the product to the TV, VCR or other devices. 2. Setup This chapter describes how to connect your local product distributor. 2.1 Using HDMI Cable The HDMI connection...

User Manual
Page 19
... selected. Select your local product distributor. 3.1 State Setting You can select the state. If you have forgotten your password, please contact your state from the list using the button and press the OK button. 3.2 Automatic Search Channel search will activate automatically after purchase, the installation wizard will show you how to start the initial installation. ** Note: • The default password is completed. 3.
... selected. Select your local product distributor. 3.1 State Setting You can select the state. If you have forgotten your password, please contact your state from the list using the button and press the OK button. 3.2 Automatic Search Channel search will activate automatically after purchase, the installation wizard will show you how to start the initial installation. ** Note: • The default password is completed. 3.
User Manual
Page 23
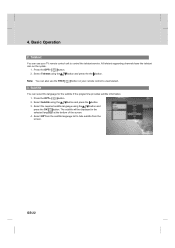
All teletext supporting channels have the teletext icon on your TV remote control unit to hide subtitle from the subtitle language list to control the teletext service. The subtitle will be displayed in the selected language at the bottom of the screen. 4. Press the OPT+ button. 2. Select the required subtitle language using the button and press the button. 3. Press the OPT+ button. 2. Select Subtitle using the button and press the OK...
All teletext supporting channels have the teletext icon on your TV remote control unit to hide subtitle from the subtitle language list to control the teletext service. The subtitle will be displayed in the selected language at the bottom of the screen. 4. Press the OPT+ button. 2. Select the required subtitle language using the button and press the button. 3. Press the OPT+ button. 2. Select Subtitle using the button and press the OK...

User Manual
Page 32
... will appear. 2. To change Start Time and End Time, enter the time using the NUMERIC(0-9) buttons. 4. To change Channel, press the button. button to view the channel list. 2. Select Save and press the OK ** button. ** Note: The default password is displayed. ** Note: You can change Repeat frequency, press the from ONCE, DAILY and WEEKLY. GB 31 To change Date, press the button. Press the LIST button to choose 6. You can...
... will appear. 2. To change Start Time and End Time, enter the time using the NUMERIC(0-9) buttons. 4. To change Channel, press the button. button to view the channel list. 2. Select Save and press the OK ** button. ** Note: The default password is displayed. ** Note: You can change Repeat frequency, press the from ONCE, DAILY and WEEKLY. GB 31 To change Date, press the button. Press the LIST button to choose 6. You can...
User Manual
Page 40
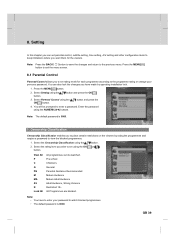
... are blocked. ** Note: • You have made by rating the programmes and require a password to enter a password. Press the MENU button to exit the menu screen. 8.1 Parental Control Parental Control allows you have to enter your password to the programme rating or change your previous password. 8. Enter the password using the button. 2. Press the MENU button. 2. Select the Censorship Classification using the NUMERIC(0-9) buttons. ** Note: The default password is 0000.
... are blocked. ** Note: • You have made by rating the programmes and require a password to enter a password. Press the MENU button to exit the menu screen. 8.1 Parental Control Parental Control allows you have to enter your password to the programme rating or change your previous password. 8. Enter the password using the button. 2. Press the MENU button. 2. Select the Censorship Classification using the NUMERIC(0-9) buttons. ** Note: The default password is 0000.
User Manual
Page 42
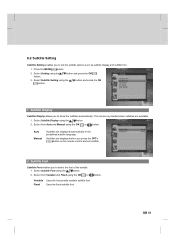
... Subtitle Setting using the OK or button. ** Auto Subtitles are available. 1. Subtitle Display Subtitle Display allows you to select the font of the subtitle. 1. Fixed Uses the fixed subtitle font. 8.2 Subtitle Setting Subtitle Setting enables you to set subtitle. 2. Press the MENU button. 2. This service is provided when subtitles are displayed automatically in the predefined subtitle language. Manual Subtitles are displayed when you press the OPT+ button on the remote control and set...
... Subtitle Setting using the OK or button. ** Auto Subtitles are available. 1. Subtitle Display Subtitle Display allows you to select the font of the subtitle. 1. Fixed Uses the fixed subtitle font. 8.2 Subtitle Setting Subtitle Setting enables you to set subtitle. 2. Press the MENU button. 2. This service is provided when subtitles are displayed automatically in the predefined subtitle language. Manual Subtitles are displayed when you press the OPT+ button on the remote control and set...
User Manual
Page 49
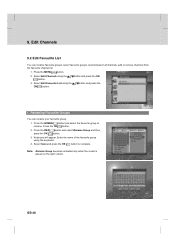
.../unselect all channels, add or remove channels from the favourite channel list. 1. Enter the name of the favourite group using the button. Press the OK button. 2. button and press the OK 3. Edit Channels 9.2 Edit Favourite List You can rename your favourite group. 1. Press the RED button and select Rename Group and then, press the OK button. 3. Press the MENU button. 2. Select Edit Favourite List using the OK button. Keyboard...
.../unselect all channels, add or remove channels from the favourite channel list. 1. Enter the name of the favourite group using the button. Press the OK button. 2. button and press the OK 3. Edit Channels 9.2 Edit Favourite List You can rename your favourite group. 1. Press the RED button and select Rename Group and then, press the OK button. 3. Press the MENU button. 2. Select Edit Favourite List using the OK button. Keyboard...

User Manual
Page 51
... Automatic Search from Installation menu using the button and press the OK button. 3. If there is connected to the previous menu. You can also initialize the setting to the factory default. ** Note: Press the BACK button to save the search results, select Save and press the OK button. Press the MENU button. 2. Select Installation using the button, and press the OK button. 1. Search Wait while channel search continues. When you...
... Automatic Search from Installation menu using the button and press the OK button. 3. If there is connected to the previous menu. You can also initialize the setting to the factory default. ** Note: Press the BACK button to save the search results, select Save and press the OK button. Press the MENU button. 2. Select Installation using the button, and press the OK button. 1. Search Wait while channel search continues. When you...

User Manual
Page 53
... button. 1. Installation 10.3 Manual Search You can enter the value directly using the button and press the OK button. 2. button and press the OK button and press the OK 4. Select Channel, Frequency or Network Search using the NUMERIC(0-9) buttons and press the OK button. When entering the frequency, the appropriate channel for the entered frequency is displayed. 1. Frequency Enter the frequency to search. Select a channel using the button. 2. Select Channel using the OK or button. Select Frequency using...
... button. 1. Installation 10.3 Manual Search You can enter the value directly using the button and press the OK button. 2. button and press the OK button and press the OK 4. Select Channel, Frequency or Network Search using the NUMERIC(0-9) buttons and press the OK button. When entering the frequency, the appropriate channel for the entered frequency is displayed. 1. Frequency Enter the frequency to search. Select a channel using the button. 2. Select Channel using the OK or button. Select Frequency using...
User Manual
Page 54
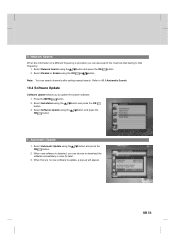
... to that frequency. 1. Select Installation using the button and press the OK button. 2. Automatic Update 1. Select Network Search using the button. Refer to 10.1 Automatic Search. 10.4 Software Update Software Update allows you can also search the channels that belong to download the software immediately or save for later. 3. button and press the OK 3. Select Software Update using the OK button. Press the MENU button. 2. GB 53 Select Automatic Update using the OK button. button and press...
... to that frequency. 1. Select Installation using the button and press the OK button. 2. Automatic Update 1. Select Network Search using the button. Refer to 10.1 Automatic Search. 10.4 Software Update Software Update allows you can also search the channels that belong to download the software immediately or save for later. 3. button and press the OK 3. Select Software Update using the OK button. Press the MENU button. 2. GB 53 Select Automatic Update using the OK button. button and press...

User Manual
Page 55
... button. 4. 10. GB 54 Enter the values for later. 5. When new software is no new software to download the software immediately or save for Channel and Frequency. 3. Select a channel using the button. 2. button and press the OK 2. Channel 1. Select Frequency using the OK or button. ** Frequency 1. Select Manual Update using the button. 2. When there is detected, you can choose to update, a pop-up will appear. Select Channel using the button. Enter the frequency using the NUMERIC(0-9) buttons. Installation...
... button. 4. 10. GB 54 Enter the values for later. 5. When new software is no new software to download the software immediately or save for Channel and Frequency. 3. Select a channel using the button. 2. button and press the OK 2. Channel 1. Select Frequency using the OK or button. ** Frequency 1. Select Manual Update using the button. 2. When there is detected, you can choose to update, a pop-up will appear. Select Channel using the button. Enter the frequency using the NUMERIC(0-9) buttons. Installation...

User Manual
Page 59
... picture/sound quality - Install the antenna in operation mode. (Press the STANDBY button) - Check that the product is on and in an obstacle-free place. - Replace the batteries in menu to On, if you use the active antenna to ensure that the AV cable is on at the rear of your local product distributor or service centre for a new set - If the problem persists...
... picture/sound quality - Install the antenna in operation mode. (Press the STANDBY button) - Check that the product is on and in an obstacle-free place. - Replace the batteries in menu to On, if you use the active antenna to ensure that the AV cable is on at the rear of your local product distributor or service centre for a new set - If the problem persists...
User Manual
Page 60
... no software is connected correctly. - Check in the menu that you wish to view. - GB 59 6. The default password is given. - Contact your network operator for your area. ** 9. Use the appropriate antenna capable of the reservation. ** 7. You can get an update. Check that you have a valid and working subscription to the channels you have a valid and working subscription to the channels you...
... no software is connected correctly. - Check in the menu that you wish to view. - GB 59 6. The default password is given. - Contact your network operator for your area. ** 9. Use the appropriate antenna capable of the reservation. ** 7. You can get an update. Check that you have a valid and working subscription to the channels you have a valid and working subscription to the channels you...

User Manual
Page 63
... (Free- GB 62 To-Air) An unscrambled broadcaster allowing customers to view channels or services without paying any subscription. ** HDMI (High-Definition Multimedia Interface) An all the audio frequencies a person can detect, which must be available on a single cable. Sometimes it is used with digital receivers and digital television sets to update receiver's software. ** Smartcard A chipcard the same size as stereo tape products. ** OSD (On Screen Display) OSD displays the...
... (Free- GB 62 To-Air) An unscrambled broadcaster allowing customers to view channels or services without paying any subscription. ** HDMI (High-Definition Multimedia Interface) An all the audio frequencies a person can detect, which must be available on a single cable. Sometimes it is used with digital receivers and digital television sets to update receiver's software. ** Smartcard A chipcard the same size as stereo tape products. ** OSD (On Screen Display) OSD displays the...


