
User Manual
Page 2
The information in this user's manual next to your product for purchasing a HUMAX product. No user serviceable parts inside the product that indicate hazardous situations. Caution Indicates a situation which could damage the equipment or other apparatus. Copyright (Copyright © 2011 HUMAX Corporation) Not to be able to change without HUMAX's prior consent in serious injury...
The information in this user's manual next to your product for purchasing a HUMAX product. No user serviceable parts inside the product that indicate hazardous situations. Caution Indicates a situation which could damage the equipment or other apparatus. Copyright (Copyright © 2011 HUMAX Corporation) Not to be able to change without HUMAX's prior consent in serious injury...

User Manual
Page 5
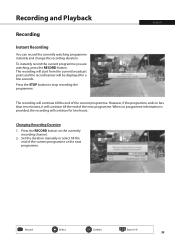
Tivù Card Only Insert Tivùsat Smartcard only. TV/RADIO CH+ / CH- Product Overview Front Panel Status Display STANDBY Switches between operation and standby modes. Checking Accessories User's Manual MEDIA Remote Control & Batteries Manual SCART Cable (HD-5400S) Note: The accessories may differ from the actual product. 4 Note: The image shown may vary according to area. 2. HDMI Cable (HD-5600S) STANDBY/TV/RADIO LED The light is emitted when the product is in each mode. USB Port Smartcard Insert a Smartcard. Quick Start Guide 1.
Tivù Card Only Insert Tivùsat Smartcard only. TV/RADIO CH+ / CH- Product Overview Front Panel Status Display STANDBY Switches between operation and standby modes. Checking Accessories User's Manual MEDIA Remote Control & Batteries Manual SCART Cable (HD-5400S) Note: The accessories may differ from the actual product. 4 Note: The image shown may vary according to area. 2. HDMI Cable (HD-5600S) STANDBY/TV/RADIO LED The light is emitted when the product is in each mode. USB Port Smartcard Insert a Smartcard. Quick Start Guide 1.
User Manual
Page 36
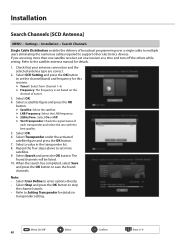
... of the current prorgramme or the next programme. When no programme information is provided, the recording will be displayed for two hours. Set the duration manually or select till the end of the next programme. Record Select Confirm Enter 0~9 35 To instantly record the current programme you are watching, press the...
... of the current prorgramme or the next programme. When no programme information is provided, the recording will be displayed for two hours. Set the duration manually or select till the end of the next programme. Record Select Confirm Enter 0~9 35 To instantly record the current programme you are watching, press the...
User Manual
Page 63
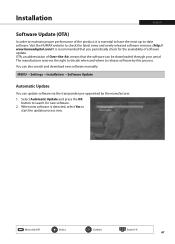
... that your antenna connection and the selected antenna type are using more satellites. 9. Select SCD Setting and press the OK button to the satellite antenna manual for this receiver. Select Transponder under the activated satellite figure and press the OK button. 7. Repeat the four steps above to save the found channels...
... that your antenna connection and the selected antenna type are using more satellites. 9. Select SCD Setting and press the OK button to the satellite antenna manual for this receiver. Select Transponder under the activated satellite figure and press the OK button. 7. Repeat the four steps above to save the found channels...
User Manual
Page 68
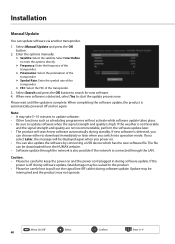
When new software is recommended that the software can also search and download new software manually. Visit the HUMAX website to check the latest news and newly released software versions. (http:// www.humaxdigital.com) It is detected, select Yes to release software by the ...
When new software is recommended that the software can also search and download new software manually. Visit the HUMAX website to check the latest news and newly released software versions. (http:// www.humaxdigital.com) It is detected, select Yes to release software by the ...
User Manual
Page 69
... update the software by connecting a USB device which has the new software file. Satellite: Select the satellite. Update may be downloaded from the HUMAX website. • Software update through the LAN. Frequeucy: Enter the frequency of the transponder. Select Search and press the OK button to enter... update, fatal damage may be caused to the product. • Please be careful to start the update process now. Enter the options manually. When new software is connected through the network is also possible if the network is detected, select Yes to keep the power on and...
... update the software by connecting a USB device which has the new software file. Satellite: Select the satellite. Update may be downloaded from the HUMAX website. • Software update through the LAN. Frequeucy: Enter the frequency of the transponder. Select Search and press the OK button to enter... update, fatal damage may be caused to the product. • Please be careful to start the update process now. Enter the options manually. When new software is connected through the network is also possible if the network is detected, select Yes to keep the power on and...

User Manual
Page 70
... the channel and software regularly. 1. Auto Search in Standby: Select On or Off. Select Invisible Channel Search to update the software by entering the options manually. English Menu On/Off Select Confirm Enter 0~9 69 Frequency: Select Daily or Weekly. If you want to set On or Off. 2. Set the options. 3. Invisible...
... the channel and software regularly. 1. Auto Search in Standby: Select On or Off. Select Invisible Channel Search to update the software by entering the options manually. English Menu On/Off Select Confirm Enter 0~9 69 Frequency: Select Daily or Weekly. If you want to set On or Off. 2. Set the options. 3. Invisible...
User Manual
Page 74
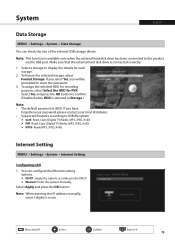
... select Format Storage. To assign the selected HDD for recording purpose, select Select the HDD for each storage. 2. Note: When entering the IP address manually, enter 3 digits in Storage.) Note: • The default password is selected in a row. Select Yes and press the OK button to enter ...the password. 3. If you will be prompted to confirm. (Disabled when HDD is 0000. Manual : Enter the options manually, Select Apply and press the OK button. Select a storage to the product via the USB port. Note: This function is connected correctly...
... select Format Storage. To assign the selected HDD for recording purpose, select Select the HDD for each storage. 2. Note: When entering the IP address manually, enter 3 digits in Storage.) Note: • The default password is selected in a row. Select Yes and press the OK button to enter ...the password. 3. If you will be prompted to confirm. (Disabled when HDD is 0000. Manual : Enter the options manually, Select Apply and press the OK button. Select a storage to the product via the USB port. Note: This function is connected correctly...


