

User Manual
Page 6
... 4.6 Subtitle GB24 4.7 Text and Interactive Services GB24 4.8 Programme Information (i-plate GB25 4.9 Option List GB26 5. Channel List GB27 5.1 My TV List GB27 5.2 Favourite List GB28 5.3 HD TV List GB28 5.4 Genre List GB29 5.5 Non-freesat Channel List GB29 6. Contents 1. First Installation GB19 3.1 User Settings GB19 3.2 freesat detection GB19 3.3 Postcode GB20 3.4 Search Channels GB20 3.5 Result GB21 3.6 Installation Checklist GB21 4. Connections GB13 2.1 Connecting the Antenna...
... 4.6 Subtitle GB24 4.7 Text and Interactive Services GB24 4.8 Programme Information (i-plate GB25 4.9 Option List GB26 5. Channel List GB27 5.1 My TV List GB27 5.2 Favourite List GB28 5.3 HD TV List GB28 5.4 Genre List GB29 5.5 Non-freesat Channel List GB29 6. Contents 1. First Installation GB19 3.1 User Settings GB19 3.2 freesat detection GB19 3.3 Postcode GB20 3.4 Search Channels GB20 3.5 Result GB21 3.6 Installation Checklist GB21 4. Connections GB13 2.1 Connecting the Antenna...

User Manual
Page 7
... 12.7 OPEN SOURCE SOFTWARE NOTICE GB57 GB6 User's Manual Setup GB44 9.1 Freesat Tune GB44 9.2 Manual Tune GB44 9.3 Software Update GB45 9.4 Factory Reset GB46 10. Edit Channels GB40 8.1 Edit Channel List GB40 8.2 Edit Favourite List GB42 8.3 Edit Customisable Channels GB43 9. Software Update GB48 11.1 OTA (Over the Air GB48 12. Contents 7.
... 12.7 OPEN SOURCE SOFTWARE NOTICE GB57 GB6 User's Manual Setup GB44 9.1 Freesat Tune GB44 9.2 Manual Tune GB44 9.3 Software Update GB45 9.4 Factory Reset GB46 10. Edit Channels GB40 8.1 Edit Channel List GB40 8.2 Edit Favourite List GB42 8.3 Edit Customisable Channels GB43 9. Software Update GB48 11.1 OTA (Over the Air GB48 12. Contents 7.

User Manual
Page 11
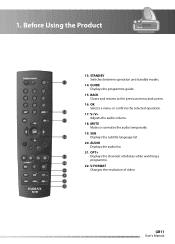
...LIST 4 Displays the channel list. 5. P-/P+ or PAGE /PAGE Changes the channel or page. 9. TV/RADIO Switches between TV and radio modes. 3 3. ARROW BUTTONS Navigates through the menu options. 6 7. COLOUR BUTTONS(R/G/Y/B) Select the colour keys for interactive applications. 7 8. 1. NUMERIC(0-9) BUTTONS Enters a TV/radio channel... Controls the output of the product is subject to change without notice. 1 1. i (INFORMATION) 10 Displays the channel and programme information. 11 11. Before Using the Product 1.4 Remote Control Note: The remote control of TV SCART....
...LIST 4 Displays the channel list. 5. P-/P+ or PAGE /PAGE Changes the channel or page. 9. TV/RADIO Switches between TV and radio modes. 3 3. ARROW BUTTONS Navigates through the menu options. 6 7. COLOUR BUTTONS(R/G/Y/B) Select the colour keys for interactive applications. 7 8. 1. NUMERIC(0-9) BUTTONS Enters a TV/radio channel... Controls the output of the product is subject to change without notice. 1 1. i (INFORMATION) 10 Displays the channel and programme information. 11 11. Before Using the Product 1.4 Remote Control Note: The remote control of TV SCART....
User Manual
Page 12
OK Selects a menu or confirms the selected operation. 14 17. SUB 16 Displays the subtitle language list. 20. 1. V-FORMAT 19 Changes the resolution of video. 20 21 22 GB11 User's Manual Before Using the Product 13. BACK Closes and returns to the ... audio volume. 15 18. STANDBY Switches between operation and standby modes. 13 14. MUTE Mutes or unmutes the audio temporarily. 19. OPT+ 17 Displays the channels attributes while watching a programme. 18 22. AUDIO Displays the audio list. 21. GUIDE Displays the programme guide. 15.
OK Selects a menu or confirms the selected operation. 14 17. SUB 16 Displays the subtitle language list. 20. 1. V-FORMAT 19 Changes the resolution of video. 20 21 22 GB11 User's Manual Before Using the Product 13. BACK Closes and returns to the ... audio volume. 15 18. STANDBY Switches between operation and standby modes. 13 14. MUTE Mutes or unmutes the audio temporarily. 19. OPT+ 17 Displays the channels attributes while watching a programme. 18 22. AUDIO Displays the audio list. 21. GUIDE Displays the programme guide. 15.
User Manual
Page 23
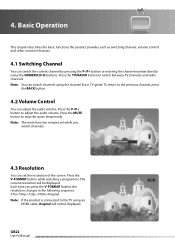
... directly using the NUMERIC(0-9) buttons. Basic Operation This chapter describes the basic functions the product provides such as switching channel, volume control and other common features. 4.1 Switching Channel You can set while you press the V-FORMAT button, the resolution changes in the following sequence: 576i 576p 720p 1080i.... Press the TV/RADIO button to adjust the audio volume. Note: If the product is connected to the TV using the channel list or TV guide. GB22 User's Manual Press the V-FORMAT button while watching a programme. Press the V-/V+ button to switch between TV...
... directly using the NUMERIC(0-9) buttons. Basic Operation This chapter describes the basic functions the product provides such as switching channel, volume control and other common features. 4.1 Switching Channel You can set while you press the V-FORMAT button, the resolution changes in the following sequence: 576i 576p 720p 1080i.... Press the TV/RADIO button to adjust the audio volume. Note: If the product is connected to the TV using the channel list or TV guide. GB22 User's Manual Press the V-FORMAT button while watching a programme. Press the V-/V+ button to switch between TV...

User Manual
Page 25
...hide the subtitle from the screen. GB24 User's Manual Basic Operation 4.6 Subtitle can access them. Select Off from the subtitle language list to access digital teletext. 2. Press the CH+/CH- Teletext services often load automatically shortly after the digital teletext window is no subtitle... available, Off does not appear. 4.7 Text and Interactive Services If your chosen channel has digital teletext features, you can select the language for the subtitle if the programme provides subtitle information. 1. In which case,...
...hide the subtitle from the screen. GB24 User's Manual Basic Operation 4.6 Subtitle can access them. Select Off from the subtitle language list to access digital teletext. 2. Press the CH+/CH- Teletext services often load automatically shortly after the digital teletext window is no subtitle... available, Off does not appear. 4.7 Text and Interactive Services If your chosen channel has digital teletext features, you can select the language for the subtitle if the programme provides subtitle information. 1. In which case,...

User Manual
Page 27
... 3. 4. Previous/Next programme information: Displayed if previous/next programme information is not displayed. 2. To rename the channel in the non-freesat channel mode, select Rename and press the OK button. Note: If there is no programme information available, programme information is...button. 2. Tip: The default password is displayed to the previous or next page. 4.9 Option List You can see the detailed information about the current channel and change the information if necessary. To delete the channel, select Delete and press the OK button. Basic Operation 5.
... 3. 4. Previous/Next programme information: Displayed if previous/next programme information is not displayed. 2. To rename the channel in the non-freesat channel mode, select Rename and press the OK button. Note: If there is no programme information available, programme information is...button. 2. Tip: The default password is displayed to the previous or next page. 4.9 Option List You can see the detailed information about the current channel and change the information if necessary. To delete the channel, select Delete and press the OK button. Basic Operation 5.
User Manual
Page 28
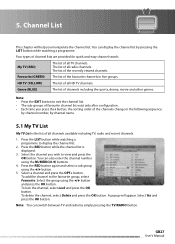
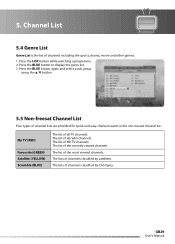
... order of all TV channels. Channel List This chapter will appear. Select the channel you manipulate the channel list. To lock the channel, select Lock and press the OK button. Genre (BLUE) The list of all channels available including TV, radio and recent channels. 1. Press the RED button while the channel list is the list of all HD TV channels. Select a channel and press the OPT...
... order of all TV channels. Channel List This chapter will appear. Select the channel you manipulate the channel list. To lock the channel, select Lock and press the OK button. Genre (BLUE) The list of all channels available including TV, radio and recent channels. 1. Press the RED button while the channel list is the list of all HD TV channels. Select a channel and press the OPT...
User Manual
Page 29
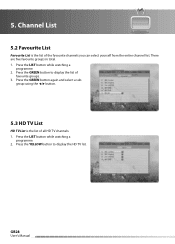
Press the LIST button while watching a programme. 2. Press the YELLOW button to display the list of favourite groups. 3. Channel List 5.2 Favourite List Favourite List is the list of the favourite channels you can select yourself from the entire channel list. Press the GREEN button again and select a sub group using the / button. 5.3 HD TV List HD TV List is the list of all HD TV channels. 1. Press the LIST button while watching a programme. 2. GB28 User's Manual 5. Press the GREEN button to display the HD TV list. There are five favourite groups in total. 1.
Press the LIST button while watching a programme. 2. Press the YELLOW button to display the list of favourite groups. 3. Channel List 5.2 Favourite List Favourite List is the list of the favourite channels you can select yourself from the entire channel list. Press the GREEN button again and select a sub group using the / button. 5.3 HD TV List HD TV List is the list of all HD TV channels. 1. Press the LIST button while watching a programme. 2. GB28 User's Manual 5. Press the GREEN button to display the HD TV list. There are five favourite groups in total. 1.
User Manual
Page 30
... other genres. 1. The lists of channels classified by satellites. Channel List 5.4 Genre List Genre List is the list of the recently viewed channels. Press the BLUE button again and select a sub group using the / button. 5.5 Non-freesat Channel List Four types of HD TV channels. The list of channel lists are provided for quick and easy channel search in the non-freesat channel list. GB29 User's Manual Press...
... other genres. 1. The lists of channels classified by satellites. Channel List 5.4 Genre List Genre List is the list of the recently viewed channels. Press the BLUE button again and select a sub group using the / button. 5.5 Non-freesat Channel List Four types of HD TV channels. The list of channel lists are provided for quick and easy channel search in the non-freesat channel list. GB29 User's Manual Press...

User Manual
Page 31
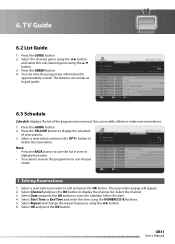
...2. Select Yes and press the OK button. Select the group using the / button. 6. Note: Press the GUIDE or EXIT button to list the channels or programmes of all channels in time and date order. 1. Select the programme you and schedule your own programme guide to exit the TV guide screen. 6.1 Table ...the / button. Press the BACK button to return to the next page. TV Guide The TV Guide displays the programme information of the channel you cannot select the channel genre. Move to view the programme. 6. If the contents are more than one page, use the P-/P+ button to skip to the...
...2. Select Yes and press the OK button. Select the group using the / button. 6. Note: Press the GUIDE or EXIT button to list the channels or programmes of all channels in time and date order. 1. Select the programme you and schedule your own programme guide to exit the TV guide screen. 6.1 Table ...the / button. Press the BACK button to return to the next page. TV Guide The TV Guide displays the programme information of the channel you cannot select the channel genre. Move to view the programme. 6. If the contents are more than one page, use the P-/P+ button to skip to the...
User Manual
Page 32
.... The features are similar as in non-freesat mode. 1. Select Start Time or End Time and enter the time using the NUMERIC(0-9) buttons. 5. TV Guide 6.2 List Guide 1. Press the GUIDE button. 2. Select Date and press the OK button to display the channel list. 6. Select the channel. 3. You can modify, delete or make new reservations. 1.
.... The features are similar as in non-freesat mode. 1. Select Start Time or End Time and enter the time using the NUMERIC(0-9) buttons. 5. TV Guide 6.2 List Guide 1. Press the GUIDE button. 2. Select Date and press the OK button to display the channel list. 6. Select the channel. 3. You can modify, delete or make new reservations. 1.
User Manual
Page 33
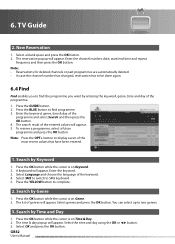
...date, start/end time and repeat frequency and then press the OK button. Note: • Reservations for deleted channels or past programmes are automatically deleted. • In case the channel number has changed, reservation has to be done again. 6.4 Find Find enables you to display seven of the ... & day of the entered values will appear. 5. The search result of the programme and select Search and then press the OK button. 4. The list of the programme. 1. Select OK and press the OK button. The reservation popup will appear. A keyboard will appear. Select SMS to switch to ...
...date, start/end time and repeat frequency and then press the OK button. Note: • Reservations for deleted channels or past programmes are automatically deleted. • In case the channel number has changed, reservation has to be done again. 6.4 Find Find enables you to display seven of the ... & day of the entered values will appear. 5. The search result of the programme and select Search and then press the OK button. 4. The list of the programme. 1. Select OK and press the OK button. The reservation popup will appear. A keyboard will appear. Select SMS to switch to ...

User Manual
Page 37
Settings 4. Select Audio Description. 2. Power On Channel You can select the channel to display the channel list. 2. Enter the powering off automatically. 1. Select Settings using the / button. 2. Enter the powering on at the preset wakeup time. 1. Select Time using the OK or / ...
Settings 4. Select Audio Description. 2. Power On Channel You can select the channel to display the channel list. 2. Enter the powering off automatically. 1. Select Settings using the / button. 2. Enter the powering on at the preset wakeup time. 1. Select Time using the OK or / ...

User Manual
Page 41
... RED button to the previous menu. Press the MENU button to exit the menu screen. • Press the TV/RADIO button to TV or radio channel list directly. 8.1 Edit Channel List Edit Channels List enables you have chosen. Note: • Press the EXIT button to save the changes and return to delete the chosen...
... RED button to the previous menu. Press the MENU button to exit the menu screen. • Press the TV/RADIO button to TV or radio channel list directly. 8.1 Edit Channel List Edit Channels List enables you have chosen. Note: • Press the EXIT button to save the changes and return to delete the chosen...

User Manual
Page 43
...list. 2. 8. Edit Channels 8.2 Edit Favourite List You can add or remove channels from the list and press the RED button. Select Edit Channels using the / button and press the OK button. Select the channels you want to add to select all channels, press the YELLOW button again. 4. Press the YELLOW button to the favourite channel list... and press the OK button. 2. Enter the name of groups. 2. A keyboard will appear. Note: Edit Favourite List is marked Add; Adding/Removing Channels 1. Select the favourite group you want to display the list of the ...
...list. 2. 8. Edit Channels 8.2 Edit Favourite List You can add or remove channels from the list and press the RED button. Select Edit Channels using the / button and press the OK button. Select the channels you want to add to select all channels, press the YELLOW button again. 4. Press the YELLOW button to the favourite channel list... and press the OK button. 2. Enter the name of groups. 2. A keyboard will appear. Note: Edit Favourite List is marked Add; Adding/Removing Channels 1. Select the favourite group you want to display the list of the ...

User Manual
Page 44
... and press the OK button. Press the BLUE button. 3. 8. Edit Channels 5. Moving Favourite Channels 1. Select the favourite channels to the right column and select an alternative channel of the region you want and press the OK button. 3. Customising Channels 1. Move the cursor to move within the favourite channel list and press the OK button. 2. GB43 User's Manual
... and press the OK button. Press the BLUE button. 3. 8. Edit Channels 5. Moving Favourite Channels 1. Select the favourite channels to the right column and select an alternative channel of the region you want and press the OK button. 3. Customising Channels 1. Move the cursor to move within the favourite channel list and press the OK button. 2. GB43 User's Manual

User Manual
Page 47
..., select No and press the OK. 5. Setup 9.4 Factory Reset Factory Reset enables you perform Factory Reset, all data such as the antenna setting information, channel list and all setting to proceed. 6. Warning: Please note that once you to restore the product to load factory reset. 9. Press the MENU button. 2. Tip...: The default password is completed, the first installation pops up automatically and assists channel search. You will be prompted to enter your password again before starting to the factory default.
..., select No and press the OK. 5. Setup 9.4 Factory Reset Factory Reset enables you perform Factory Reset, all data such as the antenna setting information, channel list and all setting to proceed. 6. Warning: Please note that once you to restore the product to load factory reset. 9. Press the MENU button. 2. Tip...: The default password is completed, the first installation pops up automatically and assists channel search. You will be prompted to enter your password again before starting to the factory default.

User Manual
Page 50
Language 3. Time 4. Manual Tune 3. Diagnostics 2. STB Mode 1. Edit Channel List 2. Factory Reset 1. Edit Favourite List 3. 12. TV Setup 2. Parental Control 5. Network GB49 User's Manual Appendix 12.1 Menu Map Settings Edit Channels Setup System 1. Software Update 4. Edit Customisable Channels 1. Other 6. Freesat Tune 2.
Language 3. Time 4. Manual Tune 3. Diagnostics 2. STB Mode 1. Edit Channel List 2. Factory Reset 1. Edit Favourite List 3. 12. TV Setup 2. Parental Control 5. Network GB49 User's Manual Appendix 12.1 Menu Map Settings Edit Channels Setup System 1. Software Update 4. Edit Customisable Channels 1. Other 6. Freesat Tune 2.
User Manual
Page 52
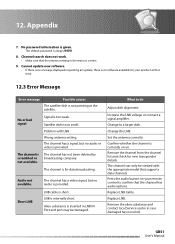
... the channel from the channel list and check for your remote control to confirm that the antenna setting in the menu is provided. No or bad signal Signal is internally short. The channel has a signal, but no audio is not pointing at that supports data channels. The channel has not...deleted by broadcasting company. Audio not available. LNB is too weak. Alien substance is inserted in case damaged has occurred. Confirm whether the channel is always 0000. 8. Change the LNB. Press the audio button on air. No password information is given. • The default ...
... the channel from the channel list and check for your remote control to confirm that the antenna setting in the menu is provided. No or bad signal Signal is internally short. The channel has a signal, but no audio is not pointing at that supports data channels. The channel has not...deleted by broadcasting company. Audio not available. LNB is too weak. Alien substance is inserted in case damaged has occurred. Confirm whether the channel is always 0000. 8. Change the LNB. Press the audio button on air. No password information is given. • The default ...


