
User Manual
Page 3
... and Notes Throughout the whole manual, pay special attention to the following marks that presents a risk of electric shock, do not remove cover (or back). This symbol indicates dangerous voltage inside . Refer servicing to maintain the installation. ** To reduce the risk of electric shock or personal injury. No user serviceable parts inside the product that indicate...
... and Notes Throughout the whole manual, pay special attention to the following marks that presents a risk of electric shock, do not remove cover (or back). This symbol indicates dangerous voltage inside . Refer servicing to maintain the installation. ** To reduce the risk of electric shock or personal injury. No user serviceable parts inside the product that indicate...

User Manual
Page 4
...extension cord or adapter as these may result in the ground. CONNECTION TO THE AERIAL ** Disconnect the receiver from the mains before connecting or disconnecting the cable from the mains before cleaning. CONNECTION TO THE TV ** Disconnect the receiver from the mains before connecting or disconnecting the cable from... solvents) to the unit. ATTACHMENTS ** Do not use any liquids such as vase, shall be placed on top of the receiver. ** 6. Do not stack electronic equipments on top of the receiver must be buried in electric fire or shock. ** 3. Use a light damp cloth (no ...
...extension cord or adapter as these may result in the ground. CONNECTION TO THE AERIAL ** Disconnect the receiver from the mains before connecting or disconnecting the cable from the mains before cleaning. CONNECTION TO THE TV ** Disconnect the receiver from the mains before connecting or disconnecting the cable from... solvents) to the unit. ATTACHMENTS ** Do not use any liquids such as vase, shall be placed on top of the receiver. ** 6. Do not stack electronic equipments on top of the receiver must be buried in electric fire or shock. ** 3. Use a light damp cloth (no ...
User Manual
Page 6
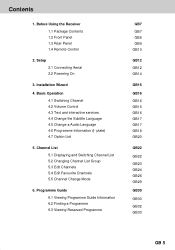
Installation Wizard 4. Basic Operation 4.1 Switching Channel 4.2 Volume Control 4.3 Text and interactive services 4.4 Change the Subtitle Language 4.5 Change a Audio Language 4.6 Programme Information (I- Setup 2.1 Connecting Aerial 2.2 Powering On 3. Programme Guide 6.1 Viewing Programme Guide Information 6.2 Finding a Programme 6.3 Viewing Reserved Programme GB7 ** GB7 GB8 GB9 GB10 GB12 ** GB12 GB14 GB15 GB16 ** GB16 GB16 GB16 GB17 GB17 GB18 GB20 GB22 ** GB22 ** ...
Installation Wizard 4. Basic Operation 4.1 Switching Channel 4.2 Volume Control 4.3 Text and interactive services 4.4 Change the Subtitle Language 4.5 Change a Audio Language 4.6 Programme Information (I- Setup 2.1 Connecting Aerial 2.2 Powering On 3. Programme Guide 6.1 Viewing Programme Guide Information 6.2 Finding a Programme 6.3 Viewing Reserved Programme GB7 ** GB7 GB8 GB9 GB10 GB12 ** GB12 GB14 GB15 GB16 ** GB16 GB16 GB16 GB17 GB17 GB18 GB20 GB22 ** GB22 ** ...

User Manual
Page 7
Contents ** 7. System Information 10.1 Status 10.2 Signal Detection 11. GAMES 12. Manipulating your TV using Remote Control 13. Glossary 17. Specification 16. Setting Preferences 7.1 Parental Control 7.2 Language Setting 7.3 Time Setting 7.4 Schedule 7.5 A/V Control 7.6 UHF Tuning 7.7 Miscellaneous Settings 8. Software Update 9.1 OTA (Over the Air) 9.2 S/W Update from PC 10. Menu Map 14. Installation 8.1 Automatic Search 8.2 Manual Search 8.3 Default Setting 9. Service and Support GB 6 GB35 ** GB35 GB37 GB38 GB40 GB40 GB42 GB43 GB44 ** GB44 GB45 GB47 GB48...
Contents ** 7. System Information 10.1 Status 10.2 Signal Detection 11. GAMES 12. Manipulating your TV using Remote Control 13. Glossary 17. Specification 16. Setting Preferences 7.1 Parental Control 7.2 Language Setting 7.3 Time Setting 7.4 Schedule 7.5 A/V Control 7.6 UHF Tuning 7.7 Miscellaneous Settings 8. Software Update 9.1 OTA (Over the Air) 9.2 S/W Update from PC 10. Menu Map 14. Installation 8.1 Automatic Search 8.2 Manual Search 8.3 Default Setting 9. Service and Support GB 6 GB35 ** GB35 GB37 GB38 GB40 GB40 GB42 GB43 GB44 ** GB44 GB45 GB47 GB48...
User Manual
Page 8
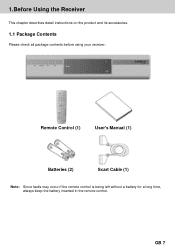
GB 7 1.Before Using the Receiver ** This chapter describes detail instructions on the product and its accessories. 1.1 Package Contents Please check all package contents before using your receiver. ** ** Remote Control (1) User's Manual (1) Batteries (2) Scart Cable (1) ** Note: Since faults may occur if the remote control is being left without a battery for a long time, always keep the battery inserted in the remote control.
GB 7 1.Before Using the Receiver ** This chapter describes detail instructions on the product and its accessories. 1.1 Package Contents Please check all package contents before using your receiver. ** ** Remote Control (1) User's Manual (1) Batteries (2) Scart Cable (1) ** Note: Since faults may occur if the remote control is being left without a battery for a long time, always keep the battery inserted in the remote control.

User Manual
Page 12
...+(PAGE-/PAGE+) ** Changes the Channel or Page. ** 9. GB 11 MENU ** Displays the main menu. ** 10.TEXT ** Displays digital text. ** 11.SOUNDTRACK ** Displays the Soundtrack. ** 12.OPT+ (OPTION) ** Displays the channel attributes during watching a programme. ** 18.V-/V+ ** Adjusts the audio volume. ** 19.MUTE ** Pauses the audio temporarily. ARROW BUTTONS ** Changes the channel or move the cursor to the previous menu and screen. ** 6. COLOR BUTTONS (R/G/Y/B) ** Select color keys for your TV. LIST ** Displays the channel list. ** 5. BACK ** Returns...
...+(PAGE-/PAGE+) ** Changes the Channel or Page. ** 9. GB 11 MENU ** Displays the main menu. ** 10.TEXT ** Displays digital text. ** 11.SOUNDTRACK ** Displays the Soundtrack. ** 12.OPT+ (OPTION) ** Displays the channel attributes during watching a programme. ** 18.V-/V+ ** Adjusts the audio volume. ** 19.MUTE ** Pauses the audio temporarily. ARROW BUTTONS ** Changes the channel or move the cursor to the previous menu and screen. ** 6. COLOR BUTTONS (R/G/Y/B) ** Select color keys for your TV. LIST ** Displays the channel list. ** 5. BACK ** Returns...

User Manual
Page 17
... the sound of your TV temporarily. 4.3 Text and interactive services If your chosen channel has teletext (MHEG) features , you can switch channel using the NUMERICAL (0-9) buttons to move to adjust the audio volume of the following methods. 1. Press the V-/V+ 2. Press the TV/RADIO button to access teletext(MHEG) features. 2. Teletext services often load automatically shortly after the Digital Teletext window is displayed. Press TEXT button...
... the sound of your TV temporarily. 4.3 Text and interactive services If your chosen channel has teletext (MHEG) features , you can switch channel using the NUMERICAL (0-9) buttons to move to adjust the audio volume of the following methods. 1. Press the V-/V+ 2. Press the TV/RADIO button to access teletext(MHEG) features. 2. Teletext services often load automatically shortly after the Digital Teletext window is displayed. Press TEXT button...

User Manual
Page 18
... button. Select your desired audio language using the button. Then the subtitle will be displayed in . 1. Press the SUBTITLE language list. button to display the subtitle 2. 4. Select OFF from the subtitle language list not to listen in the selected language at the bottom of MENU when you can select a default subtitle language by selecting MENU - Preferences Language Setting -Audio Language. Select Audio Direction(left, right, stereo) using the button to change channel and turn on or off power. 4.5 Change a Audio Language...
... button. Select your desired audio language using the button. Then the subtitle will be displayed in . 1. Press the SUBTITLE language list. button to display the subtitle 2. 4. Select OFF from the subtitle language list not to listen in the selected language at the bottom of MENU when you can select a default subtitle language by selecting MENU - Preferences Language Setting -Audio Language. Select Audio Direction(left, right, stereo) using the button to change channel and turn on or off power. 4.5 Change a Audio Language...

User Manual
Page 20
... selected, is displayed. 7. Channel Change Mode , the Icon of Channel looping mode is not displayed. 2. And channel list, which you select Within the current channel list by selecting MENU - Note: If there is no available programme information, programme information is displayed. Detail Programme Information You can see detailed information about the current programme. Note: • Press the i button again to hide the information box. •...
... selected, is displayed. 7. Channel Change Mode , the Icon of Channel looping mode is not displayed. 2. And channel list, which you select Within the current channel list by selecting MENU - Note: If there is no available programme information, programme information is displayed. Detail Programme Information You can see detailed information about the current programme. Note: • Press the i button again to hide the information box. •...

User Manual
Page 27
... MENU or EXIT button to exit the Menu screen. • You can edit Favourite channel or Favourite channel list. 1. 5. button, Note: • Press the BACK or button to save the changes and return to select the Edit Favourite Channels menu. ** The buttons for each menu. Press the MENU - 2 - 2 in order on the remote controller to the previous menu. Press the MENU button. 2. GB 26 Select Edit Favourite Channels using the the OK button...
... MENU or EXIT button to exit the Menu screen. • You can edit Favourite channel or Favourite channel list. 1. 5. button, Note: • Press the BACK or button to save the changes and return to select the Edit Favourite Channels menu. ** The buttons for each menu. Press the MENU - 2 - 2 in order on the remote controller to the previous menu. Press the MENU button. 2. GB 26 Select Edit Favourite Channels using the the OK button...

User Manual
Page 38
... 3. Note: The Default Password is English. 1. Select Change Password using the OK or button. Selec Preferences using the press the or OK button. Default language is "0000". Select Language Setting using the button, and press the OK button. Press the MENU button. 2. ** ** 3. Select your local product distributor. 7.2 Language Setting You can change the existing Password into new one. 1. Enter the New Password again to display the available Language List. 3. Change Password You can set the language for Menu, Audio, and Subtitle. 1.
... 3. Note: The Default Password is English. 1. Select Change Password using the OK or button. Selec Preferences using the press the or OK button. Default language is "0000". Select Language Setting using the button, and press the OK button. Press the MENU button. 2. ** ** 3. Select your local product distributor. 7.2 Language Setting You can change the existing Password into new one. 1. Enter the New Password again to display the available Language List. 3. Change Password You can set the language for Menu, Audio, and Subtitle. 1.

User Manual
Page 46
... channels manually by searching parameters, if you don't know the MUX information. 1. If you know the value, please select Auto. 1. Mode Required for the entered frequency is entered. 1. button, and press the 2. Enter frequency using the and press the OK button. button, and press the OK 2. When entering frequency channel value, the appropriate frequency value is automatically displayed on Channel. 1. Select one of channel using the or button...
... channels manually by searching parameters, if you don't know the MUX information. 1. If you know the value, please select Auto. 1. Mode Required for the entered frequency is entered. 1. button, and press the 2. Enter frequency using the and press the OK button. button, and press the OK 2. When entering frequency channel value, the appropriate frequency value is automatically displayed on Channel. 1. Select one of channel using the or button...

User Manual
Page 48
... perform restoring. 7. When completing the default setting, press the OK button to Factory Default. GB 47 Select Default Setting using the NUMERICAL (0-9) button. 4. Installation Wizard. Select Installation using the NUMERICAL (0-9) button to the previous menu. Select Yes and press the OK setting to automatically run the Installation Wizard. button to restore all data such as Channel List, and User Configured data are deleted. ** ** 8.3 Default Setting Default Setting restores the receiver to 6. button, press the 5. Confirm again...
... perform restoring. 7. When completing the default setting, press the OK button to Factory Default. GB 47 Select Default Setting using the NUMERICAL (0-9) button. 4. Installation Wizard. Select Installation using the NUMERICAL (0-9) button to the previous menu. Select Yes and press the OK setting to automatically run the Installation Wizard. button to restore all data such as Channel List, and User Configured data are deleted. ** ** 8.3 Default Setting Default Setting restores the receiver to 6. button, press the 5. Confirm again...

User Manual
Page 49
... the Signal line (co-axial Cable) during software update. Update may be careful to update the software. 3. If new software is not recommendable, perform the software upgrade later. ** Caution: • Please be interrupted and the product may take place by "beaming" latest software versions over the air", means that you don't have appropriate loader software. Select Yes and press the OK button to keep the power...
... the Signal line (co-axial Cable) during software update. Update may be careful to update the software. 3. If new software is not recommendable, perform the software upgrade later. ** Caution: • Please be interrupted and the product may take place by "beaming" latest software versions over the air", means that you don't have appropriate loader software. Select Yes and press the OK button to keep the power...
User Manual
Page 51
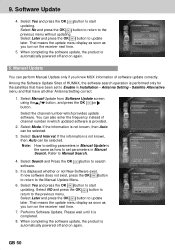
... Manual Update Menu. 6. When completing the software update, the product is automatically powered off and on again. Among the Software Update Sites of channel number in Installation - Antenna Setting - Satellite Alternative menu and that have all other Antenna Setting correct. 1. Select Mode. If the information is not known, then Auto can also enter the frequency instead of HUMAX, the software search operation is the same as you turn on the receiver...
... Manual Update Menu. 6. When completing the software update, the product is automatically powered off and on again. Among the Software Update Sites of channel number in Installation - Antenna Setting - Satellite Alternative menu and that have all other Antenna Setting correct. 1. Select Mode. If the information is not known, then Auto can also enter the frequency instead of HUMAX, the software search operation is the same as you turn on the receiver...
User Manual
Page 52
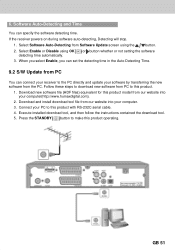
... the instructions contained the download tool. 5. When you select Enable, you can set the detecting time in the Auto-Detecting Time. 9.2 S/W Update from PC You can specify the software detecting time. Download and install download tool file from the PC. Select Enable or Disable using the button. 2. Download new software file (HDF files) equivalent for this product with RS-232C serial cable. 4. If the receiver powers on during software auto-detecting...
... the instructions contained the download tool. 5. When you select Enable, you can set the detecting time in the Auto-Detecting Time. 9.2 S/W Update from PC You can specify the software detecting time. Download and install download tool file from the PC. Select Enable or Disable using the button. 2. Download new software file (HDF files) equivalent for this product with RS-232C serial cable. 4. If the receiver powers on during software auto-detecting...

User Manual
Page 55
... 54 12. Keep pressing TV button for 3 seconds, then TV button LED turn on TV model. TV power turns on or off when the setting is completed. ** [Code for TV manufacturer. 3. TV button LED blink twice when you are setting TV code, please keep pressing TV button. 1. Manipulating your finger from the TV button. 4. Press three numbers of TV. 2. Point remote control towards the remote control receiving parts of TV code using the remote control provided by...
... 54 12. Keep pressing TV button for 3 seconds, then TV button LED turn on TV model. TV power turns on or off when the setting is completed. ** [Code for TV manufacturer. 3. TV button LED blink twice when you are setting TV code, please keep pressing TV button. 1. Manipulating your finger from the TV button. 4. Press three numbers of TV. 2. Point remote control towards the remote control receiving parts of TV code using the remote control provided by...

User Manual
Page 65
... remote control, the remote control's emitting part should directly point towards the receiving part of receiver's remote control. - Press the Audio button to the equipment. - Poor picture & sound quality - If the product does not work normally after completing the following trouble shooting, please contact your local service, please make sure following instructions. Use 75 coaxial cable to the TV. - Remote control does not operate - Check whether it it is correctly connected to change the Sound...
... remote control, the remote control's emitting part should directly point towards the receiving part of receiver's remote control. - Press the Audio button to the equipment. - Poor picture & sound quality - If the product does not work normally after completing the following trouble shooting, please contact your local service, please make sure following instructions. Use 75 coaxial cable to the TV. - Remote control does not operate - Check whether it it is correctly connected to change the Sound...

User Manual
Page 66
... a professional. This digital terrestrial receiver does not support the service that enables to confirm if the channel has Audio. air. Press the Audio button to descramble the scrambled channels. Adjust aerial. The channel is scrambled or not available. The channel is for data broadcasting. GB 65 The channel is scrambled. Cannot watch the channel in usual way. The audio is not pointing properly. Check the cable from the...
... a professional. This digital terrestrial receiver does not support the service that enables to confirm if the channel has Audio. air. Press the Audio button to descramble the scrambled channels. Adjust aerial. The channel is scrambled or not available. The channel is for data broadcasting. GB 65 The channel is scrambled. Cannot watch the channel in usual way. The audio is not pointing properly. Check the cable from the...

User Manual
Page 69
... several MUX frequencies with different or same content. ** Network The collection of channels/services that can view without additional payments to release them through aerial. ** SCART A 21-pin connector used for connection of digital channels/services. These services may transmit a service information table(network information) that is expressed in the network ** OSD (On Screen Display) The function that displays the information about all available services in the unit of...
... several MUX frequencies with different or same content. ** Network The collection of channels/services that can view without additional payments to release them through aerial. ** SCART A 21-pin connector used for connection of digital channels/services. These services may transmit a service information table(network information) that is expressed in the network ** OSD (On Screen Display) The function that displays the information about all available services in the unit of...


