

User Manual
Page 10
1. Before Using the Receiver ** This chapter provides detailed instructions on the product and its accessories. 1.1 Package Contents Please check all package contents before using your product. ** F2-1002 ** F2-7002 ** Remote Control Unit (1) User's Manual (1) Batteries (2) ** Note: Since faults may occur if the remote controller is left without a battery for a long time, always keep the battery inserted in the remote controller. GB 9
1. Before Using the Receiver ** This chapter provides detailed instructions on the product and its accessories. 1.1 Package Contents Please check all package contents before using your product. ** F2-1002 ** F2-7002 ** Remote Control Unit (1) User's Manual (1) Batteries (2) ** Note: Since faults may occur if the remote controller is left without a battery for a long time, always keep the battery inserted in the remote controller. GB 9
User Manual
Page 11
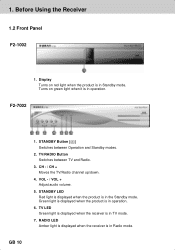
... is displayed when the product is in operation. ** 6. GB 10 VOL - / VOL + ** Adjust audio volume. ** 5. Display ** Turns on green light when it is in operation. ** F2-7002 ** 1. STANDBY LED ** Red light is displayed when the product is in the Standby mode. 1. CH - / CH + ** Moves the TV/Radio channel up/down. ** 4. RADIO LED... displayed when the receiver is in Radio mode. Turns on red light when the product is in Standby mode. Before Using the Receiver ** 1.2 Front Panel ** F2-1002 ** 1.
... is displayed when the product is in operation. ** 6. GB 10 VOL - / VOL + ** Adjust audio volume. ** 5. Display ** Turns on green light when it is in operation. ** F2-7002 ** 1. STANDBY LED ** Red light is displayed when the product is in the Standby mode. 1. CH - / CH + ** Moves the TV/Radio channel up/down. ** 4. RADIO LED... displayed when the receiver is in Radio mode. Turns on red light when the product is in Standby mode. Before Using the Receiver ** 1.2 Front Panel ** F2-1002 ** 1.
User Manual
Page 12
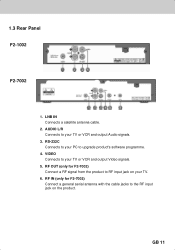
AUDIO L/R ** Connects to the RF input jack on your TV or VCR and output Audio signals. ** 3. RF IN (only for F2-7002) ** Connect a RF signal from the product to your PC to upgrade product's software programme. ** 4. VIDEO ** Connects to RF input jack on the product. RF OUT (only for F2-7002) ** Connect a general aerial antenna with the cable jacks to your TV. ** 6. GB 11 RS-232C ** Connects to your TV or VCR and output Video signals. ** 5. LNB IN ** Connects a satellite antenna cable. ** 2. ** ** 1.3 Rear Panel ** F2-1002 ** F2-7002 ** 1.
AUDIO L/R ** Connects to the RF input jack on your TV or VCR and output Audio signals. ** 3. RF IN (only for F2-7002) ** Connect a RF signal from the product to your PC to upgrade product's software programme. ** 4. VIDEO ** Connects to RF input jack on the product. RF OUT (only for F2-7002) ** Connect a general aerial antenna with the cable jacks to your TV. ** 6. GB 11 RS-232C ** Connects to your TV or VCR and output Video signals. ** 5. LNB IN ** Connects a satellite antenna cable. ** 2. ** ** 1.3 Rear Panel ** F2-1002 ** F2-7002 ** 1.
User Manual
Page 17
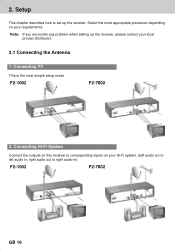
Note: If you encounter any problem when setting up the receiver. Select the most simple setup mode. Connecting TV This is the most appropriate procedure depending on your Hi-Fi system. (left audio out to left audio in, right audio out to right audio in) F2-1002 F2-7002 GB 16 Connecting Hi-Fi System Connect the outputs on this receiver to set up the receiver, please contact your requirements. 2. F2-1002 F2-7002 2. Setup ** This chapter describes how to corresponding inputs on your local product distributor. 2.1 Connecting the Antenna 1.
Note: If you encounter any problem when setting up the receiver. Select the most simple setup mode. Connecting TV This is the most appropriate procedure depending on your Hi-Fi system. (left audio out to left audio in, right audio out to right audio in) F2-1002 F2-7002 GB 16 Connecting Hi-Fi System Connect the outputs on this receiver to set up the receiver, please contact your requirements. 2. F2-1002 F2-7002 2. Setup ** This chapter describes how to corresponding inputs on your local product distributor. 2.1 Connecting the Antenna 1.

User Manual
Page 48
... following channel criteria using the the OK button. ** CH21~CH69 PAL I /PAL G/PAL B/PAL D/PAL K using the press the OK button. 3. ** ** 7.6 UHF Tuning (Only for F2-7002) You can select the PAL standard. 1. Select UHF Channel using the button, and press the OK button, and button. Select one option among PAL I /G for...
... following channel criteria using the the OK button. ** CH21~CH69 PAL I /PAL G/PAL B/PAL D/PAL K using the press the OK button. 3. ** ** 7.6 UHF Tuning (Only for F2-7002) You can select the PAL standard. 1. Select UHF Channel using the button, and press the OK button, and button. Select one option among PAL I /G for...

User Manual
Page 65
... download new software from our website into your software by transferring the new software from PC You can connect your receiver to this product operating. ** F2-1002 F2-7002 GB 64 Connect your computer. 3. 9.
... download new software from our website into your software by transferring the new software from PC You can connect your receiver to this product operating. ** F2-1002 F2-7002 GB 64 Connect your computer. 3. 9.


