
User Manual
Page 1
... (Copyright © 2001 HUMAX Corporation) Not to be able to safely install, use of the information contained in this document is a trademark of France Telecom. Please read this user manual next to be copied, used or translated in part or whole without notice....change without HUMAX's prior consent in this manual. ** Trademarks VIACCESS™ is a trademark of Philips Electronics N.V. Irdeto is a trademark of Telenor Conax AS. 'Dolby' and the double-D symbol are trademarks of Mindport BV. Keep this user manual carefully, to your offer or use and maintain the receiver...
... (Copyright © 2001 HUMAX Corporation) Not to be able to safely install, use of the information contained in this document is a trademark of France Telecom. Please read this user manual next to be copied, used or translated in part or whole without notice....change without HUMAX's prior consent in this manual. ** Trademarks VIACCESS™ is a trademark of Philips Electronics N.V. Irdeto is a trademark of Telenor Conax AS. 'Dolby' and the double-D symbol are trademarks of Mindport BV. Keep this user manual carefully, to your offer or use and maintain the receiver...
User Manual
Page 2
... additional information to the user to make sure you understand the provided instructions. ** ** ** ** ** Notice ** Read this manual carefully and make the user aware of possible problems and information of any importance to help the user to understand, to use and to qualified service personnel. ** ** ** This symbol indicates dangerous voltage inside . Refer servicing to maintain the installation. ** ** ** ** ** To reduce the risk...
... additional information to the user to make sure you understand the provided instructions. ** ** ** ** ** Notice ** Read this manual carefully and make the user aware of possible problems and information of any importance to help the user to understand, to use and to qualified service personnel. ** ** ** This symbol indicates dangerous voltage inside . Refer servicing to maintain the installation. ** ** ** ** ** To reduce the risk...

User Manual
Page 3
... the system must be hazardous or cause damage the receiver. ** 7. If you start any maintenance or installation procedures. ** 2. OVERLOADING ** Do not overload a wall outlet, extension cord or adapter as this may be left uncovered to allow proper airflow to the unit. Do not stand the receiver on top of power supplied to do so can damage the TV...
... the system must be hazardous or cause damage the receiver. ** 7. If you start any maintenance or installation procedures. ** 2. OVERLOADING ** Do not overload a wall outlet, extension cord or adapter as this may be left uncovered to allow proper airflow to the unit. Do not stand the receiver on top of power supplied to do so can damage the TV...

User Manual
Page 4
... the power cord in order to contact your local product distributor if the product is out of them may result in additional damage to the unit. ** Warning 1. Make sure to prevent the cover vinyl from melting. 2. Make sure it can be sure the service technician uses replacement ** parts specified by the manufacturer, or those that you continue to...
... the power cord in order to contact your local product distributor if the product is out of them may result in additional damage to the unit. ** Warning 1. Make sure to prevent the cover vinyl from melting. 2. Make sure it can be sure the service technician uses replacement ** parts specified by the manufacturer, or those that you continue to...
User Manual
Page 5
... GB37 ** GB 5 ** ** ** ** ** ** ** Basic Operation 4.1 Switching Channel 4.2 Volume Control 4.3 Change the Subtitle Language 4.4 Change an Audio Language 4.5 MHP Application 4.6 Programme Information (I- Setup 2.1 Connecting Aerial 2.2 Powering On 3. Channel List 5.1 Displaying and Switching Channel List 5.2 Changing Channel List Group 5.3 Edit Channels 5.4 Edit Favourite Channels 5.5 Channel Change Mode 6. plate) ** 4.7 Option List 5. Before Using the Receiver 1.1 Package Contents 1.2 Front Panel 1.3 Rear Panel 1.4 Remote Control 2. ** ** ** Contents ** 1.
... GB37 ** GB 5 ** ** ** ** ** ** ** Basic Operation 4.1 Switching Channel 4.2 Volume Control 4.3 Change the Subtitle Language 4.4 Change an Audio Language 4.5 MHP Application 4.6 Programme Information (I- Setup 2.1 Connecting Aerial 2.2 Powering On 3. Channel List 5.1 Displaying and Switching Channel List 5.2 Changing Channel List Group 5.3 Edit Channels 5.4 Edit Favourite Channels 5.5 Channel Change Mode 6. plate) ** 4.7 Option List 5. Before Using the Receiver 1.1 Package Contents 1.2 Front Panel 1.3 Rear Panel 1.4 Remote Control 2. ** ** ** Contents ** 1.

User Manual
Page 6
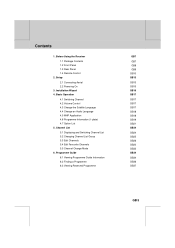
** ** ** Contents ** 7. Installation 8.1 Automatic Search 8.2 Analog Manual Search 8.3 Digital Manual Search 8.4 Regular Auto Update 8.5 Default Setting 8.6 Antenna Power ** 9. Software Update 9.1 OTA (Over the Air) 10. System Information 10.1 Status 10.2 Signal Detection 10.3 Modem Setup 11. Specification 15. Menu Map 13. Glossary 16. Service and Support ** GB 6 ** ** ** ** ** ** GB39 ** GB39 GB41 GB43 GB45 GB45 GB47 GB48 GB49 GB50 ** GB50 GB51 GB52 GB54 GB55 GB56 GB57 ** ** GB57 GB61 ** GB61 GB61 GB62...
** ** ** Contents ** 7. Installation 8.1 Automatic Search 8.2 Analog Manual Search 8.3 Digital Manual Search 8.4 Regular Auto Update 8.5 Default Setting 8.6 Antenna Power ** 9. Software Update 9.1 OTA (Over the Air) 10. System Information 10.1 Status 10.2 Signal Detection 10.3 Modem Setup 11. Specification 15. Menu Map 13. Glossary 16. Service and Support ** GB 6 ** ** ** ** ** ** GB39 ** GB39 GB41 GB43 GB45 GB45 GB47 GB48 GB49 GB50 ** GB50 GB51 GB52 GB54 GB55 GB56 GB57 ** ** GB57 GB61 ** GB61 GB61 GB62...

User Manual
Page 7
Before Using the Receiver ** This chapter describes detail instructions on the product and its accessories. 1.1 Package Contents Please check all package contents before using your receiver. ** ** ** ** ** ** Remote Control Unit User's Manual Batteries ** ** ** ** Scart Cable Modem Cable ** Note: Since faults may occur if the remote control is being left without a battery for a long time, always keep the battery inserted in the remote control. ** GB 7 ** ** ** ** ** ** ** ** ** ** ** ** 1.
Before Using the Receiver ** This chapter describes detail instructions on the product and its accessories. 1.1 Package Contents Please check all package contents before using your receiver. ** ** ** ** ** ** Remote Control Unit User's Manual Batteries ** ** ** ** Scart Cable Modem Cable ** Note: Since faults may occur if the remote control is being left without a battery for a long time, always keep the battery inserted in the remote control. ** GB 7 ** ** ** ** ** ** ** ** ** ** ** ** 1.

User Manual
Page 11
... main menu or Guide screen. ** Displays the main menu. 11. ARROW BUTTONS ** Changes the channel or move the cursor to the previous menu and screen. OK 18. V- / V+ Play the audio continuously. ** Adjusts the audio volume. 10. LIST ** Displays the channel list. ** GB 11 ** ** ** ** ** ** ** NUMERICAL BUTTONS ** Enters a TV/Radio channel number or menu option number. SOUNDTRACK ** Displays the Soundtrack. 3. volume on/off temporarily. 6. G (Game) ** Displays the game. 13. TV/RADIO ** ** Switches between TV and ** Changes the Channel. Supports SMS...
... main menu or Guide screen. ** Displays the main menu. 11. ARROW BUTTONS ** Changes the channel or move the cursor to the previous menu and screen. OK 18. V- / V+ Play the audio continuously. ** Adjusts the audio volume. 10. LIST ** Displays the channel list. ** GB 11 ** ** ** ** ** ** ** NUMERICAL BUTTONS ** Enters a TV/Radio channel number or menu option number. SOUNDTRACK ** Displays the Soundtrack. 3. volume on/off temporarily. 6. G (Game) ** Displays the game. 13. TV/RADIO ** ** Switches between TV and ** Changes the Channel. Supports SMS...

User Manual
Page 12
... no index page, jump to the index page. TELETEXT BUTTONS ** TELETEXT On ** Switches between Teletext and TV modes. ** TELETEXT Off ** Switches between Teletext and TV modes. ** INDEX ** Returns to page 100. ** SUB-PAGE ** Searches the sub-page using other manual. ** GB 12 ** ** ** ** ** ** ** Note: You can manipulate TV using the four-digit sub-code written by users. Before Using the Receiver ** 24. ** ** ** ** ** 1.
... no index page, jump to the index page. TELETEXT BUTTONS ** TELETEXT On ** Switches between Teletext and TV modes. ** TELETEXT Off ** Switches between Teletext and TV modes. ** INDEX ** Returns to page 100. ** SUB-PAGE ** Searches the sub-page using other manual. ** GB 12 ** ** ** ** ** ** ** Note: You can manipulate TV using the four-digit sub-code written by users. Before Using the Receiver ** 24. ** ** ** ** ** 1.
User Manual
Page 13
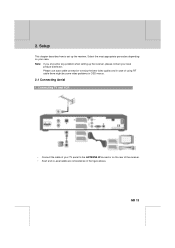
... any problem when setting up the receiver. Setup ** This chapter describes how to set up the receiver, please contact your TV aerial to enjoy the best video quality and in case of using RF cable there might be some video problems in the figure above. ** GB 13 ** ** ** ** ** ** ** ** ** ** ** ** 2. Please use scart cable connection to the ANTENNA IN connector on your case. Connecting TV and VCR ** ** ** ** • Connect the cable...
... any problem when setting up the receiver. Setup ** This chapter describes how to set up the receiver, please contact your TV aerial to enjoy the best video quality and in case of using RF cable there might be some video problems in the figure above. ** GB 13 ** ** ** ** ** ** ** ** ** ** ** ** 2. Please use scart cable connection to the ANTENNA IN connector on your case. Connecting TV and VCR ** ** ** ** • Connect the cable...

User Manual
Page 17
.... 1. button to stop the sound of the following methods. 1. Then the subtitle will be unstable. 4.2 Volume Control 1. Note: You can switch the current channel using Programme Guide or Channel List. Please refer to the channel directly. Press the SUBTITLE language list. Select Off from the subtitle language list not to display the subtitle 2. Subtitle Language. ** GB 17 ** ** ** ** ** ** ** ** ** ** ** ** 4. Language Setting - Basic Operation ** This chapter describes functions such as switching channel, volume control...
.... 1. button to stop the sound of the following methods. 1. Then the subtitle will be unstable. 4.2 Volume Control 1. Note: You can switch the current channel using Programme Guide or Channel List. Please refer to the channel directly. Press the SUBTITLE language list. Select Off from the subtitle language list not to display the subtitle 2. Subtitle Language. ** GB 17 ** ** ** ** ** ** ** ** ** ** ** ** 4. Language Setting - Basic Operation ** This chapter describes functions such as switching channel, volume control...

User Manual
Page 23
... the channel manually. 1. button, and press the or 3. Enter password using the button, and press the or OK button. Displays a Fine Tune dialog box. 3. Delete a Channel You can tune an analog channel. "Do you may have to control a frequency and press the OK button. ** GB 23 ** ** ** ** ** ** ** Select Fine Tune using the NUMERICAL (0~9) button to delete the current channel and move to delete the channel? ** ** ** ** ** ** ** 3. Select Delete using the OK button.
... the channel manually. 1. button, and press the or 3. Enter password using the button, and press the or OK button. Displays a Fine Tune dialog box. 3. Delete a Channel You can tune an analog channel. "Do you may have to control a frequency and press the OK button. ** GB 23 ** ** ** ** ** ** ** Select Fine Tune using the NUMERICAL (0~9) button to delete the current channel and move to delete the channel? ** ** ** ** ** ** ** 3. Select Delete using the OK button.

User Manual
Page 30
... Favourite channel list are described in the following table. ** ** Add Adds Favourite channel. ** ** Remove ** Removes from the Favourite channel. ** ** ** TV/Radio Switches between TV and Radio channel list. ** Fav.Group ** Changes Favourite channel list group. ** ** Move Moves the order of channel list within the Favourite channel list. ** Rename ** Renames the name of Favourite channel list. ** ** Sort Sorts channels by number or name in order at remote control to the previous menu. button, Note...
... Favourite channel list are described in the following table. ** ** Add Adds Favourite channel. ** ** Remove ** Removes from the Favourite channel. ** ** ** TV/Radio Switches between TV and Radio channel list. ** Fav.Group ** Changes Favourite channel list group. ** ** Move Moves the order of channel list within the Favourite channel list. ** Rename ** Renames the name of Favourite channel list. ** ** Sort Sorts channels by number or name in order at remote control to the previous menu. button, Note...

User Manual
Page 41
... OK button. Change Password You can set the language for Menu, Audio, and Subtitle. 1. Select Change Password using the button, and ** press the OK or button. 1. Select Language Setting using the button, and press the OK or button. 2. If you have forgotten your Password, please contact your desired language using the button. 2. Menu/Audio/Subtitle Language You can set Language for Menu, Audio and Subtitle. Enter the new password again to display the available Language List. 3. Press the MENU button. 2. Select Menu/Audio/Subtitle Language using the...
... OK button. Change Password You can set the language for Menu, Audio, and Subtitle. 1. Select Change Password using the button, and ** press the OK or button. 1. Select Language Setting using the button, and press the OK or button. 2. If you have forgotten your Password, please contact your desired language using the button. 2. Menu/Audio/Subtitle Language You can set Language for Menu, Audio and Subtitle. Enter the new password again to display the available Language List. 3. Press the MENU button. 2. Select Menu/Audio/Subtitle Language using the...

User Manual
Page 51
... Manual Search from Installation menu using the OK or button. Select the button to fine-tune the channel manually. Channel Number Select one option between Start and Stop using the button. 2. If the signal is weak or distorted, you may have to control a frequency and press the OK button. Select one of channel using the button, and press the OK or button. 1. Displays a Fine Tune dialog box. Select Search, Channel, or Fine Tune using the button...
... Manual Search from Installation menu using the OK or button. Select the button to fine-tune the channel manually. Channel Number Select one option between Start and Stop using the button. 2. If the signal is weak or distorted, you may have to control a frequency and press the OK button. Select one of channel using the button, and press the OK or button. 1. Displays a Fine Tune dialog box. Select Search, Channel, or Fine Tune using the button...

User Manual
Page 52
Installation ** 8.3 Digital Manual Search You can search channels manually by searching parameters, if you don't know the MUX information. 1.Channel Number Enter your desired frequency to search. button, press the 2. Frequency Enter the your desired frequency channel to search directly. Select Frequency using the press the OK button. If you know the value, please select Auto. 1. Select among Auto, 2k and 8k using the OK or button. Mode Required for the...
Installation ** 8.3 Digital Manual Search You can search channels manually by searching parameters, if you don't know the MUX information. 1.Channel Number Enter your desired frequency to search. button, press the 2. Frequency Enter the your desired frequency channel to search directly. Select Frequency using the press the OK button. If you know the value, please select Auto. 1. Select among Auto, 2k and 8k using the OK or button. Mode Required for the...

User Manual
Page 55
... Factory Default. button, and press the 3. Select Yes and press the OK setting to start loading default setting. button to restore all data such as Channel List, and User Configured data are deleted. 1. Select Default Setting using the NUMERICAL (0-9) button to perform ** restoring. ** 7. For detailed information about Installation Wizard, refer to 3. Enter Password using the OK or button. When default setting is completed, Installation Wizard is automatically displayed, which helps Channel Search. Press the MENU button. 2. ** ** ** ** ** ** ** 8.5 Default...
... Factory Default. button, and press the 3. Select Yes and press the OK setting to start loading default setting. button to restore all data such as Channel List, and User Configured data are deleted. 1. Select Default Setting using the NUMERICAL (0-9) button to perform ** restoring. ** 7. For detailed information about Installation Wizard, refer to 3. Enter Password using the OK or button. When default setting is completed, Installation Wizard is automatically displayed, which helps Channel Search. Press the MENU button. 2. ** ** ** ** ** ** ** 8.5 Default...
User Manual
Page 57
...this software update can take 5 ~ 10 minutes to update software. • Scheduling operation cannot work during software update, it is not recommendable, perform the software ** upgrade later. ** ** Caution: • Please be "tuned" properly to the same aerial that downloads the software ...the Signal line (co-axial Cable) during software update. Update software when the quality of receiving signal strength is essential to have normal loader software, the equipment may be careful not to keep the power on and the power cord plugged in during software update. The latest ...
...this software update can take 5 ~ 10 minutes to update software. • Scheduling operation cannot work during software update, it is not recommendable, perform the software ** upgrade later. ** ** Caution: • Please be "tuned" properly to the same aerial that downloads the software ...the Signal line (co-axial Cable) during software update. Update software when the quality of receiving signal strength is essential to have normal loader software, the equipment may be careful not to keep the power on and the power cord plugged in during software update. The latest ...
User Manual
Page 65
... On. 2. Use 75 coaxial cable to change the Sound Track type. ** 5. Check the Mute status of Remote control. 6. Press the Audio button to connecting TV and aerial. 4. Check the battery of the TV and product. ** - No picture - Make sure that it not overlapped with remote control, the remote control's emitting part should directly point towards the receiving part of TV. - Check the brightness level of receiver's remote control. - Poor picture & sound quality - To...
... On. 2. Use 75 coaxial cable to change the Sound Track type. ** 5. Check the Mute status of Remote control. 6. Press the Audio button to connecting TV and aerial. 4. Check the battery of the TV and product. ** - No picture - Make sure that it not overlapped with remote control, the remote control's emitting part should directly point towards the receiving part of TV. - Check the brightness level of receiver's remote control. - Poor picture & sound quality - To...

User Manual
Page 69
... you can transport signals with different or same content. ** Network ** The collection of digital channels/services. To-Air) ** An unscrambled broadcast, which is informing the digital terrestrial receiver about the monitor that the user needs or has to release them through aerial. ** SCART ** A 21-pin connector used for connection of hertz ** FTA (Free- Usually there are several MUX frequencies with high frequency. ** Frequency ** The number of cycles or...
... you can transport signals with different or same content. ** Network ** The collection of digital channels/services. To-Air) ** An unscrambled broadcast, which is informing the digital terrestrial receiver about the monitor that the user needs or has to release them through aerial. ** SCART ** A 21-pin connector used for connection of hertz ** FTA (Free- Usually there are several MUX frequencies with high frequency. ** Frequency ** The number of cycles or...


