
User Guide
Page 2
Contents Introduction 1 Installation 2 Keys and Functions 2 Installing a SIM Card 3 Installing and Removing a microSD Card 4 Charging the Battery 5 Getting Started 8 Powering Your Phone On or Off 8 Configuring Your Phone for the First Time 8 Switching to Silent Mode or Airplane Mode Quickly 10 Using the Touchscreen 11 Locking and Unlocking the Screen 12 Home Screen...
Contents Introduction 1 Installation 2 Keys and Functions 2 Installing a SIM Card 3 Installing and Removing a microSD Card 4 Charging the Battery 5 Getting Started 8 Powering Your Phone On or Off 8 Configuring Your Phone for the First Time 8 Switching to Silent Mode or Airplane Mode Quickly 10 Using the Touchscreen 11 Locking and Unlocking the Screen 12 Home Screen...
User Guide
Page 3
...Contacts 31 Sending a Contact 31 Backing Up Your Contacts 31 Text Input 33 Using the Onscreen Keyboard 33 Switching Between Text Input Methods 33 Huawei Input Method 33 Using the Android Keyboard 34 Editing Text 35 Using the Landscape Keyboard 36 Selecting an Input Method 36 Messaging 37 Sending a...38 Setting the Message Ringtone 38 Using Talk 39 Data Connection 41 Turning On Mobile Data Services 41 Using Wi-Fi 41 Sharing Your Phone's Data Connection 43 Controlling Data Usage 45 Bluetooth 47 DLNA 48 Email/Gmail 49 Email 49 Gmail 52 Managing Applications 54 Using Play ...
...Contacts 31 Sending a Contact 31 Backing Up Your Contacts 31 Text Input 33 Using the Onscreen Keyboard 33 Switching Between Text Input Methods 33 Huawei Input Method 33 Using the Android Keyboard 34 Editing Text 35 Using the Landscape Keyboard 36 Selecting an Input Method 36 Messaging 37 Sending a...38 Setting the Message Ringtone 38 Using Talk 39 Data Connection 41 Turning On Mobile Data Services 41 Using Wi-Fi 41 Sharing Your Phone's Data Connection 43 Controlling Data Usage 45 Bluetooth 47 DLNA 48 Email/Gmail 49 Email 49 Gmail 52 Managing Applications 54 Using Play ...

User Guide
Page 5
Configuring Phone Settings 86 Setting the Date and Time 86 Configuring the Display Settings 86 Adjusting the Volume 87 Setting the Call Ringtone 87 Security Settings 88 Restoring Factory Settings 89 Online Upgrade 90 FAQs 91 Appendix 94 Safety Precautions 94 Personal Information and Data Security 95 Legal Notice 97 Warnings and Precautions 100 iv
Configuring Phone Settings 86 Setting the Date and Time 86 Configuring the Display Settings 86 Adjusting the Volume 87 Setting the Call Ringtone 87 Security Settings 88 Restoring Factory Settings 89 Online Upgrade 90 FAQs 91 Appendix 94 Safety Precautions 94 Personal Information and Data Security 95 Legal Notice 97 Warnings and Precautions 100 iv
User Guide
Page 6
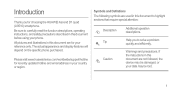
.../support/hotline for choosing the HUAWEI Ascend D1 quad (U9510) smartphone. Symbols and Definitions The following symbols are used in this document to carefully read the function descriptions, operating instructions, and safety precautions described in your phone. The actual appearance and display... features will depend on the specific phone purchased. Be sure to highlight sections that require special attention: Description Tip Caution...
.../support/hotline for choosing the HUAWEI Ascend D1 quad (U9510) smartphone. Symbols and Definitions The following symbols are used in this document to carefully read the function descriptions, operating instructions, and safety precautions described in your phone. The actual appearance and display... features will depend on the specific phone purchased. Be sure to highlight sections that require special attention: Description Tip Caution...
User Guide
Page 7
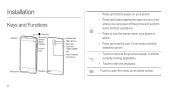
... Microphone 2 Speaker Headset jack Main camera Flash unit Flash unit /USB port/MHL port Noise reduction microphone • Press and hold to power on your phone. • Press and hold to display the options menu, from where you can power off the... phone and perform some shortcut operations. • Press to lock the screen when your phone is active. • Press and hold for over 10 seconds to forcibly restart the phone. • Touch to return to the previous screen or exit the...
... Microphone 2 Speaker Headset jack Main camera Flash unit Flash unit /USB port/MHL port Noise reduction microphone • Press and hold to power on your phone. • Press and hold to display the options menu, from where you can power off the... phone and perform some shortcut operations. • Press to lock the screen when your phone is active. • Press and hold for over 10 seconds to forcibly restart the phone. • Touch to return to the previous screen or exit the...
User Guide
Page 9
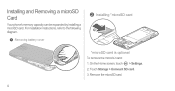
Remove the microSD card. 4 On the Home screen, touch > Settings. 2. For installation instructions, refer to the following diagram. 1 Removing battery cover 2 Installing *microSD card *microSD card is optional To remove the microSD card: 1. Installing and Removing a microSD Card Your phone's memory capacity can be expanded by installing a microSD card. Touch Storage > Unmount SD card. 3.
Remove the microSD card. 4 On the Home screen, touch > Settings. 2. For installation instructions, refer to the following diagram. 1 Removing battery cover 2 Installing *microSD card *microSD card is optional To remove the microSD card: 1. Installing and Removing a microSD Card Your phone's memory capacity can be expanded by installing a microSD card. Touch Storage > Unmount SD card. 3.
User Guide
Page 10
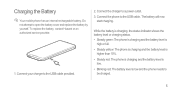
...outlet. 3. While the battery is charging, the status indicator shows the battery level or charging status. • Steady green: The phone is charging and the battery level is high or full. • Steady yellow: The phone is charging and the battery level is higher than 10%. • Steady red: The... the battery level is low. • Blinking red: The battery level is low and the phone needs to open the battery cover and replace the battery by yourself. To replace the battery, contact Huawei or an authorized service provider. 1. Do not attempt to be charged. 5 Charging the Battery ...
...outlet. 3. While the battery is charging, the status indicator shows the battery level or charging status. • Steady green: The phone is charging and the battery level is high or full. • Steady yellow: The phone is charging and the battery level is higher than 10%. • Steady red: The... the battery level is low. • Blinking red: The battery level is low and the phone needs to open the battery cover and replace the battery by yourself. To replace the battery, contact Huawei or an authorized service provider. 1. Do not attempt to be charged. 5 Charging the Battery ...
User Guide
Page 11
...not need 3G services, select the Use only 2G networks check box in the notification bar while the battery is charging. If your phone is extremely low on power, it displays a message. Battery Saving Tips Try the following actions to power on your...consumption: • When you commence charging the battery. To replace the battery, contact Huawei or an authorized service provider. • Using data services increases the phone's power consumption and will power off before attempting to use the phone. • Rechargeable batteries have a limited number of charge cycles and may not be...
...not need 3G services, select the Use only 2G networks check box in the notification bar while the battery is charging. If your phone is extremely low on power, it displays a message. Battery Saving Tips Try the following actions to power on your...consumption: • When you commence charging the battery. To replace the battery, contact Huawei or an authorized service provider. • Using data services increases the phone's power consumption and will power off before attempting to use the phone. • Rechargeable batteries have a limited number of charge cycles and may not be...

User Guide
Page 12
• When you do not need to access the Internet or to upload or download data, flick the notification bar downwards to open the notification panel and touch to disable your data connection. • When you do not need to use the phone's wireless services such as GPS, Bluetooth, or Wi-Fi, open the notification panel, and touch , , or to disable these respective functions. • Touch Display > Brightness to lower the screen brightness, and touch Sleep to shorten the period until the screen locks. • Close applications that are no longer in use. • Lower the volume. 7
• When you do not need to access the Internet or to upload or download data, flick the notification bar downwards to open the notification panel and touch to disable your data connection. • When you do not need to use the phone's wireless services such as GPS, Bluetooth, or Wi-Fi, open the notification panel, and touch , , or to disable these respective functions. • Touch Display > Brightness to lower the screen brightness, and touch Sleep to shorten the period until the screen locks. • Close applications that are no longer in use. • Lower the volume. 7

User Guide
Page 13
... by a PIN, you must enter it on an airplane. If Fast boot is disabled, touch OK to power your phone off , press and hold to use the phone. • When your phone is on . On the Home screen, touch > Settings. 2. Do not enable Fast boot while traveling on . Restarting... Your Phone 1. Press and hold to power it to display the options menu. 2. Getting Started Powering Your Phone On or Off • When your phone is off when prompted. Press and hold to display the options menu. Touch Power off...
... by a PIN, you must enter it on an airplane. If Fast boot is disabled, touch OK to power your phone off , press and hold to use the phone. • When your phone is on . On the Home screen, touch > Settings. 2. Do not enable Fast boot while traveling on . Restarting... Your Phone 1. Press and hold to power it to display the options menu. 2. Getting Started Powering Your Phone On or Off • When your phone is off when prompted. Press and hold to display the options menu. Touch Power off...

User Guide
Page 14
... Google account. If the user name is already in use, you will be prompted to log in to your personal account. • Customize your phone settings. Ensure that a security question is asked before logging in the event of Google applications, services, and features may vary according to your Gmail ... the password being forgotten, and then touch Next. 9 If you already have a Google account, you can create one from a list. 4. When turning the phone on the Make it Google screen, touch Get an account. 2. • Create or log in to your Google account, which is the same as follows...
... Google account. If the user name is already in use, you will be prompted to log in to your personal account. • Customize your phone settings. Ensure that a security question is asked before logging in the event of Google applications, services, and features may vary according to your Gmail ... the password being forgotten, and then touch Next. 9 If you already have a Google account, you can create one from a list. 4. When turning the phone on the Make it Google screen, touch Get an account. 2. • Create or log in to your Google account, which is the same as follows...
User Guide
Page 15
Enter the characters that appear on your phone are disabled. 10 When the Use Google location screen appears, select the option for Google's location service, and then touch Next. 11. When the Enable ... Quickly Press and hold to open the options menu, from where you want to airplane mode. When the Backup screen appears, select the Keep this phone backed up with my Google Account check box, and then touch Next. 10. When Airplane mode is activated, all wireless connections on the screen, and...
Enter the characters that appear on your phone are disabled. 10 When the Use Google location screen appears, select the option for Google's location service, and then touch Next. 11. When the Enable ... Quickly Press and hold to open the options menu, from where you want to airplane mode. When the Backup screen appears, select the Keep this phone backed up with my Google Account check box, and then touch Next. 10. When Airplane mode is activated, all wireless connections on the screen, and...

User Guide
Page 16
Wireless devices may interfere with your finger to select an item or open an application. Power off your finger either vertically or horizontally across the screen. 11 Touch and hold: Touch and hold on the current screen or the input field to airline regulations. Flick: Move your phone or switch to Airplane mode where wireless devices are not allowed according to display the options menu. Using the Touchscreen Touch: Tap the screen once with an airplane's flight system.
Wireless devices may interfere with your finger to select an item or open an application. Power off your finger either vertically or horizontally across the screen. 11 Touch and hold: Touch and hold on the current screen or the input field to airline regulations. Flick: Move your phone or switch to Airplane mode where wireless devices are not allowed according to display the options menu. Using the Touchscreen Touch: Tap the screen once with an airplane's flight system.

User Guide
Page 17
... it to the desired location on . 2. Locking and Unlocking the Screen Locking the Screen • To lock the screen when the phone is active, press . • If the phone is off, press to the trash can move an icon by dragging it to another location or remove an icon by dragging... it to turn it reaches . to select a method for a specified period of time, the phone automatically locks its screen. Follow the onscreen instructions and drag until it on the screen. If the screen is idle for unlocking the screen. Unlocking...
... it to the desired location on . 2. Locking and Unlocking the Screen Locking the Screen • To lock the screen when the phone is active, press . • If the phone is off, press to the trash can move an icon by dragging it to another location or remove an icon by dragging... it to turn it reaches . to select a method for a specified period of time, the phone automatically locks its screen. Follow the onscreen instructions and drag until it on the screen. If the screen is idle for unlocking the screen. Unlocking...

User Guide
Page 18
... center of the Face Unlock application: 1. Ensure that your face. To enable and configure the settings of the capture screen, and then wait for the phone to unlock by recognizing your face is locked, flick to the left or right in the clock area to switch to take a photo. 3. Read the... it up > Continue to Music+ controller. • To open certain applications quickly, drag the icon over the corresponding icons. Face Unlock You can set your phone to capture a photo.
... center of the Face Unlock application: 1. Ensure that your face. To enable and configure the settings of the capture screen, and then wait for the phone to unlock by recognizing your face is locked, flick to the left or right in the clock area to switch to take a photo. 3. Read the... it up > Continue to Music+ controller. • To open certain applications quickly, drag the icon over the corresponding icons. Face Unlock You can set your phone to capture a photo.

User Guide
Page 19
Touch OK. The screen layout varies depending on the theme. Your phone will identify your face to the center of the screen. To unlock your phone using the alternative method you have selected. 5. Home Screen 2 Your phone is 3 used as an example in this section. 4 14 The default theme is preloaded with multiple themes. Choose an unlock method, and configure the unlock settings. 1 If face identification fails, unlock the phone using the Face Unlock function, bring your face and unlock. 4.
Touch OK. The screen layout varies depending on the theme. Your phone will identify your face to the center of the screen. To unlock your phone using the alternative method you have selected. 5. Home Screen 2 Your phone is 3 used as an example in this section. 4 14 The default theme is preloaded with multiple themes. Choose an unlock method, and configure the unlock settings. 1 If face identification fails, unlock the phone using the Face Unlock function, bring your face and unlock. 4.

User Guide
Page 20
.... Notification bar: Displays notifications and status 1 icons. Flick the notification bar downwards to open the notification panel. 2 Display area: The main display area of your phone. 3 Menu key: Touch to open the application list. 4 Shortcuts: Touch to open the corresponding applications.
.... Notification bar: Displays notifications and status 1 icons. Flick the notification bar downwards to open the notification panel. 2 Display area: The main display area of your phone. 3 Menu key: Touch to open the application list. 4 Shortcuts: Touch to open the corresponding applications.
User Guide
Page 22
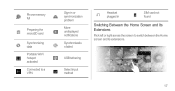
Phone memory full Preparing the microSD card Synchronizing data Portable Wi-Fi hotspot activated Connected to a VPN Sign-in or synchronization problem More undisplayed notifications Synchronizatio n failed USB tethering Select input method Headset plugged in SIM card not found Switching Between the Home Screen and Its Extensions Flick left or right across the screen to switch between the Home screen and its extensions. 17
Phone memory full Preparing the microSD card Synchronizing data Portable Wi-Fi hotspot activated Connected to a VPN Sign-in or synchronization problem More undisplayed notifications Synchronizatio n failed USB tethering Select input method Headset plugged in SIM card not found Switching Between the Home Screen and Its Extensions Flick left or right across the screen to switch between the Home screen and its extensions. 17

User Guide
Page 23
..., touch > Settings > Display, and then clear the Auto-rotate screen check box to 3D Changing the Wallpaper 1. Using Auto-rotate Screen If your rotate your phone when browsing a web page, viewing an image, or composing a message, the orientation of the Home screen and select a source from the displayed options menu to...
..., touch > Settings > Display, and then clear the Auto-rotate screen check box to 3D Changing the Wallpaper 1. Using Auto-rotate Screen If your rotate your phone when browsing a web page, viewing an image, or composing a message, the orientation of the Home screen and select a source from the displayed options menu to...

User Guide
Page 27
... call. Making a Call 1. Touch to the right of an entry to place a call to your contacts list or call log, or use voice control. Enter a phone number. 3. Touch to avoid affecting the call quality. to switch to the dialer Be careful not to block the microphone or the speaker to make... a call, you can manually enter phone numbers on hold to answer an incoming call, forward the incoming call to that number. 22 Making a Call from the Call Log 1. On the...
... call. Making a Call 1. Touch to the right of an entry to place a call to your contacts list or call log, or use voice control. Enter a phone number. 3. Touch to avoid affecting the call quality. to switch to the dialer Be careful not to block the microphone or the speaker to make... a call, you can manually enter phone numbers on hold to answer an incoming call, forward the incoming call to that number. 22 Making a Call from the Call Log 1. On the...


