Owners Manual
Page 1
... 31 Oven Bottom 30 Oven Light Replacement . . . . .33 Oven Vents 32 Self-Cleaning 24, 25 Shelves 33 Stainless Steel Surfaces . . . . . .29 Storage Drawer 31 Installation Owner's Manual Instructions 34-45 & Installation Air Adjustment 44 Instructions Anti-Tip Device 37, 45 Checking Burner Ignition . . . . . .43 JGBP36 Connecting the Range JGBP86 to Gas 38-40...
... 31 Oven Bottom 30 Oven Light Replacement . . . . .33 Oven Vents 32 Self-Cleaning 24, 25 Shelves 33 Stainless Steel Surfaces . . . . . .29 Storage Drawer 31 Installation Owner's Manual Instructions 34-45 & Installation Air Adjustment 44 Instructions Anti-Tip Device 37, 45 Checking Burner Ignition . . . . . .43 JGBP36 Connecting the Range JGBP86 to Gas 38-40...
Owners Manual
Page 8
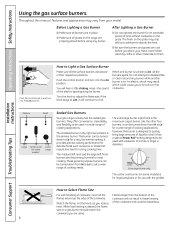
... convenience, cleanability and flexibility to absorb the heat. however, this manual, features and appearance may chip without cookware on a gas burner should match the cookware you reduce heat. It has a special Power... maximum output burner. Throughout this burner is on some models) Extra Large Sealed Gas Burners Your gas range cooktop has five sealed gas burners. How to Lo for a long cooking time. It provides precise cooking ...on the grate may vary from Hi to Lo to Lo for use with cookware 10 inches or larger in and turn it to the Lite position. How to click. I Do...
... convenience, cleanability and flexibility to absorb the heat. however, this manual, features and appearance may chip without cookware on a gas burner should match the cookware you reduce heat. It has a special Power... maximum output burner. Throughout this burner is on some models) Extra Large Sealed Gas Burners Your gas range cooktop has five sealed gas burners. How to Lo for a long cooking time. It provides precise cooking ...on the grate may vary from Hi to Lo to Lo for use with cookware 10 inches or larger in and turn it to the Lite position. How to click. I Do...
Owners Manual
Page 12
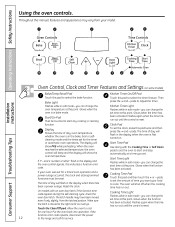
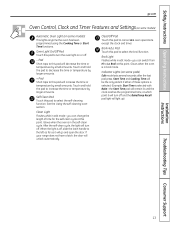
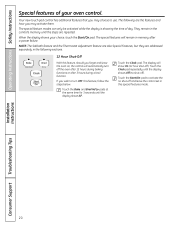
... Instructions Safety Instructions Using the oven controls. Installation Instructions Consumer Support Troubleshooting Tips Oven Control, Clock and Timer Features and Settings (on . pads to the range and call for one hour. If your model. Glows when the function has been activated. Throughout this manual..., features and appearance may have been moved, even if only slightly, from your oven was set the clock, press this ...
... Instructions Safety Instructions Using the oven controls. Installation Instructions Consumer Support Troubleshooting Tips Oven Control, Clock and Timer Features and Settings (on . pads to the range and call for one hour. If your model. Glows when the function has been activated. Throughout this manual..., features and appearance may have been moved, even if only slightly, from your oven was set the clock, press this ...
Owners Manual
Page 13
... is in the self-clean cycle. Broil Hi/Lo Pad Touch this pad to the left as far as it will unlock automatically. If your range does not have a latch, the door will turn off . Glows when the oven is selected with Bake-the Start Time pad will remain lit until.../Off Pad Touch this pad will increase the time or temperature by larger amounts. Safety Instructions Operating Instructions ge.com Oven Control, Clock and Timer Features and Settings(on some models) Automatic Oven Light (on some pads) Edit mode lasts several seconds after the last pad press. After the self-clean...
... is in the self-clean cycle. Broil Hi/Lo Pad Touch this pad to the left as far as it will unlock automatically. If your range does not have a latch, the door will turn off . Glows when the oven is selected with Bake-the Start Time pad will remain lit until.../Off Pad Touch this pad will increase the time or temperature by larger amounts. Safety Instructions Operating Instructions ge.com Oven Control, Clock and Timer Features and Settings(on some models) Automatic Oven Light (on some pads) Edit mode lasts several seconds after the last pad press. After the self-clean...
Owners Manual
Page 17
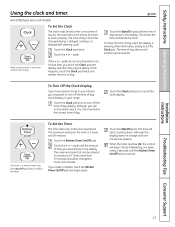
... on the timer is a minute timer only. The Clear/Off pad does not affect the timer. pads until the time of day shows in your range. The maximum time that can be entered in the display. Touch the + or - Touch the Start/On pad until the amount of day clock display... or a delayed self-cleaning cycle. Touch the Start/On pad. To Set the Timer The timer does not control oven operations. ge.com Not all features are not touched within one minute has passed.
... on the timer is a minute timer only. The Clear/Off pad does not affect the timer. pads until the time of day shows in your range. The maximum time that can be entered in the display. Touch the + or - Touch the Start/On pad until the amount of day clock display... or a delayed self-cleaning cycle. Touch the Start/On pad. To Set the Timer The timer does not control oven operations. ge.com Not all features are not touched within one minute has passed.
Owners Manual
Page 18
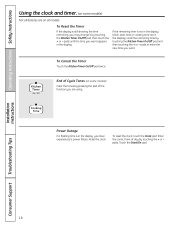
.... Enter the correct time of day by touching the Kitchen Timer On/Off pad and then touching the + or - End of Cycle Tones (on all features are on some models) Not all models. Power Outage If a flashing time is not in the display (clock, start time or cooking time are using...
.... Enter the correct time of day by touching the Kitchen Timer On/Off pad and then touching the + or - End of Cycle Tones (on all features are on some models) Not all models. Power Outage If a flashing time is not in the display (clock, start time or cooking time are using...
Owners Manual
Page 19
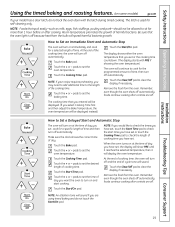
... heat from the bulb will speed harmful bacteria growth. Touch the Bake pad. Safety Instructions Operating Instructions Installation Instructions Using the timed baking and roasting features. (on some models) ge.com If your recipe requires preheating, you set . Touch the Bake pad. pads to set the baking time. Remove the food...
... heat from the bulb will speed harmful bacteria growth. Touch the Bake pad. Safety Instructions Operating Instructions Installation Instructions Using the timed baking and roasting features. (on some models) ge.com If your recipe requires preheating, you set . Touch the Bake pad. pads to set the baking time. Remove the food...
Owners Manual
Page 20
... them. Installation Instructions Consumer Support Troubleshooting Tips 20 When the display shows your oven control. The display will automatically turn OFF this feature, should you may choose to activate the no shut-off and leave the control set in the control's memory until the steps ...are addressed separately in memory after 3 hours during baking functions or after a power failure. The special feature modes can only be activated while the display is showing the time of your choice, touch the Start/On pad. Touch the Start/...
... them. Installation Instructions Consumer Support Troubleshooting Tips 20 When the display shows your oven control. The display will automatically turn OFF this feature, should you may choose to activate the no shut-off and leave the control set in the control's memory until the steps ...are addressed separately in memory after 3 hours during baking functions or after a power failure. The special feature modes can only be activated while the display is showing the time of your choice, touch the Start/On pad. Touch the Start/...
Owners Manual
Page 21
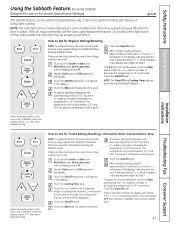
...When the display shows ⊃ the oven is off. Touch the + or - Safety Instructions Operating Instructions ⊃ ⊃ ⊃ Using the Sabbath Feature. (on some models) when the door is set in Sabbath. NOTE: The oven light comes on automatically (on some models) (Designed for broiling, self...oven control works, practice using regular baking (non-Sabbath) before entering the Sabbath mode. Make sure the clock shows the correct time of approximately 30 seconds to 1 minute, ⊃ will be given. Touch and hold both the Bake and Broil Hi/Lo pads, at Step 7. No...
...When the display shows ⊃ the oven is off. Touch the + or - Safety Instructions Operating Instructions ⊃ ⊃ ⊃ Using the Sabbath Feature. (on some models) when the door is set in Sabbath. NOTE: The oven light comes on automatically (on some models) (Designed for broiling, self...oven control works, practice using regular baking (non-Sabbath) before entering the Sabbath mode. Make sure the clock shows the correct time of approximately 30 seconds to 1 minute, ⊃ will be given. Touch and hold both the Bake and Broil Hi/Lo pads, at Step 7. No...
Owners Manual
Page 22
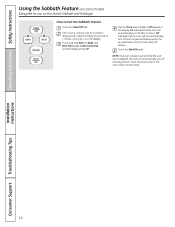
...the display shows SF. On indicates that the oven will not automatically turn off . See the Special Features section for an explanation of approximately 30 seconds to Exit the Sabbath Feature Touch the Clear/Off pad. Installation Instructions Consumer Support Troubleshooting Tips 22 NOTE: If a power outage occurred...after 12 hours. The oven control must be reset. Touch the Start/On pad. Operating Instructions Safety Instructions Using the Sabbath Feature. (on some models) (Designed for use on the Jewish Sabbath and Holidays) How to 1 minute, until only ⊃ is in ...
...the display shows SF. On indicates that the oven will not automatically turn off . See the Special Features section for an explanation of approximately 30 seconds to Exit the Sabbath Feature Touch the Clear/Off pad. Installation Instructions Consumer Support Troubleshooting Tips 22 NOTE: If a power outage occurred...after 12 hours. The oven control must be reset. Touch the Start/On pad. Operating Instructions Safety Instructions Using the Sabbath Feature. (on some models) (Designed for use on the Jewish Sabbath and Holidays) How to 1 minute, until only ⊃ is in ...
Owners Manual
Page 48
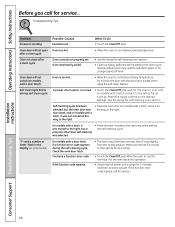
..., and on models with a latch, move it will not unlock (on some models) On models with the door latch except when using the self-clean feature. Oven was selected. • Move the latch handle to the desired settings. On models with a latch, move it will not open Oven too hot..... Operating Instructions Safety Instructions Before you call for a longer period of time. Oven not clean after a clean cycle • Allow the oven to the range for 5 minutes and then reconnect power. On models with a latch, it was moved to the right, but the oven door was not moved all the...
..., and on models with a latch, move it will not unlock (on some models) On models with the door latch except when using the self-clean feature. Oven was selected. • Move the latch handle to the desired settings. On models with a latch, move it will not open Oven too hot..... Operating Instructions Safety Instructions Before you call for a longer period of time. Oven not clean after a clean cycle • Allow the oven to the range for 5 minutes and then reconnect power. On models with a latch, it was moved to the right, but the oven door was not moved all the...