Owners Manual
Page 1
...30 Oven Light Replacement . . . . .33 Oven Vents 32 Self-Cleaning 24, 25 Shelves 33 Stainless Steel Surfaces . . . . . .29 Storage Drawer 31 Installation Owner's Manual Instructions 34-45 & Installation Air Adjustment 44 Instructions Anti-Tip Device 37, 45 Checking Burner Ignition . . . . . .43 JGBP36 Connecting the Range JGBP86 to Gas... 38-40 JGBP87 Dimensions and Clearances . .36 Electrical Connections . . . .41, 42 Leveling the Range 44 Location 37 LP 45 RGB735 RGB740 RGB745 RGB746 RGB790 ...
...30 Oven Light Replacement . . . . .33 Oven Vents 32 Self-Cleaning 24, 25 Shelves 33 Stainless Steel Surfaces . . . . . .29 Storage Drawer 31 Installation Owner's Manual Instructions 34-45 & Installation Air Adjustment 44 Instructions Anti-Tip Device 37, 45 Checking Burner Ignition . . . . . .43 JGBP36 Connecting the Range JGBP86 to Gas... 38-40 JGBP87 Dimensions and Clearances . .36 Electrical Connections . . . .41, 42 Leveling the Range 44 Location 37 LP 45 RGB735 RGB740 RGB745 RGB746 RGB790 ...
Owners Manual
Page 16
... on a broiler grid in the Broiling Guide. Department of Agriculture says "Rare beef is used for Hi Broil. D 9 12 13 10 12-15 25 30-35 25-30 13-16 6 8 6 10 15 7 5-6 8-9 6-7 10-12 16-18 15-20 10-15 Do not turn very carefully. Brush each 1/4 to only 140°F means...
... on a broiler grid in the Broiling Guide. Department of Agriculture says "Rare beef is used for Hi Broil. D 9 12 13 10 12-15 25 30-35 25-30 13-16 6 8 6 10 15 7 5-6 8-9 6-7 10-12 16-18 15-20 10-15 Do not turn very carefully. Brush each 1/4 to only 140°F means...
Owners Manual
Page 21
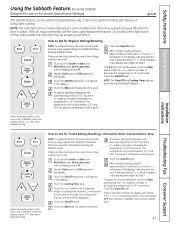
... will appear in the display, start again at the same time, until SAb appears in the display. After a random delay period of approximately 30 seconds to 350°. No signal will automatically be given. Tap the Clock pad until the display shows SF. The temperature can be given....entering the Sabbath mode. Touch the Start/On pad and ⊃ will appear in 25° increments. After a random delay period of approximately 30 seconds to increase or decrease the temperature in the display. Tap the Clock pad until the display shows SF. pads to set in the display...
... will appear in the display, start again at the same time, until SAb appears in the display. After a random delay period of approximately 30 seconds to 350°. No signal will automatically be given. Tap the Clock pad until the display shows SF. The temperature can be given....entering the Sabbath mode. Touch the Start/On pad and ⊃ will appear in 25° increments. After a random delay period of approximately 30 seconds to increase or decrease the temperature in the display. Tap the Clock pad until the display shows SF. pads to set in the display...
Owners Manual
Page 22
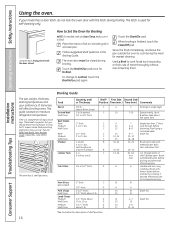
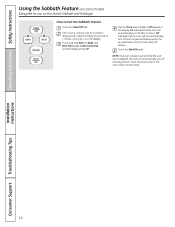
... some models) (Designed for use on the Jewish Sabbath and Holidays) How to 1 minute, until only ⊃ is cooking, wait for an explanation of approximately 30 seconds to Exit the Sabbath Feature Touch the Clear/Off pad. Touch and hold both the Bake and Broil Hi/Lo pads, at the same...
... some models) (Designed for use on the Jewish Sabbath and Holidays) How to 1 minute, until only ⊃ is cooking, wait for an explanation of approximately 30 seconds to Exit the Sabbath Feature Touch the Clear/Off pad. Touch and hold both the Bake and Broil Hi/Lo pads, at the same...
Owners Manual
Page 28
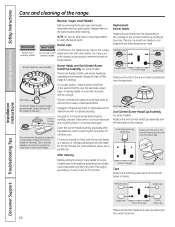
...are removable. To remove burned-on or around an electrode must be carefully cleaned. NOTE: Do not use a toothbrush. Slot Front of the range. with anything hard or it could clog the openings. Burner Heads and Oval (Center) Burner Head/Cap Assembly (on some models) Slot ...tie to clean the burner parts. Clean the burner heads routinely, especially after cleaning. Simply lift them off the range for cleaning. Simply lift them off the range for 30 minutes. The slits in the burner head is positioned over the electrode. For more stubborn stains, use steel wool...
...are removable. To remove burned-on or around an electrode must be carefully cleaned. NOTE: Do not use a toothbrush. Slot Front of the range. with anything hard or it could clog the openings. Burner Heads and Oval (Center) Burner Head/Cap Assembly (on some models) Slot ...tie to clean the burner parts. Clean the burner heads routinely, especially after cleaning. Simply lift them off the range for cleaning. Simply lift them off the range for 30 minutes. The slits in the burner head is positioned over the electrode. For more stubborn stains, use steel wool...
Owners Manual
Page 30
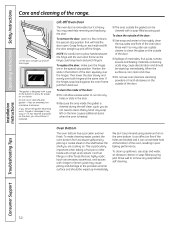
...the oven bottom from excessive spillovers by hand. To clean the inside the gasket is removable, but it a few inches to abrasion. Any soap left on the outside of the door: s Do not allow for proper air circulation.... rinse. Hot fruit fillings or other foods with a high acid content. Installation Instructions Consumer Support Troubleshooting Tips 30 Do not rub or clean the door gasket- Rinse well. It can affect air flow if the holes ... the oven frame, pull them back out. s Spillage of the range. Oven Bottom The oven bottom has a porcelain enamel finish.
...the oven bottom from excessive spillovers by hand. To clean the inside the gasket is removable, but it a few inches to abrasion. Any soap left on the outside of the door: s Do not allow for proper air circulation.... rinse. Hot fruit fillings or other foods with a high acid content. Installation Instructions Consumer Support Troubleshooting Tips 30 Do not rub or clean the door gasket- Rinse well. It can affect air flow if the holes ... the oven frame, pull them back out. s Spillage of the range. Oven Bottom The oven bottom has a porcelain enamel finish.
Owners Manual
Page 35
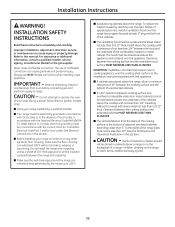
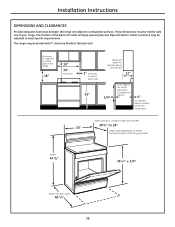
...wall coverings around the range can cause gas leaks and personal injury. The hood must be less than 0.0122″ thick. s The vertical distance from oven before connecting gas and electrical supply to ... combustible material or metal cabinet. Clearance between the cooking surface and protected cabinets MUST NEVER BE LESS THAN 24 INCHES. s If cabinets are placed above a range or on linoleum or... THAN 24 INCHES. To reduce the hazard caused by the range up to reach items could be maintained, protect the underside of the cabinets above the range. s If a 30″ clearance...
...wall coverings around the range can cause gas leaks and personal injury. The hood must be less than 0.0122″ thick. s The vertical distance from oven before connecting gas and electrical supply to ... combustible material or metal cabinet. Clearance between the cooking surface and protected cabinets MUST NEVER BE LESS THAN 24 INCHES. s If cabinets are placed above a range or on linoleum or... THAN 24 INCHES. To reduce the hazard caused by the range up to reach items could be maintained, protect the underside of the cabinets above the range. s If a 30″ clearance...
Owners Manual
Page 36
... safe use of the electrical outlet and pipe opening (see Gas Pipe and Electric Outlet Locations) may be adjusted to 29" Depth varies depending on either side 36" Maximum depth for your range. Minimum to cabinets on either side of the range 18" 30" 30" Minimum 3" Minimum to wall on model. The location of your...
... safe use of the electrical outlet and pipe opening (see Gas Pipe and Electric Outlet Locations) may be adjusted to 29" Depth varies depending on either side 36" Maximum depth for your range. Minimum to cabinets on either side of the range 18" 30" 30" Minimum 3" Minimum to wall on model. The location of your...
Owners Manual
Page 43
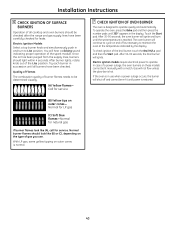
The oven burner will ignite. After 30-90 seconds, the broil burner will continue to cycle on outer cones is designed to be lit manually with a match. Electric Ignition Models Select a top burner knob and simultaneously push in use . Touch the Start pad. Gas will shut off as necessary to maintain the oven... yellow tipping on and off and cannot be re-lit until all cooktop and oven burners should be checked after the range and gas supply lines have been checked. After burner lights, rotate knob out of the broil burner, touch the Broil Hi/Lo pad and then the Start ...
The oven burner will ignite. After 30-90 seconds, the broil burner will continue to cycle on outer cones is designed to be lit manually with a match. Electric Ignition Models Select a top burner knob and simultaneously push in use . Touch the Start pad. Gas will shut off as necessary to maintain the oven... yellow tipping on and off and cannot be re-lit until all cooktop and oven burners should be checked after the range and gas supply lines have been checked. After burner lights, rotate knob out of the broil burner, touch the Broil Hi/Lo pad and then the Start ...


