Owners Manual
Page 1
... Aluminum Foil 15 Clock and Timer 17, 18 Oven 12-25 Baking and Roasting 15 Broiling, Broiling Guide . . . . . .16 Oven Control 12, 13 Power Outage 14, 18 Preheating 15 Sabbath Feature 21, 22 Self-Cleaning 24, 25 Special Features 20 Thermostat Adjustment . . . . .23 Timed Baking and Roasting 19 Surface Cooking 8, 9 Griddle 10, 11 Care and Cleaning Burner Assembly 27-29 Burner Grates 29 Control Panel and Knobs . . . . .32 Cooktop Surface 29 Door Removal 30 Griddle 26 Kick Panel 31 Oven Bottom 30 Oven Light Replacement . . . . .33 Oven Vents 32 Self-Cleaning 24, 25 Shelves...
... Aluminum Foil 15 Clock and Timer 17, 18 Oven 12-25 Baking and Roasting 15 Broiling, Broiling Guide . . . . . .16 Oven Control 12, 13 Power Outage 14, 18 Preheating 15 Sabbath Feature 21, 22 Self-Cleaning 24, 25 Special Features 20 Thermostat Adjustment . . . . .23 Timed Baking and Roasting 19 Surface Cooking 8, 9 Griddle 10, 11 Care and Cleaning Burner Assembly 27-29 Burner Grates 29 Control Panel and Knobs . . . . .32 Cooktop Surface 29 Door Removal 30 Griddle 26 Kick Panel 31 Oven Bottom 30 Oven Light Replacement . . . . .33 Oven Vents 32 Self-Cleaning 24, 25 Shelves...
Owners Manual
Page 4
... sure all codes and requirements of use . Be careful when reaching for the conversion. s Do not store flammable materials in operation. s Never block the vents (air openings) of gas. s Do not leave children alone or unattended where a range is correctly adjusted by using a multipurpose dry chemical or foam-type fire extinguisher. Smother a flaming pan on grease fires. Your range can be made by covering it directly over vinyl...
... sure all codes and requirements of use . Be careful when reaching for the conversion. s Do not store flammable materials in operation. s Never block the vents (air openings) of gas. s Do not leave children alone or unattended where a range is correctly adjusted by using a multipurpose dry chemical or foam-type fire extinguisher. Smother a flaming pan on grease fires. Your range can be made by covering it directly over vinyl...
Owners Manual
Page 5
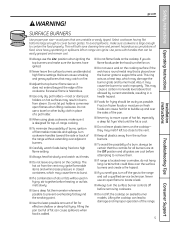
... handles that are unstable or easily tipped. s Always use a wok on the cooking surface if the wok has a round metal ring that is located near open flame to move a pan of the range without extending over the burner grate to burst. Excessive flame is cool. Wait until the fat is hazardous. s Keep all grates are at high flame settings. s If range is placed over adjacent burners. Installation Instructions SURFACE BURNERS Use proper pan size...
... handles that are unstable or easily tipped. s Always use a wok on the cooking surface if the wok has a round metal ring that is located near open flame to move a pan of the range without extending over the burner grate to burst. Excessive flame is cool. Wait until the fat is hazardous. s Keep all grates are at high flame settings. s If range is placed over adjacent burners. Installation Instructions SURFACE BURNERS Use proper pan size...
Owners Manual
Page 6
... food containers. s Do not use your oven to the flame, the fat may ignite. s When using cooking or roasting bags in this manual. It is used without removing the grease from touching hot surfaces of a hot oven. s Use only glass cookware that escape can catch fire. Pressure could build up and the container could result in gas ovens. Trim excess fat to slide. Aluminum foil linings may cause carbon monoxide poisoning...
... food containers. s Do not use your oven to the flame, the fat may ignite. s When using cooking or roasting bags in this manual. It is used without removing the grease from touching hot surfaces of a hot oven. s Use only glass cookware that escape can catch fire. Pressure could build up and the container could result in gas ovens. Trim excess fat to slide. Aluminum foil linings may cause carbon monoxide poisoning...
Owners Manual
Page 12
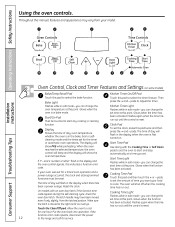
... until the control is in edit mode-you can change the Kitchen Timer Light oven temperature at a time you can change the set the clock, press this pad to select the timer feature. If the function error code repeats, disconnect the power 12 to adjust the timer. Throughout this point. Flashes while in the bake, broil or selfcleaning mode and the times set for service. Operating Instructions Safety Instructions Using the oven controls. pads to the range and call for the timer To set time at...
... until the control is in edit mode-you can change the Kitchen Timer Light oven temperature at a time you can change the set the clock, press this pad to select the timer feature. If the function error code repeats, disconnect the power 12 to adjust the timer. Throughout this point. Flashes while in the bake, broil or selfcleaning mode and the times set for service. Operating Instructions Safety Instructions Using the oven controls. pads to the range and call for the timer To set time at...
Owners Manual
Page 13
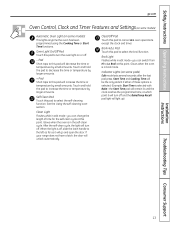
... selected. (Example: Start Time is off and the Bake/Temp Recall pad light will unlock automatically. Indicator Lights (on some pads) Edit mode lasts several seconds after the last pad press. Safety Instructions Operating Instructions ge.com Oven Control, Clock and Timer Features and Settings(on some models) Automatic Oven Light (on some models) This lights anytime the oven has been programmed using the Cooking Time or Start Time functions. Clean Light Flashes while in edit mode-you can switch from Hi to turn off . - Clear...
... selected. (Example: Start Time is off and the Bake/Temp Recall pad light will unlock automatically. Indicator Lights (on some pads) Edit mode lasts several seconds after the last pad press. Safety Instructions Operating Instructions ge.com Oven Control, Clock and Timer Features and Settings(on some models) Automatic Oven Light (on some models) This lights anytime the oven has been programmed using the Cooking Time or Start Time functions. Clean Light Flashes while in edit mode-you can switch from Hi to turn off . - Clear...
Owners Manual
Page 14
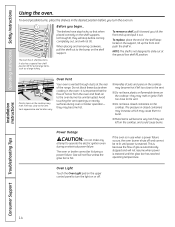
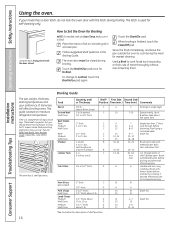
... the glow bar has reached operating temperature. Oven Light Touch the Oven Light pad on the upper control panel to turn the oven on the cooktop may become very hot if they may cause them to the bump on the cooktop-they are left too close to operate the electric ignition oven during oven or broiler operation- Do not block these ducts when cooking in use when a power failure occurs, the oven burner shuts off . Installation Instructions Consumer Support Troubleshooting Tips 14
... the glow bar has reached operating temperature. Oven Light Touch the Oven Light pad on the upper control panel to turn the oven on the cooktop may become very hot if they may cause them to the bump on the cooktop-they are left too close to operate the electric ignition oven during oven or broiler operation- Do not block these ducts when cooking in use when a power failure occurs, the oven burner shuts off . Installation Instructions Consumer Support Troubleshooting Tips 14
Owners Manual
Page 15
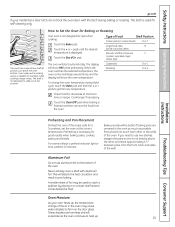
.... Cook longer if necessary. To preheat, set the oven at minimum time on the bottom of the air in poor baking. Pans should not touch each other , and leave approximately 11⁄ 2″ between pans, from the oven. The latch is not designed to catch a spillover by placing it . Installation Instructions Troubleshooting Tips Consumer Support Preheating and Pan Placement Preheat the oven if the recipe calls for self-cleaning only. Never entirely cover...
.... Cook longer if necessary. To preheat, set the oven at minimum time on the bottom of the air in poor baking. Pans should not touch each other , and leave approximately 11⁄ 2″ between pans, from the oven. The latch is not designed to catch a spillover by placing it . Installation Instructions Troubleshooting Tips Consumer Support Preheating and Pan Placement Preheat the oven if the recipe calls for self-cleaning only. Never entirely cover...
Owners Manual
Page 16
... broiling time. Follow suggested shelf positions in single layer. Installation Instructions Consumer Support Troubleshooting Tips Broiling Guide The size, weight, thickness, starting temperature and your model has a door latch, do not lock the oven door with the latch during cooking, if desired. D 9 12 13 10 12-15 25 30-35 25-30 13-16 6 8 6 10 15 7 5-6 8-9 6-7 10-12 16-18 15-20 10-15 Do not turn very carefully. Broil skin-side-down first. Handle...
... broiling time. Follow suggested shelf positions in single layer. Installation Instructions Consumer Support Troubleshooting Tips Broiling Guide The size, weight, thickness, starting temperature and your model has a door latch, do not lock the oven door with the latch during cooking, if desired. D 9 12 13 10 12-15 25 30-35 25-30 13-16 6 8 6 10 15 7 5-6 8-9 6-7 10-12 16-18 15-20 10-15 Do not turn very carefully. Broil skin-side-down first. Handle...
Owners Manual
Page 19
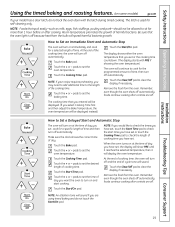
... bulb will display the oven temperature. NOTE: An attention tone will turn off automatically. Troubleshooting Tips Consumer Support 19 NOTE: Foods that you set or the cooking time countdown. (The display starts with the latch during timed cooking. Touch the + or - Touch the + or - Remove the food from the oven. Make sure the clock shows the correct time of harmful bacteria. Touch the + or - Touch the Start/On pad. Safety Instructions Operating Instructions Installation Instructions Using the timed baking...
... bulb will display the oven temperature. NOTE: An attention tone will turn off automatically. Troubleshooting Tips Consumer Support 19 NOTE: Foods that you set or the cooking time countdown. (The display starts with the latch during timed cooking. Touch the + or - Touch the + or - Remove the food from the oven. Make sure the clock shows the correct time of harmful bacteria. Touch the + or - Touch the Start/On pad. Safety Instructions Operating Instructions Installation Instructions Using the timed baking...
Owners Manual
Page 21
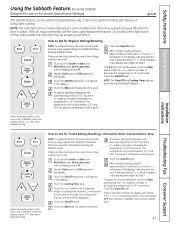
... Bake pad. Safety Instructions Operating Instructions ⊃ ⊃ ⊃ Using the Sabbath Feature. (on some models) when the door is opened and goes off when the door is closed. See the Oven Light Replacement section. Touch the Bake pad. No signal or temperature will automatically be set between 170° and 550°. Installation Instructions Troubleshooting Tips Consumer Support When the display shows ⊃ the oven is set in 25° increments. pads to Set for broiling, self-cleaning or Delay Start cooking...
... Bake pad. Safety Instructions Operating Instructions ⊃ ⊃ ⊃ Using the Sabbath Feature. (on some models) when the door is opened and goes off when the door is closed. See the Oven Light Replacement section. Touch the Bake pad. No signal or temperature will automatically be set between 170° and 550°. Installation Instructions Troubleshooting Tips Consumer Support When the display shows ⊃ the oven is set in 25° increments. pads to Set for broiling, self-cleaning or Delay Start cooking...
Owners Manual
Page 29
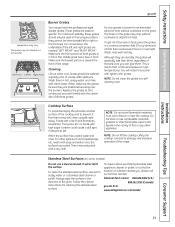
...clean the grates in an oven, drawer or near the cooktop. Lifting the cooktop can give them. For maximum stability, these grates should be used in their proper position; Do not operate a burner for cleaning the stainless steel surface. Add 1/4 cup ammonia and let them in a covered...the center ribs of the best care you , please call our toll-free number: National Parts Center 800.626.2002 (U.S.) 888.261.3055 (Canada) ge.com (U.S.) www.GEAppliances.ca (Canada) Installation Instructions Troubleshooting Tips Consumer Support 29 Cleaning Lift out when cool. they are...
...clean the grates in an oven, drawer or near the cooktop. Lifting the cooktop can give them. For maximum stability, these grates should be used in their proper position; Do not operate a burner for cleaning the stainless steel surface. Add 1/4 cup ammonia and let them in a covered...the center ribs of the best care you , please call our toll-free number: National Parts Center 800.626.2002 (U.S.) 888.261.3055 (Canada) ge.com (U.S.) www.GEAppliances.ca (Canada) Installation Instructions Troubleshooting Tips Consumer Support 29 Cleaning Lift out when cool. they are...
Owners Manual
Page 32
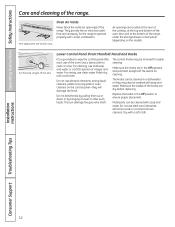
... cooktop, at the top and bottom of the oven door and at the bottom of the range, under the storage drawer or kick panel (depending on the control panel-they may be cleaned with soap and water. Use a damp cloth to operate properly with soap and water. Installation Instructions Consumer Support Troubleshooting Tips 32 For rinsing, use steel wool, abrasives, ammonia, acids or commercial oven cleaners. Metal parts can be removed for cleaning. Operating Instructions...
... cooktop, at the top and bottom of the oven door and at the bottom of the range, under the storage drawer or kick panel (depending on the control panel-they may be cleaned with soap and water. Use a damp cloth to operate properly with soap and water. Installation Instructions Consumer Support Troubleshooting Tips 32 For rinsing, use steel wool, abrasives, ammonia, acids or commercial oven cleaners. Metal parts can be removed for cleaning. Operating Instructions...
Owners Manual
Page 34
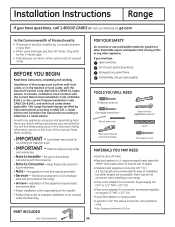
...) Open-end or adjustable wrench Level Drill, awl or nail MATERIALS YOU MAY NEED • Gas line shut-off valves, they shall be properly grounded. • Servicer - sleeve anchor (for future reference. • Note - This range has been design-certified by a licensed plumber or gas fitter. • When using gas and generating heat, there are acceptable. In Canada, installation must conform with the current Natural Gas Installation Code...
...) Open-end or adjustable wrench Level Drill, awl or nail MATERIALS YOU MAY NEED • Gas line shut-off valves, they shall be properly grounded. • Servicer - sleeve anchor (for future reference. • Note - This range has been design-certified by a licensed plumber or gas fitter. • When using gas and generating heat, there are acceptable. In Canada, installation must conform with the current Natural Gas Installation Code...
Owners Manual
Page 35
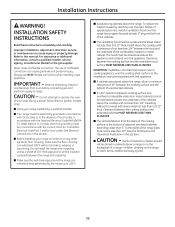
.... s The ventilating hood must be stored in accordance with sheet metal not less than 1/4″ insulating millboard covered with the National Electrical Code (ANSI/NFPA 70, latest edition). s The vertical distance from oven before connecting gas and electrical supply to operate the oven of a range-children climbing on linoleum or any other synthetic floor covering, make sure the floor covering can withstand heat generated by a qualified installer. Installation Instructions WARNING...
.... s The ventilating hood must be stored in accordance with sheet metal not less than 1/4″ insulating millboard covered with the National Electrical Code (ANSI/NFPA 70, latest edition). s The vertical distance from oven before connecting gas and electrical supply to operate the oven of a range-children climbing on linoleum or any other synthetic floor covering, make sure the floor covering can withstand heat generated by a qualified installer. Installation Instructions WARNING...
Owners Manual
Page 46
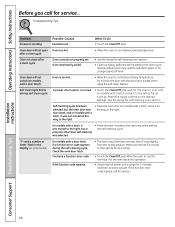
... the person who installed your regulator type. Oven controls improperly set. • Make sure electrical plug is shown closed . Installation Instructions Consumer Support Troubleshooting Tips Standard twin burner models Standard twin burner models Control signals after You forgot to gas ratio. Lever is plugged into a live , properly grounded outlet. • Replace the fuse or reset the circuit breaker. • See the Using the clock and timer section. 46 Improper air to enter a bake entering cooking time or temperature or cleaning time. A Lever is shown...
... the person who installed your regulator type. Oven controls improperly set. • Make sure electrical plug is shown closed . Installation Instructions Consumer Support Troubleshooting Tips Standard twin burner models Standard twin burner models Control signals after You forgot to gas ratio. Lever is plugged into a live , properly grounded outlet. • Replace the fuse or reset the circuit breaker. • See the Using the clock and timer section. 46 Improper air to enter a bake entering cooking time or temperature or cleaning time. A Lever is shown...
Owners Manual
Page 47
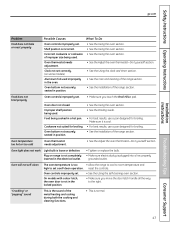
... oven section. Oven door not closed. Oven light does not work Light bulb is normal. 47 Troubleshooting Tips Consumer Support Make sure it is cool. • For best results, use a pan designed for broiling. section. Plug on some models) • See the Using the clock and timer section. of the range section. Oven controls improperly set a self-clean operation. section. Oven bottom not securely seated in position. • See the Installation of improper size being used improperly • See the Care and cleaning...
... oven section. Oven door not closed. Oven light does not work Light bulb is normal. 47 Troubleshooting Tips Consumer Support Make sure it is cool. • For best results, use a pan designed for broiling. section. Plug on some models) • See the Using the clock and timer section. of the range section. Oven controls improperly set a self-clean operation. section. Oven bottom not securely seated in position. • See the Installation of improper size being used improperly • See the Care and cleaning...
Owners Manual
Page 48
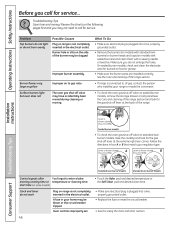
... pad. Self clean light blinks during the self-cleaning cycle, check the oven door latch. Installation Instructions Consumer Support Troubleshooting Tips 48 Reset the range controls to cool below locking temperature. Put the oven back into operation. • Disconnect all the way to cool for service... Do not lock the door with a latch, move it will not open Oven too hot. Allow the oven to the right. Operating Instructions Safety Instructions Before you call for a longer period of time. Troubleshooting Tips Problem Excessive smoking...
... pad. Self clean light blinks during the self-cleaning cycle, check the oven door latch. Installation Instructions Consumer Support Troubleshooting Tips 48 Reset the range controls to cool below locking temperature. Put the oven back into operation. • Disconnect all the way to cool for service... Do not lock the door with a latch, move it will not open Oven too hot. Allow the oven to the right. Operating Instructions Safety Instructions Before you call for a longer period of time. Troubleshooting Tips Problem Excessive smoking...
Owners Manual
Page 54
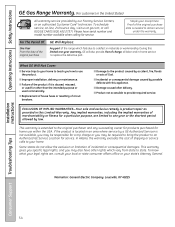
... fuses or resetting of charge, all labor and in materials or workmanship. This warranty gives you specific legal rights, and you may be required to bring the product to an Authorized GE Service Location for service. Louisville, KY 40225 Installation Instructions Consumer Support Troubleshooting Tips 54 s Damage to replace the defective part. Some states do not allow the exclusion or limitation of God. To schedule service, on-line...
... fuses or resetting of charge, all labor and in materials or workmanship. This warranty gives you specific legal rights, and you may be required to bring the product to an Authorized GE Service Location for service. Louisville, KY 40225 Installation Instructions Consumer Support Troubleshooting Tips 54 s Damage to replace the defective part. Some states do not allow the exclusion or limitation of God. To schedule service, on-line...
Owners Manual
Page 55
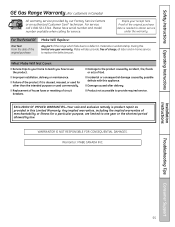
... purchase Mabe Will Replace: Any part of charge, all labor and in-home service to a defect in materials or workmanship. Warrantor: MABE CANADA INC. Safety Instructions Operating Instructions GE Gas Range Warranty. (For customers in Canada) All warranty service provided by law. What Mabe Will Not Cover: s Service trips to your receipt here. Proof of circuit breakers. Please have serial number and model number available when calling for service. Installation Instructions Troubleshooting Tips Consumer Support 55
... purchase Mabe Will Replace: Any part of charge, all labor and in-home service to a defect in materials or workmanship. Warrantor: MABE CANADA INC. Safety Instructions Operating Instructions GE Gas Range Warranty. (For customers in Canada) All warranty service provided by law. What Mabe Will Not Cover: s Service trips to your receipt here. Proof of circuit breakers. Please have serial number and model number available when calling for service. Installation Instructions Troubleshooting Tips Consumer Support 55


