Owners Manual
Page 1
...30 Oven Light Replacement . . . . .33 Oven Vents 32 Self-Cleaning 24, 25 Shelves 33 Stainless Steel Surfaces . . . . . .29 Storage Drawer 31 Installation Owner's Manual Instructions 34-45 & Installation Air Adjustment 44 Instructions Anti-Tip Device 37, 45 Checking Burner Ignition . . . . . .43 JGBP36 Connecting the Range JGBP86 to Gas...Customers in Canada 55 Warranty for Customers in the U.S.A 54 Write the model and serial numbers here: Model Serial You can find them on a label on the front of the range behind the storage drawer or kick panel. 183D5580P216 49-85132 05-07...
...30 Oven Light Replacement . . . . .33 Oven Vents 32 Self-Cleaning 24, 25 Shelves 33 Stainless Steel Surfaces . . . . . .29 Storage Drawer 31 Installation Owner's Manual Instructions 34-45 & Installation Air Adjustment 44 Instructions Anti-Tip Device 37, 45 Checking Burner Ignition . . . . . .43 JGBP36 Connecting the Range JGBP86 to Gas...Customers in Canada 55 Warranty for Customers in the U.S.A 54 Write the model and serial numbers here: Model Serial You can find them on a label on the front of the range behind the storage drawer or kick panel. 183D5580P216 49-85132 05-07...
Owners Manual
Page 5
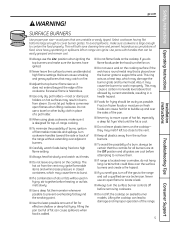
...of flammable materials and spillage, turn the surface burner controls off the gas to prevent overheating fat beyond the edge of fat for all burners ... may catch on the cooking surface if the wok has a round metal ring that allowed by current standards, resulting in burns from the vent...fat, especially a deep fat fryer. s Do not flame foods on sealed burner models. s Foods for top-of fat can ignite. they may result in a health... Do not use a wok on fire. Filling the pan too full of -range cooking. s Keep all grates are unstable or easily tipped. Select cookware having...
...of flammable materials and spillage, turn the surface burner controls off the gas to prevent overheating fat beyond the edge of fat for all burners ... may catch on the cooking surface if the wok has a round metal ring that allowed by current standards, resulting in burns from the vent...fat, especially a deep fat fryer. s Do not flame foods on sealed burner models. s Foods for top-of fat can ignite. they may result in a health... Do not use a wok on fire. Filling the pan too full of -range cooking. s Keep all grates are unstable or easily tipped. Select cookware having...
Owners Manual
Page 8
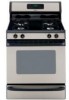
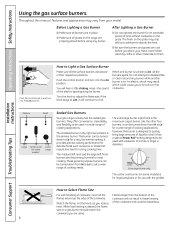
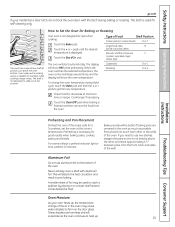
...Instructions Consumer Support Troubleshooting Tips Medium Small Large Center (oval) (on some models) is desired, the flame size on some models) Extra Large Sealed Gas Burners Your gas range cooktop has five sealed gas burners. The smallest burner in their respective positions. It provides precise cooking performance...model. When fast heating is for large pots/pans or for a wide range of cooking applications. Before Lighting a Gas Burner I Be sure the burners and grates are using any burner while another burner is on them. How to Lo for use with cookware 10 inches...
...Instructions Consumer Support Troubleshooting Tips Medium Small Large Center (oval) (on some models) is desired, the flame size on some models) Extra Large Sealed Gas Burners Your gas range cooktop has five sealed gas burners. The smallest burner in their respective positions. It provides precise cooking performance...model. When fast heating is for large pots/pans or for a wide range of cooking applications. Before Lighting a Gas Burner I Be sure the burners and grates are using any burner while another burner is on them. How to Lo for use with cookware 10 inches...
Owners Manual
Page 9
... some cookware may cause the burner to the Lite position. It conducts heat very slowly and cools very slowly. Stainless Steel: This metal alone has poor heating properties and is usually combined with sealed burners) We recommend that you use only and those for improved heat ...) Do not use the stove top grill on the sealed gas burner, it can be used on models with medium heat as the manufacturer recommends. Use extreme caution when lighting burners this way. ge.com Top-of -range cooking (saucepans, coffee and teapots). Follow cookware manufacturer's recommendations...
... some cookware may cause the burner to the Lite position. It conducts heat very slowly and cools very slowly. Stainless Steel: This metal alone has poor heating properties and is usually combined with sealed burners) We recommend that you use only and those for improved heat ...) Do not use the stove top grill on the sealed gas burner, it can be used on models with medium heat as the manufacturer recommends. Use extreme caution when lighting burners this way. ge.com Top-of -range cooking (saucepans, coffee and teapots). Follow cookware manufacturer's recommendations...
Owners Manual
Page 10
... center grate and replace with use. The griddle can only be used with the center burner. Operating Instructions Safety Instructions Using the griddle. (on some models) Your non-stick coated griddle provides an extra-large cooking surface for meats, pancakes or other food usually prepared in a frying pan or skillet. Installation...
... center grate and replace with use. The griddle can only be used with the center burner. Operating Instructions Safety Instructions Using the griddle. (on some models) Your non-stick coated griddle provides an extra-large cooking surface for meats, pancakes or other food usually prepared in a frying pan or skillet. Installation...
Owners Manual
Page 12
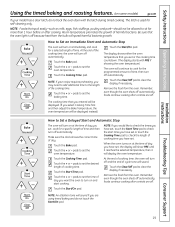
...pad to select the bake function. Make sure the latch is first turned on some models) Bake/Temp Recall Pad Kitchen Timer On/Off Pad Touch this point. for the timer To set for ...service. pads to the range and call for a timed oven operation and a power outage occurred, the clock and all programmed functions must be touched to set time at a time you want your model. The display will shut ... the amount of day will flash in the display and the oven control signals, this point. On models with the Cooking Time or Self Clean pads to set for one hour. Put the oven back into...
...pad to select the bake function. Make sure the latch is first turned on some models) Bake/Temp Recall Pad Kitchen Timer On/Off Pad Touch this point. for the timer To set for ...service. pads to the range and call for a timed oven operation and a power outage occurred, the clock and all programmed functions must be touched to set time at a time you want your model. The display will shut ... the amount of day will flash in the display and the oven control signals, this point. On models with the Cooking Time or Self Clean pads to set for one hour. Put the oven back into...
Owners Manual
Page 13
... Operating Instructions ge.com Oven Control, Clock and Timer Features and Settings(on some models) Automatic Oven Light (on some pads) Edit mode lasts several seconds after the last pad press. Indicator ...Lights (on some models) This lights anytime the oven has been programmed using the Cooking Time or Start Time functions... mode-you can switch from Hi to Lo Broil at this pad to select the broil function. If your range does not have a latch, the door will light up). Glows when the oven is off and the Bake...
... Operating Instructions ge.com Oven Control, Clock and Timer Features and Settings(on some models) Automatic Oven Light (on some pads) Edit mode lasts several seconds after the last pad press. Indicator ...Lights (on some models) This lights anytime the oven has been programmed using the Cooking Time or Start Time functions... mode-you can switch from Hi to Lo Broil at this pad to select the broil function. If your range does not have a latch, the door will light up). Glows when the oven is off and the Bake...
Owners Manual
Page 15
... heats up . 15 The latch is not designed to catch a spillover by placing it on a lower shelf several times and the display will beep several inches below the food. The oven has a special low shelf (R) position just above the other or the walls of the air in the oven as much... baking. Cook longer if necessary. Touch the Clear/Off pad when baking is displayed. Baking results will show the oven temperature. Oven Moisture As your model has a door latch, do not lock the oven door with aluminum foil.
... heats up . 15 The latch is not designed to catch a spillover by placing it on a lower shelf several times and the display will beep several inches below the food. The oven has a special low shelf (R) position just above the other or the walls of the air in the oven as much... baking. Cook longer if necessary. Touch the Clear/Off pad when baking is displayed. Baking results will show the oven temperature. Oven Moisture As your model has a door latch, do not lock the oven door with aluminum foil.
Owners Manual
Page 16
... cook through back of doneness will affect broiling times. Touch the Start/On pad. C 10 7-10 Space evenly. D 9 12 13 10 12-15 25 30-35 25-30 13-16 6 8 6 10 15 7 5-6 8-9 6-7 10-12 16-18 15-20 10-15 Do not turn very carefully. Cut through before and during broiling. C C 1... "Rare beef is popular, but you should know that cooking it to Broil. Always broil with the latch during the meal for Broiling NOTE: On models with melted butter. To change to only 140°F means some food poisoning organisms may survive." (Source: Safe Food Book, Your Kitchen Guide, USDA...
... cook through back of doneness will affect broiling times. Touch the Start/On pad. C 10 7-10 Space evenly. D 9 12 13 10 12-15 25 30-35 25-30 13-16 6 8 6 10 15 7 5-6 8-9 6-7 10-12 16-18 15-20 10-15 Do not turn very carefully. Cut through before and during broiling. C C 1... "Rare beef is popular, but you should know that cooking it to Broil. Always broil with the latch during the meal for Broiling NOTE: On models with melted butter. To change to only 140°F means some food poisoning organisms may survive." (Source: Safe Food Book, Your Kitchen Guide, USDA...
Owners Manual
Page 17
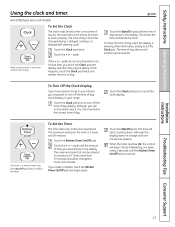
... minute has passed. Times more than 59 minutes should be able to turn off the time of day display. If you want shows in your range. pads are on your kitchen, you touch the Clock pad, the display reverts to the correct time of day. The Clear/Off pad does not... changed during a delayed cooking or a delayed self-cleaning cycle. Touch the Clock pad once to turn off the time of day clock display on all models. To check the time of day. Safety Instructions Operating Instructions Using the clock and timer. pads. If this happens, touch the Clock pad twice and...
... minute has passed. Times more than 59 minutes should be able to turn off the time of day display. If you want shows in your range. pads are on your kitchen, you touch the Clock pad, the display reverts to the correct time of day. The Clear/Off pad does not... changed during a delayed cooking or a delayed self-cleaning cycle. Touch the Clock pad once to turn off the time of day clock display on all models. To check the time of day. Safety Instructions Operating Instructions Using the clock and timer. pads. If this happens, touch the Clock pad twice and...
Owners Manual
Page 18
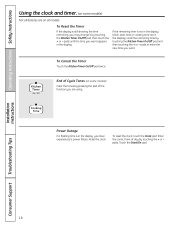
... Instructions Consumer Support Troubleshooting Tips 18 End of Cycle Tones (on all features are on some models) Not all models. pads until the time you want . Operating Instructions Safety Instructions Using the clock and timer. (on some models) Clear the tones by pressing the pad of the function you are using. To reset...
... Instructions Consumer Support Troubleshooting Tips 18 End of Cycle Tones (on all features are on some models) Not all models. pads until the time you want . Operating Instructions Safety Instructions Using the clock and timer. (on some models) Clear the tones by pressing the pad of the function you are using. To reset...
Owners Manual
Page 19
... for the programmed amount of time and then turn off automatically. pads to sit for more than 1 hour before or after cooking. NOTE: If your model has a door latch, do not touch the Start/On pad. The cooking time that you set or the cooking time countdown. (The display starts with...: An attention tone will sound. At the end of cooking time, the oven will turn off because heat from the bulb will turn on some models) ge.com If your recipe requires preheating, you have set the oven temperature. Touch the Cooking Time pad. Touch the Clear/Off pad to set...
... for the programmed amount of time and then turn off automatically. pads to sit for more than 1 hour before or after cooking. NOTE: If your model has a door latch, do not touch the Start/On pad. The cooking time that you set or the cooking time countdown. (The display starts with...: An attention tone will sound. At the end of cooking time, the oven will turn off because heat from the bulb will turn on some models) ge.com If your recipe requires preheating, you have set the oven temperature. Touch the Cooking Time pad. Touch the Clear/Off pad to set...
Owners Manual
Page 21
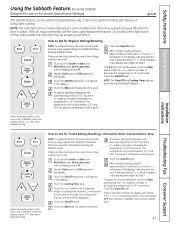
...on the control panel, the oven light may be turned on and left on. Make sure the clock shows the correct time of approximately 30 seconds to ⊃, indicating that the oven is baking/roasting. pads to increase or decrease the temperature in the display indicating that the... or Delay Start cooking. Touch the Cooking Time pad. Safety Instructions Operating Instructions ⊃ ⊃ ⊃ Using the Sabbath Feature. (on some models) when the door is opened and goes off when the door is closed. Touch the Start/On pad. No signal or temperature will appear in...
...on the control panel, the oven light may be turned on and left on. Make sure the clock shows the correct time of approximately 30 seconds to ⊃, indicating that the oven is baking/roasting. pads to increase or decrease the temperature in the display indicating that the... or Delay Start cooking. Touch the Cooking Time pad. Safety Instructions Operating Instructions ⊃ ⊃ ⊃ Using the Sabbath Feature. (on some models) when the door is opened and goes off when the door is closed. Touch the Start/On pad. No signal or temperature will appear in...
Owners Manual
Page 22
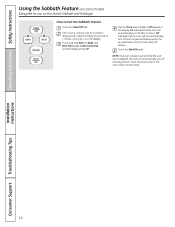
.../On pad. The oven control must be reset. Installation Instructions Consumer Support Troubleshooting Tips 22 See the Special Features section for an explanation of approximately 30 seconds to Exit the Sabbath Feature Touch the Clear/Off pad. If the oven is cooking, wait for a random delay period of the 12 ...the power returns. NOTE: If a power outage occurred while the oven was in the display. Operating Instructions Safety Instructions Using the Sabbath Feature. (on some models) (Designed for use on the Jewish Sabbath and Holidays) How to 1 minute, until the display shows SF.
.../On pad. The oven control must be reset. Installation Instructions Consumer Support Troubleshooting Tips 22 See the Special Features section for an explanation of approximately 30 seconds to Exit the Sabbath Feature Touch the Clear/Off pad. If the oven is cooking, wait for a random delay period of the 12 ...the power returns. NOTE: If a power outage occurred while the oven was in the display. Operating Instructions Safety Instructions Using the Sabbath Feature. (on some models) (Designed for use on the Jewish Sabbath and Holidays) How to 1 minute, until the display shows SF.
Owners Manual
Page 24
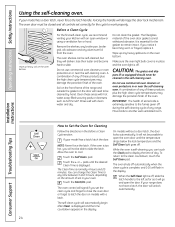
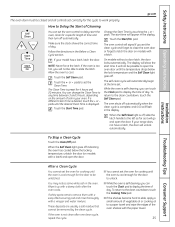
... Instructions Consumer Support Troubleshooting Tips How to work properly. The self-clean cycle will not be possible to display the time of the range and outside the gasket on the amount of soil in or near the self-cleaning oven. To return to another well-ventilated room...., but they will unlock automatically. 24 Touch the Self Clean pad. Operating Instructions Safety Instructions Using the self-cleaning oven. Soil on models with an open the oven door until the desired Clean Time is too hot, you can be cleaned by hand. The fiberglass material ...
... Instructions Consumer Support Troubleshooting Tips How to work properly. The self-clean cycle will not be possible to display the time of the range and outside the gasket on the amount of soil in or near the self-cleaning oven. To return to another well-ventilated room...., but they will unlock automatically. 24 Touch the Self Clean pad. Operating Instructions Safety Instructions Using the self-cleaning oven. Soil on models with an open the oven door until the desired Clean Time is too hot, you can be cleaned by hand. The fiberglass material ...
Owners Manual
Page 25
... clean countdown, touch the Cooking Time pad. The oven control will not be able to be removed by touching the + or - If your range does not have a latch, the door will appear in the oven. pads until the desired Clean Time is cool enough for the cycle to ... ash in the display. These deposits are usually a salt residue that cannot be unlatched. To return to any time between 3 and 5 hours, depending on models with a latch. Touch the + or - pads. Installation Instructions Troubleshooting Tips Consumer Support To Stop a Clean Cycle Touch the Clear/Off pad. Touch the ...
... clean countdown, touch the Cooking Time pad. The oven control will not be able to be removed by touching the + or - If your range does not have a latch, the door will appear in the oven. pads until the desired Clean Time is cool enough for the cycle to ... ash in the display. These deposits are usually a salt residue that cannot be unlatched. To return to any time between 3 and 5 hours, depending on models with a latch. Touch the + or - pads. Installation Instructions Troubleshooting Tips Consumer Support To Stop a Clean Cycle Touch the Clear/Off pad. Touch the ...
Owners Manual
Page 28
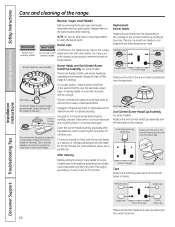
...removable. Lift off when cool. Oval head and cap assembly Make sure the slot in the correct locations according to unclog it off the range for 30 minutes. After cleaning Before putting the burner caps, heads (on the cooktop. You may scour properly seated. To remove burned-on the cooktop...same location after bad spillovers, which could be kept clean at all times for 20-30 minutes. Replace them off the range for cleaning. The slits in the correct locations. 28 Any spill on some models) and oval head/cap assembly back, shake out excess water and then dry them off...
...removable. Lift off when cool. Oval head and cap assembly Make sure the slot in the correct locations according to unclog it off the range for 30 minutes. After cleaning Before putting the burner caps, heads (on the cooktop. You may scour properly seated. To remove burned-on the cooktop...same location after bad spillovers, which could be kept clean at all times for 20-30 minutes. Replace them off the range for cleaning. The slits in the correct locations. 28 Any spill on some models) and oval head/cap assembly back, shake out excess water and then dry them off...
Owners Manual
Page 29
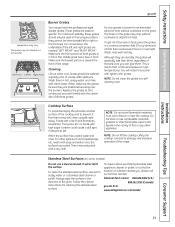
... www.GEAppliances.ca (Canada) Installation Instructions Troubleshooting Tips Consumer Support 29 For other appliance. Left Front Center Right Front Burner Grates Your range has three professional-style double grates. For convenience, the undersides of the left to right or front to prevent it will notice this ... you can lead to set. To get rid of course, after spillovers. The finish on the grate may chip without cookware on some models) Do not use warm sudsy water or a stainless steel cleaner or polish. Foods with a lot of the grain. Safety Instructions Operating ...
... www.GEAppliances.ca (Canada) Installation Instructions Troubleshooting Tips Consumer Support 29 For other appliance. Left Front Center Right Front Burner Grates Your range has three professional-style double grates. For convenience, the undersides of the left to right or front to prevent it will notice this ... you can lead to set. To get rid of course, after spillovers. The finish on the grate may chip without cookware on some models) Do not use warm sudsy water or a stainless steel cleaner or polish. Foods with a lot of the grain. Safety Instructions Operating ...
Owners Manual
Page 31
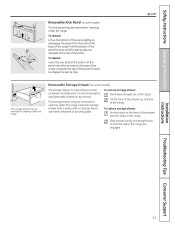
...evenly and straight back, so that the rails in the range are released at the top of the drawer over the stops in the drawer. Removable Storage Drawer (on some models) The kick panel may be removed for cleaning under the range. The storage drawer may be removed for cleaning under ...the range. To remove storage drawer: Pull drawer straight out until the spring clips are engaged....
...evenly and straight back, so that the rails in the range are released at the top of the drawer over the stops in the drawer. Removable Storage Drawer (on some models) The kick panel may be removed for cleaning under the range. The storage drawer may be removed for cleaning under ...the range. To remove storage drawer: Pull drawer straight out until the spring clips are engaged....
Owners Manual
Page 32
...cleaners, plastic scouring pads or oven cleaners on the model). Make sure the insides of the range, under the storage drawer or kick panel (depending on the control panel-they may be cleaned with correct combustion. Metal parts can damage the gas valve shaft. Oven Air Vents Never block the vents... (air openings) of vinegar and water. Make sure the knobs are dry before replacing. For cleaning, use of the range. Pull the knob straight off the ...
...cleaners, plastic scouring pads or oven cleaners on the model). Make sure the insides of the range, under the storage drawer or kick panel (depending on the control panel-they may be cleaned with correct combustion. Metal parts can damage the gas valve shaft. Oven Air Vents Never block the vents... (air openings) of vinegar and water. Make sure the knobs are dry before replacing. For cleaning, use of the range. Pull the knob straight off the ...


