
Owner's Manual
Page 8
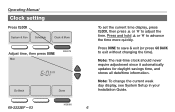
... DONE to save & exit (or press GO BACK to adjust the time. Note: To change the current week day display, see System Setup in your Installation Guide. 6 Note: The real-time clock should never require adjustment since it automatically updates for daylight savings time, and stores all date/time information. Operating...
... DONE to save & exit (or press GO BACK to adjust the time. Note: To change the current week day display, see System Setup in your Installation Guide. 6 Note: The real-time clock should never require adjustment since it automatically updates for daylight savings time, and stores all date/time information. Operating...

Owner's Manual
Page 10
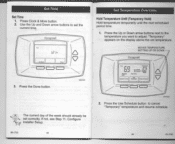
... the heating system. • Cool: Thermostat controls only the cooling system. • Auto: Thermostat automatically selects heating or cooling depending on how your thermostat was installed. 8
... the heating system. • Cool: Thermostat controls only the cooling system. • Auto: Thermostat automatically selects heating or cooling depending on how your thermostat was installed. 8
Owner's Manual
Page 19
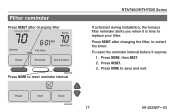
AFibltoeurtryeomuirndnewr thermostat RTH7400/RTH7500 Series Press RESET after changing the filter, to save and exit. To reset the reminder interval before it is time to replace your filter. Press ... Heat On System Fan Auto Heat Reset Schedule Clock & More M28089 Press MORE to reset reminder interval 60 Days Reset Next Done If activated during installation, the furnace filter reminder alerts you when it expires: 1.
AFibltoeurtryeomuirndnewr thermostat RTH7400/RTH7500 Series Press RESET after changing the filter, to save and exit. To reset the reminder interval before it is time to replace your filter. Press ... Heat On System Fan Auto Heat Reset Schedule Clock & More M28089 Press MORE to reset reminder interval 60 Days Reset Next Done If activated during installation, the furnace filter reminder alerts you when it expires: 1.
Owner's Manual
Page 21
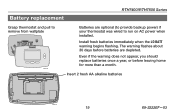
Insert 2 fresh AA alkaline batteries M28101 19 69-2222EF-03 Even if the warning does not appear, you should replace batteries once a year, or before batteries are optional (to provide backup power) if your thermostat was wired to remove from wallplate M28103 Batteries are depleted. The warning flashes about 30 days before leaving home for more than a month. Battery replacement RTH7400/RTH7500 Series Grasp thermostat and pull to run on AC power when installed. Install fresh batteries immediately when the LO BATT warning begins flashing.
Insert 2 fresh AA alkaline batteries M28101 19 69-2222EF-03 Even if the warning does not appear, you should replace batteries once a year, or before batteries are optional (to provide backup power) if your thermostat was wired to remove from wallplate M28103 Batteries are depleted. The warning flashes about 30 days before leaving home for more than a month. Battery replacement RTH7400/RTH7500 Series Grasp thermostat and pull to run on AC power when installed. Install fresh batteries immediately when the LO BATT warning begins flashing.

Owner's Manual
Page 23
No response to Make sure heating and cooling temperatures are correctly installed (see page 19). Most problems can be corrected quickly and easily. temperature will • Cool: 50° to 99°F (10° to 32°C). ... acceptable ranges: key presses (or • Heat: 40° to 90°F (4.5° to 37°C). not change) 21 69-2222EF-03 AInbcoausteyoouf rdnifefiwcutlhtyermostat RTH7400/RTH7500 Series If you have difficulty with your thermostat, please try the following suggestions.
No response to Make sure heating and cooling temperatures are correctly installed (see page 19). Most problems can be corrected quickly and easily. temperature will • Cool: 50° to 99°F (10° to 32°C). ... acceptable ranges: key presses (or • Heat: 40° to 90°F (4.5° to 37°C). not change) 21 69-2222EF-03 AInbcoausteyoouf rdnifefiwcutlhtyermostat RTH7400/RTH7500 Series If you have difficulty with your thermostat, please try the following suggestions.

Owners Guide
Page 2
...• .i• b If any of the items shown above are missing. call Honeywell Customer Care at 1-800-468-1502 before returning the thermostat to Wallpiele Configure Installer Setup Customer Assistance Limited One-Year Warranty 64-1730 Step 1. Prepare for Installation Follow Important Instructions Remove Old Thermostat Follow Special Instructions Label Old ThennCallt Wins...
...• .i• b If any of the items shown above are missing. call Honeywell Customer Care at 1-800-468-1502 before returning the thermostat to Wallpiele Configure Installer Setup Customer Assistance Limited One-Year Warranty 64-1730 Step 1. Prepare for Installation Follow Important Instructions Remove Old Thermostat Follow Special Instructions Label Old ThennCallt Wins...

Owners Guide
Page 3
... the wires to the new thermostat based on wire color because damage can occur to the heating and/or cooling system These Installation Instructions explain later how to your old thermostat OLD THERMOSTAT TE DO NOT WIRE NEW THERMOSTAT BASED ON WIRE COLOR. 69-1730...1. Prepare for plaster • Level (optional) • Hammer • Pencil • Electrical tape Step 2. Check that you have everything required for the installation: • Two AA alkaline batteries • No 2 Phillips screwdriver and standard pocket screwdnver • Drill • Drill bit-use 3/16 in for drywall:...
... the wires to the new thermostat based on wire color because damage can occur to the heating and/or cooling system These Installation Instructions explain later how to your old thermostat OLD THERMOSTAT TE DO NOT WIRE NEW THERMOSTAT BASED ON WIRE COLOR. 69-1730...1. Prepare for plaster • Level (optional) • Hammer • Pencil • Electrical tape Step 2. Check that you have everything required for the installation: • Two AA alkaline batteries • No 2 Phillips screwdriver and standard pocket screwdnver • Drill • Drill bit-use 3/16 in for drywall:...

Owners Guide
Page 12
Install two fresh AA alkaline batteries on the thermostat. REMOVE TAB /- 23 641730 Connect Wires to New Wallplate (Cont) 9. BATTERIES (2) - Push excess wire back into the wall opening Keep wires in the lower right corner of the thermostat as marked on the back of the thermostat back. Step 7. Install Batteries 1. BATTERY HOLDER WALL OPENING SHADED AREA 64 1730 22 UP V72207 L I!1 BACK OF THERMOSTAT 2. Remove tab labeled 'Remove during installation' in the shaded area WIRE WALLPLATE Step 8.
Install two fresh AA alkaline batteries on the thermostat. REMOVE TAB /- 23 641730 Connect Wires to New Wallplate (Cont) 9. BATTERIES (2) - Push excess wire back into the wall opening Keep wires in the lower right corner of the thermostat as marked on the back of the thermostat back. Step 7. Install Batteries 1. BATTERY HOLDER WALL OPENING SHADED AREA 64 1730 22 UP V72207 L I!1 BACK OF THERMOSTAT 2. Remove tab labeled 'Remove during installation' in the shaded area WIRE WALLPLATE Step 8.

Owners Guide
Page 14
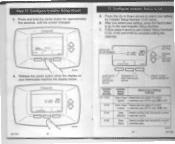
Follow the steps in this section to your thermostat 2. Configure Installer Setup for instructions 69-173c 2f3 27 69.1731) Press and release the System button c. 0 - Use the Installer Setup Menu to match your new thermostat to set anytime See Step 11. Configure Installer Setup 1. Press the Done button emo3 59 ete-P Spam , Arm 1)8 %sr.4Pell inkeillig llama&WM 0 0- . 32 If The calendar can be set up your heating and/or cooling system. Step 10. DONE BUTTON ADVANCES TO HOME SCREEN 8. Set the Calendar (Cont) UP AND DOWN BUTTONS CHANGES TIME • Step 11.
Follow the steps in this section to your thermostat 2. Configure Installer Setup for instructions 69-173c 2f3 27 69.1731) Press and release the System button c. 0 - Use the Installer Setup Menu to match your new thermostat to set anytime See Step 11. Configure Installer Setup 1. Press the Done button emo3 59 ete-P Spam , Arm 1)8 %sr.4Pell inkeillig llama&WM 0 0- . 32 If The calendar can be set up your heating and/or cooling system. Step 10. DONE BUTTON ADVANCES TO HOME SCREEN 8. Set the Calendar (Cont) UP AND DOWN BUTTONS CHANGES TIME • Step 11.
Owners Guide
Page 15
...number that represents aurora (Day) calendw dole. 0. 122207 29 55.1730 Configure Installer Setup (Cont) 3. Follow steps 5 and 6 to set Installer Setup Numbers 0130, 0140 and 0150 to the next Installer Setup Number. 7. Release the center button when the display on your setting ...1730 (net: 20 o Cm Mom 0 0 D.o.• 0- 1102Xl• GOES BACK TO LAST INSTALLER SETUP ADVANCE NEXT INSTALLER SETUP PRESS TO EXIT INSTALLER SETUP Installer Setup Number -4,. 0120 Installer Setup Name Date (Year Upper) (Select Your Selling) Settings Setect first two doges of current calendar yew...
...number that represents aurora (Day) calendw dole. 0. 122207 29 55.1730 Configure Installer Setup (Cont) 3. Follow steps 5 and 6 to set Installer Setup Numbers 0130, 0140 and 0150 to the next Installer Setup Number. 7. Release the center button when the display on your setting ...1730 (net: 20 o Cm Mom 0 0 D.o.• 0- 1102Xl• GOES BACK TO LAST INSTALLER SETUP ADVANCE NEXT INSTALLER SETUP PRESS TO EXIT INSTALLER SETUP Installer Setup Number -4,. 0120 Installer Setup Name Date (Year Upper) (Select Your Selling) Settings Setect first two doges of current calendar yew...

Owners Guide
Page 16
... (Conventional) - rose nano wan auwary or back-up ARROW DOWN ARROW GOES BACK TO LAST INSTALLER SETUP ADVANCE NEXT INSTALLER SETUP PRESS TO EXIT INSTALLER SETUP Installer Setup Number 0100 Installer Setup Name (Select Your Setting) Settings Fan Control 0 • Gas or Oil Heat - ...II 1 )° SETTING up beat • II • Wastage Conventional Healing and Cooling - 2 stages of your display. PRESS TO EXIT INSTALLER SETUP Inatallgr ItlstsNN SetUp Soft* NM**, Name (Select Your Setting) Settings -4. 0110 System • N. od or Type electric gni central as condleonru...
... (Conventional) - rose nano wan auwary or back-up ARROW DOWN ARROW GOES BACK TO LAST INSTALLER SETUP ADVANCE NEXT INSTALLER SETUP PRESS TO EXIT INSTALLER SETUP Installer Setup Number 0100 Installer Setup Name (Select Your Setting) Settings Fan Control 0 • Gas or Oil Heat - ...II 1 )° SETTING up beat • II • Wastage Conventional Healing and Cooling - 2 stages of your display. PRESS TO EXIT INSTALLER SETUP Inatallgr ItlstsNN SetUp Soft* NM**, Name (Select Your Setting) Settings -4. 0110 System • N. od or Type electric gni central as condleonru...

Owners Guide
Page 17
...; Gas or Oil Steam. After you conned's Valve ore labeled O to the OM lenninlil. 14:1310 ise-Ir3o 32 Step 11. I TO LAST INSTALLER SETUP ADVANCE TO\ NEXT INSTALLER SETUP \\•- Gas or Oil Hot Water, Gas 90%. Gas or Oil Gravity. 33 et1-1710 Changeover Use this setting if you select... your setting, press the Next button to go to the next Installer Setup Number. If you do not have a number 0240 on the left side of your display, press the Up or Down arrow to select your...
...; Gas or Oil Steam. After you conned's Valve ore labeled O to the OM lenninlil. 14:1310 ise-Ir3o 32 Step 11. I TO LAST INSTALLER SETUP ADVANCE TO\ NEXT INSTALLER SETUP \\•- Gas or Oil Hot Water, Gas 90%. Gas or Oil Gravity. 33 et1-1710 Changeover Use this setting if you select... your setting, press the Next button to go to the next Installer Setup Number. If you do not have a number 0240 on the left side of your display, press the Up or Down arrow to select your...

Owners Guide
Page 18
... Display. Step 11. Daylight Savings in Off - press the Next button to go to select your setting for Installer Setup Number 0330 22. Configure Installer Setup (Cont) 21. After you select your setting, press the Next button to go to select your setting....Up or Down arrow to the next Installer Setup Number INSTALLER SETUP NUMBER LI L Li sl _ SETTING n c2 UP ARROW DOWN ARROW I: GOES BACK TO LAST INSTALLER SETUP ADVANC ;:o NEXT INSTALLER SETUP PRESS TO EXIT INSTALLER SETUP Installer Setup Number -4. 0320 Installer Setup Name Tiimpsisture Indiction Sale (Select Your...
... Display. Step 11. Daylight Savings in Off - press the Next button to go to select your setting for Installer Setup Number 0330 22. Configure Installer Setup (Cont) 21. After you select your setting, press the Next button to go to select your setting....Up or Down arrow to the next Installer Setup Number INSTALLER SETUP NUMBER LI L Li sl _ SETTING n c2 UP ARROW DOWN ARROW I: GOES BACK TO LAST INSTALLER SETUP ADVANC ;:o NEXT INSTALLER SETUP PRESS TO EXIT INSTALLER SETUP Installer Setup Number -4. 0320 Installer Setup Name Tiimpsisture Indiction Sale (Select Your...

Owners Guide
Page 19
...unun Oo Ooco1r:fa: ii SETTING UP ARROW DOWN ARROW INSTALLER • SETUP NUMBER OS 3(1 SETTING UP ARROW DOWN ARROW GOES BACK TO LAST INSTALLER SETUP ADVANCE TO NEXT INSTALLER SETUP PRESS TO EXIT INSTALLER SETUP Installer Setup Number •-e. 0500 lesibbiler Setup Name Furnace Filter ...time 2 - Step 11. based on 60 days of fan run time 3 - GOES BACK J TO LAST INSTALLER SETUP ADVANCE TO\ NEXT INSTAUSR SETUP PRESS TO EXIT INSTALLER SETUP kneeler Setup Number 0630 Sanwa Nam (Select Your Setting) Settings Adaptive 0 - Approximately 6 months -- Approximately ...
...unun Oo Ooco1r:fa: ii SETTING UP ARROW DOWN ARROW INSTALLER • SETUP NUMBER OS 3(1 SETTING UP ARROW DOWN ARROW GOES BACK TO LAST INSTALLER SETUP ADVANCE TO NEXT INSTALLER SETUP PRESS TO EXIT INSTALLER SETUP Installer Setup Number •-e. 0500 lesibbiler Setup Name Furnace Filter ...time 2 - Step 11. based on 60 days of fan run time 3 - GOES BACK J TO LAST INSTALLER SETUP ADVANCE TO\ NEXT INSTAUSR SETUP PRESS TO EXIT INSTALLER SETUP kneeler Setup Number 0630 Sanwa Nam (Select Your Setting) Settings Adaptive 0 - Approximately 6 months -- Approximately ...

Owners Guide
Page 20
... Press the Up or Down arrow to select your setting. After you select your setting for Installer Setup Number 0640 28. Congratulations! Get to exit the Installer Setup and save your settings 29. COOL FURNACE FILTER AND EM HEAT INFORMATION 60.1730 38...SETTING UP ARROW DOWN ARROW GOES BACK TO LAST INSTALLER SETUP ADVANCE NEXT INSTALLER SETUP PRESS TO EXIT INSTALLER SETUP Installer Setup Number 0640 Installer Setup Name (Select Your Setting) Settings Clock -.le 12 - 12-hour clock format. Step 11. Configure Installer Setup (Cont) 27. Woo SCHEDULE BUTTON SELECTS ...
... Press the Up or Down arrow to select your setting. After you select your setting for Installer Setup Number 0640 28. Congratulations! Get to exit the Installer Setup and save your settings 29. COOL FURNACE FILTER AND EM HEAT INFORMATION 60.1730 38...SETTING UP ARROW DOWN ARROW GOES BACK TO LAST INSTALLER SETUP ADVANCE NEXT INSTALLER SETUP PRESS TO EXIT INSTALLER SETUP Installer Setup Number 0640 Installer Setup Name (Select Your Setting) Settings Clock -.le 12 - 12-hour clock format. Step 11. Configure Installer Setup (Cont) 27. Woo SCHEDULE BUTTON SELECTS ...
Owners Guide
Page 25
see Step 11. Configure Installer Setup P 69-1730 401 2. MOVES TEMPERATURE SETTING UP OR DOWN ,t.r.8..9.., 600..e • • The current day of the week should already be set the current ...
see Step 11. Configure Installer Setup P 69-1730 401 2. MOVES TEMPERATURE SETTING UP OR DOWN ,t.r.8..9.., 600..e • • The current day of the week should already be set the current ...

Owners Guide
Page 30
... on. Temperature Check that fresh AA alkaline batteries are : settings do not • Heating 40'F to 90'F(4.5'C to 32'C). Check that the temperature settings are installed as marked on the thermostat. Wait five minutes for the cooling system to respond If all of this was checked. Wait five minutes for the...
... on. Temperature Check that fresh AA alkaline batteries are : settings do not • Heating 40'F to 90'F(4.5'C to 32'C). Check that the temperature settings are installed as marked on the thermostat. Wait five minutes for the cooling system to respond If all of this was checked. Wait five minutes for the...
Owners Guide
Page 31
...and make sure it is runn.ling in the upper left L terminal. Both the heating and cooling systems are not touching Heating system Check Installer Setup Number 0170, is set the temperature setting above the room temperature If 'Heat On' is active. Heating and/or Cooling System Type, ... thenn09114 in Heating and/or Cooling System Type, and cool mode. See HeetingOforuCbios lgoar corner and the does not turn on Fan does not Check Installer Setup Number 0180. Then . . . Cannot set the temperature setting below the room temperature ("Heat On" is shown solidly in Heating. and ...
...and make sure it is runn.ling in the upper left L terminal. Both the heating and cooling systems are not touching Heating system Check Installer Setup Number 0170, is set the temperature setting above the room temperature If 'Heat On' is active. Heating and/or Cooling System Type, ... thenn09114 in Heating and/or Cooling System Type, and cool mode. See HeetingOforuCbios lgoar corner and the does not turn on Fan does not Check Installer Setup Number 0180. Then . . . Cannot set the temperature setting below the room temperature ("Heat On" is shown solidly in Heating. and ...


