
Owner's Manual
Page 3
Table of contents About your new thermostat Thermostat features 2 Programming at a glance 3 Quick reference to controls 4 Quick reference to status display 5 Programming & Operation Clock setting 6 Fan setting 7 System setting 8 Using program schedules 9 Program schedule overrides 13 Auto Changeover 15 Filter reminder 17 Special features 18 RTH7400/RTH7500 Series Appendices Battery replacement 19 Customer assistance 20 In case of difficulty 21 Limited warranty 23 This thermostat is pre-programmed and ready to go . Your new thermostat is ready to go ! See page...
Table of contents About your new thermostat Thermostat features 2 Programming at a glance 3 Quick reference to controls 4 Quick reference to status display 5 Programming & Operation Clock setting 6 Fan setting 7 System setting 8 Using program schedules 9 Program schedule overrides 13 Auto Changeover 15 Filter reminder 17 Special features 18 RTH7400/RTH7500 Series Appendices Battery replacement 19 Customer assistance 20 In case of difficulty 21 Limited warranty 23 This thermostat is pre-programmed and ready to go . Your new thermostat is ready to go ! See page...
Owner's Manual
Page 4
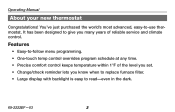
It has been designed to read-even in the dark. 69-2222EF-03 2 Features • Easy-to-follow menu programming. • One-touch temp control overrides program schedule at any time. • Precise comfort control keeps temperature within 1°F of the level you set. • Change/check reminder lets you know when to replace furnace filter. • Large display with backlight is easy to give you many years of reliable service and climate control. You've just purchased the world's most advanced, easy-to-use thermostat. Operating Manual About your new thermostat Congratulations!
It has been designed to read-even in the dark. 69-2222EF-03 2 Features • Easy-to-follow menu programming. • One-touch temp control overrides program schedule at any time. • Precise comfort control keeps temperature within 1°F of the level you set. • Change/check reminder lets you know when to replace furnace filter. • Large display with backlight is easy to give you many years of reliable service and climate control. You've just purchased the world's most advanced, easy-to-use thermostat. Operating Manual About your new thermostat Congratulations!
Owner's Manual
Page 7
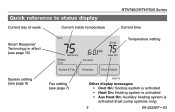
Quick reference to status display Current day of week Current inside temperature RTH7400/RTH7500 Series Current time Smart Response® Technology in effect (see page 15) System setting (see page 8) Mon 75 Recovery System Cool 6:01 AM Fan Auto Set to 75 Heat On System & Fan Schedule Clock & Mode Temperature setting Fan setting (see page 7) M28078 Other display messages: • Cool On: Cooling system is activated • Heat On: Heating system is activated • Aux Heat On: Auxiliary heating system is activated (heat pump systems only) 5 69-2222EF-03
Quick reference to status display Current day of week Current inside temperature RTH7400/RTH7500 Series Current time Smart Response® Technology in effect (see page 15) System setting (see page 8) Mon 75 Recovery System Cool 6:01 AM Fan Auto Set to 75 Heat On System & Fan Schedule Clock & Mode Temperature setting Fan setting (see page 7) M28078 Other display messages: • Cool On: Cooling system is activated • Heat On: Heating system is activated • Aux Heat On: Auxiliary heating system is activated (heat pump systems only) 5 69-2222EF-03

Owner's Manual
Page 10
Operating Manual System setting Press SYSTEM & FAN System & Fan Schedule Clock & More Press SYSTEM to select mode, then press DONE M28081 System Heat System Fan Auto Fan 69-2222EF-03 Done M28083 Follow steps at left to select system: • Heat: Thermostat controls only the heating system. • Cool: Thermostat controls only the cooling system. • Auto: Thermostat automatically selects heating or cooling depending on how your thermostat was installed. 8 Compressor is locked out. Note: The Auto and Em Heat system...
Operating Manual System setting Press SYSTEM & FAN System & Fan Schedule Clock & More Press SYSTEM to select mode, then press DONE M28081 System Heat System Fan Auto Fan 69-2222EF-03 Done M28083 Follow steps at left to select system: • Heat: Thermostat controls only the heating system. • Cool: Thermostat controls only the cooling system. • Auto: Thermostat automatically selects heating or cooling depending on how your thermostat was installed. 8 Compressor is locked out. Note: The Auto and Em Heat system...
Owner's Manual
Page 13
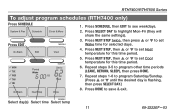
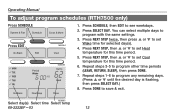
... STEP, then s or t to 62 Heat Next Step Done 1. RTH7400/RTH7500 Series To adjust program schedules (RTH7400 only) Press SCHEDULE System & Fan Schedule Clock & More Press EDIT Go Back Edit M28084 View MON TUE WED THU FRI Go Back Period 6:00 Wake AM M28085 Set to set Cool temperature for this time period. 5. Press SCHEDULE, then EDIT to program other time periods (LEAVE, RETURN, SLEEP), then press DONE. 7. Repeat steps...
... STEP, then s or t to 62 Heat Next Step Done 1. RTH7400/RTH7500 Series To adjust program schedules (RTH7400 only) Press SCHEDULE System & Fan Schedule Clock & More Press EDIT Go Back Edit M28084 View MON TUE WED THU FRI Go Back Period 6:00 Wake AM M28085 Set to set Cool temperature for this time period. 5. Press SCHEDULE, then EDIT to program other time periods (LEAVE, RETURN, SLEEP), then press DONE. 7. Repeat steps...
Owner's Manual
Page 14
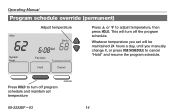
Operating Manual To adjust program schedules (RTH7500 only) Press SCHEDULE System & Fan Schedule Clock & More Press EDIT Go Back Edit M28084 View MON TUE WED THU FRI Go Back Period 6:00 Wake AM M28085 Set to see weekdays. 2. Press SCHEDULE, then EDIT to 62 Heat Next Step Done 1. You can select multiple days to program other time periods (LEAVE, RETURN, SLEEP), then press DONE. 7. Repeat steps 3-5 to program with the...
Operating Manual To adjust program schedules (RTH7500 only) Press SCHEDULE System & Fan Schedule Clock & More Press EDIT Go Back Edit M28084 View MON TUE WED THU FRI Go Back Period 6:00 Wake AM M28085 Set to see weekdays. 2. Press SCHEDULE, then EDIT to 62 Heat Next Step Done 1. You can select multiple days to program other time periods (LEAVE, RETURN, SLEEP), then press DONE. 7. Repeat steps 3-5 to program with the...
Owner's Manual
Page 16
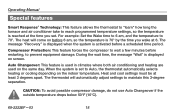
This will be maintained 24 hours a day, until you set temperature M28088 69-2222EF-03 14 Press HOLD to adjust temperature, then press HOLD. Whatever temperature you manually change it, or press USE SCHEDULE to cancel "Hold" and resume the program schedule. Operating Manual Program schedule override (permanent) Mon 62 System Heat Adjust temperature Set to 6:08 AM 68 Fan Auto Permanent Hold Hold Cancel Press s or t to turn off program schedule and maintain set will turn off the program schedule.
This will be maintained 24 hours a day, until you set temperature M28088 69-2222EF-03 14 Press HOLD to adjust temperature, then press HOLD. Whatever temperature you manually change it, or press USE SCHEDULE to cancel "Hold" and resume the program schedule. Operating Manual Program schedule override (permanent) Mon 62 System Heat Adjust temperature Set to 6:08 AM 68 Fan Auto Permanent Hold Hold Cancel Press s or t to turn off program schedule and maintain set will turn off the program schedule.
Owner's Manual
Page 20
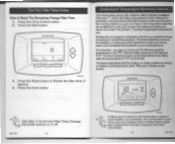
... compressor to wait a few minutes before a scheduled time period. Auto Changeover: This feature is displayed on screen. CAUTION: To avoid possible compressor damage, do not use Auto Changeover if the outside temperature drops below 50°F (10°C). 69-2222EF-03 18 Operating Manual Special features Smart Response® Technology: This feature allows the thermostat to "learn" how long the furnace and air conditioner take to reach programmed temperature settings...
... compressor to wait a few minutes before a scheduled time period. Auto Changeover: This feature is displayed on screen. CAUTION: To avoid possible compressor damage, do not use Auto Changeover if the outside temperature drops below 50°F (10°C). 69-2222EF-03 18 Operating Manual Special features Smart Response® Technology: This feature allows the thermostat to "learn" how long the furnace and air conditioner take to reach programmed temperature settings...

Owner's Manual
Page 23
...°F (10° to Make sure heating and cooling temperatures are correctly installed (see page 19). Most problems can be corrected quickly and easily. AInbcoausteyoouf rdnifefiwcutlhtyermostat RTH7400/RTH7500 Series If you have difficulty with your thermostat, please try the following suggestions. Display is blank • Check circuit breaker and reset if necessary. • Make sure power switch at heating & cooling system is on. • Make...
...°F (10° to Make sure heating and cooling temperatures are correctly installed (see page 19). Most problems can be corrected quickly and easily. AInbcoausteyoouf rdnifefiwcutlhtyermostat RTH7400/RTH7500 Series If you have difficulty with your thermostat, please try the following suggestions. Display is blank • Check circuit breaker and reset if necessary. • Make sure power switch at heating & cooling system is on. • Make...

Owners Guide
Page 2
Prepare for Installation Follow Important Instructions Remove Old Thermostat Follow Special Instructions Label Old ThennCallt Wins Mount New Wallpfaie to Wall Connect Wires to New Wallpiala Install Batteries Attach New Thermostat to the store 69-1730 Contents Prepare for Installation . call Honeywell Customer Care at 1-800-468-1502 before returning the thermostat to Wallpiele Configure Installer Setup Customer Assistance Limited One-Year Warranty 64-1730 Step 1. Check that the following items are included 5 6 7 10 11...
Prepare for Installation Follow Important Instructions Remove Old Thermostat Follow Special Instructions Label Old ThennCallt Wins Mount New Wallpfaie to Wall Connect Wires to New Wallpiala Install Batteries Attach New Thermostat to the store 69-1730 Contents Prepare for Installation . call Honeywell Customer Care at 1-800-468-1502 before returning the thermostat to Wallpiele Configure Installer Setup Customer Assistance Limited One-Year Warranty 64-1730 Step 1. Check that the following items are included 5 6 7 10 11...

Owners Guide
Page 10
... old thermostet, the wire should be connected to both R and RH terminals on page 20 if you are wiring a Heat Pump system. Conned the old R to the new Rc and the old RH to New Wallplate (Cont) 7. Use the information below if you are wiring a CONVENTIONAL System Use the information on the old thermostat remove metal jumper wire between Rc and Ron the new thermostat. am • =me Y2 0 0 w2 1/1 NOM* 1=I -, the numbered...
... old thermostet, the wire should be connected to both R and RH terminals on page 20 if you are wiring a Heat Pump system. Conned the old R to the new Rc and the old RH to New Wallplate (Cont) 7. Use the information below if you are wiring a CONVENTIONAL System Use the information on the old thermostat remove metal jumper wire between Rc and Ron the new thermostat. am • =me Y2 0 0 w2 1/1 NOM* 1=I -, the numbered...

Owners Guide
Page 11
... the C. Connect Wires to New Wallplate (Cont) Step 7. Compare letter designations on your old and new thermostats Use the information below if you are wiring a HEAT PUMP system Possible Meer nson tdhe = wires HEAT PUMP *ow elosaginebOne on the nevi !haemostat r • L R OMEN ND-. 1.00 O43 A omm m0 derma tammum ss,iili e m t moo WNW AUX. *1 V/ or A, MD= C NEM NOTES FOR HEAT PUMP SYSTEMS ,L Leave metal jumper vAre...
... the C. Connect Wires to New Wallplate (Cont) Step 7. Compare letter designations on your old and new thermostats Use the information below if you are wiring a HEAT PUMP system Possible Meer nson tdhe = wires HEAT PUMP *ow elosaginebOne on the nevi !haemostat r • L R OMEN ND-. 1.00 O43 A omm m0 derma tammum ss,iili e m t moo WNW AUX. *1 V/ or A, MD= C NEM NOTES FOR HEAT PUMP SYSTEMS ,L Leave metal jumper vAre...

Owners Guide
Page 16
... or for heel. 1 - DOWN ARROW 1=7" ---- Gas. If you select your display. Thermostat controls fan m a cal tor heat .9-1730 30 31 Step 11. press the Next button to go to select your setting for Installer Setup Number 0180. 12. Carnal ar conditorkng talk 7 • Multistage Hest Pumps - NSTALLER SETUP NUMBER a IBC n .1f II 1 )° SETTING up or altallary Mist - and Cooling (Convenuonal) - W and G on U 1 ILI - After you...
... or for heel. 1 - DOWN ARROW 1=7" ---- Gas. If you select your display. Thermostat controls fan m a cal tor heat .9-1730 30 31 Step 11. press the Next button to go to select your setting for Installer Setup Number 0180. 12. Carnal ar conditorkng talk 7 • Multistage Hest Pumps - NSTALLER SETUP NUMBER a IBC n .1f II 1 )° SETTING up or altallary Mist - and Cooling (Convenuonal) - W and G on U 1 ILI - After you...

Owners Guide
Page 17
... in Heating - Configure Installer Setup (Cont) 16. INSTALLER SETUP NUMBER lUC 71J SETTING UP ARROW e.dL. ■ DOWN GOES BACK TO LAST INSTALLER SETUP ADVANCE TO NEXT INSTALLER SETUP PRESS TO EXIT INSTALLER SETUP Installer lI Number 0240 Matelot Setup Name (Select Your Setting) Settings Heabng 5 - Gas or Oil Furnace (less than Cycle 90% efficient). If you connected a wire labeled B to the next Installer Setup Number. PRESS TO EXIT INSTALLER SETUP Installer Setup Number 0190 Installer Sib* Name 9 (Select Your Setting) Settings Heat Pump 0 - Use thes...
... in Heating - Configure Installer Setup (Cont) 16. INSTALLER SETUP NUMBER lUC 71J SETTING UP ARROW e.dL. ■ DOWN GOES BACK TO LAST INSTALLER SETUP ADVANCE TO NEXT INSTALLER SETUP PRESS TO EXIT INSTALLER SETUP Installer lI Number 0240 Matelot Setup Name (Select Your Setting) Settings Heabng 5 - Gas or Oil Furnace (less than Cycle 90% efficient). If you connected a wire labeled B to the next Installer Setup Number. PRESS TO EXIT INSTALLER SETUP Installer Setup Number 0190 Installer Sib* Name 9 (Select Your Setting) Settings Heat Pump 0 - Use thes...

Owners Guide
Page 18
... setting, press the Next button to go to select your setting. After you select your setting for Daylight Sayings Time. 1-Daylight Savings is On - Celsius Temperature Display. Press the Up or Down arrow to the next Installer Setup Number INSTALLER SETUP NUMBER LI L Li sl _ SETTING n c2 UP ARROW DOWN ARROW I: GOES BACK TO LAST INSTALLER SETUP ADVANC ;:o NEXT INSTALLER SETUP PRESS TO EXIT INSTALLER SETUP Installer Setup Number -4. 0320 Installer Setup Name Tiimpsisture Indiction Sale (Select Your Setting) Settings...
... setting, press the Next button to go to select your setting. After you select your setting for Daylight Sayings Time. 1-Daylight Savings is On - Celsius Temperature Display. Press the Up or Down arrow to the next Installer Setup Number INSTALLER SETUP NUMBER LI L Li sl _ SETTING n c2 UP ARROW DOWN ARROW I: GOES BACK TO LAST INSTALLER SETUP ADVANC ;:o NEXT INSTALLER SETUP PRESS TO EXIT INSTALLER SETUP Installer Setup Number -4. 0320 Installer Setup Name Tiimpsisture Indiction Sale (Select Your Setting) Settings...

Owners Guide
Page 20
... INSTALLER SETUP ADVANCE NEXT INSTALLER SETUP PRESS TO EXIT INSTALLER SETUP Installer Setup Number 0640 Installer Setup Name (Select Your Setting) Settings Clock -.le 12 - 12-hour clock format. COOL FURNACE FILTER AND EM HEAT INFORMATION 60.1730 38 39 69-1730 Get to select your setting for Installer Setup Number 0640 28. Woo SCHEDULE BUTTON SELECTS PROGRAMMING MODE CLOCK & SYSTEM & FAN BUTTON MORE BUTTON SELECTS FAN AUTO OR ON SELECTS TIME AND SELECTS HEAT, OFF. Congratulations! Press the Up or Down arrow to Know Your Thermostat Buttons Thermostat...
... INSTALLER SETUP ADVANCE NEXT INSTALLER SETUP PRESS TO EXIT INSTALLER SETUP Installer Setup Number 0640 Installer Setup Name (Select Your Setting) Settings Clock -.le 12 - 12-hour clock format. COOL FURNACE FILTER AND EM HEAT INFORMATION 60.1730 38 39 69-1730 Get to select your setting for Installer Setup Number 0640 28. Woo SCHEDULE BUTTON SELECTS PROGRAMMING MODE CLOCK & SYSTEM & FAN BUTTON MORE BUTTON SELECTS FAN AUTO OR ON SELECTS TIME AND SELECTS HEAT, OFF. Congratulations! Press the Up or Down arrow to Know Your Thermostat Buttons Thermostat...

Owners Guide
Page 24
... the Heating temperature 8. Return and Sleep schedules 59 1714c 4,, - To set a program schedule for the Leave. Program Your Heating and Cooling Schedule (Cont) 4. Press the Next Step button to schedule. Wake flashes to the day(s) selected Cfreirosti DOWN ARROW CHANGES TIME AND TEMPERATURES GO BACK BUTTON GOES BACK TO THE DONE BUTTON LAST SCHEDULE STEP EXITS AND SAVES CHANGES MADE NEXT STEP BUTTON TO SCHEDULE ADVANCES PERIOD.TimE HEAT AND COOL TEMPERATURES 5. Use the Up and Down arrow buttons to select the Cooling temperature...
... the Heating temperature 8. Return and Sleep schedules 59 1714c 4,, - To set a program schedule for the Leave. Program Your Heating and Cooling Schedule (Cont) 4. Press the Next Step button to schedule. Wake flashes to the day(s) selected Cfreirosti DOWN ARROW CHANGES TIME AND TEMPERATURES GO BACK BUTTON GOES BACK TO THE DONE BUTTON LAST SCHEDULE STEP EXITS AND SAVES CHANGES MADE NEXT STEP BUTTON TO SCHEDULE ADVANCES PERIOD.TimE HEAT AND COOL TEMPERATURES 5. Use the Up and Down arrow buttons to select the Cooling temperature...
Owners Guide
Page 27
... problem. Press the Clock 8. Press the Reset button to turn the Filter Timer Change Reminder feature on the screen ,O.= 4 11.•• - 0 o c7 - fal234) . 01 It takes about a week for Your Sim* set your program schedule to the time you want the house to 70°F by 6:00 AM. The thermostat determines that the treydlii or waling systemis coming on before 6.00 AM to rase the temperature...
... problem. Press the Clock 8. Press the Reset button to turn the Filter Timer Change Reminder feature on the screen ,O.= 4 11.•• - 0 o c7 - fal234) . 01 It takes about a week for Your Sim* set your program schedule to the time you want the house to 70°F by 6:00 AM. The thermostat determines that the treydlii or waling systemis coming on before 6.00 AM to rase the temperature...

Owners Guide
Page 30
... compressor turns off timer expires, "Cool On" or "Heat On"' appears solidly in the display and the compressor and fan turn on. • Set the system to Cool by pressing the System button Check the heat temperature setting to be sure it is set below the room temperature and -Cool On" shows solidly in the display Check the circuit breaker to be sure it is not tnpped, Check the power switch...
... compressor turns off timer expires, "Cool On" or "Heat On"' appears solidly in the display and the compressor and fan turn on. • Set the system to Cool by pressing the System button Check the heat temperature setting to be sure it is set below the room temperature and -Cool On" shows solidly in the display Check the circuit breaker to be sure it is not tnpped, Check the power switch...
Owners Guide
Page 31
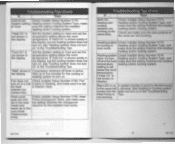
... heat I Check Installer Setup Number 0190. Fan turn on A system monitor Is wired le the thenn09114 in the cool mode (heat pumps only). make sure the setting matches the installed heating and/or cooling syslem. the display Wait up to Electric Heat (electric fur- Red LED is not shown in disPiltY)- Then . . . and make sure the bare portions of the wires are running at the same time Check Installer Setup Number 0170. guis set the temperature setting below the room temperature ("Heat...
... heat I Check Installer Setup Number 0190. Fan turn on A system monitor Is wired le the thenn09114 in the cool mode (heat pumps only). make sure the setting matches the installed heating and/or cooling syslem. the display Wait up to Electric Heat (electric fur- Red LED is not shown in disPiltY)- Then . . . and make sure the bare portions of the wires are running at the same time Check Installer Setup Number 0170. guis set the temperature setting below the room temperature ("Heat...


